


As per a Walker report, customer experience will have more weightage in 2020 than both price & product, as 86% of consumers will pay more for a better user experience. Another amazing statistic displayed in WebFX infographic, mentioned that 89% of consumers join hands with a competitor business after a poor user experience.
These statistics emphasize how relevant user experience has become for online businesses. Booking travel tickets, online purchase & payment, filling out applications etc. are done in a single click within fraction of seconds through different websites.
Cross browser testing plays a pivotal role in ensuring a seamless user experience across different browsers. What happens if your registration form starts failing in Safari, or Mozilla Firefox? You’re gonna end up losing potential customers which is why companies rely on browser automation for testing their web applications. And that is precisely what you’ll be learning in this Selenium & Java Tutorial.
Today, I will show you how to run your first script for browser automation with Selenium and Java.
What Is Selenium?
This Selenium & Java Tutorial will help you in exploring Selenium, the most popular web browser automation tool.
Selenium is an open source automation framework which has been extensively used for browser automation of web applications. It has four major components which are designed for different purposes and the selection of these components depends upon the testing requirement. The four components are:
- Selenium IDE
- Selenium RC
- Selenium WebDriver
- Selenium Grid
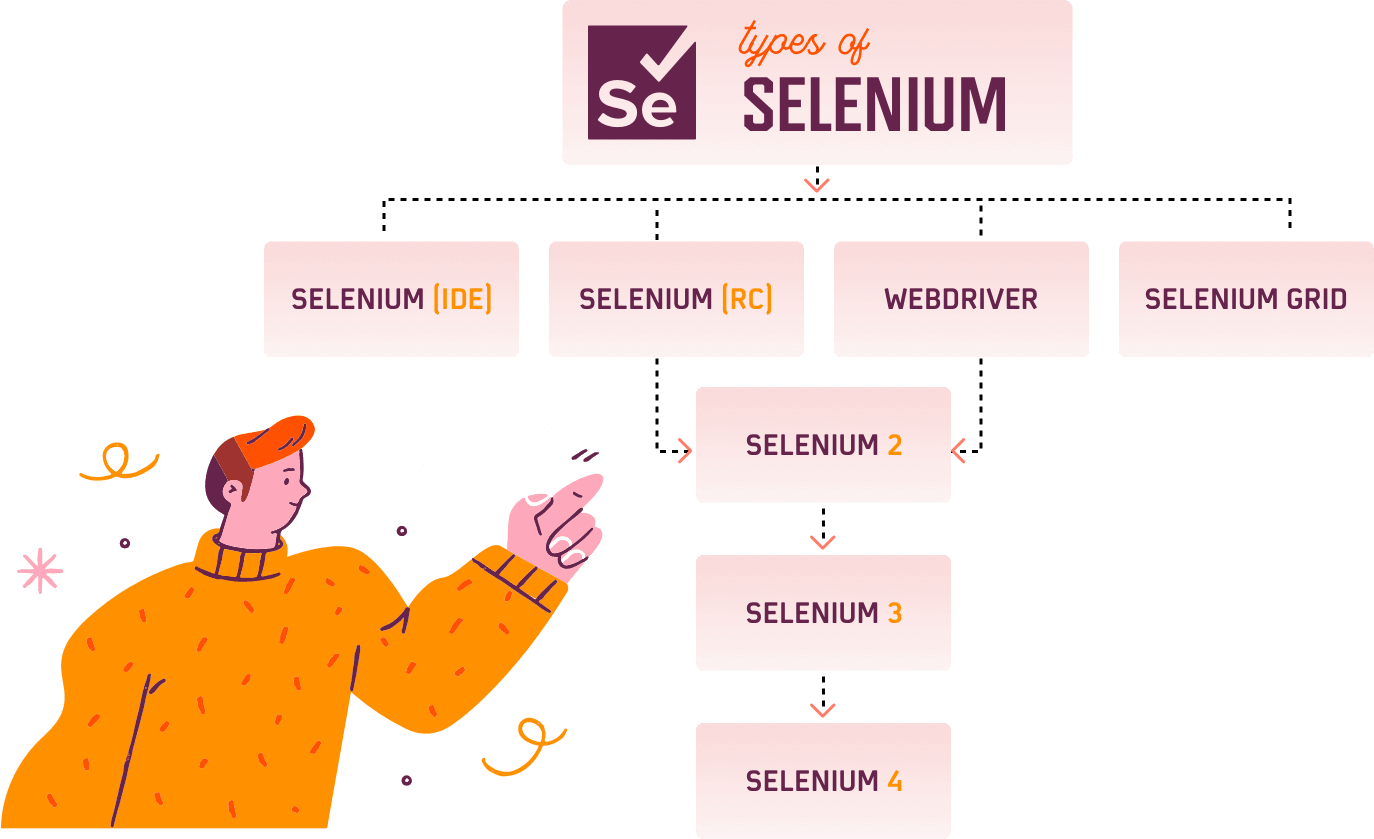
If you want to perform browser automation on different browsers such as Chrome, Firefox etc, Selenium WebDriver is your best bet. Now I’ll explore the Selenium WebDriver features in detail in this Selenium & Java tutorial.
Selenium WebDriver
Selenium WebDriver is a browser specific driver that provides an interface to write and execute the browser automation scripts for testing different web applications. It provides binding for all popular languages like Java, Python, Ruby etc. It supports all the major browsers like Chrome, Firefox, Opera, IE, Edge etc. It can be integrated with various frameworks, like Maven or ANT, for compiling the source code. For application testing and reporting, it can also be integrated with testing frameworks like TestNG to ease automation testing. It can be integrated with Jenkins for Continuous Integration or Continuous Delivery automated build and deployment.
Prerequisites For Browser Automation With Selenium & Java
To start performing browser automation with Selenium & Java, you need to ensure that below prerequisites are met.
Java
Step 1: Depending upon the operating system (Mac, Windows or Linux) download and install JDK with JRE (32 bit or 64 bit).
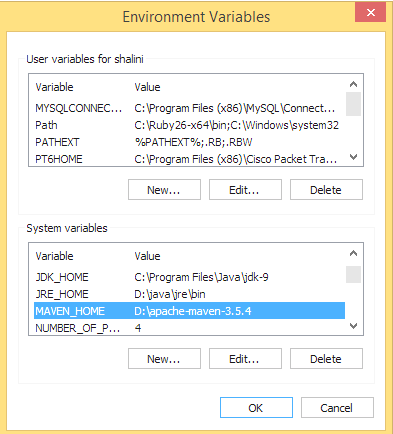
Step 2: Create a new environment variable JAVA_HOME and define the value to JDK installation location in the system.
To create the environment variable,
Right Click “This PC”–> Properties –>Advanced system settings –> Environment variables –> System Variables –> Add a variable JAVA_HOME with path of JDK installation folder.
For Example, JAVA_HOME → C:\Program Files\Java\jdk-9
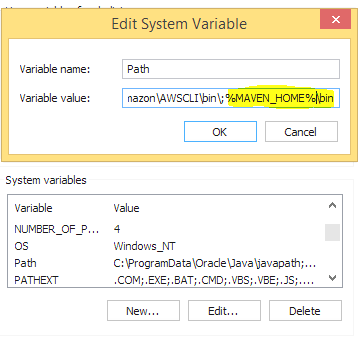
Step 3: Update the path to the bin folder of JDK installation folder. In path variable of the System variables add the value %JAVA_HOME%\bin.
Step 4: Verify the successful installation of Java in your system by using the command java –version in the command prompt.
IDE(Integrated Development Environment)
Download the latest version of any IDE depending upon your Operating System (32 or 64 bit) and setup in your system for browser automation with Selenium & Java. You can download Eclipse or download IntelliJ as they are one of the preferred IDE’s.
WebDrivers
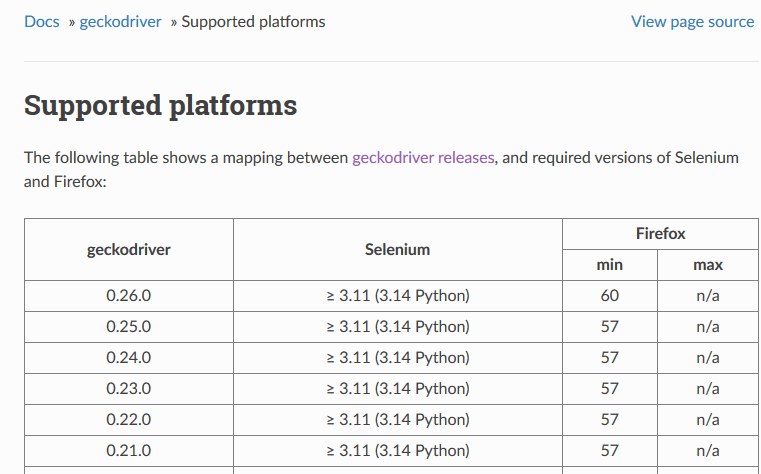
There are different types of drivers each supporting a specific browser. You can download them in the link below:
https://www.selenium.dev/downloads/
You can also find a documentation page in each driver section to understand the compatibility of the driver and the browser version. Below is the compatibility of gecko driver & chrome driver which are for Firefox and Google chrome respectively.
How To Configure Selenium WebDriver With Eclipse?
Creating the first project for browser automation with Selenium & Java and completing it successfully would require a lot of patience. The below steps would assist in taking a step forward.
You can create your project either as a java project or a maven project.
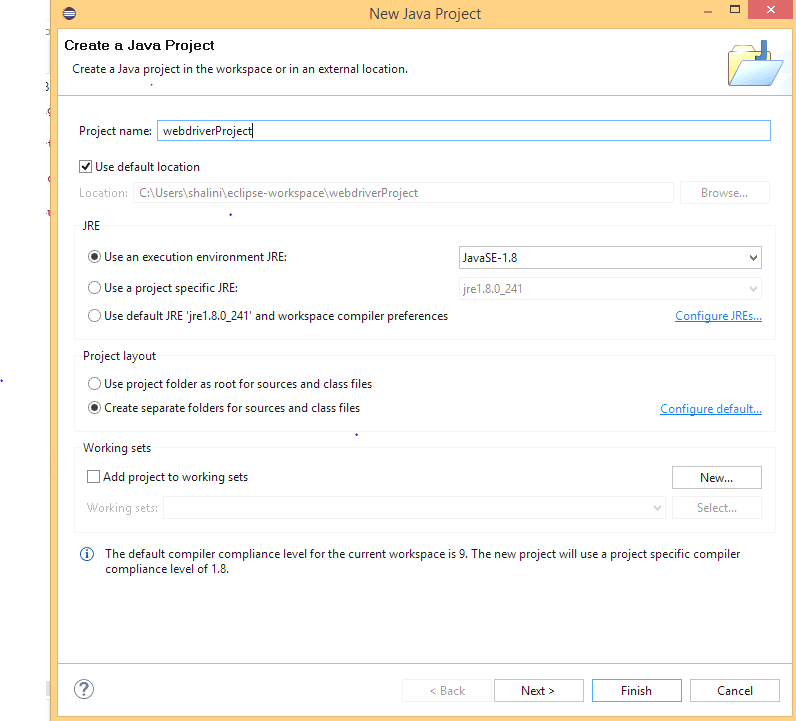
Creating a Java project in Eclipse IDE
Step 1: Launch the eclipse
Step 2: Go to File🡪New🡪Project. Specify the name of the project and click Finish.
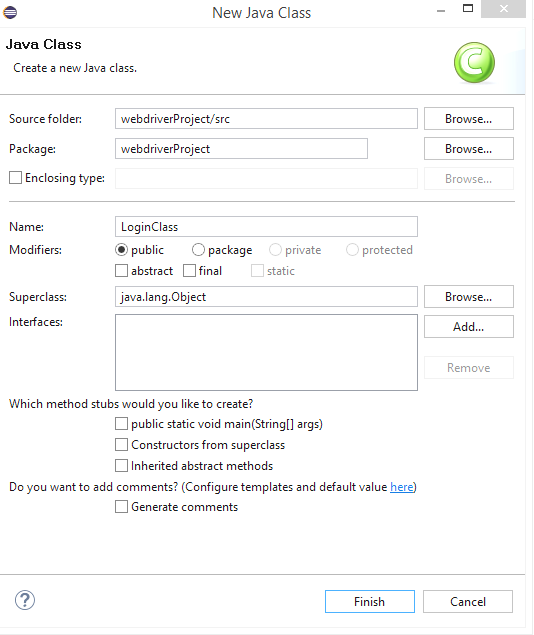
Step 3: Create a package and create a class file within the same package. Select the modifier as public and click finish.
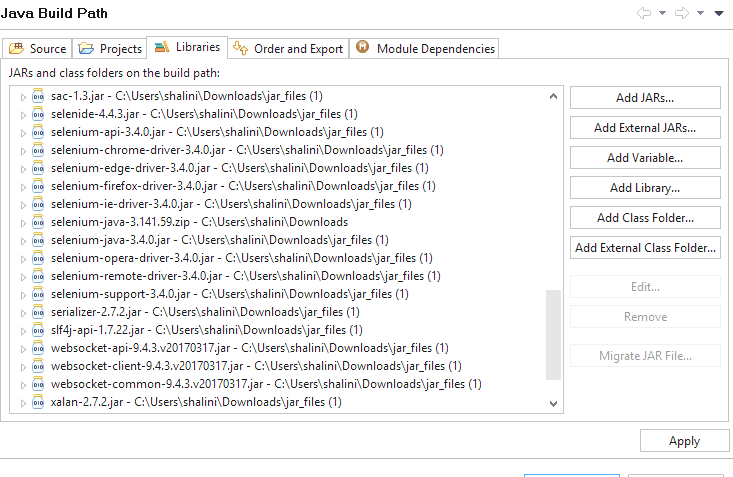
Step 4: To add the referenced libraries, right click on the project🡪Build Path 🡪Configure Build Path and add the external jars.
Before we get into the coding part for browser automation with Selenium & Java, there is something important which has to be clearly understood. In every selenium WebDriver project there will be a line which says
WebDriver driver = new ChromeDriver();
or may be whatever the driver that is being used.
WebDriver is basically an interface. A WebDriver instance is created and cast to the browser driver class. In the WebDriver interface the get(),quit(),close() methods are implemented by respective driver classes. Upcasting provides the feasibility of running the same automation scripts in different browsers.
Hence, Selenium WebDriver is an interface, driver is a reference variable,ChromeDriver() is a Constructor, new is a keyword, and new ChromeDriver() is an Object.
Here is an example for testing login functionality in a single browser. To test this we need the correct URL of the website and valid login credentials of a registered user.
First of all, we have to specify the path of the driver and then instantiate the appropriate browser for that driver.
For Firefox
    System.setProperty("WebDriver.gecko.driver","C:\\Users\\shalini\\Downloads\\geckodriver-v0.26.0-win64\\geckodriver.exe");
WebDriver driver = new FirefoxDriver();
For Chrome
System.setProperty("WebDriver.chrome.driver","C:\\Users\\shalini\\Downloads\\chromedriver\\chromedriver.exe");
WebDriver driver = new ChromeDriver();
For Opera
System.setProperty(“WebDriver.opera.driver”,”C:\\Users\\shalini\\Downloads\\operadriver\\operadriver_win64\\operadriver.exe”);
WebDriver driver = new OperaDriver();
For Internet Explorer
System.setProperty("WebDriver.ie.driver", " C:\\Users\\shalini\\Downloads\\ieDriver\\IEDriverServer.exe”);
WebDriver driver=new InternetExplorerDriver();
Selenium also provides the advantage of running the browser automation tests in a web application without a Graphical User Interface. Such a browser is called a headless browser and the testing carried out in such browser is called Headless browser testing. The main advantage of this testing is improved performance and speed. HtmlUnit driver and Headless chrome are some of the examples to carry out this test.
After instantiating the driver, we need to navigate to the website.
driver.get("https://opensource-demo.orangehrmlive.com/");
Before logging in, you need to ensure that you have reached the correct website. There are numerous ways to achieve this condition and for our project we will verify the title of the webpage.
String pageTitle = driver.getTitle();
System.out.println("The title of this page is ===> " +pageTitle);
Assert.assertEquals("OrangeHRM", pageTitle);
To test the login function, the first step is to locate the elements on the webpage that have to be interacted with. These HTML elements are referred to as web elements in Selenium. Once you know how to access a webelement you can easily perform any browser actions using them.
Below are the 8 different Selenium locators that the WebDriver supports to locate elements:
- id
- name
- className
- tagName
- linkText
- partialLinkText
- cssSelector
- xpath
Let us use the id locator to locate the elements. The basic requirement for this test would be the user should be allowed to enter his Username and password and click the Login button.
driver.findElement(By.id("txtUsername")).sendKeys("Admin");
driver.findElement(By.id("txtPassword")).sendKeys("admin123");
driver.findElement(By.id("btnLogin")).click();
Once the tests for browser automation with Selenium & Java are executed, you need to close the browser instance which is considered to be the best practise in finishing the test execution.
You can close the browser by using two different WebDriver command, these are:
- close(): Closes the current browser window being accessed.
- quit(): Closes down all the browser windows opened by the script.
driver.close(); // Closes the single browser window accessed by the WebDriver instance
driver.quit();   // Closes all the open browser windows instances
Below is the code snippet for testing the login functionality in a single browser for browser automation with Selenium & Java.
package WebDriverProject;

import org.junit.Assert;
import org.openqa.selenium.By;
import org.openqa.selenium.WebDriver;
import org.openqa.selenium.firefox.FirefoxDriver;

public class LoginClass {

    public static void main(String args[]) {

        System.setProperty("WebDriver.gecko.driver","C:\\Users\\shalini\\Downloads\\geckodriver-v0.26.0-win64\\geckodriver.exe");

              WebDriver driver = new FirefoxDriver();                    //initialise the WebDriver

              driver.get("https://opensource-demo.orangehrmlive.com/"); //define the url

        String pageTitle = driver.getTitle();        //get the title of the webpage
        System.out.println("The title of this page is ===> " +pageTitle);
        Assert.assertEquals("OrangeHRM", pageTitle);    //verify the title of the webpage

        driver.findElement(By.id("txtUsername")).clear();//clear the input field before entering any value
        driver.findElement(By.id("txtUsername")).sendKeys("Admin");//enter the value of username
        driver.findElement(By.id("txtPassword")).clear();
        driver.findElement(By.id("txtPassword")).sendKeys("admin123");//enter the value of password
        driver.findElement(By.id("btnLogin")).click();        //click Login button
        System.out.println(“Successfully logged in”);
        driver.quit();
        }
}
Creating A Maven Project In Eclipse
The primary advantage of having a Maven project is that we get all our dependencies (JARS) added automatically, which also allows users to reuse the same jars across multiple projects. Maven automatically downloads the necessary files from the repository while building the project. You can also refer to our Maven tutorial to know about how to use Maven for Selenium test automation.
Step1: Download Maven
Step2: Add MAVEN_HOME system variable
Set the path which points to the bin directory of the maven directory.
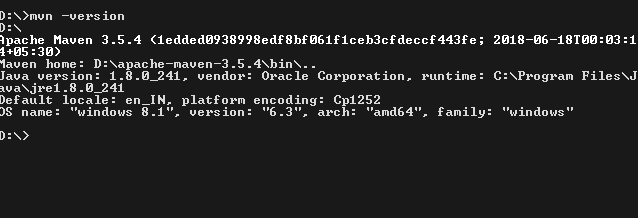
Step 3 : To verify successful installation of Maven, type mvn –version in command prompt.
We can use the same code as in Java Project example. The only difference would be the addition of dependencies in pom.xml file without the need to add all the external jars manually.
Pom.xml

<project
xmlns="http://maven.apache.org/POM/4.0.0"
xmlns:xsi="http://www.w3.org/2001/XMLSchema-instance" xsi:schemaLocation="http://maven.apache.org/POM/4.0.0 http://maven.apache.org/xsd/maven-4.0.0.xsd">
  <modelVersion>4.0.0</modelVersion>
  <groupId>demoProject</groupId>
  <artifactId>demoProject</artifactId>
  <version>0.0.1-SNAPSHOT</version>
  <build>
    <sourceDirectory>src</sourceDirectory>
    <plugins>
      <plugin>
        <artifactId>maven-compiler-plugin</artifactId>
        <version>3.8.0</version>
        <configuration>
          <source>1.8</source>
          <target>1.8</target>
        </configuration>
      </plugin>
    </plugins>
  </build>

  <dependencies>
                <dependency>
              <groupId>org.seleniumhq.selenium</groupId>
              <artifactId>selenium-java</artifactId>
              <version>3.141.59</version>
                </dependency>
<dependency>
                             <groupId>junit</groupId>
               <artifactId>junit</artifactId>
                <version>4.10</version>
                 <scope>test</scope>
</dependency>
  </dependencies>
</project>
Running First Script For Browser Automation With Selenium & Java
In this Selenium & Java Tutorial, I’ll run a test script, where I’ll perform automated browser testing on Firefox,Chrome & Opera browsers, to test the login feature of the website on these browsers.
In case you’re not familiar with cross browser testing, i’ll explain in the section below:
Overview Of Cross Browser Testing
Every web browser has their own rendering engine, so even though your website works perfectly on one browser, it might not necessarily work fine on another. This is due to the reason that the web elements in your website might not be compatible with other browsers. This is why need to perform cross browser testing to make sure that your website is compatible with these browsers as well
Cross browser testing involves testing of the web application in multiple browsers like Firefox, Google chrome, Microsoft Edge, Internet Explorer, Opera etc.
Need For Cross Browser Testing
Availability of different browsers, devices, and platforms has dynamically increased the need for cross browser testing. The purpose of cross browser testing is to provide a consistent behaviour and experience across all browsers, devices, and platforms. Some of the most common areas addressing cross browser compatibility issues are.
- Image orientation
- Font size mismatch
- JavaScript implementation might differ in different browsers
- Page alignment
- CSS styles can render differently in Internet Explorer 8 than in more recent versions of Internet Explorer and Google Chrome
- Few browsers may not still support HTML5
Thus the goal of cross browser testing is to ensure your users are able to access all content and execute all of the basic functions on your website without any major issues.
Implementing Cross Browser Testing in Selenium WebDriver
Cross browser testing can be performed by integrating TestNG framework with Selenium WebDriver. Let us try to use the same application to check the login functionality in various browsers.
Integrating TestNG with WebDriver
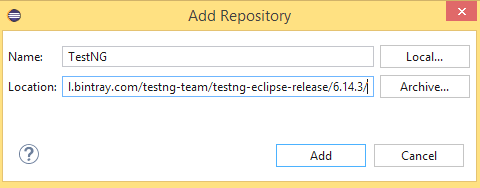
Step 1: Go to Help –> Install Software.
Step 2: Click Add and enter the below link in location field
https://dl.bintray.com/testng-team/testng-eclipse-release/6.14.3/
Step 3: Click Add
Step 4: Select TestNG and click Next

Step 5: Click Next.
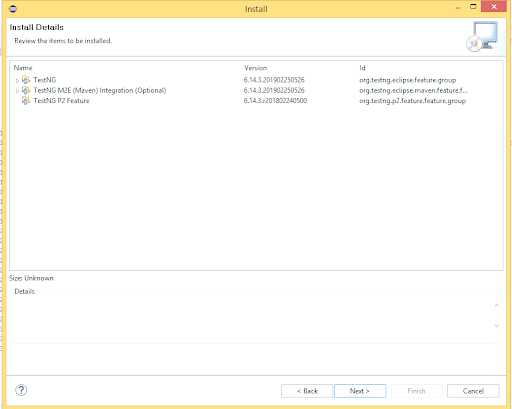
Step 6: Accept the terms of the license agreement.

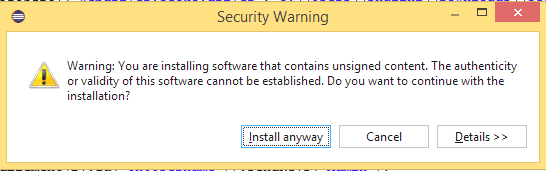
Sometimes you may get security warning while installing, Click Install anyway.
Step 7: Restart the eclipse to complete the installation.
New to TestNG, read this guide on running your first TestNG script for Selenium test automation:
A Complete Guide For Your First TestNG Automation Script
Running The Script For Browser Automation With Selenium & Java
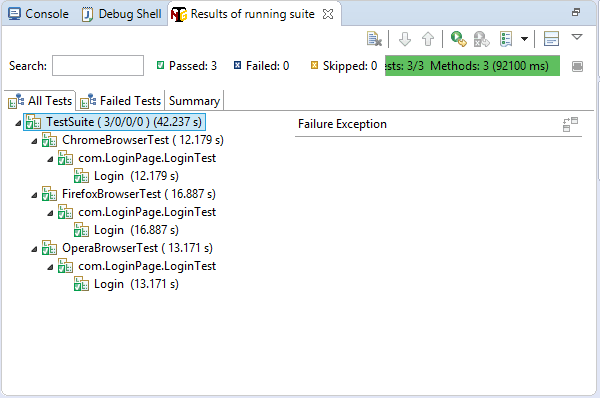
Test Scenario: Check if the user is able to login the website in multiple browsers and ensure that the webpage implementation and styles are the same across all the browsers.
In the below code,we perform the cross browser testing in Firefox,Chrome & Opera browsers.
//Running The Script For Browser Automation With Selenium & Java  tutorial//

package com.LoginPage;

import java.util.concurrent.TimeUnit;

import org.openqa.selenium.By;
import org.openqa.selenium.WebDriver;
import org.openqa.selenium.chrome.ChromeDriver;
import org.openqa.selenium.firefox.FirefoxDriver;
import org.openqa.selenium.opera.OperaDriver;
import org.testng.annotations.AfterClass;
import org.testng.annotations.AfterTest;
import org.testng.annotations.BeforeTest;
import org.testng.annotations.Parameters;
import org.testng.annotations.Test;

public class LoginTest {

    public WebDriver driver;

    @BeforeTest
    @Parameters("browser")
    public void setUp(String browser) {

        if(browser.equalsIgnoreCase("Firefox")) {
System.setProperty("WebDriver.gecko.driver", "C:\\Users\\shalini\\Downloads\\geckodriver-v0.26.0-win64\\geckodriver.exe");
            driver = new FirefoxDriver();
        }

        else if (browser.equalsIgnoreCase("GoogleChrome")) {
System.setProperty("WebDriver.chrome.driver", "C:\\Users\\shalini\\Downloads\\chromedriver\\chromedriver.exe");
            driver = new ChromeDriver();
        }

        else if(browser.equalsIgnoreCase("Opera")) {
                          System.setProperty("WebDriver.opera.driver","C:\\Users\\shalini\\Downloads\\operadriver\\operadriver_win64\\operadriver.exe");
            driver = new OperaDriver();
        }
    }

    @Test
        public void Login() {

        driver.get("https://opensource-demo.orangehrmlive.com/");
        driver.manage().timeouts().implicitlyWait(10, TimeUnit.SECONDS);
        String pageTitle = driver.getTitle();
        System.out.println("The title of this page is ===> " +pageTitle);

        driver.findElement(By.id("txtUsername")).clear();
        driver.findElement(By.id("txtUsername")).sendKeys("Admin");

        driver.findElement(By.id("txtPassword")).clear();
        driver.findElement(By.id("txtPassword")).sendKeys("admin123");

        driver.findElement(By.id("btnLogin")).click();

  }

    @AfterTest
    public void tearDown() {
        driver.quit();
    }
}
To execute the test case in different browsers, we need to create a xml file which allows to configure the suite and run them.This file allows to configure the tests,set the priority and dependency of the tests,include or exclude any class,method or tests,execute different tests in parallel ,parameterize the values by using the annotation @Paramters etc.According to our requirements , we have to parameterize the value of different browsers which are used for automated browser testing.
To create a TestNG.xml file,
Step 1: Right your project → New → File
Step 2: Add the name of the file to be used and click Finish
<?xml version="1.0" encoding="UTF-8"?>
<!DOCTYPE suite SYSTEM "http://testng.org/testng-1.0.dtd">
<suite name="TestSuite">
<test name="ChromeBrowserTest">
<parameter name="browser" value="GoogleChrome"/>
<classes>
<class name="com.LoginPage.LoginTest">
</class>
</classes>
</test>
<test name="FirefoxBrowserTest">
<parameter name="browser" value="Firefox" />
<classes>
<class name="com.LoginPage.LoginTest">
</class>
</classes>
</test>
<test name="OperaBrowserTest">
<parameter name="browser" value="Opera" />
<classes>
<class name="com.LoginPage.LoginTest">
</class>
</classes>
</test>
</suite>
Right the TestNG.xml file and select Run As → TestNG suite
Common Exceptions In Test Execution Of Browser Automation
Exceptions are events which cause the java program to end abruptly without giving expected output. Below are the most common exceptions that occur while executing tests in WebDriver.
1. org.openqa.selenium.NoSuchElementException
NoSuchElementException occurs when the WebDriver is can’t locate an element.
2.java.lang.IllegalStateException: The driver executable does not exist:
This would be due to the driver is not actually found in the specified path.
3. org.openqa.selenium.firefox.NotConnectedException: Unable to connect to host 127.0.0.1 on port 7055 after 45000ms
This might be the version compatibility of the browser and the selenium. Check the compatibility of the browser and the driver in the download page of the driver.
4. org.openqa.selenium.StaleElementReferenceException
This exception might occur when a web element is no longer present in the web page.
It is thrown when an object of a specific web element was created this element is no longer present in the window. This occurs when the DOM has been refreshed. To overcome this exception, use dynamic xpath.
Performing Parallel Testing For Faster Test Execution With Selenium Grid
While performing browser automation with Selenium & Java, you might want to run your test script against several browser & OS combinations, this is why running your test sequentially might turn out to be time consuming.
Let’s say you have 50 Browser & OS combinations you want to run your tests on. Also, each test script takes about 100 seconds to run a test script. If you run these tests sequentially, i.e. one after one, you’ll take a total of 5000 seconds to run these tests. This is essentially around 1 hours 23 min. That’s a lot of time! Don’t you think so?
But if you run tests in parallel, let’s say you run 5 parallel sessions, where you run 5 tests at the same time. Total time would come down to 1000 seconds, i.e. 16 mins approx. So you end up saving more than an hour of your time.
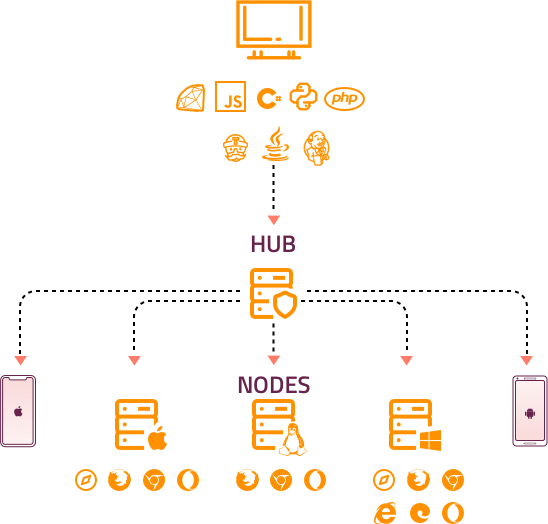
Parallel testing in Selenium is performed with the help of Selenium Grid](lambdatest.com/selenium-automation). Selenium Grid routes test commands to browser instances on remote devices. Selenium Grid has two main components, these are:
- Hub (server):The WebDriver client gives the access request from the Hub
- Node (remote device): Node is the Selenium WebDriver instance on remote machines, it contains an operating system, browsers, along with remoteWebDriver.
The WebDriver client performs test execution on a remote system through remoteWebDriver. RemoteWebDriver has two important components – the Client and the Server.
In the browser automation test script, we define desired capabilities (device, platform, browser)of the node where the test will be executed. The Hub I receives this script, runs through the registered nodes to find one that matches the desired capabilities and assigns the test for execution.
Parallel Testing On LambdaTest Selenium Grid
Once you signUp in LambdaTest, you will be provided an unique username and an accesskey. Use them in the code to set the gridURL.
//Parallel testing for Browser automation with Selenium & Java tutorial//

package com.ParallelTestInGrid;

import java.net.MalformedURLException;
import java.net.URL;
import java.util.concurrent.TimeUnit;

import org.openqa.selenium.By;
import org.openqa.selenium.remote.DesiredCapabilities;
import org.openqa.selenium.remote.RemoteWebDriver;
import org.testng.annotations.AfterTest;
import org.testng.annotations.BeforeTest;
import org.testng.annotations.Parameters;
import org.testng.annotations.Test;
public class gridTesting {
    String username = "USERNAME";            //Enter your username
    String accesskey = "ACCESSKEY";            //Enter your accesskey
    static RemoteWebDriver driver = null;
    String gridURL = "@hub.lambdatest.com/wd/hub";

    boolean status = false;

    @BeforeTest
    @Parameters("browser")
    public void setUp(String browser)throws MalformedURLException
    {
        if(browser.equalsIgnoreCase("chrome"))
        {
        DesiredCapabilities capabilities = new DesiredCapabilities();
        capabilities.setCapability("browserName", "chrome");     //To specify the browser
        capabilities.setCapability("version", "70.0");        //To specify the browser version
        capabilities.setCapability("platform", "win10");         // To specify the OS
        capabilities.setCapability("build", "LambdaTestApp");               //To identify the test
        capabilities.setCapability("name", "LambdaTestGridExample");
        capabilities.setCapability("network", true);         // To enable network logs
        capabilities.setCapability("visual", true);             // To enable step by step screenshot
        capabilities.setCapability("video", true);            // To enable video recording
        capabilities.setCapability("console", true);             // To capture console logs
        try {
            driver = new RemoteWebDriver(new URL("https://" + username + ":" + accesskey + gridURL), capabilities);
        } catch (MalformedURLException e) {
            System.out.println("Invalid grid URL");
        } catch (Exception e) {
            System.out.println(e.getMessage());
        }
        }

        else if(browser.equalsIgnoreCase("Firefox"))
        {
        DesiredCapabilities capabilities = new DesiredCapabilities();
        capabilities.setCapability("browserName", "Firefox");    //To specify the browser
        capabilities.setCapability("version", "76.0");        //To specify the browser version
        capabilities.setCapability("platform", "win10");         // To specify the OS
        capabilities.setCapability("build", "LambdaTestApp");    //To identify the test
        capabilities.setCapability("name", "LambdaTestGridExample");
        capabilities.setCapability("network", true);         // To enable network logs
        capabilities.setCapability("visual", true);             // To enable step by step screenshot
        capabilities.setCapability("video", true);                           // To enable video recording
        capabilities.setCapability("console", true);             // To capture console logs
        try {
            driver = new RemoteWebDriver(new URL("https://" + username + ":" + accesskey + gridURL), capabilities);
        } catch (MalformedURLException e) {
            System.out.println("Invalid grid URL");
        } catch (Exception e) {
            System.out.println(e.getMessage());
        }
}
}


        @Test
        public void Login() {
            driver.get("https://opensource-demo.orangehrmlive.com/");
            String pageTitle = driver.getTitle();
            System.out.println("The title of this page is ===> " +pageTitle);
            driver.manage().window().maximize();

        driver.manage().timeouts().implicitlyWait(10, TimeUnit.SECONDS);

            driver.findElement(By.id("txtUsername")).clear();
            driver.findElement(By.id("txtUsername")).sendKeys("Admin");

            driver.findElement(By.id("txtPassword")).clear();
            driver.findElement(By.id("txtPassword")).sendKeys("admin123");

            driver.findElement(By.id("btnLogin")).click();

        System.out.println("successfully logged in");


    }

     @AfterTest
     public void tearDown() {
         driver.quit();
}


}
TestNG.xml
<?xml version="1.0" encoding="UTF-8"?>
<!DOCTYPE suite SYSTEM "http://testng.org/testng-1.0.dtd">
<suite name="TestSuite" parallel="tests">
<test name="ChromeBrowserTest">
<parameter name="browser" value="chrome"/>
<classes>
<class name="com.ParallelTestInGrid.gridTesting">
</class>
</classes>
</test>
<test name="FirefoxBrowserTest">
<parameter name="browser" value="Firefox" />
<classes>
<class name="com.ParallelTestInGrid.gridTesting">
</class>
</classes>
</test>
<test name="OperaBrowserTest">
<parameter name="browser" value="Opera" />
<classes>
<class name="com.LoginPage.LoginTest">
</class>
</classes>
</test>
</suite>
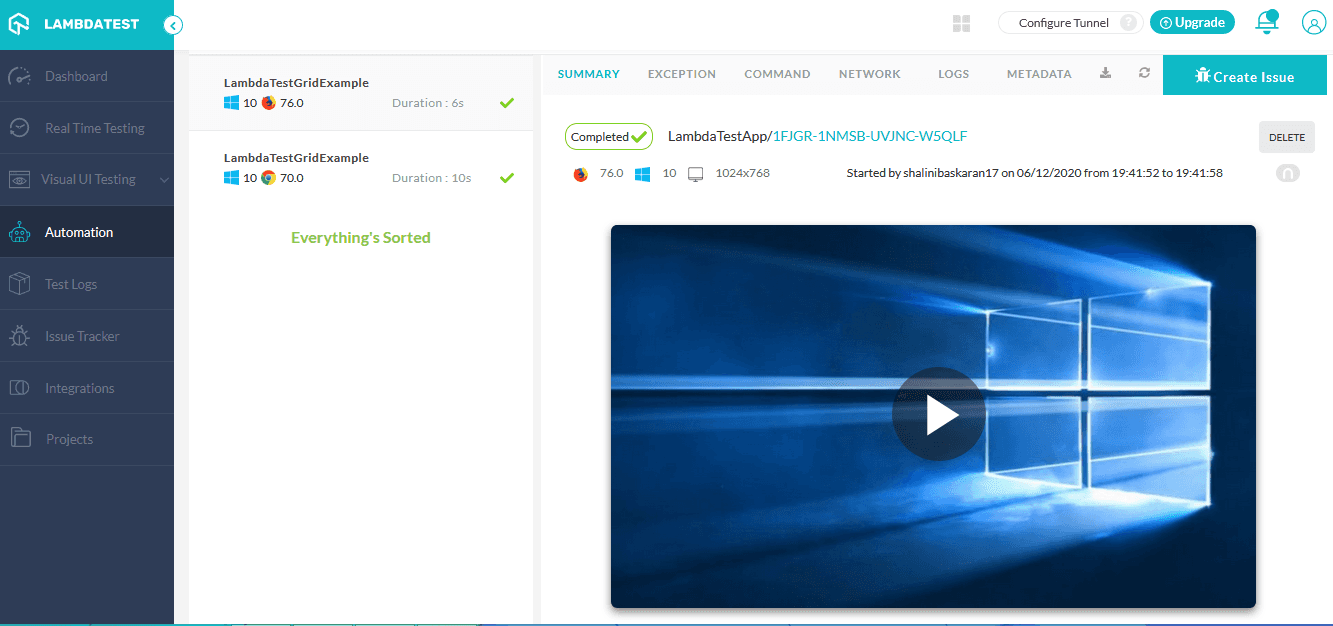
Once the browser automation with Selenium & Java is completed, you can view the results in the Automation tab on the LamdaTest app. Here you can see the complete information about the browser automation tests. You can find the browser information which was used for testing and the time taken for the test execution. The most interesting part of LambaTest grid is that it provides an option of video recording of the test execution. You can play the video to know how the browser was automated and what has caused the error in case of any failed test.
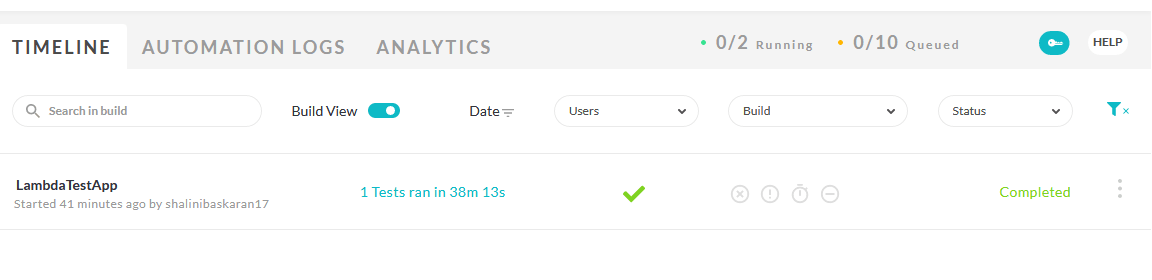
Browser Automation Test Results In Automation Tab
The timeline tab shows the number of builds recorded. You can toggle Test View from Build View to see the list of executed tests. LambdaTest provides an option to filter the tests/Build based on the date,users,build name and the status.
The automation logs tab provide complete details such as the browser in which the test was automated, the operating system, the status of the test, the execution time of the test,the screenshot of each and every WebDriver command execution, the logs captured while test execution, the test execution video and finally the feature to download all the captured data.
Console output:
The below output for browser automation with Selenium & Java, shows the successful execution of the test case in two different browsers – Firefox and Chrome in parallel.Click the test case to view the detailed logs.

Let’s Take A Quick Recap!
To summarise this Selenium & Java Tutorial, I explored the importance of browser automation, features of Selenium WebDriver and Selenium Grid. I also explored how browser automation can be performed in a single browser, multiple browsers one at a time or even in parallel. I explained the importance of automated browser testing and parallel testing which provides an idea of wider compatibility. The available tools have to be leveraged effectively so as to ensure that the webpage behaves the same across all browsers.
Testing on different browser & OS combinations is the key factor for successful test completion for browser automation with Selenium and Java, helping to ensure better user experience too. Your test coverage should ensure that your users get an seamless user experience across their devices. Your Selenium test automation has to provide the confidence that not a single critical defect has been ignored in the producy.
I hope you have gained knowledge and interest by reading this browser automation with Selenium & Java Tutorial. I would love to hear your comments on this article, feel free to share them in the comment section down below. Dive into the automation pool and explore melange of features hidden beneath it. Learn…Explore….Share…!!!!! 😊