


Building a Serverless Doc Writing app using Cloudflare Workers and KV Store


I have been experimenting with Cloudflare workers for some time now and I must say I really love it. However, when it was launched there was no way to store custom data on Cloudflare data centers. Fortunately, they introduced a fast distributed KV store towards the end of 2018 and I was amazed by the possibilities. Workers is already a powerful concept because it lets you run computations on 175+ edge locations across the globe. Combine that with a blazing fast key-value store and you can build truly amazing origin-less apps.
To test things out, I decided to build a serverless web app that lets users write and publish articles anonymously. Here is the end product:
You can check out the source code here: github.com/panda-sandeep/telex
In this article I am going to share code snippets and walk you through the process of building such an app.
Set up Wrangler
Wrangler is Cloudflare's CLI tool to write, preview and publish workers. You can install it by running:
npm i @cloudflare/wrangler -g
Once it's installed, we need to generate our project. You can either generate a bare project or use one of the supplied templates. In our app, we are going to have a few routes. So, we'll generate a project with a few pre-defined routes.
Run the following command to get started:
wrangler generate telex https://github.com/cloudflare/worker-template-router
To see all available templates, click here.
Code
If you go to the directory telex, you can see routes.js. This is our router. We require it in index.js (which is the app's entry point) and define our routes.
Inside index.js, you will see something like this:
addEventListener('fetch', event => {
    event.respondWith(handleRequest(event.request))
});
This simply means whenever a request comes, our handler handleRequest executes.
Define routes
Remove everything inside handleRequest function. We are going to add new routes one by one.
Home (/)
When people visit our app we want to show them a field where they can write articles. To do that we'll write some custom HTML inside a file called html/index.js. Here is how it looks like:
const home = `
<html>
  <head>
    <title>Anonymous Doc Writing App</title>
  </head>
  <body>
    <input type="text" autocomplete="off" id="title"/>
    <input type="text" autocomplete="off" id="name" />
    <div id="editable" contenteditable></div>
    <button class="publish-button" id="save-btn">Publish</button>
  </body>
</html>
`;

module.exports = home;
P.S. I have stripped away extra HTML, CSS classes and other stuff to keep the snippet readable.
Now inside ./index.js (the entry point), we'll create a route to render this HTML whenever someone visits /.
const home = require('./html/index');

async function handleRequest(request) {
    const r = new Router();

    r.get('/', () => {
        return new Response(home, { headers: { 'content-type': 'text/html' } })
    });
}
So, whenever our worker receives a request that matches / (in other words home page), it responds with HTML markup we wrote above. We also return content-type header which is set to text/html.
Let's add the following JavaScript to the above HTML to make the Publish button functional:
document.getElementById("save-btn").addEventListener("click", function(e){
    const title = document.getElementById("title").value.trim();
    const name = document.getElementById("name").value.trim();
    const content = document.getElementById("editable").innerHTML;
    if (!title || !content) { return };
    e.target.setAttribute("disabled", "disabled");
    fetch("/save", {
        method: "POST",
        headers: { "content-type": "application/json"},
        body: JSON.stringify({ title: title, name: name, content: content })
    }).then(function(response){
        return response.json();
    }).then(function(data){
        window.location.href = "/p/" + data.key;
    });
});
As you notice, whenever you click on Publish button, a fetch request is made to /save route which creates a new article on Cloudflare. Let's define that route in our worker.
API to Publish (/save)
Let's go back to handleRequest function inside index.js. Now paste the following snippet just below your first route:
r.post('/save', async (req) => {
    const body = await readRequestBody(req);
    const title = body.title, content = body.content, name = body.name;
    if (!title || !content) {
        return new Response("Please provide a title and content", {
            headers: { "Content-Type": "text/html" },
            status: 400,
            statusText: "Forbidden"
            });
    }

    const key = shortid.generate().toLowerCase();

    await articles.put(key, JSON.stringify({ key: key, title: title, name:name, content: content, dateAdded: new Date() }));

    return new Response(JSON.stringify({ key: key }), {
        headers: { "Content-Type": "application/json" },
        status: 200,
        statusText: "OK"
    });
});
Here are a few things to note about the above route:
- We just defined a route called
/savewhich responds to POST requests. - We make use of a utility function called
readRequestBody()(you can see the function in the GitHub repo) to retrieve the request body and collect various details liketitle,nameandcontent. - In case of insufficient data, we return 400 status code.
- We generate a unique key for each article with the help of
shortidnpm module. It's required at the top ofindex.js. - Now we make a call to
articles.put(key, value)to store our article against the above generated key. The variablearticlesis automatically made available by Cloudflare (we'll see how subsequently). Think of it as a bucket which stores your key-value pairs. - If all goes well, we respond back with the generated key so that the client can pick it up and redirect users to the newly published article.
Article Details (/p/:id)
Now we need a route to show the details of each article. Before that let's add the HTML markup to html/post.js file:
const renderArticle = (data) => {
return `
    <html>
      <head>
        <title>${data.title} ${data.name ? 'by ' + data.name : ''}</title>
      </head>
      <body>
        <div>
          <h1>${data.title}</h1>
          <div><p>${data.name ? 'By ' + data.name + ' · ' : ''} ${new Date(data.dateAdded).toLocaleString()}</p></div>
          ${data.content}
        </div>
      </body>
    </html>
    `
};

module.exports = renderArticle;
The above function simply accepts an article object and generates HTML string on the fly. Now let's create our route in handleRequest function inside index.js:
r.get('/p/.+', async (req) => {
    const url = new URL(req.url).pathname;
    const key = url.substring(url.lastIndexOf('/') + 1).toLowerCase();
    let article = await articles.get(key);

    if (!article) {
        return new Response("Article Not Found", {
            headers: { "Content-Type": "text/html" },
            status: 404,
            statusText: "Not Found"
        });
    }

    article = sanitize(JSON.parse(article));

    return new Response(renderArticle(article), {
        headers: { "Content-Type": "text/html" },
        status: 200,
        statusText: "OK"
    });
});
A few things to note:
- We extract the supplied
keyfrom URL and use it to retrieve our article fromarticlesbucket. - If the article is not found, we return 404 status code.
- If all goes well, we use our helper function
renderArticleto generate HTML string and commit the response.
Now we are done with the coding part. Let's configure our app and learn how to build and publish.
Config
Every Wrangler project has a config file called wrangler.toml. Here is how it looks like:
account_id = "<Your Cloudflare Account ID>"
name = "telex"
type = "webpack"
workers_dev = true
# route = "telex.blog/*"
# zone_id = "<Zone ID of your Cloudflare Site>"

[[kv-namespaces]]
binding = "articles"
id = "<ID of your Workers KV namespace>"
I have not committed my wrangler.toml to GitHub repo because it's specific to my Cloudflare account. In order to deploy Workers to your account, you need to rename wrangler.example.toml to wrangler.toml and replace the content with your own details.
Did you notice the config binding = "articles"? This line asks Cloudflare to make the variable articles accessible to the worker code. This is where your key-value pairs live.
Finding Account ID, Zone ID and Namespace ID
Account ID
You can find your Account ID by visiting your Cloudflare Dashboard. Just copy the id from URL:

Zone ID
A Zone ID is needed if you want to deploy the worker to your custom domain (provided it's added to Cloudflare). If that's the case, click on your Cloudflare site and scroll to the bottom.
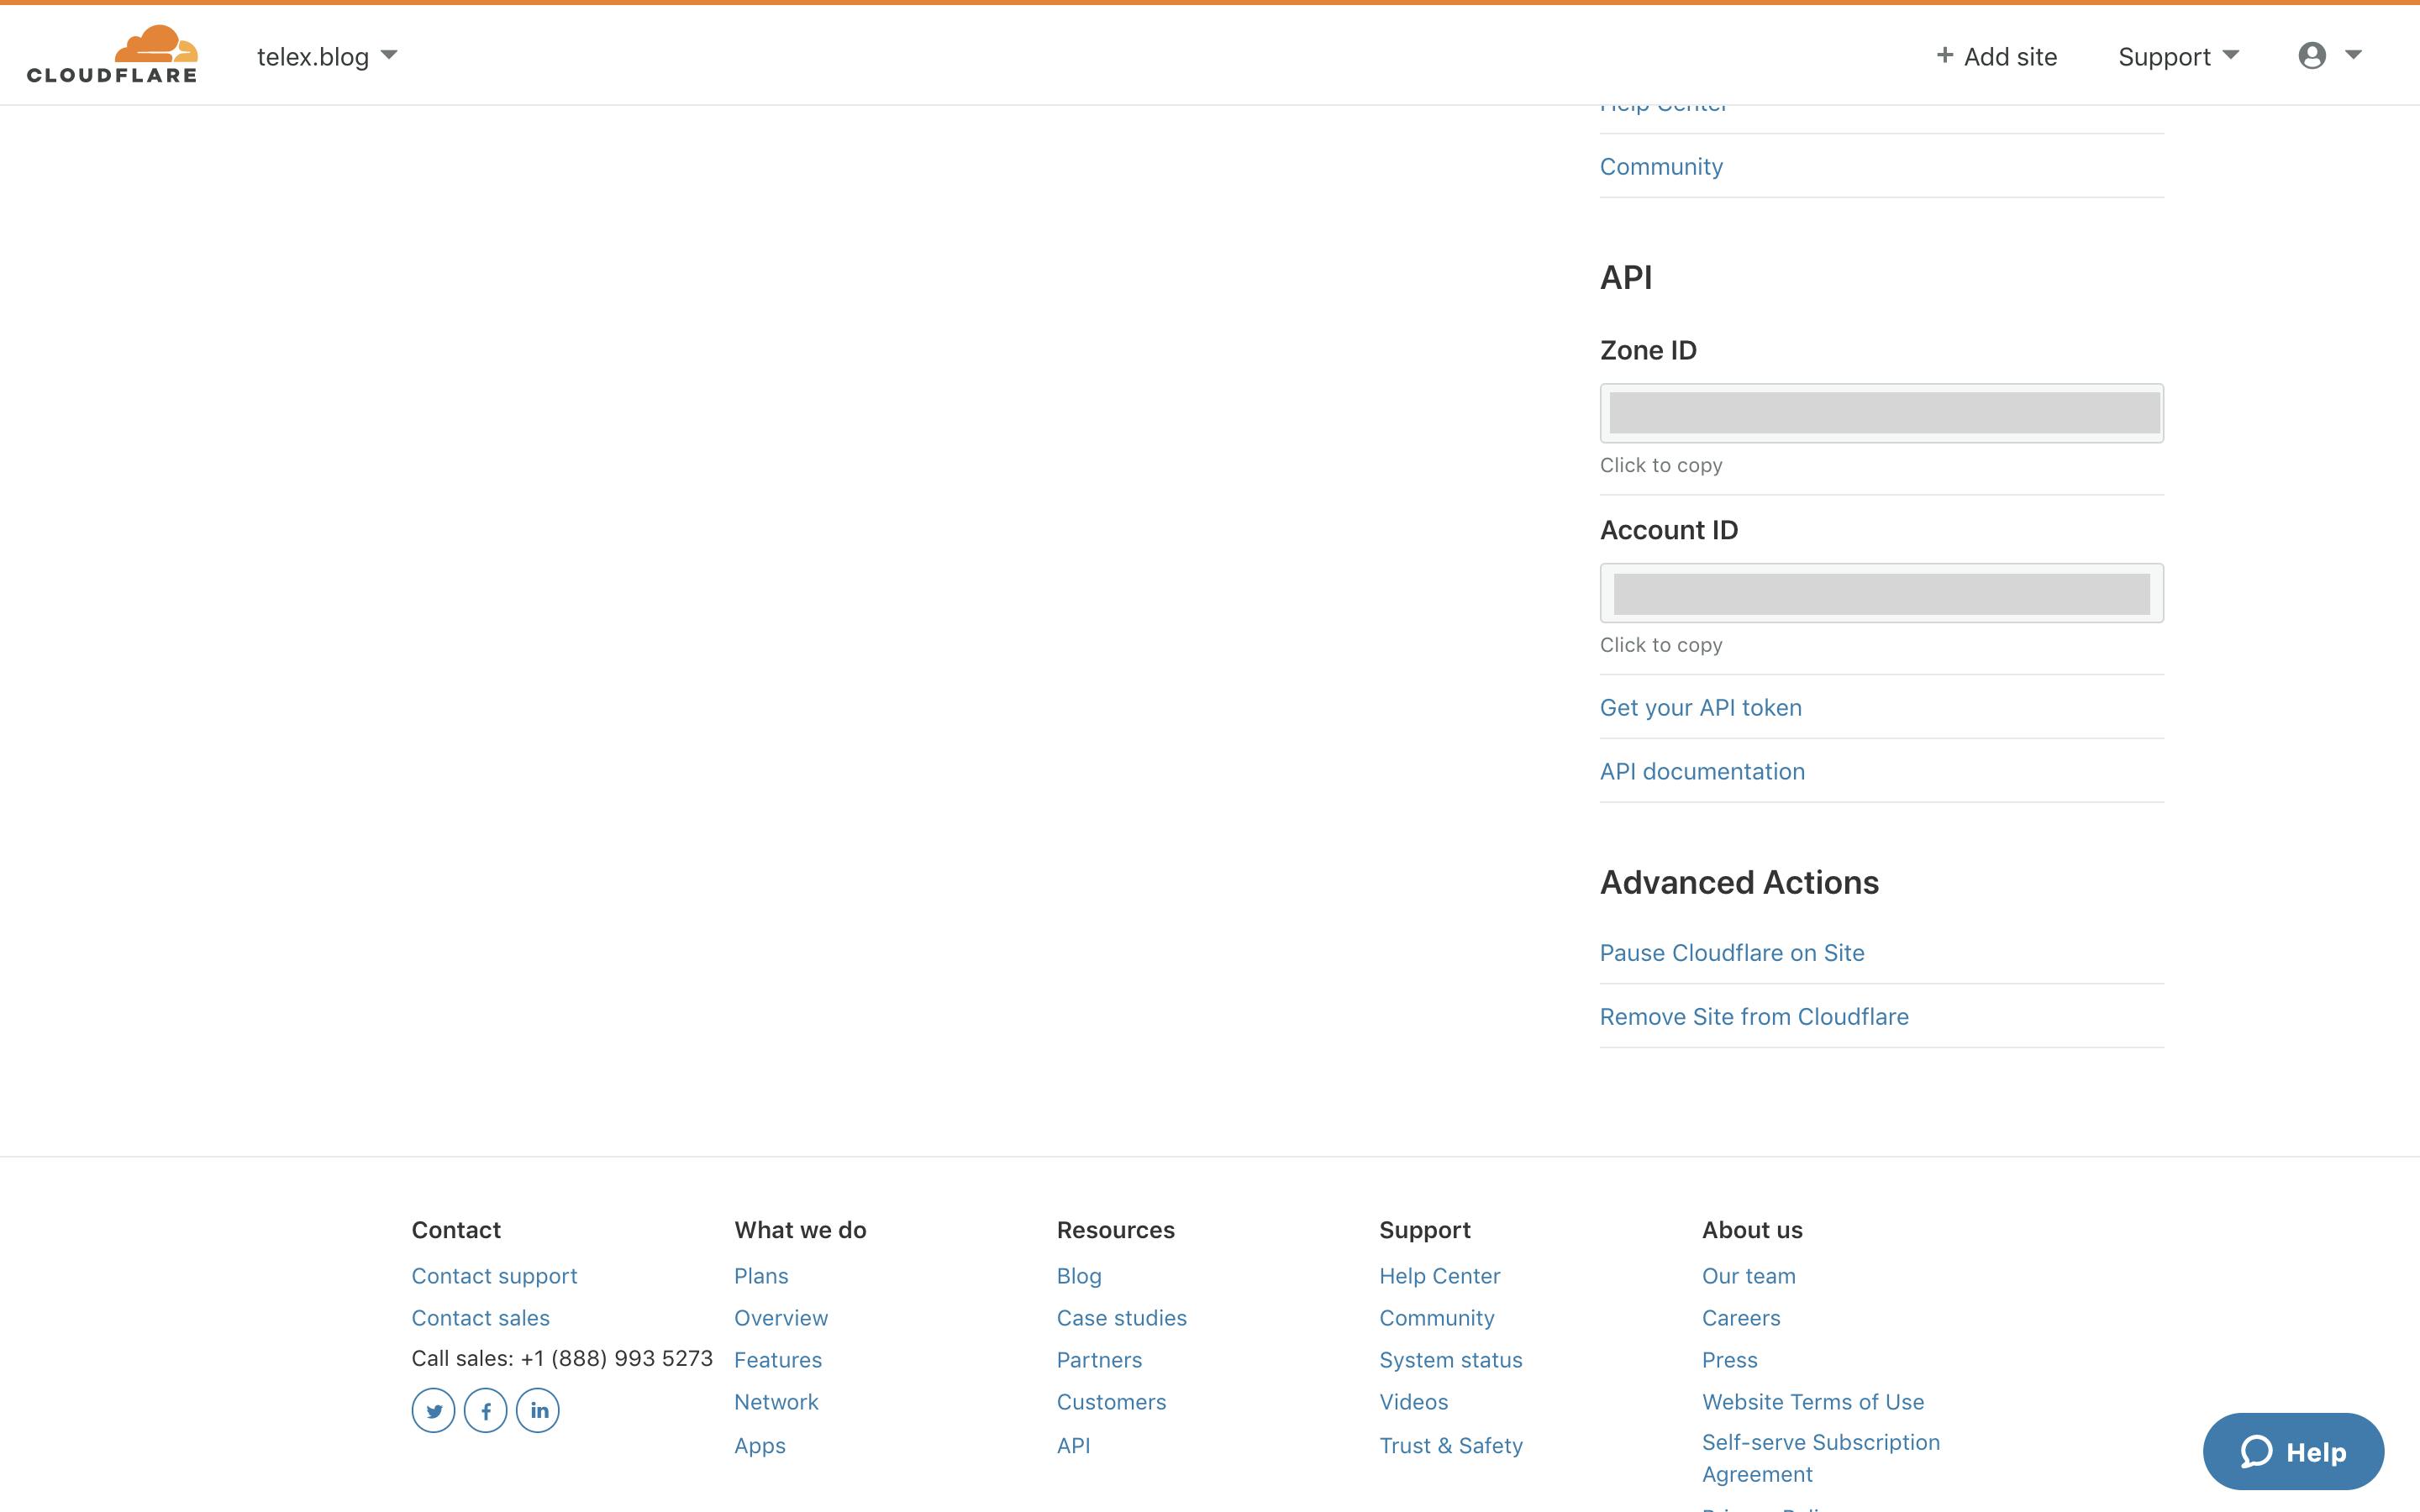
Just copy the Zone ID. You can also grab your Account ID from this page.
Namespace ID
To create a binding like article, you need a namespace. To create a namespace visit workers tab on your Cloudflare dashboard and click on KV tab.
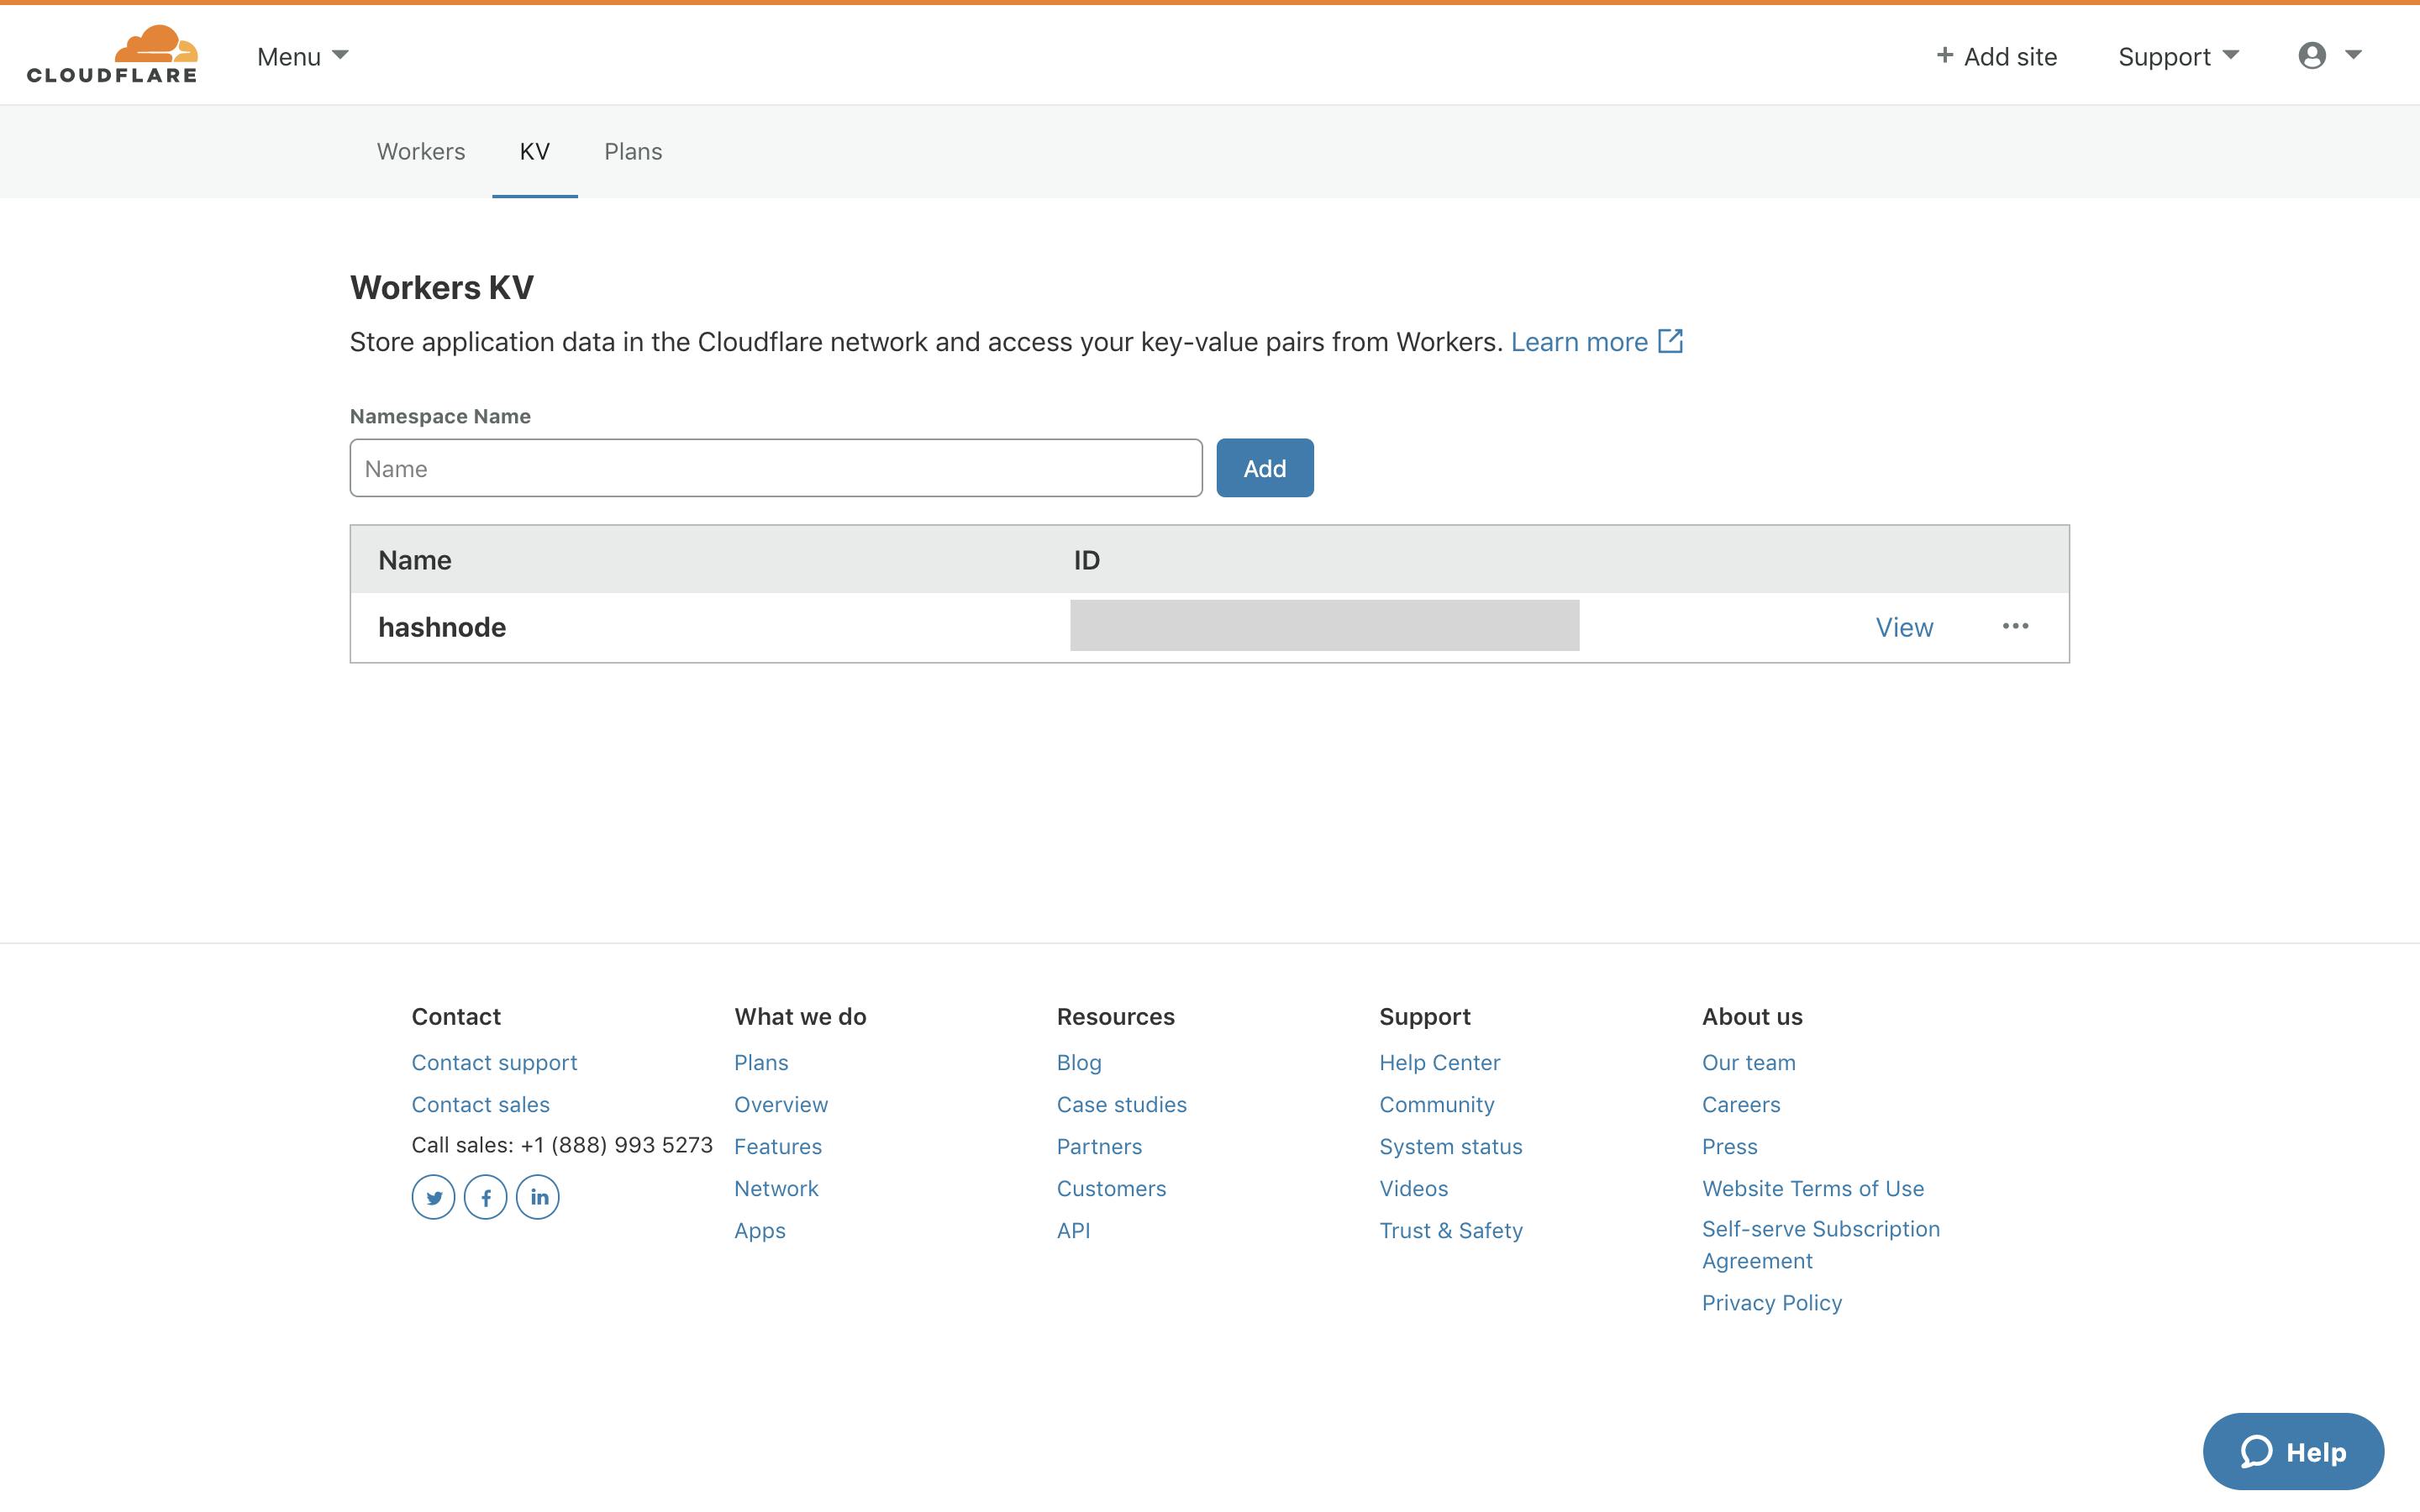
Give your namespace a name and add it. Once it's added, note down its id and add it to wrangler.toml.
Build, Preview and Deploy
Once everything looks good, check if the build succeeds:
wrangler build
You can also see a live preview of your worker and edit files by running:
wrangler preview --watch
To deploy the worker to your Cloudflare account, you need access to your API key. Click on your site and scroll down to the bottom.
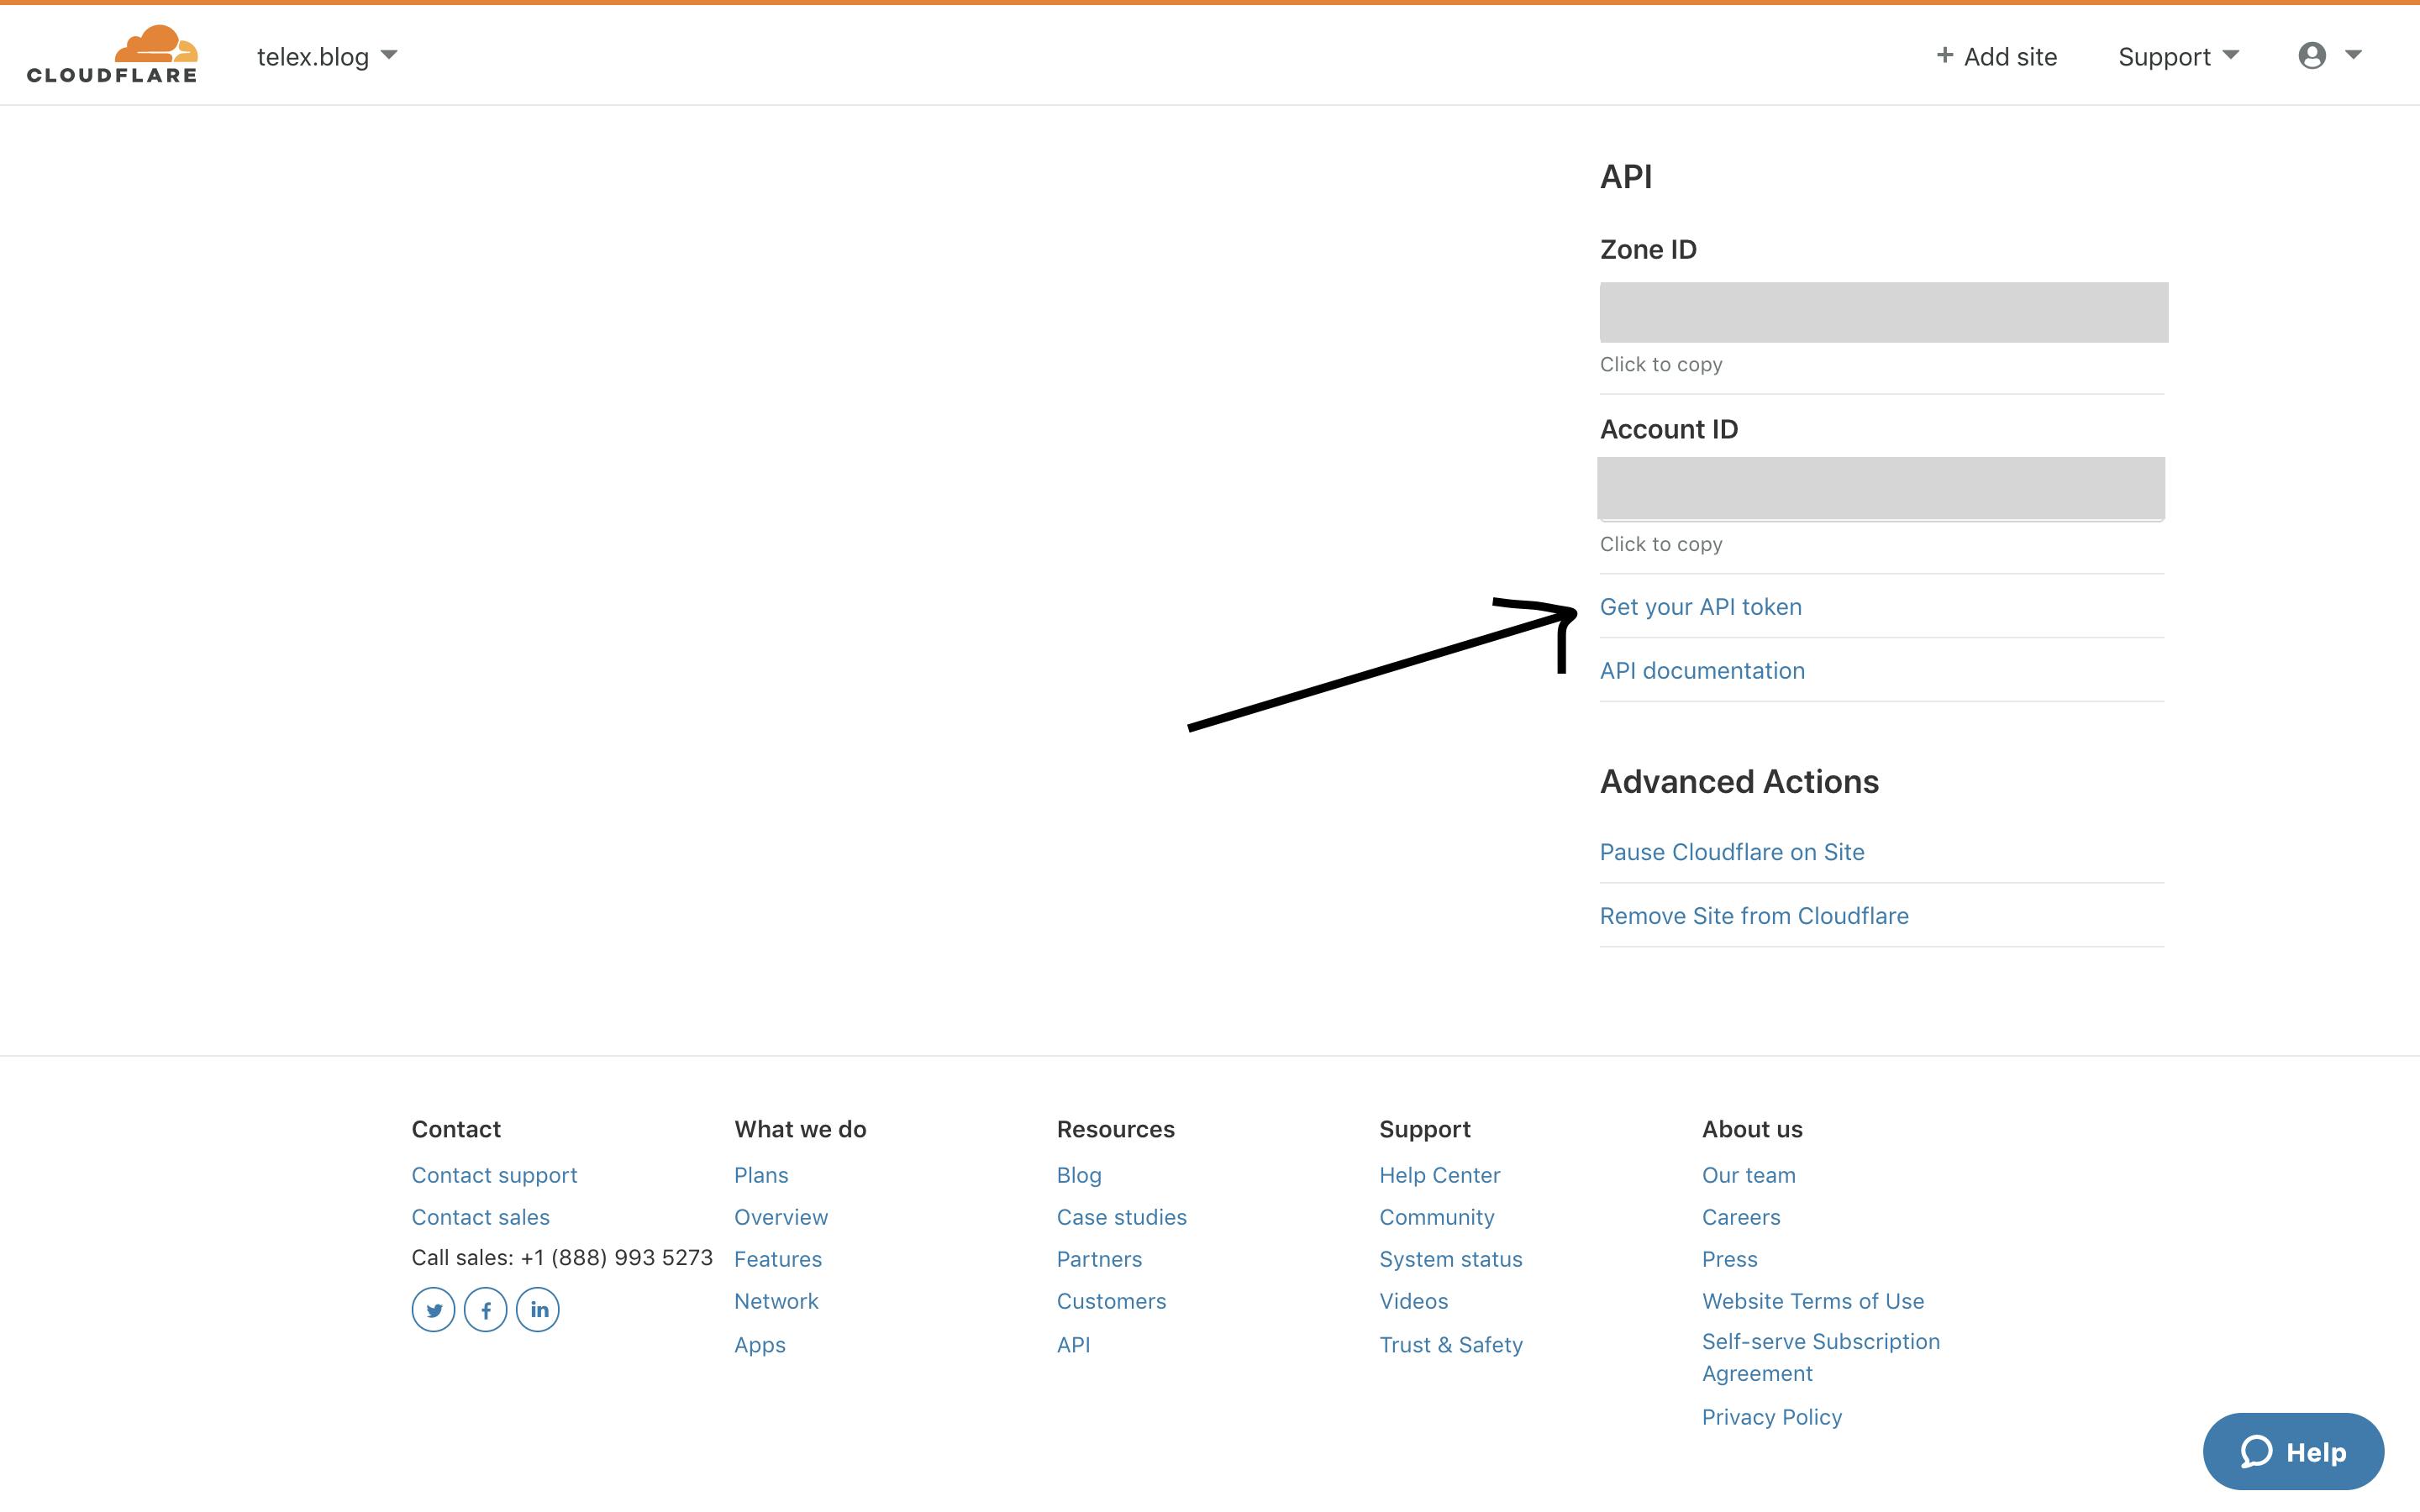
Click on "Get Your API Token". You will see a page like this:
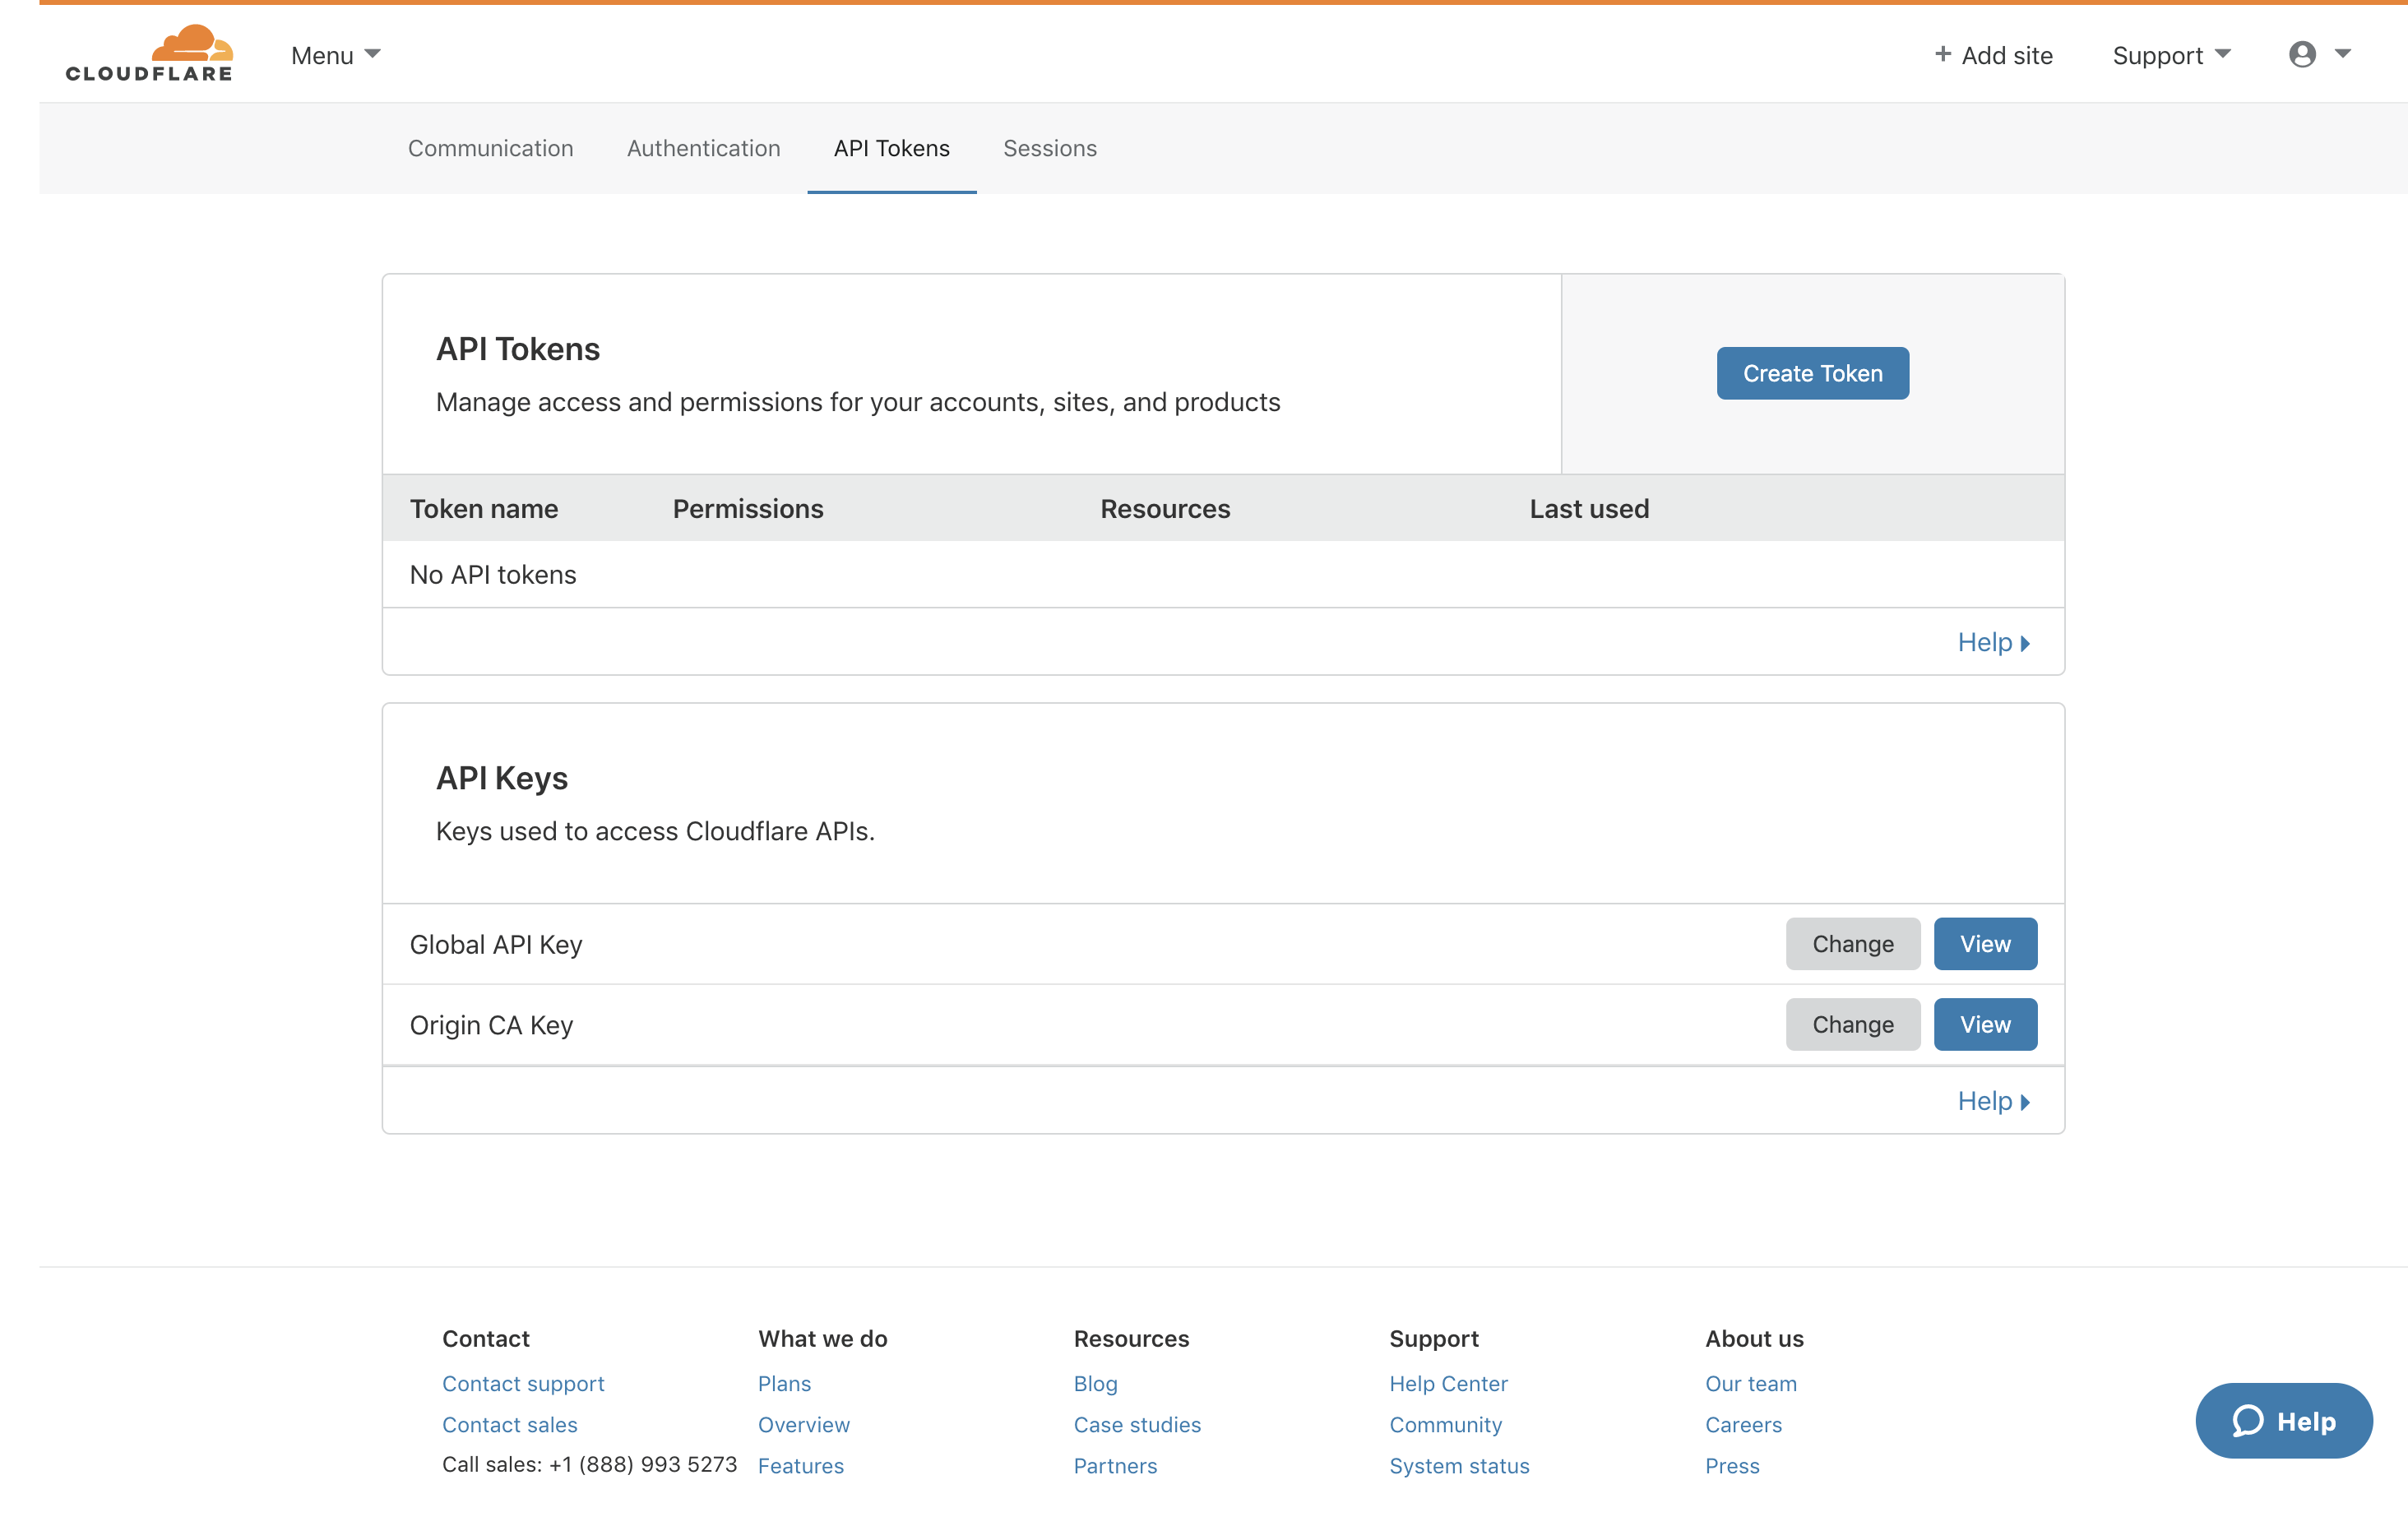
Grab your Global API Key from this page. Now run the following command to configure wrangler to use your Cloudflare account:
wrangler config
Enter your Cloudflare email and API key when promoted and you are done!
Finally, to deploy your worker:
wrangler publish
Congrats 🎉! You have deployed your first Cloudflare powered serverless app!
Again, here is the full source code: github.com/panda-sandeep/telex. Feel free to play around and raise a PR if you end up building something cool.
Let me know what you think in the comments section below.