


Through this post, I intend to show the power of Magnus UI ( https://magnus-ui.com/ ) in creating react-native apps rapidly.
I'll be creating Hashnode mobile app's homepage with Magnus 😁.
Here is what we will be creating

About Magnus
Magnus is a UI framework that helps you in building consistent user interfaces effortlessly in react native. ( I am working on flutter version also ).
Basic Setup
Let's install and setup Magnus first. Add react-native-magnus and it's dependencies ( color, react-native-modal, react-native-vector-icons & react-native-animatable ) in package.json to your react-native project.
We will also be using react-navigation and its dependencies to render the bottom tabs and header.
// package.json
{
  "dependencies": {
    "@react-native-community/masked-view": "^0.1.6",
    "@react-navigation/bottom-tabs": "^5.0.7",
    "@react-navigation/native": "^5.0.7",
    "@react-navigation/stack": "^5.0.8",
    "color": "3.1.2",
    "react-native-modal": "11.3.1",
    "react-native-magnus": "1.0.29",
    "react-native-animatable": "1.3.2",
    "react-native-screens": "^2.0.0-beta.10",
    "react-native-vector-icons": "^6.6.0",
    "react-native-safe-area-context": "^0.7.3"
  }
}
After you are done with installing the packages and installing pods, let's set up the theme. For that, you will need to wrap your app inside something called ThemeProvider. ThemeProvider is basically a Context which provides our app a custom theme. For now, we will be adding our custom colors needed in the app.
// App.js
import * as React from 'react';
import { ThemeProvider } from 'react-native-magnus';

// This is our custom theme
const theme = {
  colors: {
    primary: "#2963FF",
  },
};

export default class App extends React.Component {
  render() {
    return (
      <ThemeProvider theme={theme}>
        // our app will go here
      </ThemeProvider>
    );
  }
}
Now all the Magnus Component will inherit this custom theme object along with predefined theme values. You can check more about theme customization here - https://magnus-ui.com/docs/customization
Now we will set up our navigation. For this tutorial, I'll be just using @react-navigation/bottom-tabs and one stack with @react-navigation/stack. But in the real-world, you will be using combinations of all sorts of react-navigation packages ( tabs, stack, drawer ).
react-navigation expects us to wrap our app inside the NavigationContainer of @react-navigation/native.
// App.js

import * as React from 'react';
import { ThemeProvider } from 'react-native-magnus';
import { NavigationContainer } from '@react-navigation/native';

import AppTabNavigator from './application/navigators/AppTabNavigator';

// This is our custom theme
const theme = {
  colors: {
    primary: '#2963FF',
  },
};

// this is react-navigation theme
const navigationTheme = {
  ...DefaultTheme,
  colors: {
    ...DefaultTheme.colors,
    background: '#fff',
  },
};

export default class App extends React.Component {
  render() {
    return (
      <NavigationContainer theme={navigationTheme}>
        <ThemeProvider theme={theme}>
          <AppTabNavigator />
        </ThemeProvider>
      </NavigationContainer>
    );
  }
}
Now we will just simply create bottom tab navigation by using @react-navigation/bottom-tabs with one tab having our stack navigator.
/application/navigators/AppTabNavigator.js

import * as React from 'react';
import { Icon } from 'react-native-magnus';
import { createBottomTabNavigator } from '@react-navigation/bottom-tabs';

import HomeStack from './HomeStackNavigator';

const Tab = createBottomTabNavigator();

const AppTabNavigator = () => (
  <Tab.Navigator initialRouteName="Home">
    <Tab.Screen
      name="Home"
      component={HomeStack}
      options={{
        tabBarIcon: options => {
          return (
            <Icon
              fontSize="text700"
              color={options.focused ? 'primary' : 'gray400'}
              name="home"
            />
          );
        },
      }}
    />
  </Tab.Navigator>
);

export default AppTabNavigator;
Notice how we are using fontSize value as text700. You can check out the complete list of predefined fontSizes values here - magnus-ui.com/docs/typography
// application/navigators/HomeStackNavigator

import React from 'react';
import { Button, Image } from 'react-native-magnus';
import { createStackNavigator } from '@react-navigation/stack';

import HomeScreen from '../screens/HomeScreen';

const Stack = createStackNavigator();

export default () => {
  return (
    <Stack.Navigator
      screenOptions={{
        headerStyle: {
          elevation: 0,
          shadowOpacity: 0,
          borderBottomWidth: 0,
        },
      }}>
      <Stack.Screen
        name="Home"
        component={HomeScreen}
        options={{
          title: 'Home',
        }}
      />
    </Stack.Navigator>
  );
};
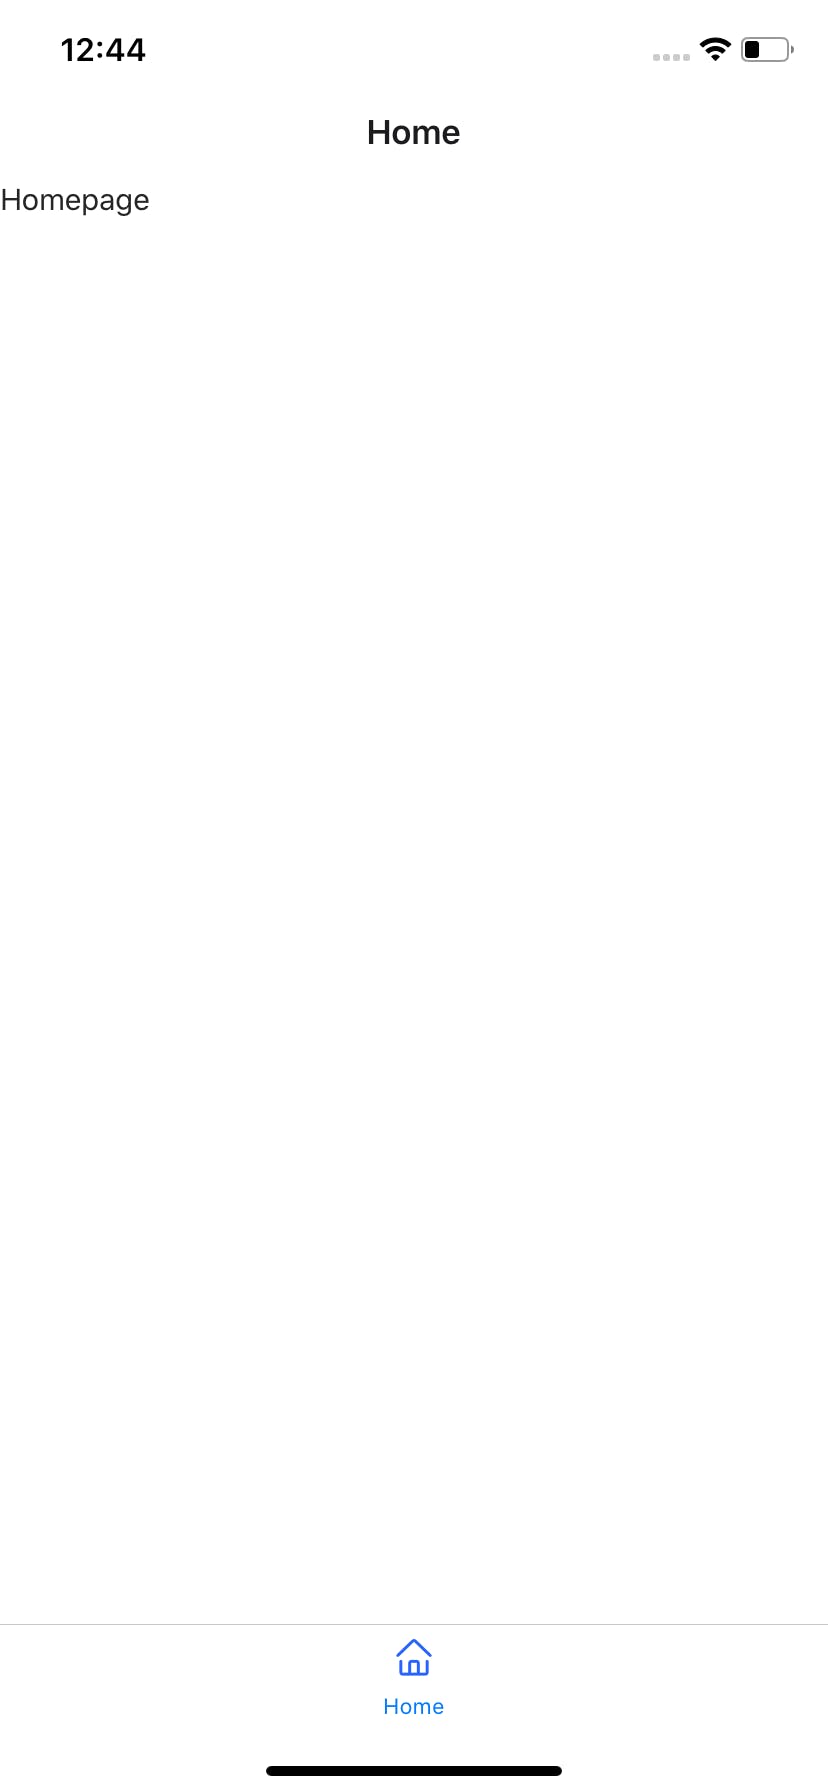
Now let's finally create our HomeScreen.
import React from 'react';
import { SafeAreaView } from 'react-native';
import { Text, ScrollDiv } from 'react-native-magnus';

export default function HomeScreen() {
  return (
    <SafeAreaView>
      <ScrollDiv>
        <Text>Homepage</Text>
      </ScrollDiv>
    </SafeAreaView>
  );
}
Your application should look like this by now -
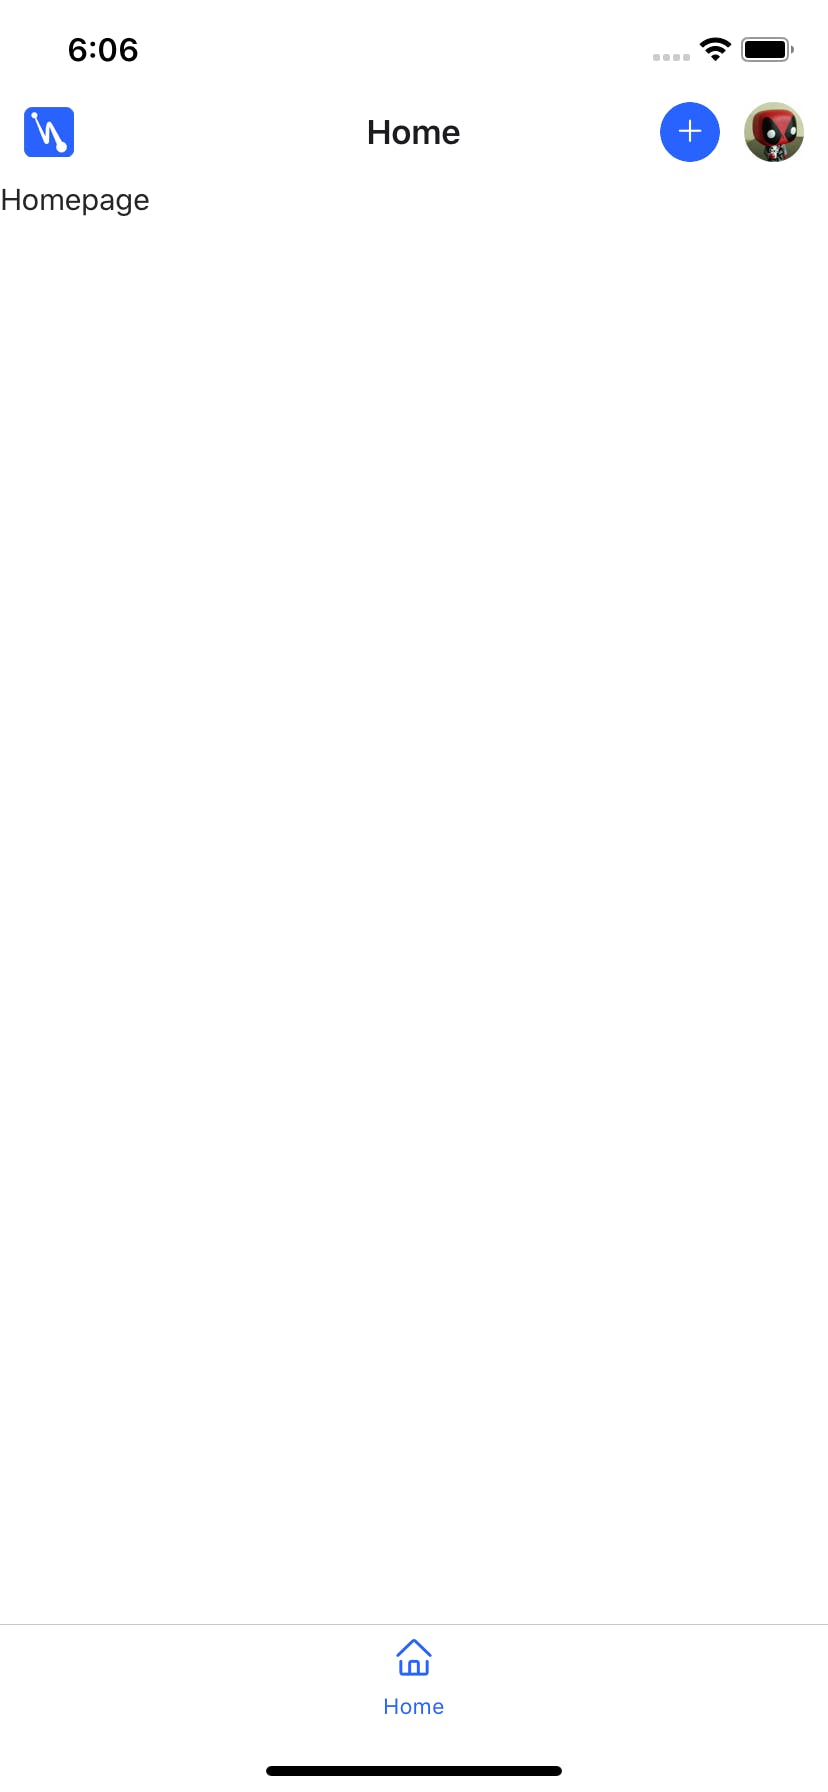
Let's start by customizing the header. To do that, we need pass headerLeft and headerRight to options of stack screen of HomeStackNavigator.
// application/navigators/HomeStackNavigator.js

import React from 'react';
import { Button, Image } from 'react-native-magnus';
import { createStackNavigator } from '@react-navigation/stack';

import HomeScreen from '../screens/HomeScreen';

const Stack = createStackNavigator();

export default () => {
  return (
    <Stack.Navigator
      screenOptions={{
        headerStyle: {
          elevation: 0,
          shadowOpacity: 0,
          borderBottomWidth: 0,
        },
      }}>
      <Stack.Screen
        name="Home"
        component={HomeScreen}
        options={{
          title: 'Home',
          headerLeft: () => (
            <Image
              ml="lg"
              h={25}
              w={25}
              source={require('../images/logo.png')}
            />
          ),
          headerRight: () => (
            <Div row alignItems="center">
              <Button
                row
                h={30}
                w={30}
                rounded="circle"
                bg="primary"
                p="sm"
                alignSelf="center">
                <Icon name="plus" color="white" />
              </Button>
              <Button
                bg="transparent"
                ml="lg"
                mr="lg"
                p="none"
                alignSelf="center">
                <Image
                  h={30}
                  w={30}
                  rounded="circle"
                  source={{
                    uri:
                      'https://hashnode.imgix.net/res/hashnode/image/upload/v1574853913314/L53Qr3_ma.png?w=90&h=90&fit=crop&crop=faces&auto=format&q=60',
                  }}
                />
              </Button>
            </Div>
          ),
        }}
      />
    </Stack.Navigator>
  );
};
Notice how to we provide height, width and spacing with special props (h, wm ml & mr ). These all comes from magnus. This become quite handy as we don't need to actually stylesheet to style them. Just pass the prop and that's it.
- For spacing, see magnus-ui.com/docs/spacing
- For colors, see magnus-ui.com/docs/colors-system
- For font sizes, see magnus-ui.com/docs/typography
- For border radius, see magnus-ui.com/docs/border-radius
- For icons, see magnus-ui.com/docs/icons
The above code will make it look like
Now let's make the horizontal category list for navigation. You won't actually hook into navigation for these items. We will just simple style it for the sake of the scope of this tutorial.
// /application/screens/HomeScreen.js

import React from 'react';
import { SafeAreaView } from 'react-native';
import { ScrollDiv } from 'react-native-magnus';

import CategoryList from '../components/categories/CategoryList';

export default function HomeScreen() {
  return (
    <SafeAreaView>
      <ScrollDiv>
        <CategoryList />
      </ScrollDiv>
    </SafeAreaView>
  );
}
// application/components/categories/CategoryList.js

import React from 'react';
import { FlatList } from 'react-native';
import { Text, Div, Button } from 'react-native-magnus';

const categories = ['WhoIsHiring', 'ShowHashnode', 'DevRant', 'DevRant', 'TIL'];

const CategoryList = () => {
  return (
    <Div mx="lg" mt="lg" borderWidth={1} borderColor="gray200" rounded="md">
      <FlatList
        showsHorizontalScrollIndicator={false}
        data={categories}
        renderItem={({ item }) => (
          <Button mx="md" py="sm" color="gray700" bg="transparent">
            <Text>#{item}</Text>
          </Button>
        )}
        horizontal
        ListHeaderComponent={
          <Text mx="lg" py="sm" color="black" fontWeight="500">
            My Feed
          </Text>
        }
      />
    </Div>
  );
};

export default CategoryList;
You might be thinking from where these values are coming that we are passing for colors, margins ( like gray700, gray300, md, lg, etc ). Well, that are being provided by Magnus. Magnus comes with set predifined utilities values.
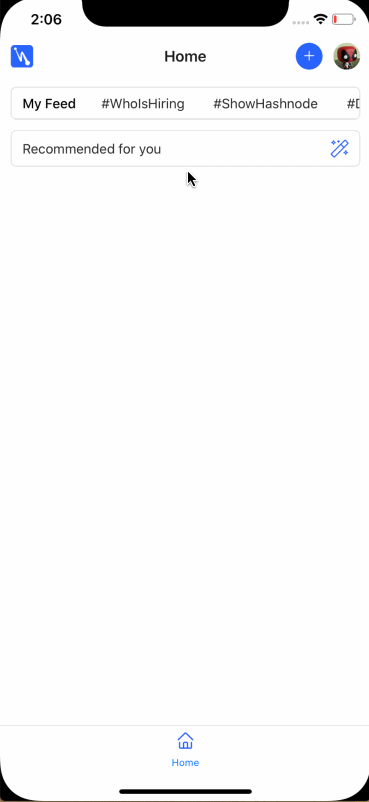
Okay when you are done with above code, the outout should look like this -
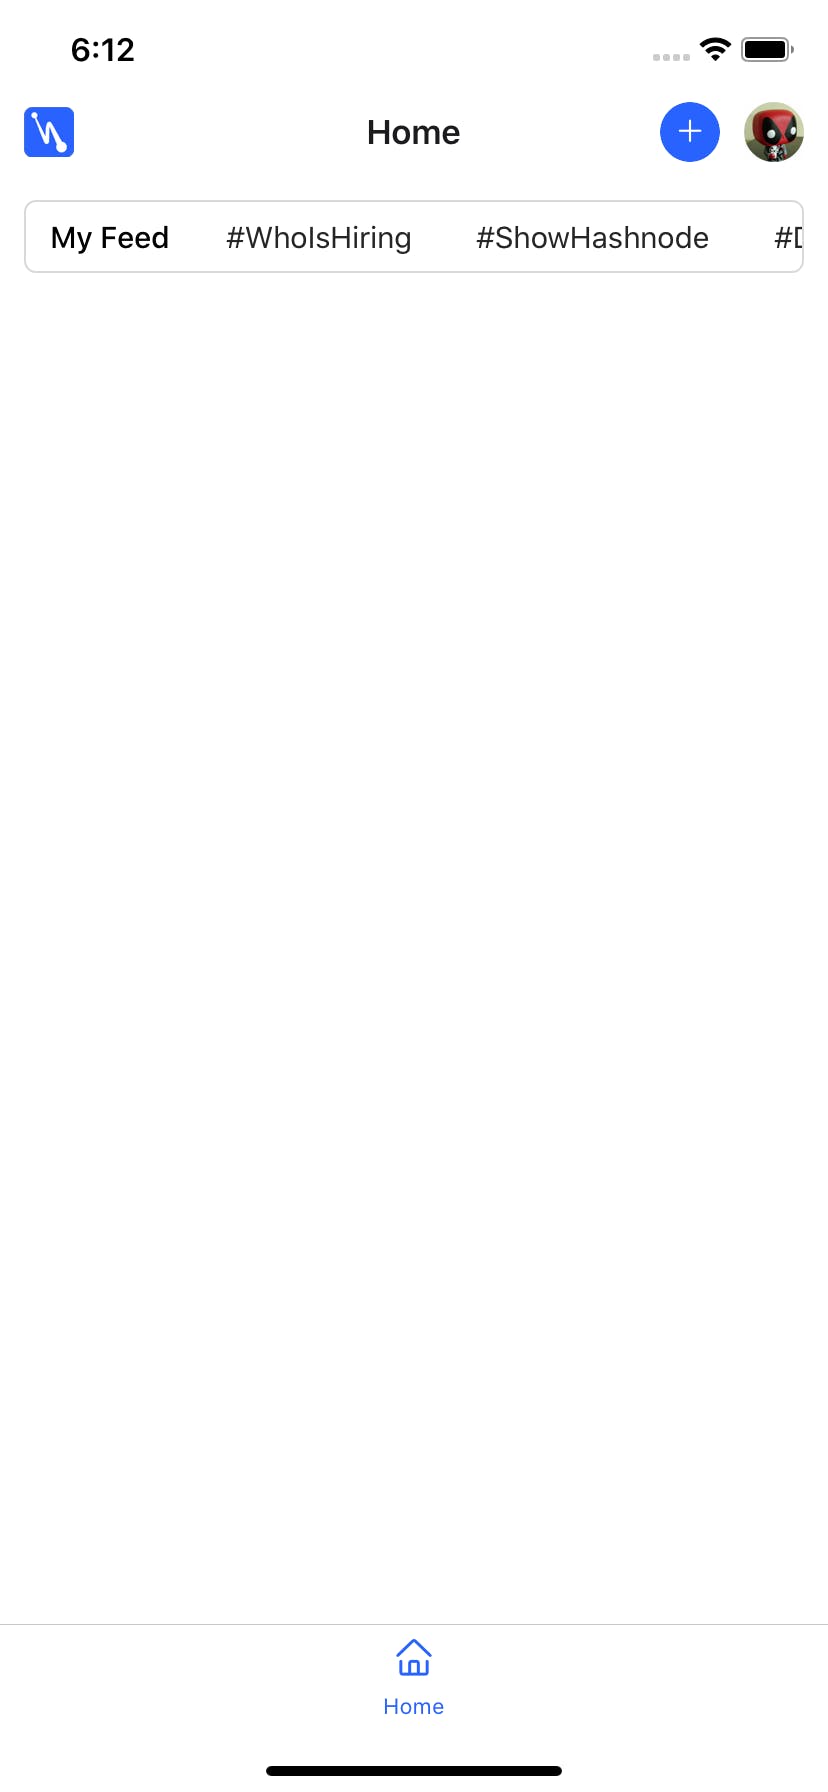
Quite simple right?
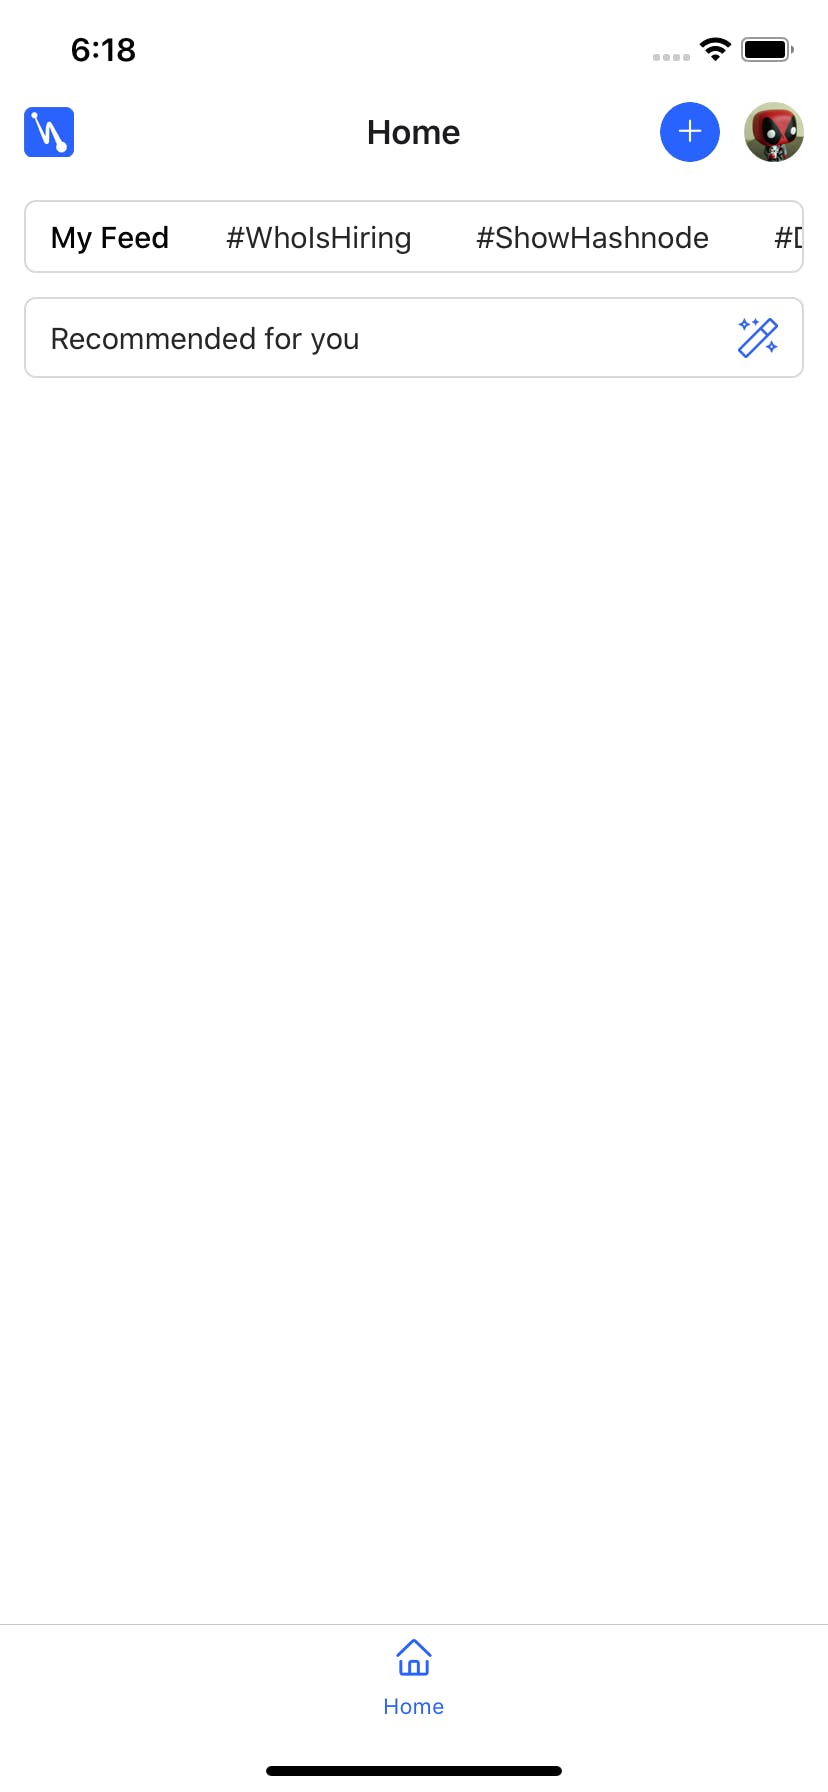
Now let's create the section which let's user to change algorithm of post's feed.
import React from 'react';
import { SafeAreaView } from 'react-native';
import { ScrollDiv } from 'react-native-magnus';

import CategoryList from '../components/categories/CategoryList';
import PostFilter from '../components/posts/PostFilter';

export default function HomeScreen() {
  return (
    <SafeAreaView>
      <ScrollDiv>
        <CategoryList />
        <PostFilter />
      </ScrollDiv>
    </SafeAreaView>
  );
}
// /application/components/posts/PostFilter
import React from 'react';
import { Button, Text, Image } from 'react-native-magnus';

const PostFilter = () => {
  return (
    <>
      <Button
        mx="lg"
        px="lg"
        mt="lg"
        block
        bg="transparent"
        borderWidth={1}
        borderColor="gray200"
        justifyContent="flex-start"
        underlayColor="gray100">
        <Text flex={1}>Recommended for you</Text>
        <Image h={20} w={20} source={require('../../images/recommended.png')} />
      </Button>
    </>
  );
};

export default PostFilter;
This will make it look like -
Now let's do the awesome part. If you used have Hashnode, It might know they allows us to change algorithm of feeds by clicking a button that opens a popup at the bottom of the screen. We can do something like that with Magnus. There is a component called Dropdown that will help us to achive the same functionality.
So, basically we will add a Dropdown. Once the user click the button, we will open this dropdown and that's it. ( Remember we are just doing the UI part in this tutorial. )
// /application/components/posts/PostFilter.js

import React from 'react';
import { Button, Text, Image, Dropdown, Div } from 'react-native-magnus';

const dropdownRef = React.createRef();

const PostFilter = () => {
  return (
    <>
      <Button
        mx="lg"
        px="lg"
        mt="lg"
        block
        bg="transparent"
        borderWidth={1}
        borderColor="gray200"
        justifyContent="flex-start"
        underlayColor="gray100"
        onPress={() => dropdownRef.current.open()}>
        <Text flex={1}>Recommended for you</Text>
        <Image h={20} w={20} source={require('../../images/recommended.png')} />
      </Button>

      <Dropdown.Container
        ref={dropdownRef}
        title={
          <Div alignItems="center" mt="lg" mb="xl">
            <Image
              h={50}
              w={50}
              source={require('../../images/recommended.png')}
            />
            <Text mt="lg" fontWeight="bold">
              My feed shows you recommended posts first
            </Text>
          </Div>
        }
        mt="md"
        showScrollIndicator={true}
        message="This is the long message used to set some context"
        roundedTop="xl">
        <Dropdown.Option
          bg="gray100"
          rounded="lg"
          mx="lg"
          py="md"
          px="xl"
          color="gray900"
          alignItems="center"
          block>
          <Image source={require('../../images/recent.png')} h={20} w={20} />
          <Text ml="lg">See recent posts instead</Text>
        </Dropdown.Option>
      </Dropdown.Container>
    </>
  );
};

export default PostFilter;
That's it. Our popup is all ready. Check it in action.
Now it's time to create the feed list. First let add some dummy content.
import React from 'react';
import { SafeAreaView } from 'react-native';
import { ScrollDiv } from 'react-native-magnus';

import CategoryList from '../components/categories/CategoryList';
import PostFilter from '../components/posts/PostFilter';
import PostList from '../components/posts/PostList';

export default function HomeScreen() {
  return (
    <SafeAreaView>
      <ScrollDiv>
        <CategoryList />
        <PostFilter />
        <PostList />
      </ScrollDiv>
    </SafeAreaView>
  );
}
// /application/components/posts/PostList.js

const posts = [
  {
    title:
      'How Our MongoDB Data Was Kidnapped and How You Can Protect Your MongoDB from Data Kidnappers',
    excerpt:
      'A few months ago I worked on a project and the application data got kidnapped 2 months after our team deployed the application. You might be wondering what Data Kidnapping means. Well, Data Kidnapping is the process of gaining unauthorised access to ...',
    thumbnail:
      'https://hashnode.imgix.net/res/hashnode/image/upload/v1584051194938/qoNmBX_qb.png?w=600&fit=crop&crop=entropy&auto=format&q=60',
    tag: '#programming',
    user: {
      name: "Otse Obande's blog",
      thumbnail:
        'https://hashnode.imgix.net/res/hashnode/image/upload/v1581335712475/qJkYBP7_B.png?w=200&h=200&fit=crop&crop=faces&auto=format&q=60',
    },
    likesCount: 10,
    comments: [
      {
        comment: 'Comment 1',
        user: {
          name: "Otse Obande's blog",
          thumbnail:
            'https://hashnode.imgix.net/res/hashnode/image/upload/v1581335712475/qJkYBP7_B.png?w=200&h=200&fit=crop&crop=faces&auto=format&q=60',
        },
      },
      {
        comment: 'Comment 2',
        user: {
          name: "Otse Obande's blog",
          thumbnail:
            'https://hashnode.imgix.net/res/hashnode/image/upload/v1582826163162/_rBcUZ9Z1.jpeg?w=50&h=50&fit=crop&crop=faces&auto=format&q=60',
        },
      },
      {
        comment: 'Comment 3',
        user: {
          name: "Otse Obande's blog",
          thumbnail:
            'https://hashnode.imgix.net/res/hashnode/image/upload/v1583971522163/DBhisGLTq.jpeg?w=50&h=50&fit=crop&crop=faces&auto=format&q=60',
        },
      },
    ],
  },
  {
    title: 'Creating a Blog or Docs using Web Components',
    excerpt:
      "Markdown is my jam. I'm always looking for ways to integrate it into my workflows to make authoring content easier for myself (and ideally others). When I started using Web Components, I used them with other SSG (static-site generator) solutions like...",
    thumbnail:
      'https://hashnode.imgix.net/res/hashnode/image/upload/v1584134090854/giaZO-cst.png?w=600&fit=crop&crop=entropy&auto=format&q=60',
    tag: '#javascript',
    user: {
      name: 'Ryosuke',
      thumbnail:
        'https://hashnode.imgix.net/res/hashnode/image/upload/v1582826163162/_rBcUZ9Z1.jpeg?w=50&h=50&fit=crop&crop=faces&auto=format&q=60',
    },
    comments: [],
  },
  {
    title: 'First Steps in React',
    excerpt:
      "Markdown is my jam. I'm always looking for ways to integrate it into my workflows to make authoring content easier for myself (and ideally others). When I started using Web Components, I used them with other SSG (static-site generator) solutions like...",

    thumbnail:
      'https://hashnode.imgix.net/res/hashnode/image/upload/v1584092616655/w4zgIhJlV.png?w=600&fit=crop&crop=entropy&auto=format&q=60',
    tag: '#javascript',
    user: {
      name: 'Kolosek',
      thumbnail:
        'https://hashnode.imgix.net/res/hashnode/image/upload/v1581687417734/FM-uImO90.jpeg?w=200&h=200&fit=crop&crop=faces&auto=format&q=60',
    },
    comments: [],
  },
];
We will now use FlatList and use this posts array as data.
// /application/components/posts/PostList.js

import React from 'react';
import { FlatList } from 'react-native';

import {
  Text,
  Div,
  Avatar,
  Button,
  Image,
  Icon,
  AvatarGroup,
} from 'react-native-magnus';

const posts = [...];

const PostList = () => {
  return (
    <FlatList
      data={posts}
      renderItem={({ item, index }) => (
        <Div
          mx="lg"
          mt="lg"
          mb={index === posts.length - 1 ? 'lg' : 'none'}
          borderWidth={1}
          borderColor="gray200"
          rounded="md">
          <Div borderBottomWidth={1} borderBottomColor="gray200">
            <Text py="md" px="lg" fontWeight="bold" color="gray500">
              {item.tag}
            </Text>
          </Div>
          <Text
            px="lg"
            pt="lg"
            color="black"
            fontWeight="bold"
            fontSize="text600">
            {item.title}
          </Text>
          <Text px="lg" pt="lg" color="gray700">
            {item.excerpt}
          </Text>
          <Div mx="lg">
            <Image
              my="lg"
              rounded="md"
              borderWidth={1}
              borderColor="gray200"
              source={{ uri: item.thumbnail }}
              h={185}
              resizeMode="cover"
              w="100%"
            />
          </Div>
          <Div mx="lg" row alignItems="center">
            <Div flex={1}>
              <Button
                pl="none"
                color="gray900"
                bg="transparent"
                prefix={
                  <Icon
                    fontSize="text700"
                    name="bookmark-o"
                    fontFamily="FontAwesome"
                    mr="lg"
                  />
                }>
                Bookmark
              </Button>
            </Div>

            <Div row alignItems="center">
              <Icon
                color="gray700"
                name="chat-bubble-outline"
                fontFamily="MaterialIcons"
              />
              <Text ml="md">{`${item.comments.length}`}</Text>
            </Div>

            {item.comments.length > 0 && (
              <AvatarGroup ml="md">
                {item.comments.map((comment, index) => (
                  <Avatar
                    key={`comment=${index}`}
                    bg="white"
                    rounded="circle"
                    size={25}
                    source={{ uri: comment.user.thumbnail }}
                  />
                ))}
              </AvatarGroup>
            )}
          </Div>
          <Div row bg="gray100" px="lg" py="lg" mt="sm">
            <Div rounded="circle" row alignItems="center" flex={1}>
              <Avatar
                source={{ uri: item.user.thumbnail }}
                size={25}
                rounded="circle"
                bg="white"
              />
              <Text ml="md">{item.user.name}</Text>
            </Div>

            {item.likesCount && (
              <Div row alignItems="center">
                <Text ml="md">{`${item.likesCount} likes`}</Text>
              </Div>
            )}

            <Div row alignItems="center">
              <Button
                rounded="circle"
                bg="transparent"
                alignSelf="center"
                underlayColor="gray200"
                ml="lg">
                <Icon name="dots-three-horizontal" fontFamily="Entypo" />
              </Button>
            </Div>
          </Div>
        </Div>
      )}
    />
  );
};

export default PostList;

Final code - https://github.com/jsartisan/react-native-hashnode
If you find any typo or if there is any that does not make sense in the post, let me know in the comments.
Happy Coding! 😀