
Post hidden from Hashnode
Posts can be hidden from Hashnode network for various reasons. Contact the moderators for more details.
Deploy an Eleventy Blog on Cloudflare pages with Strapi, MySQL, and Dokku on a Digital Ocean Droplet, part 1


Table of Contents
- Deploy an Eleventy Blog on Cloudflare pages with Strapi, MySQL, and Dokku on a Digital Ocean Droplet, part 1
- Getting a Domain Name from Namesilo.com
- Creating SSH Keys and adding them to your Digital Ocean Account
- Creating a new Digital Ocean Dokku droplet to hold our apps and MySQL database
- Getting free fast static site hosting and DNS management from Cloudflare Pages and adding new A records
- Setting our nameservers to Cloudflare's within Namesilo Domain Manager
- SSH into the Dokku droplet from Windows 10
- Hardening the Ubuntu Dokku Droplet Part 1: Creating a new user in the sudo group
- Hardening the Ubuntu Dokku Droplet Part 2: Harden OpenSSH on Ubuntu and disable root
- Changing your Host to a Static IP and Implementing an IP address Allowlist Part 1
- Changing your Host to a Static IP and Implementing an IP address Allowlist Part 2
- Connecting the dots...getting a blog pushed onto Cloudflare pages, querying our MySQL database on the DO Dokku droplet via a GraphQL playground in Strapi (hosted also on our DO Dokku droplet).
Deploy an Eleventy Blog on Cloudflare pages with Strapi, MySQL, and Dokku on a Digital Ocean Droplet, part 1
For my first article, I'll review all the steps required to setting up a new digital ocean Dokku Ubuntu droplet and hardening it. Throughout this process you will be picking up a few DevOps and Front-end skills to add to your toolset. By the end, you'll have your very own secured remote Dokku server to host your static site, apps, and database. Next time I'll cover installing Dokku mysql and a Strapi CMS on our new Dokku server.
Getting a Domain Name from Namesilo.com
- For the first step, you'll be deciding if you want a domain name. It doesn't really matter who you choose to go with, I personally go with Namesilo because they're cheap, easy, and they don't have "daddy" in the name. 😏
For the purposes of this tutorial, I'll walk you through creating a new domain name with namesilo.com, though do note that Cloudflare also sells domain names if you want to do it all through them.
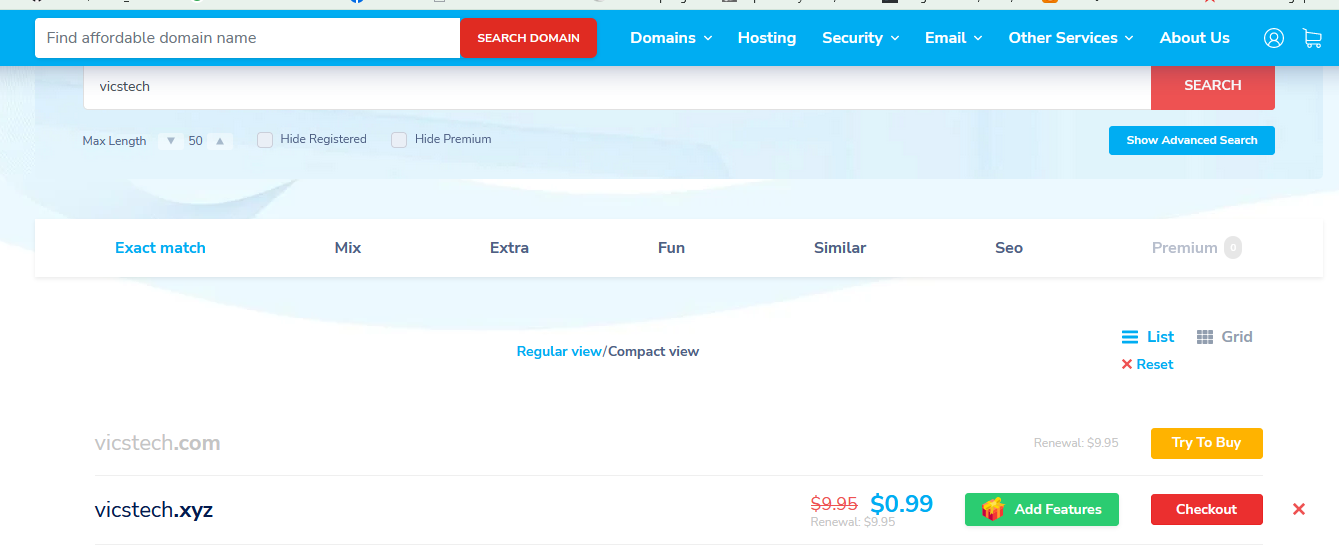
After creating an account at namesilo.com, search a new domain name to create. For this tutorial, I'll be using vicstech.xyz (since it's only 99 cents). Press the Add button, then "Checkout".
After purchasing, leave "Service link" as "None (default)". We'll be configuring our DNS nameservers we get from Cloudflare pages in a bit, so leave that blank for now, so go ahead and click "Skip this step".
Click domain manager, then the little 🌎 icon next to our new domain name to get to DNS management.

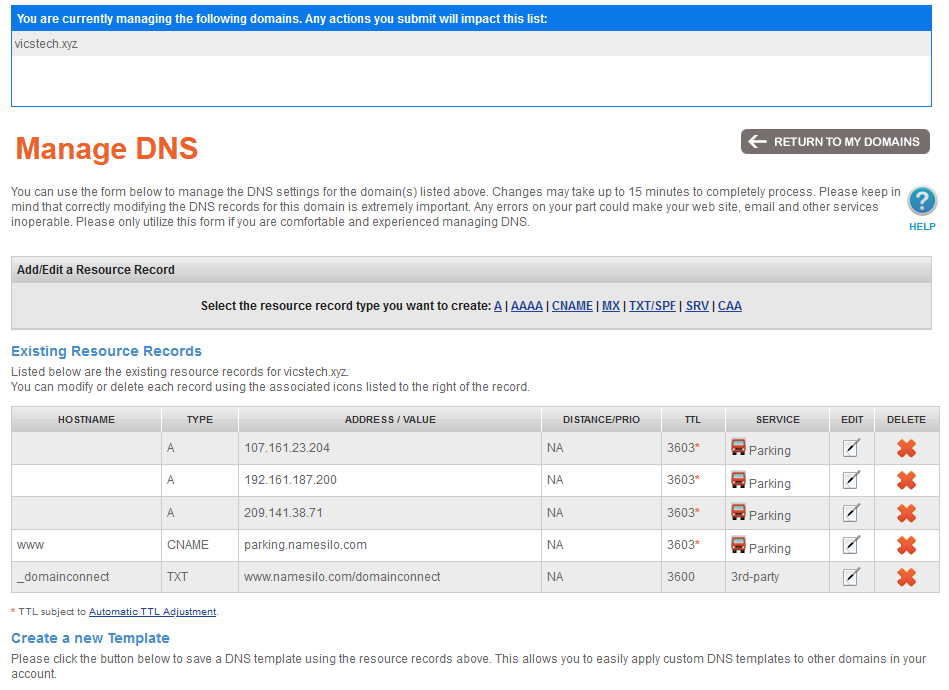
- Cool, now I have a new domain name, vicstech.xyz. By default, it creates a few A records and CNAME records for default hostname mapping settings. As we will be configuring our DNS through Cloudflare pages, feel free to leave them or delete them. Leave this tab open however, we'll be coming back to it in later.
Next, we'll be creating an SSH key pair to securely login to our new SSH Dokku droplet once it's up.
Creating SSH Keys and adding them to your Digital Ocean Account
I'll walk you through the process of creating the SSH keys on Windows that we'll need for our Dokku container later. Note the process is similar on Linux, full directions for DO are here.
If you could kindly sign up through my Digital Ocean Referral, you'll get a free $100 to start which is plenty to play around.
Install Git for Windows, go through with all the default options.
After installing, open a new Git Bash window, and run the following command to generate a 2048-bit RSA key pair, stored in ~/.ssh (which, on Windows 10, is
C:\Users\Vic\.sshfor me):
ssh-keygen
- After signing up and creating a new account on Digital Ocean, we'll upload the contents of
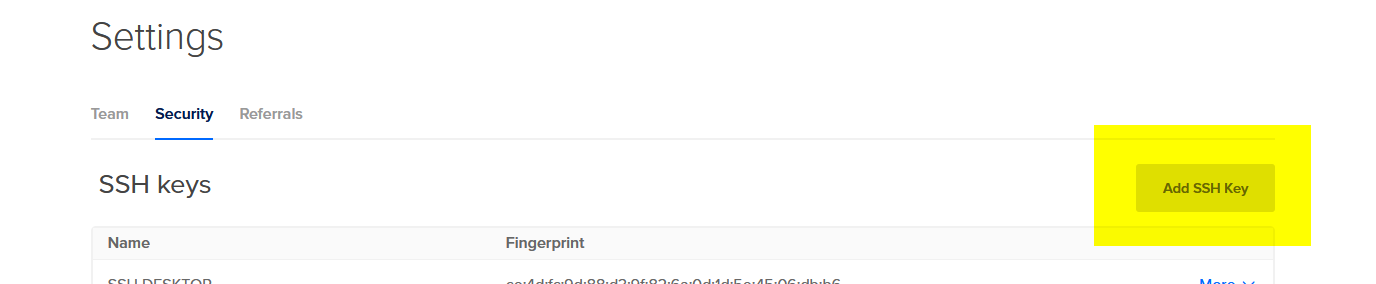
id_rsa.pubto Digital Ocean. Login to your control panel and click "Settings" on the side.
Click "Security" tab and then "Add SSH Key" button near the top.
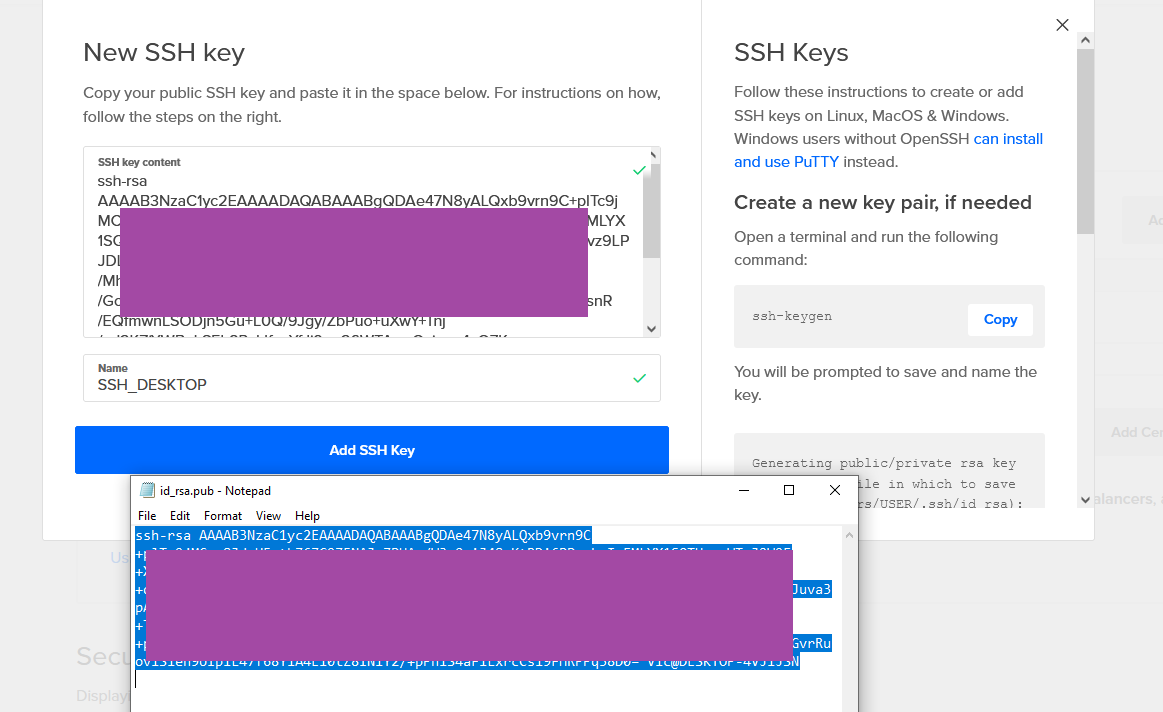
Copy and paste the contents of id_rsa.pub into the "SSH key content" field on the New SSH Key dialog. Name it "SSH_DESKTOP" and click "Add SSH Key". Cool, now we've got an SSH key readily available in DO for any of our new droplets. 😎
Next we'll be creating a new Digital Ocean Dokku droplet and add our generated SSH key for use in our Dokku applications.
Creating a new Digital Ocean Dokku droplet to hold our apps and MySQL database
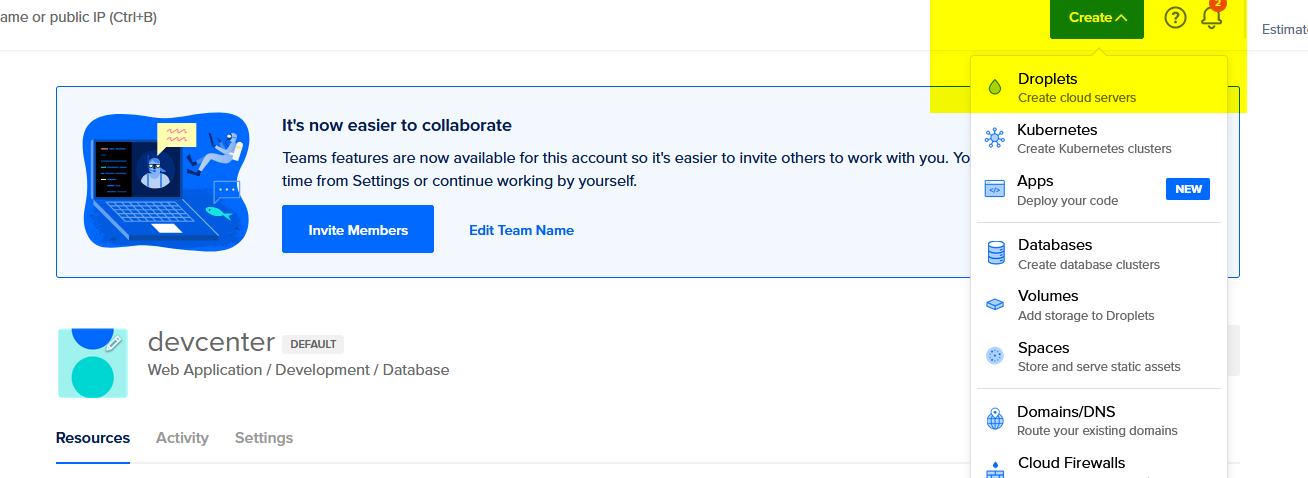
After signing up and creating a new account, let's go ahead and create a new Dokku droplet. After creating a new Project, let's set up a Dokku droplet found here.
Go with whatever defaults you prefer. I chose Regular Intel with SSD plan, 1GB CPU / 25GB SSD ($5/mo plan). I did not add block storage, and I chose San Francisco data center as that is closest to me.

!!! note We are going to need to up this to around 4GB later temporarily, a requirement to get Strapi installed correctly. Luckily, Digital Ocean allows you add and remove CPU/RAM quite easily.
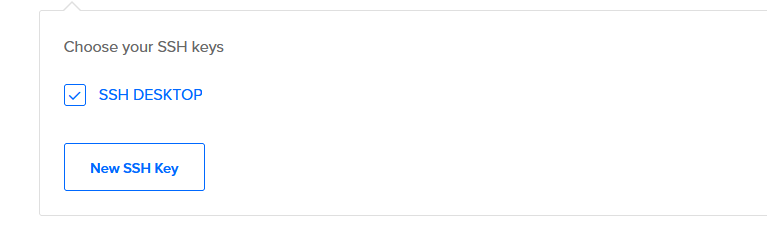
Before finishing up, ensure you tick the checkbox for the SSH Keys you created earlier. Finally, click "Create Droplet" button at the bottom.
After it's created, let's visit the droplet. Click the Droplets tab on the left, then click on the name of the newly created dokku droplet.
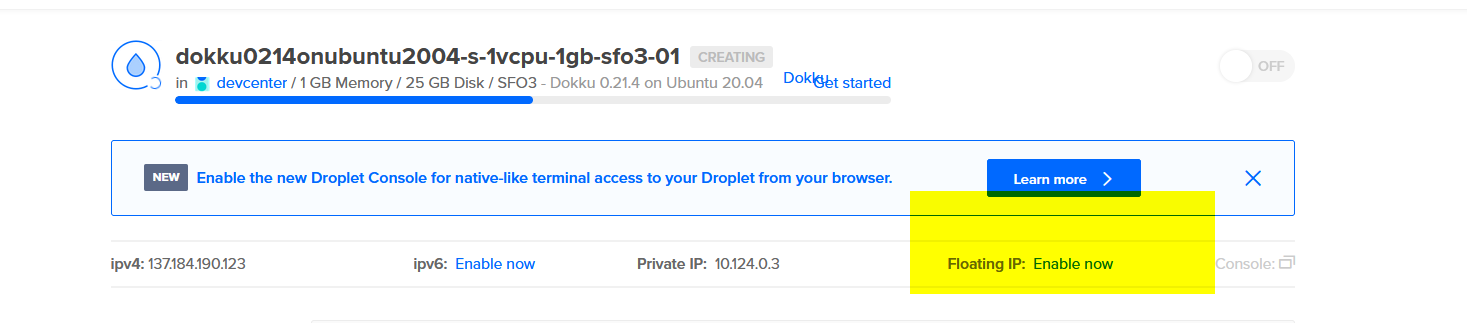
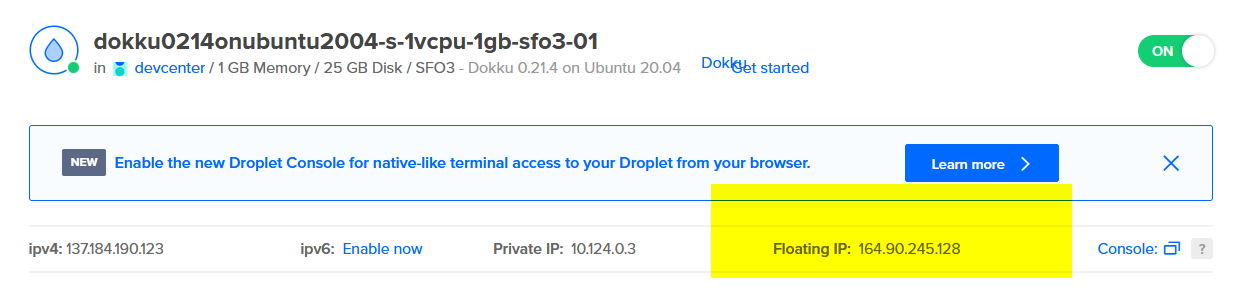
Next, go to the Networking tab of your new droplet and assign a Floating IP. We'll need this to tie to our new domain name later.
It should look like this after assigning a Floating IP:
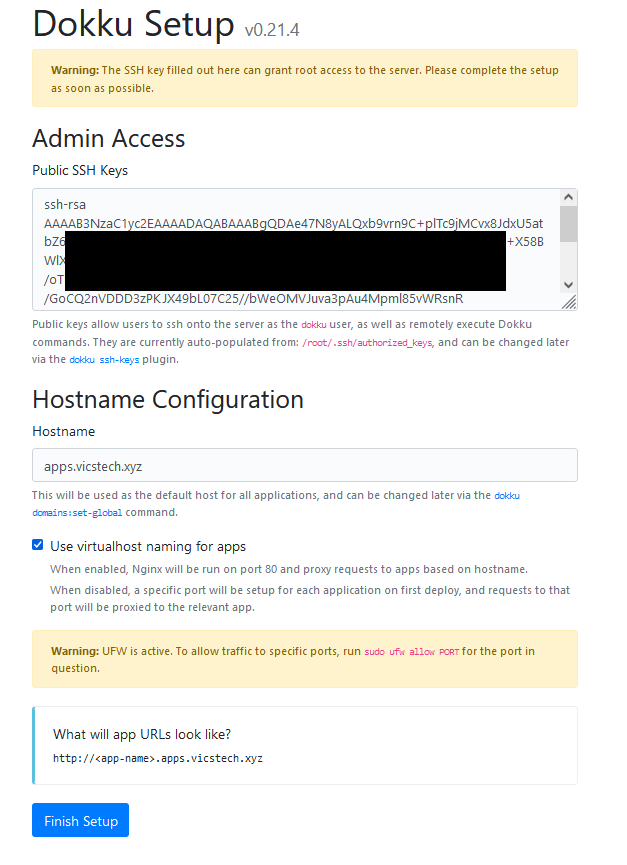
- Visit your new Floating IP in the browser to find the Dokku setup screen.
If you had ticked the SSH Keys box this should be filled, otherwise go ahead and copy and paste from your local id_rsa.pub file (generated by ssh-keygen). For hostname, I chose my subdomain as "apps" following by .vicstech.xyz, the domain I just created with namesilo.
Be sure to check "Use virtualhost naming for apps" as it makes naming conventions easier, and finally click "Finish setup".
Let's review what we've got: A domain name tied to a floating IP (accessible from anywhere), and a Dokku droplet configured with our SSH key for authentication. This will allow us to SSH into the Dokku server as the "dokku" user later on.
Next, we can configure Cloudflare to use our Dokku droplet's newly assigned floating IP address.
Open up a new tab at Cloudflare Pages. We will be setting up a new account to host our static websites and manage our DNS through cloudflare's blazing fast DNS services.
Getting free fast static site hosting and DNS management from Cloudflare Pages and adding new A records
Sign up for a free account at Cloudflare Pages.
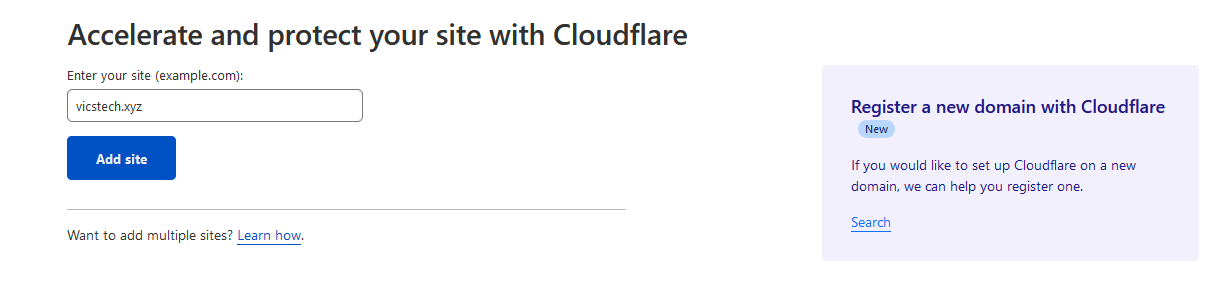
Enter your new site's domain name and click "Add site" button (note you can also register a new domain through Cloudflare directly, if you so choose).
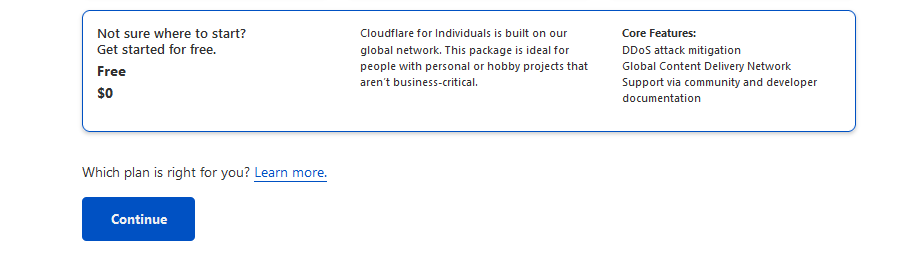
Go ahead and click the Free plan and click the "Continue" button.
As we'll be letting cloudflare manage our DNS, let's set up some DNS records. Click "Add record", for type choose "A", for name the chosen subdomain which is "apps" in my case, for IPv4 put the floating IP from the Dokku droplet. Untick the Cloudflare Proxy, for DNS only mode, as Proxy mode can cause problems when connecting.
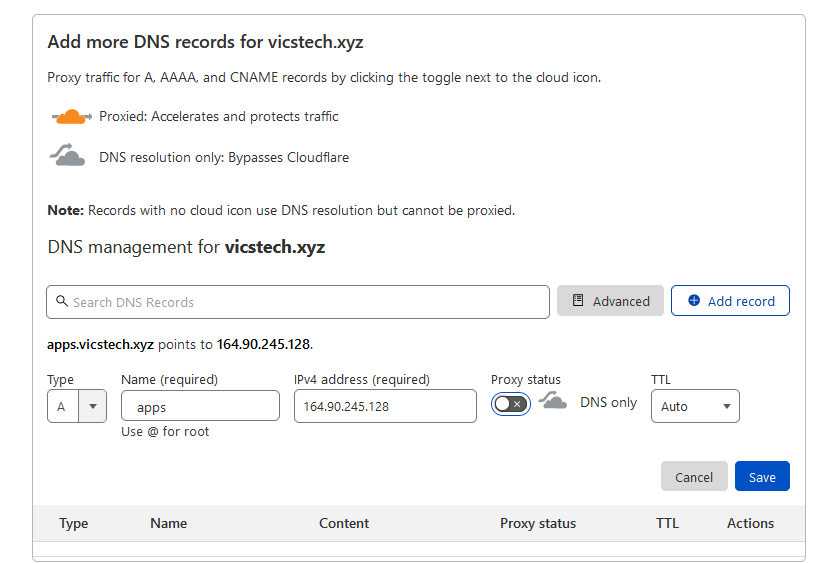
This will be for our main subdomain. This will allow me to SSH into "apps.vicstech.xyz" soon enough.
- Add a "catch-all" rule, using
*.appsas the name, so that anything deployed on the subdomain will be forwarded to the droplet. Be sure to also disable the Cloudflare proxy, then click "Continue" for now.
Before we go too much further, we're going to set the nameservers to our Cloudflare ones within Namesilo Domain manager settings.
Cloudflare should instruct us to do this the first time through:
We'll do exactly that next.
Setting our nameservers to Cloudflare's within Namesilo Domain Manager
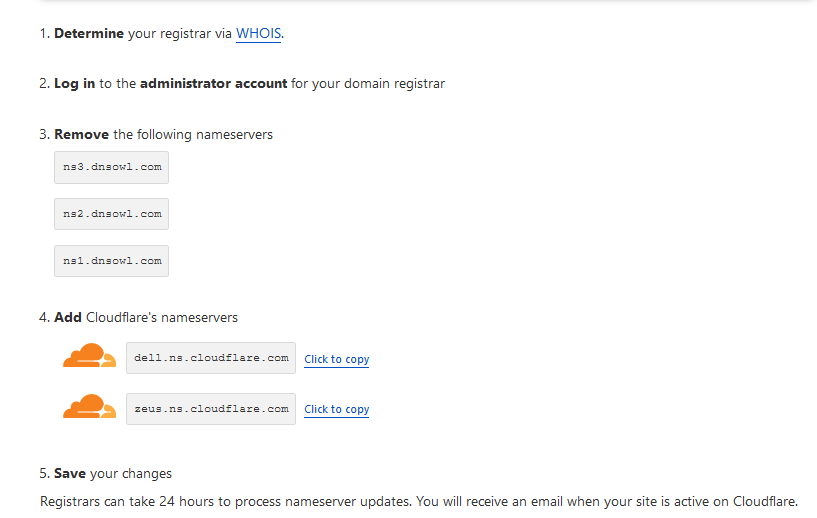
!!! note Now before we forget, let's ensure Cloudflare is actually the one managing our DNS by setting the nameservers in Namesilo domain manager to our Cloudflare DNS nameservers
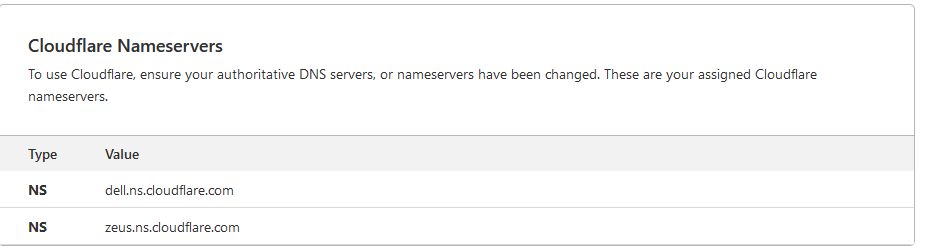
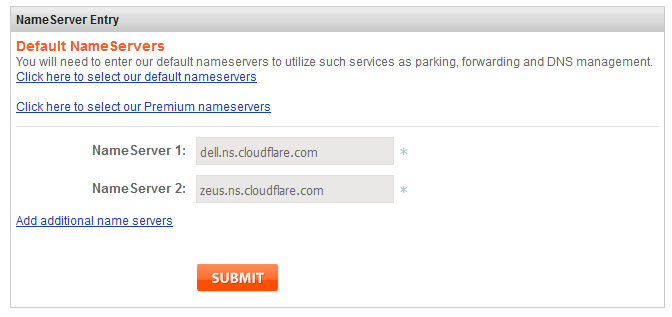
Note the Cloudflare Nameservers: dell.ns.cloudflare.com, and zeus.ns.cloudflare.com.
From Domain Manager in Namesilo, tick the domain to update, and click "Change Nameservers".
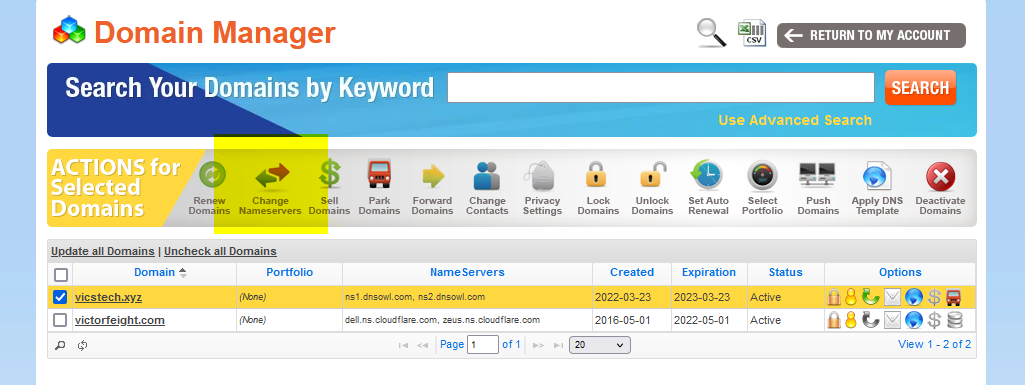
Delete the default nameservers and add Cloudflare's given ones, then click "Submit".
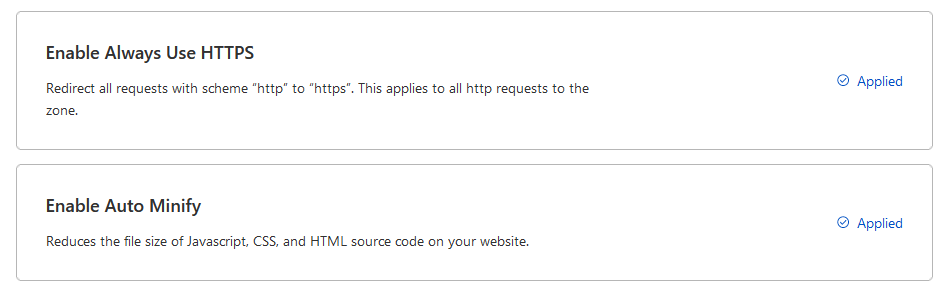
Within Cloudflare, click "Done, check nameservers" and go through some configuration recommendations.
Apply both the options:
After a few minutes, you should get a success message upon reloading:
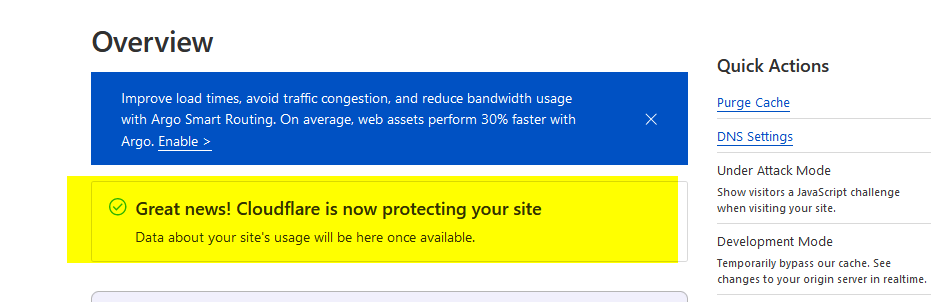
Cool. Now our new vicstech.xyz domain is being managed by Cloudflare. 🧐 Ultimately, we want our static website to be reachable on our main domain, vicstech.xyz, to be able to SSH to our apps subdomain, apps.vicstech.xyz, and all of our serverside applications reachable by further subdomains, such as strapi.apps.vicstech.xyz.
Later on, when we have an actual Eleventy blog to push, we'll add some additional records to our Cloudflare DNS settings, so that vicstech.xyz will redirect to vicstech.xyz and vicstech.xyz will redirect to the url produced by Cloudflare page build.
community.cloudflare.com/t/redirect-www-exa..
Now we can finally SSH into the new Dokku Droplet. Pull up the hacker shades.
SSH into the Dokku droplet from Windows 10
Alright, so we have got our domain name set up and configured behind Cloudflare pages, we have configured Namesilo to use Cloudflare's nameservers, we've added appropriate A records for redirection rules to our subdomain apps, we have enabled HTTPS and Autominify services from Cloudflare, and we have set up a new Dokku droplet (configured with our SSH keys). Feel free to grab some tea, this next part gets pretty Linuxy. 🍵
!!! info I will be prefacing each instruction with either LOCAL or REMOTE meaning "Launch these commands from your LOCAL computer" and "Launch these commands from the REMOTE DOKKU DROPLET", respectively.
- LOCAL: Launch Git bash. First, add our Private SSH Key to our local terminal so we can authenticate and connect to our droplet.
eval `ssh-agent -s` # Start the agent that holds on to our keys
ssh-add '~/path/to/ssh/private.key' # Add our private SSH key
In my case, it looks like this:
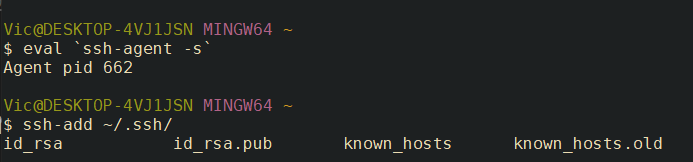

LOCAL: Check the key was added correctly with
ssh-add -l
LOCAL: Finally, let's try to SSH into the Dokku droplet. To enter your new server, type:
ssh root@<subdomain name>ie.ssh root@apps.vicstech.xyz
Hopefully, you'll get output similar to the following:

I'm in. 👨🏻💻
Pretty soon we'll add a Strapi node application to our fresh server, that will be reachable at strapi.vicstech.xyz, containerized and speaking to a MySQL service on the same host. But before that, we've got to do some administration tasks on our new server.
Now, take a quick breather, because next we'll be hardening up our server. Digital Ocean gives us pretty much our own server and with that much power comes great responsibility. 🕷
Hardening the Ubuntu Dokku Droplet Part 1: Creating a new user in the sudo group
!!! tip As a preface, to anybody who's interested in hardening your Linux server, I highly recommend "Unix and Linux Administration Handbook 5th edition" which contains the following advice and more.
!!! note Recall, instructions prefaced with REMOTE are run on my remote Dokku droplet in an SSH terminal.
For further instructions, see here and here.
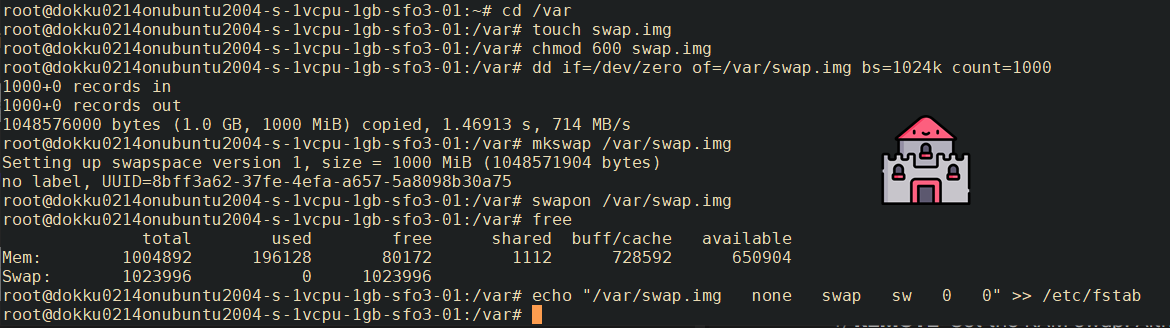
- REMOTE: Set the RAM swap. Although we will be temporarily increasing memory when installing Strapi, using a RAM swap decreases the chances of failure due to low memory when installing NPM packages. For more information, see here.
cd /var
touch swap.img
chmod 600 swap.img
dd if=/dev/zero of=/var/swap.img bs=1024k count=1000
mkswap /var/swap.img
swapon /var/swap.img
free
echo "/var/swap.img    none    swap    sw    0    0" >> /etc/fstab
Here's my output:
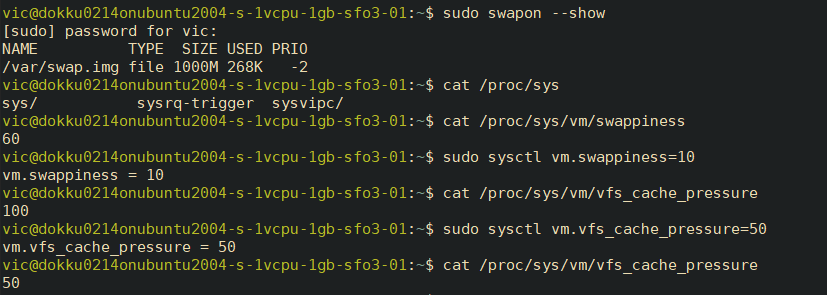
- REMOTE: Let's adjust swappiness values and vfs_cache_pressure. swappiness values close to 100 (the default) attempt to load the SWAP with data to free up RAM. For a server, this is better closer to 0:
sudo sysctl vm.swappiness=10
vfs_cache_pressure is related to inode/filesystem access and should be set conservatively, so inode information is removed from cache less often:
sudo sysctl vm.vfs_cache_pressure=50
Output:
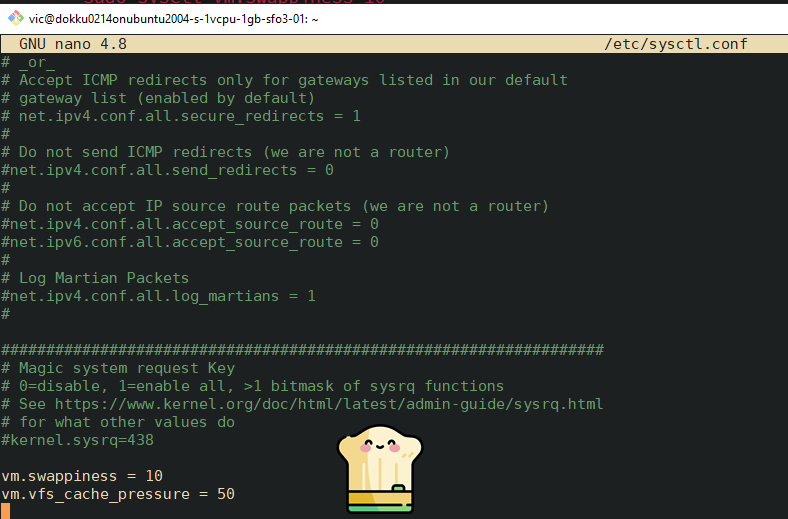
To make these settings persist, sudo nano /etc/sysctl.conf and add the following to the bottom of the file:
vm.swappiness = 10
vm.vfs_cache_pressure = 50
Output:
- Being root user is a huge security problem, as you could wipe your system in a single command if you're not careful. Let's remedy this by creating our own user account and later we'll be turning off root account.
REMOTE: Create a new user as root with adduser <username>
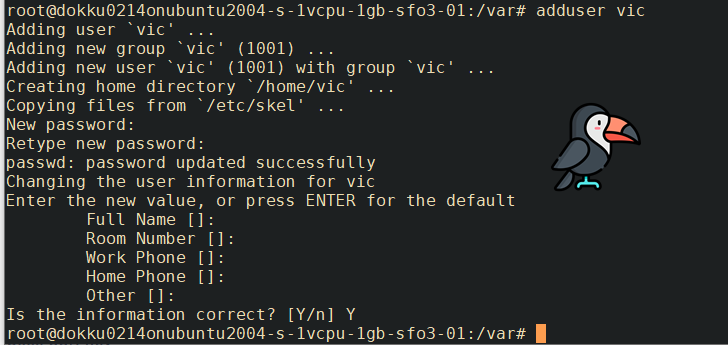
REMOTE: Grant that user administrative privileges with usermod -aG sudo <username>
- REMOTE: Next, we copy Public SSH keys from the
rootuser to our own user. The set of commands is as follows, replacevicwith the user you created:
mkdir -p /home/vic/.ssh # Create ssh directory
chmod 700 /home/vic/.ssh # Apply directory permissions
cp /root/.ssh/authorized_keys /home/vic/.ssh/authorized_keys # Copy the ssh authorized key
chown -R vic:vic /home/vic/.ssh # Apply user and group permissions
chmod 600 /home/vic/.ssh/authorized_keys # Apply file permissions
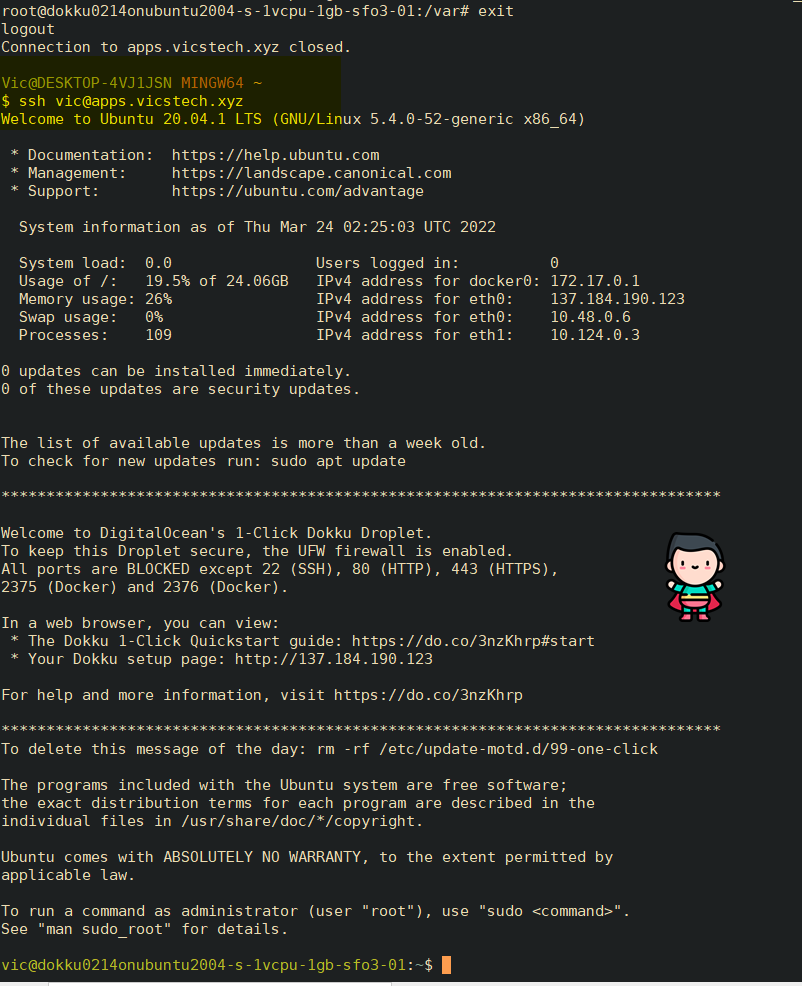
- LOCAL: Reconnect to the droplet as your new user.
exitthe root remote connection, then, on a local Git Bash window, runssh <user>@<subdomain>.vicstech.xyz
- REMOTE: Delete the Docker ports which are opened by default to mitigate security risks.
sudo ufw status

# Delete Docker UFW rules
sudo ufw delete allow 2375/tcp
sudo ufw delete allow 2376/tcp

sudo ufw status
My output:

Nice, we're getting there. 🌷
We've set up a new user account with sudo privileges and added a swap file.
Hardening the Ubuntu Dokku Droplet Part 2: Harden OpenSSH on Ubuntu and disable root
We're almost finished setting up our server. The last things we need to do are harden our security settings for OpenSSH, and install Fail2Ban to prevent unwanted logins.
Information is taken from this guide.
Now that we're logged in as a new user, let's go ahead and harden OpenSSH then install Fail2Ban.
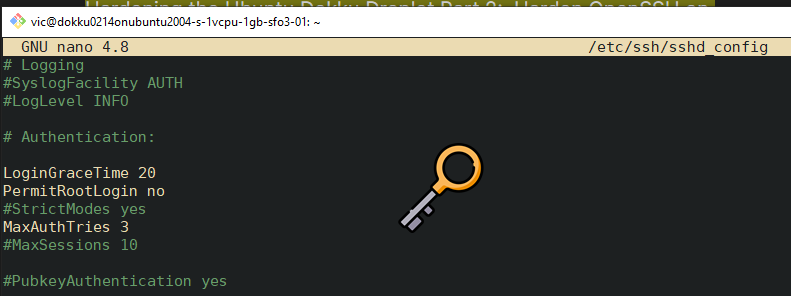
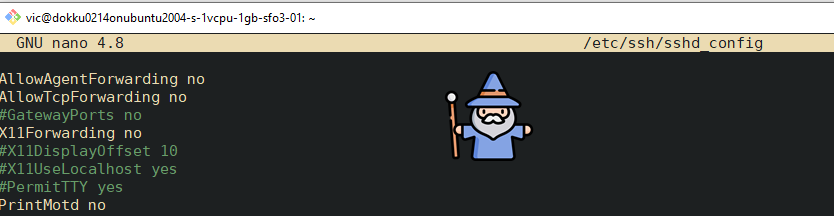
REMOTE: Backup configuration file:
sudo cp /etc/ssh/sshd_config /etc/ssh/sshd_config.bakREMOTE: Edit the SSHD configuration with
sudo nano /etc/ssh/sshd_config
Change the following settings to more secure ones as follows:
PermitRootLogin no
MaxAuthTries 3
LoginGraceTime 20
X11Forwarding no
AllowAgentForwarding no
AllowTcpForwarding no
Output:
REMOTE: Validate the syntax with
sudo sshd -t, which should have no output if everything is correct:
REMOTE: Reload the new settings with
sudo service sshd reloadLOCAL: Now, if we attempt to SSH at root, we get the following output:

Alright, good. Now root can no longer login, which was a big security risk. We'll continue by implementing an IP Address Allowlist.
The basic idea behind this is Deny By Default security, in which all inbound and outbound traffic not expressly permitted by SSHD service is blocked. 🛑
Changing your Host to a Static IP and Implementing an IP address Allowlist Part 1
!!! note The following commands are all local.
Even if by some odd chance your private keys or password gets leaked, if you have implemented an IP address allow list, you can ensure only users on those IP addresses can login. Let's do that now.
!!! tip For the purposes of this guide, I'll be setting up my Ethernet IP as static, though the instructions are similar for a Wi-Fi adapter.
I'll be taking steps from this guide.
Type
ip addressinto the Windows 10 search bar, then click "Ethernet Settings"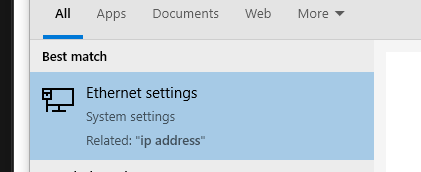
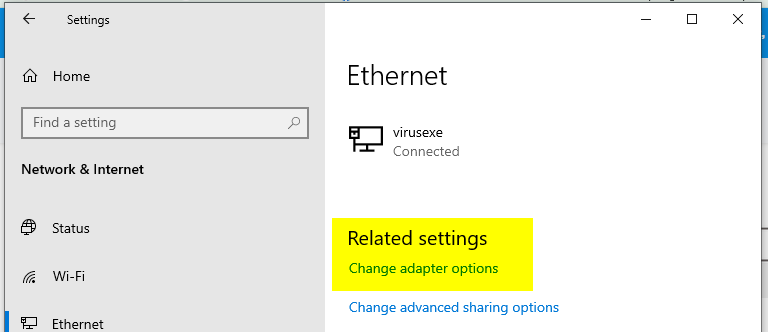
Click "Change Adapter options"
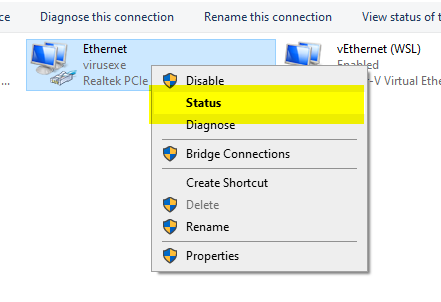
Right click on Ethernet to set up a static IP over Ethernet, or right click on WiFi if your computer is connected via WiFi --> Then click "Status"
Click "Details"

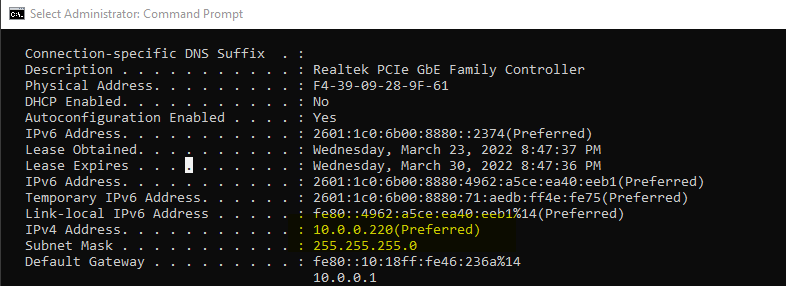
Take note of the following info: IPv4 address, IPv4 subnet mask, IPv4 default gateway, and IPv4 DNS server.
!!! note As my IP is currently Static, it says DHCP is not enabled.

This information can also be found via ip config /all on the Windows CMD prompt:
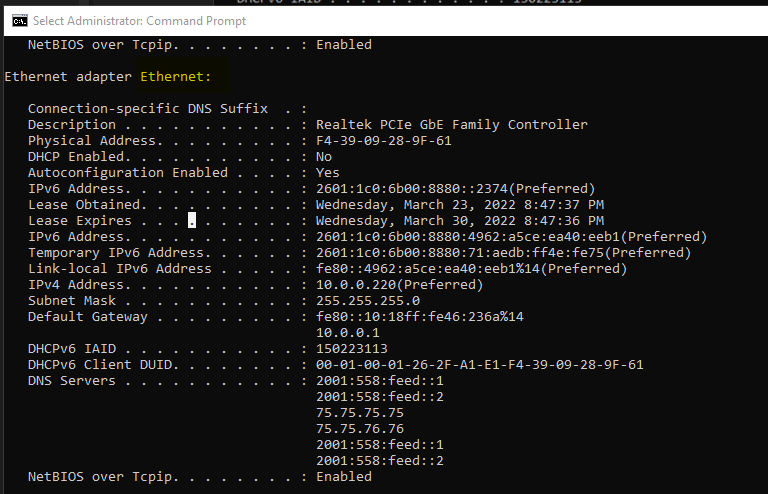
Note: the adapter's name is "Ethernet"
- IPv4 Address: 10.0.0.220 (Preferred)
- IPv4 Subnet Mask: 255.255.255.0
- IPv4 Default Gateway: 10.0.0.1
IPv4 DNS Servers:
- 75.75.75.75
- 75.75.76.76
We can set our static IP address graphically or through the CMD. To set it graphically, follow the rest of this guide.
To set it manually via CMD using netsh command, keep following:
- To set a static IP address to 10.0.0.220 for an adapter named "Ethernet", with subnet mask 255.255.255.0, and Gateway 10.0.0.1:
   IPv4 Address. . . . . . . . . . . : 10.0.0.180(Preferred)
   Subnet Mask . . . . . . . . . . . : 255.255.255.0
   Lease Obtained. . . . . . . . . . : Thursday, February 24, 2022 9:07:06 AM
   Lease Expires . . . . . . . . . . : Saturday, February 26, 2022 9:07:06 AM
   Default Gateway . . . . . . . . . : fe80::10:18ff:fe46:236a%12
   10.0.0.1
   DHCP Server . . . . . . . . . . . : 10.0.0.1

C:\WINDOWS\system32>netsh interface ip set address name="Ethernet" static 10.0.0.220 255.255.255.0 10.0.0.1
Output of ipconfig /all:
Note: If you're using a Wifi Adapter, check the name in ipconfig /all:

Your adapter name would be "Wi-Fi" (case-sensitive).
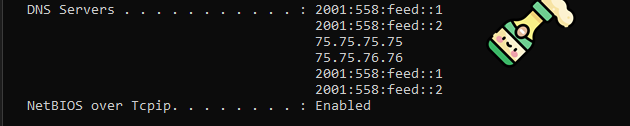
- To set the DNS servers:
Set DNS servers:
C:\WINDOWS\system32>netsh interface ip set dns name="Ethernet" static 75.75.75.75
C:\WINDOWS\system32>netsh interface ip add dns name="Ethernet" 75.75.76.76 index=2
Output of ipconfig /all
Great, that's it. We're static. ⚡ There's a lot of other benefits to setting your static IP such as ease of SSH use and port forwarding, but I won't get into that here.
For our next steps, let's finish configuring OpenSSH on our remote server, then configure Fail2Ban.
Changing your Host to a Static IP and Implementing an IP address Allowlist Part 2
!!! note These instructions are taken from the latter half of this guide.
Now we're going to implement an IP Address Allowlist in both OpenSSH and Fail2Ban.
- LOCAL: If you're not already, log on to the remote server again with
ssh vic@apps.vicstech.xyz - REMOTE: press
wand enter to see your connecting IP:

!!! note My remote Dokku server's connecting IP is 71.59.236.28.
- REMOTE: Edit our OpenSSH server configuration:
sudo nano /etc/ssh/sshd_configand add some configuration directives:
AllowUsers *@71.59.236.28 *@71.59.236.0/27
Here we restrict all users to a specific IP address and a range.
To be a bit more secure, you can remove the range if you want.
- REMOTE: Run
sudo service sshd reload
Congratulations, your SSHD server is hardened. Next, let's install Fail2Ban to prevent any unwanted users from accessing our server.
- REMOTE: Let's update with
sudo apt update
Output:

- REMOTE: Install Fail2Ban on our Dokku server with
sudo apt install fail2ban
Output:

REMOTE: Create a .local Fail2Ban configuration file from the default jail.conf:
sudo cp /etc/fail2ban/jail.{conf,local}REMOTE: Open the jail.conf file with
sudo nano /etc/fail2ban/jail.localand uncomment the line starting with ignoreip, add our local IP address followed by all machines to whitelist (insert your IP from earlier here):
ignoreip = 127.0.0.1/8 ::1 71.59.236.28 71.59.236.0/27
Output from /etc/fail2ban/jail.local

Modify the following additional settings in /etc/fail2ban/jail.local:
For more information on these options and more, see this guide.
!!! note Set 1d to a negative like -99d if you want to permaban them.
bantime  = 1d
maxretry = 4
- REMOTE: Finally, restart Fail2Ban to apply the configurations --
sudo systemctl restart fail2ban
So we've set up a static IP on our host PC, installed Fail2Ban on our remote Dokku server, and whitelisted our host PC's IP on the remote server in both SSHD and Fail2Ban configurations. We've also disabled root login and hardened both configurations against attackers.
It's a lot... but it's necessary in this dog eat dog world. 🤷🏼♂️ Check out your Fail2Ban logs sometime, you might see some surprising brute force and automated attack attempts...
Soon, finally, we will get to the cooler stuff 🥁
Setting up an Eleventy blog with MySQL-hosted posts and a Strapi CMS on our shiny new and secure server. 💻 🕷
Connecting the dots...getting a blog pushed onto Cloudflare pages, querying our MySQL database on the DO Dokku droplet via a GraphQL playground in Strapi (hosted also on our DO Dokku droplet).
I'll save the nitty-gritty, inner-workings of my blog and how I emulate Eleventy's high performance blog example for later. For now, we just want to connect the dots...let's see what we have and what we still need to do:
- Install MySQL plugin for Dokku
- Install Strapi CMS onto Dokku
- Allow Strapi CMS to talk to our MySQL instance.
- Query from our MySQL instance using GraphQL query playground (built-in to Strapi).
- Pull queries into Blog markdown files and present them with Nunjucks templating language (and some JS) in Eleventy.