


Introduction
In this blog, we will discuss how to use Node.js to enable us to create console-based applications with the help of Inquirer.js, a third-party package library.
Node.js has also a built-in module (readline) which provides functionality to accept user-input in the console, but the main difference is that Inquirer.js gives you more flexibility to provide appropriate questions such as:
Instead of asking a user to type about their favorite programming languages repeatedly, you can use a checkbox which we will tackle later.
Instead of asking a user to type their password and letting it be displayed on the screen, you can use a password prompt type to mask the input and give that kind of
passwordfunctionality.
As you can see, by having that kind of features and functionalities, we can also build a console-based app and many more.
Without further due, let's get started!
Prerequisites ❗
👉🏻 Basic Knowledge of Plain JavaScript and Node.js.
👉🏻 Basic knowledge of NPM.
👉🏻 Installed Node.js in your local machine.
👉🏻 Inquirer.js package.
What you will learn 😍
- Built-in prompt() function from Inquirer.js.
- Basic Prompt or Question Types.
What is Inquirer.js? 💻
👉🏻 Inquirer.js is a third-party package that enables us to do console applications.
First Step 1️⃣
Make sure you have installed Node.js on your personal computer.
Second Step (Initialize a package.json) 2️⃣
Open your terminal and initialize a package.json file in your project by running this npm command:
npm init

or

npm init -y
Third Step (Installing the Inquirer.js) 3️⃣
npm install inquirer
Fourth Step (Setting it up) 4️⃣
import the package on your file using CommonJS module
const inquirer = require('inquirer');
Here's the basic structure of setting up the inquirer:
inquirer.prompt(questions).then(answers => {});
prompt()function needs an Array of Questions and it returns a promise since it is an asynchronous function.questionsis an array containing all of the question objects.answeris an object containing all of the answers for every prompt/question.
Example:
So here's the basic structure of the questions array.
const questions = [
    {
        type: typeOfPrompt,
        name: nameOfPrompt,
        message: textToBePrompted
    },
]
As you can see in the object, we need to provide the first 3 basic properties:
type property
- It is the type of prompt or question to be displayed on the console.
name property
- Since the
answeris an object, it is the key for every question that is going to be stored in theanswerobject.
message property
- It is the message to be displayed on the screen.
Question Types ✔
I will only tackle the basic or core question types in Inquirer.js, so that it can help you to get started with it.
type
input1️⃣
Use this type if you want to accept texts as data.
The value of the answer in this type of prompt is a
string.
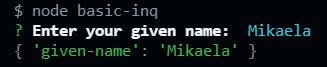
Basic Structure
const questions = [
    {
        type: 'input',
        name: 'given-name',
        message: 'Enter your given name: '
    },
]

// inquirer
inquirer.prompt(questions)
    .then(answers => {
      console.log(answers);
    })
Here's the output of it:
type
password2️⃣
In some cases, you want to accept a password from the user, and you don't want to display it while the user providing it on the console. This prompt provides that kind of functionalities.
The value of the answer in this type of prompt is a
string.
Let's add it to our questions array:
const questions = [
    {
        type: 'input',
        name: 'given-name',
        message: 'Enter your given name: '
    },
    {
        type: 'password',
        name: 'password',
        message: 'Enter your password: ',
        mask: true
    }
]

// inquirer
inquirer.prompt(questions)
    .then(answers => {
      console.log(answers);
    })
NOTE: the
maskproperty is needed to actually hide the input.
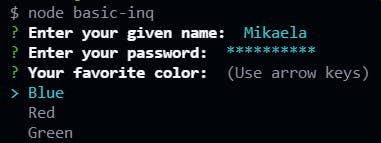
Here's the output of it:

type
listandrawlist
list and rawlist help you to create questions with choices. An example of that is if you want to create a console-based quiz app, and that two is a great fit for that.
NOTE: Don't be tricked by the value of
listandrawliston theanswersobject. Since these two only accept one input, the value of it in theanswersobject is still in astringtype.
Here's the example of the list and rawlist type:
const questions = [
{
type: 'input',
name: 'given-name',
message: 'Enter your given name: '
},
{
type: 'password',
name: 'password',
message: 'Enter your password: ',
mask: true
},
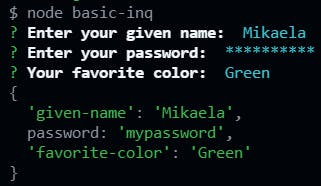
{
type: 'list', // or type: 'rawlist'
name: 'favorite-color',
message: 'Your favorite color: ',
choices: ['Blue', 'Red', 'Green']
},
]
Both types are needed to have a choices property with an array type for the items that are going to be displayed on the screen.
Here's the list type
Here's the rawlist type
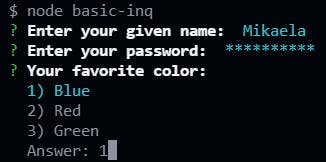
As you can see the difference between the two is that the
rawlisttype is numbered and it can also accept an input from the range of the choices such as 1, 2, or 3.
Here's the output:
type
checkbox
Let's say you want the user to select their favorite programming languages, and our previous question types are not capable to give that to us because they only accept single input.
NOTE: The checkbox accepts multiple inputs. The value of it in the
answersobject is anarraytype.
Here's the example of using checkbox prompt:
const questions = [
    {
        type: 'input',
        name: 'given-name',
        message: 'Enter your given name: '
    },
    {
        type: 'password',
        name: 'password',
        message: 'Enter your password: ',
        mask: true
    },
    {
        type: 'rawlist',
        name: 'favorite-color',
        message: 'Your favorite color: ',
        choices: ['Blue', 'Red', 'Green']
    },
    {
        type: 'checkbox',
        name: 'fave-prog-language',
        message: 'Favorite Programming Languages: ',
        choices: ['Python', 'Java', 'JavaScript']
    },
]
Same to other list types, the checkbox also needs to have a
choicesproperty.
Here's the output of it:
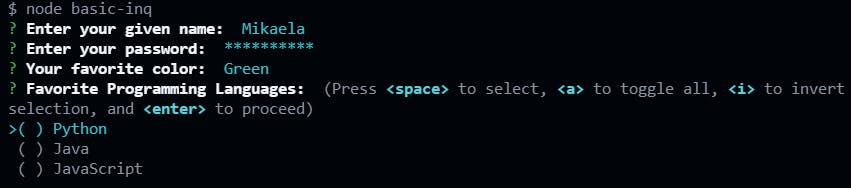
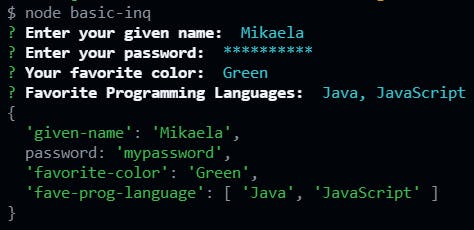
NOTE: The result will be saved in an array type since the user can select multiple choices.
Voila! These are some of the Inquirer.js prompt/question types.
You've reached the end! 🎉🎉🎉
I hope you have learned from this post. There are other prompt types that I don't cover in this article. This will only be an introduction using it, and you are also free to explore it on your own. This blog is some of the topics I currently know in Node.js so far, and I hope this would help other developers who are also starting to break into the world of tech.
References
You can check other advanced prompt types and other plugins in their documentation.
If you are new to Node.js, this documentation will help you to understand some of the core fundamentals of it.
If you have some questions in HTML, CSS, Tailwind.js, React.js and Node.js feel free to reach me on my social media accounts.
Here's my Github Profile:
Thanks, gorgeous developers! See you in my next blog! 😍