


Implementing A Registration page with real-time Username Availability checking.


The most awesome features of websites for me are usually the real-time ones. Ranging from real-time chats to WebRTC, I have always been fascinated by the concept of having bidirectional communication in webpages. Today, I will be showing how I implemented one of those features. A rather simple but effective part of registration pages. A username availability checker.
Background
Many websites have registration pages that allow users to choose usernames and instantly gives feedback on the availability of the chosen username. This feature is not only found on registration pages but in profile pages during editing of user info.
There are various ways to implement this important feature. I will be explaining how to implement such feature in a very simple and efficient way.
Initial preparations
Firstly, a new folder should be created to house out project files. This can be done with
mkdir username_checker
cd username_checker
npm init -y
The important libraries for this tutorial are as follows.
Expressjs : This is to create a very simple server on which our code runs.
SocketIO : This is for bidirectional communication between the server and the clients.
Mongoose and Mongodb : This is for database based operations.
- Bcrypt : This is for hashing the password before saving.
These libraries and others can be installed with the following code.
npm install --save express mongoose socketio bcryptjs body-parser
We are set up for the next step.
Creating a user Database
I assume that you already have mongodb installed on your local machine. If not, you can use the popular and free Atlas.
We begin by defining the schema of our user. This implementation is a very crude one and only done to pass on a message.
We create a file named User.js. The content of the file is as shown below.
var mongoose = require('mongoose');


var UserSchema = new mongoose.Schema({
  fullname: { type: String, default:""},
  email: { type: String, unique: true },
  username: { type: String, unique: true },
  password: String,
});
mongoose.model('User', UserSchema);

module.exports = mongoose.model('User');
This is a basic setup of a user in the database.
Starting the Database
We need to start our database when our application begins to run. I love to specially place the code for starting up the mongodb instance in another file called db.jsand importing it into the main file. In this case, the app.js.
The content of db.js is
var mongoose = require("mongoose");

mongoose.connect(
  "mongodb://localhost:27017/thrsin",
  {
    useNewUrlParser: true,
    useUnifiedTopology: true,
  },
  (error) => {
   console.log("Db started");
    }
);
Creating the Registration Endpoint
There is need for an endpoint created for registration of users. This is where we handle the request from a client to register a new user. This endpoint takes a post request and returns either success or failure based on the result of the operation.
The code below is the content of app.js.
var express = require('express');

var app = express();
var db = require('./db');
var cors = require('cors');
global.__root   = __dirname + '/';

app.use(bodyParser.urlencoded({ extended: false }));
app.use(bodyParser.json());
var User = require('./User');


var bcrypt = require('bcryptjs');
var http = require('http').createServer(app);
app.get('/api', function (req, res) {
  res.status(200).send('API works.');
});

app.post('/register', function (req, res) {

  var hashedPassword = bcrypt.hashSync(req.body.password, 8);

  User.create({
    fullname: req.body.name,
    email: req.body.email,
    password: hashedPassword,
    username: req.body.username
  },
    function (err, user) {
      if (err) return res.status(500).send("Error.");

   return  res.status(200).send("Successful  Registration" );

    });
});

http.listen(4000, () => {
    console.log('listening on *:4000');
});
The above code is a simple registration endpoint. It is apparent that the user would have to send in multiple requests to get a unique username as the endpoint would raise an error if the username used for registration isn't unique. We will remedy this by giving the user the ability to check the availability of any username before sending the registration request.
Implementation of SocketIO Events
In other to use SocketIO in our app, we need to import it and attach it to our http server implementation. This is done with the following code.
const app = express();
var http = require('http').createServer(app);
...

var io = require('socket.io')(http);

io.on('connection', (socket, next) => {
    console.log('a user connected ', socket.id);
});
And thus, the SocketIO feature is ready to be used.
However, we have not implemented the username checking feature of the server.
This will be implemented in the form of a function. The code below shows the implementation.
async function checkUsername(userObject, id, callback) {
    var response;

    try {
        var user = await User.findOne({ username: userObject.username });

        response = {
            username: userObject.username,
            available: !!!user
        }

    }
    catch (err) {
        console.log("error occurred", err.message);
        response = {
            error: err.message
        }
    }
    callback(null, { response, receiverId: id });

}
The function takes a userObject and socket unique identifier id as argument. It then query the database for any user with that username. If it returns a user, we return false in our response object and if it doesn't, we return true instead. The callback function is then called to handle the sending of the response the the SocketIO client that requested the information.
The function is called in a SocketIO event which we place in the use method of a SocketIO instance. This method acts like a middleware and all socketio requests are passed through it. The code below shows the way this is done.
io.use(
    function (socket, next) {
        socket.on('username_check', (userObject) => {
            checkUsername(userObject, socket.id, (err, result) => {
                console.log("result");
                io.to(result.receiverId).emit('username_check', result.response);
            })

        });
next();
}
Now, our code is complete and ready to be tested. The app.js file should look like this at this point.
var db = require('./db');
// var cors = require('cors');
var bodyParser = require('body-parser');
global.__root = __dirname + '/';

var express = require('express');
var app = express();

app.use(bodyParser.urlencoded({ extended: false }));
app.use(bodyParser.json());
var User = require('./User');
var bcrypt = require('bcryptjs');
var http = require('http').createServer(app);

var io = require('socket.io')(http);


app.get('/api', function (req, res) {
    res.status(200).send('API works.');
});

app.post('/register', function (req, res) {

    var hashedPassword = bcrypt.hashSync(req.body.password, 8);

    User.create({
        fullname: req.body.name,
        email: req.body.email,
        password: hashedPassword,
        username: req.body.username
    },
        function (err, user) {
            if (err) return res.status(500).send({status: "Error"});

            return res.status(200).send({status:"Success"});

        });
});

async function checkUsername(userObject, id, callback) {
    var response;

    try {
        var user = await User.findOne({ username: userObject.username });

        response = {
            username: userObject.username,
            available: !!!user
        }

    }
    catch (err) {
        console.log("error occurred", err.message);
        response = {
            error: err.message
        }
    }
    callback(null, { response, receiverId: id });

}

io.use(
    function (socket, next) {
        socket.on('username_check', (userObject) => {
            checkUsername(userObject, socket.id, (err, result) => {
                io.to(result.receiverId).emit('username_check', result.response);
            })

        });
        next();
    })

io.on('connection', (socket, next) => {
    console.log('a user connected ');
});

http.listen(4000, () => {
    console.log('listening on *:4000');
});
Testing
To test our code, I will prepare a basic registration webpage which will communicate with the server. We serve the index.html from the server at the request of the client.
The content of the file index.html is as written below.
<!DOCTYPE html>
<html>
  <head>
    <title>Socket.IO chat</title>
  </head>
  <body>
    <div>
      <fieldset>
        <label for="Fullname"
          >Fullname: <br /><input id="Fullname" autocomplete="off" />
        </label>
        <br />
        <label for="username"
          >Username: <br /><input id="username" autocomplete="off" />
          <p style="display: inline;" id="out"></p
        ></label>

        <br />
        <label for="email"
          >Email: <br /><input id="email" autocomplete="off"
        /></label>

        <br />
        <label for="password"
          >Password: <br />
          <input id="password" type="password" autocomplete="off" /></label
        ><br />
      </fieldset>
      <button onclick="register">Register</button>
    </div>
    <script src="/socket.io/socket.io.js"></script>
<script src="https://cdn.jsdelivr.net/npm/axios/dist/axios.min.js"></script>
    <script>
      var socket = io();

      function send(e) {
        socket.emit("username_check", { username: e.target.value });
      }
      const Usernameinput = document.querySelector("#username");
      Usernameinput.addEventListener("change", send);

      socket.on("username_check", function (msg) {
        const out = document.getElementById("out");
        console.log(msg);
        if (msg.available) {
          out.textContent = "Username Available";
        } else {
          out.textContent = "Username Taken";
        }
      });
      function register() {
        var fullname = document.getElementById("Fullname").value;
        var password = document.getElementById("password").value;
        var username = document.getElementById("username").value;
        var email = document.getElementById("email").value;

        var payload = { name: fullname, password, username, email };
        //send with axios
        axios({
          url: "localhost:4000/register",
          data: payload,
          method: "POST",
        }).then((resp) => {
          if (resp.data.status == "Success") {
            alert("Success");
          } else {
            alert("Error");
          }
        });
      }
    </script>
  </body>
</html>
Add to app.js the following code to serve the HTML file.
app.get('/', (req, res) => {
    res.sendFile(__dirname + '/index.html');
});
Save the files and start the webserver with
node app.js
Visit localhost:4000/ to view page and test the code.
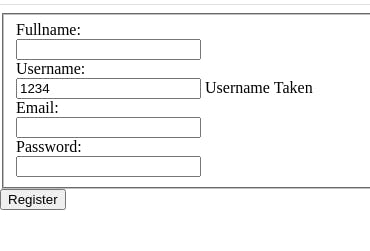
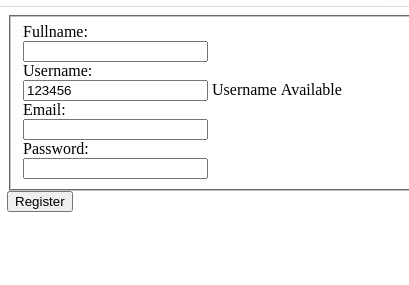
Here are pictures of the page after two instances. In one instance, the username was taken and in the other, ithe username was available.
That marks the end of the tutorial. The complete source files can be found on GitHub.
If you have any questions, I am always available on Twitter.
Have fun...