


Overview about Monokle
If you're a developer like me, you might agree that developers are lazy and we don't like to rewrite the same piece of code over and over. Introducing Monokle from Kubeshop. This convenient Open Source tool can help you with easily creating manifests for your Kubernetes clusters.
Monokle has tons of features to enhance your Kubernetes experience. Some of which include
-A high-level view of your manifests
-Easily edit your resources without the need to know YAML
-Preview and debug resources with Helm and more
Monokle recently introduced plugin support. At the moment there is support only for Templates, although this will change in the future.
Templates are a really great way to create Manifests easily without having to write down all the YAML syntax. All you will have to do is define your parameters.
Prerequisites
Before we get into how you can create your own custom templates in monokle, I'm assuming you know the following ( Don't worry if you don't, I'll touch on it in brief as and when required) -
-Kubernetes
-YAML
-JSON
Kubernetes
Kubernetes ( or K8s) is a container orchestration system. In order to understand what that means first, we need to know about containers. Containers are essentially packages. For example, let's say you have a Windows OS and you want to run Ubuntu(Linux) without deleting Windows. One way to do this is dual-booting or running a Virtual Machine. However, this will take quite a bit of system resources. Comes into picture containers. With a container engine, such as docker, you can just download run an image file of ubuntu. Now we have a very basic version of ubuntu and it isn't using a lot of resources. This is what a container is.
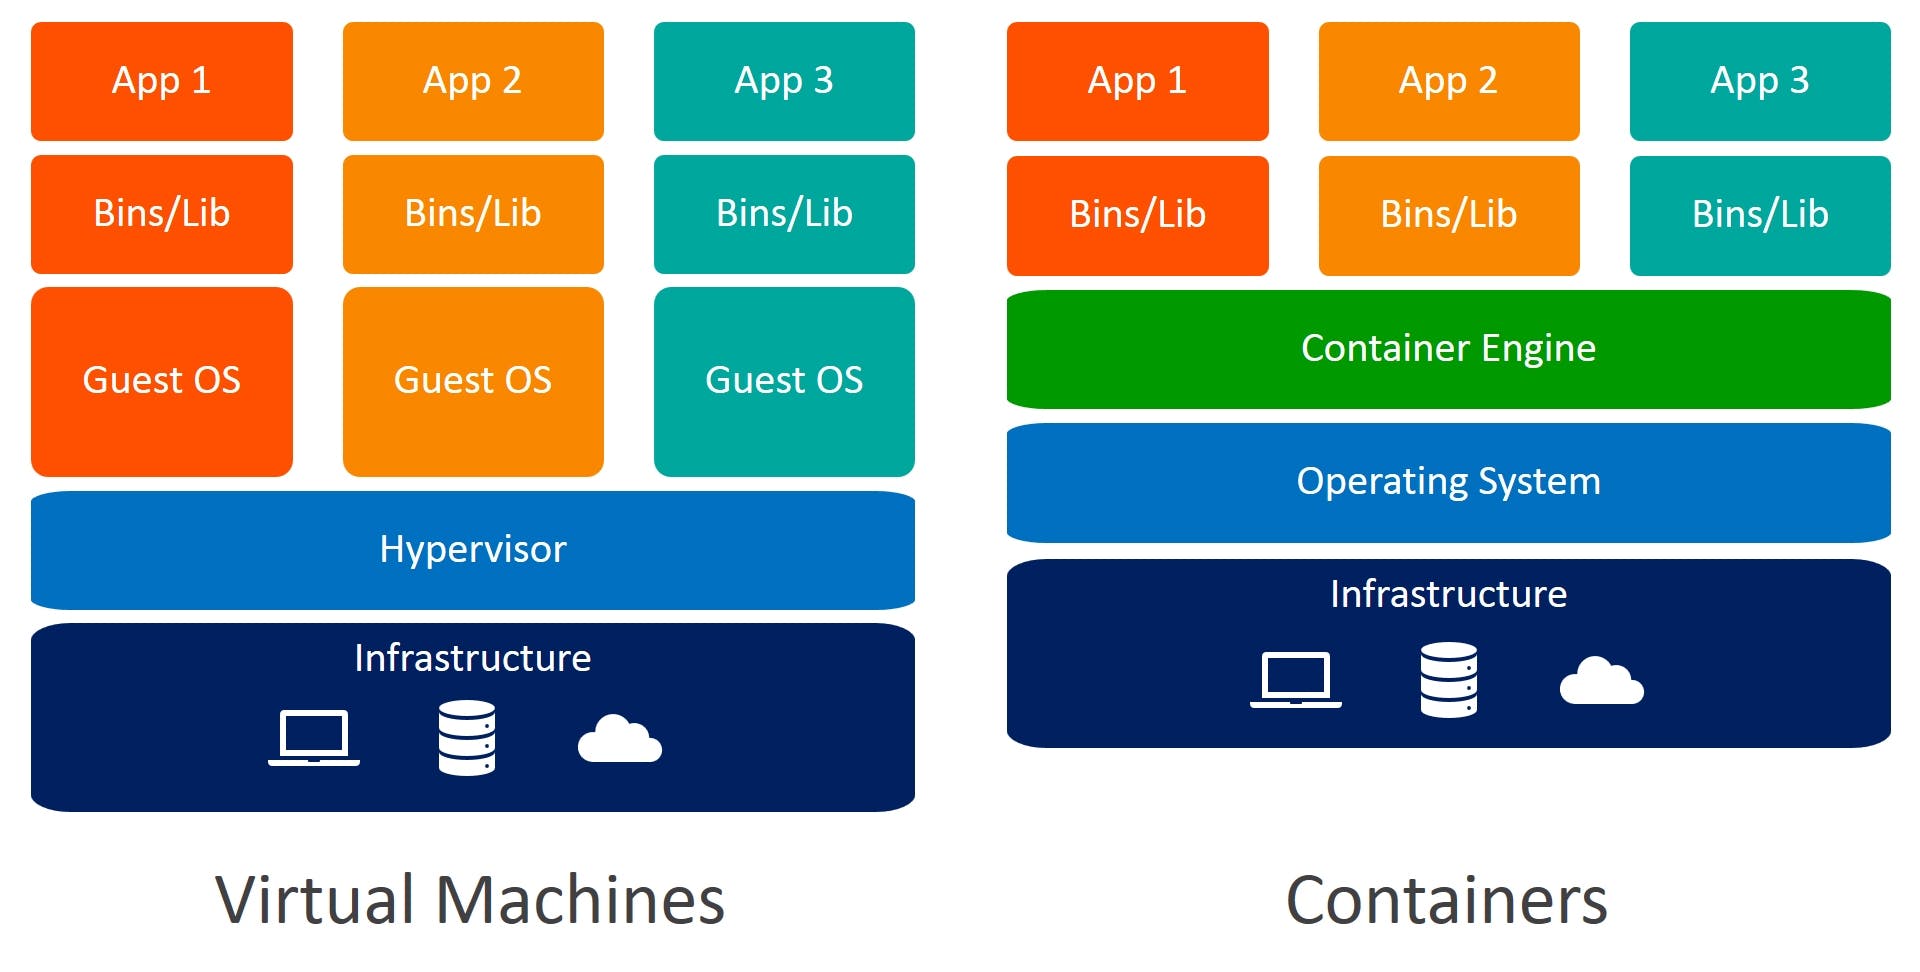
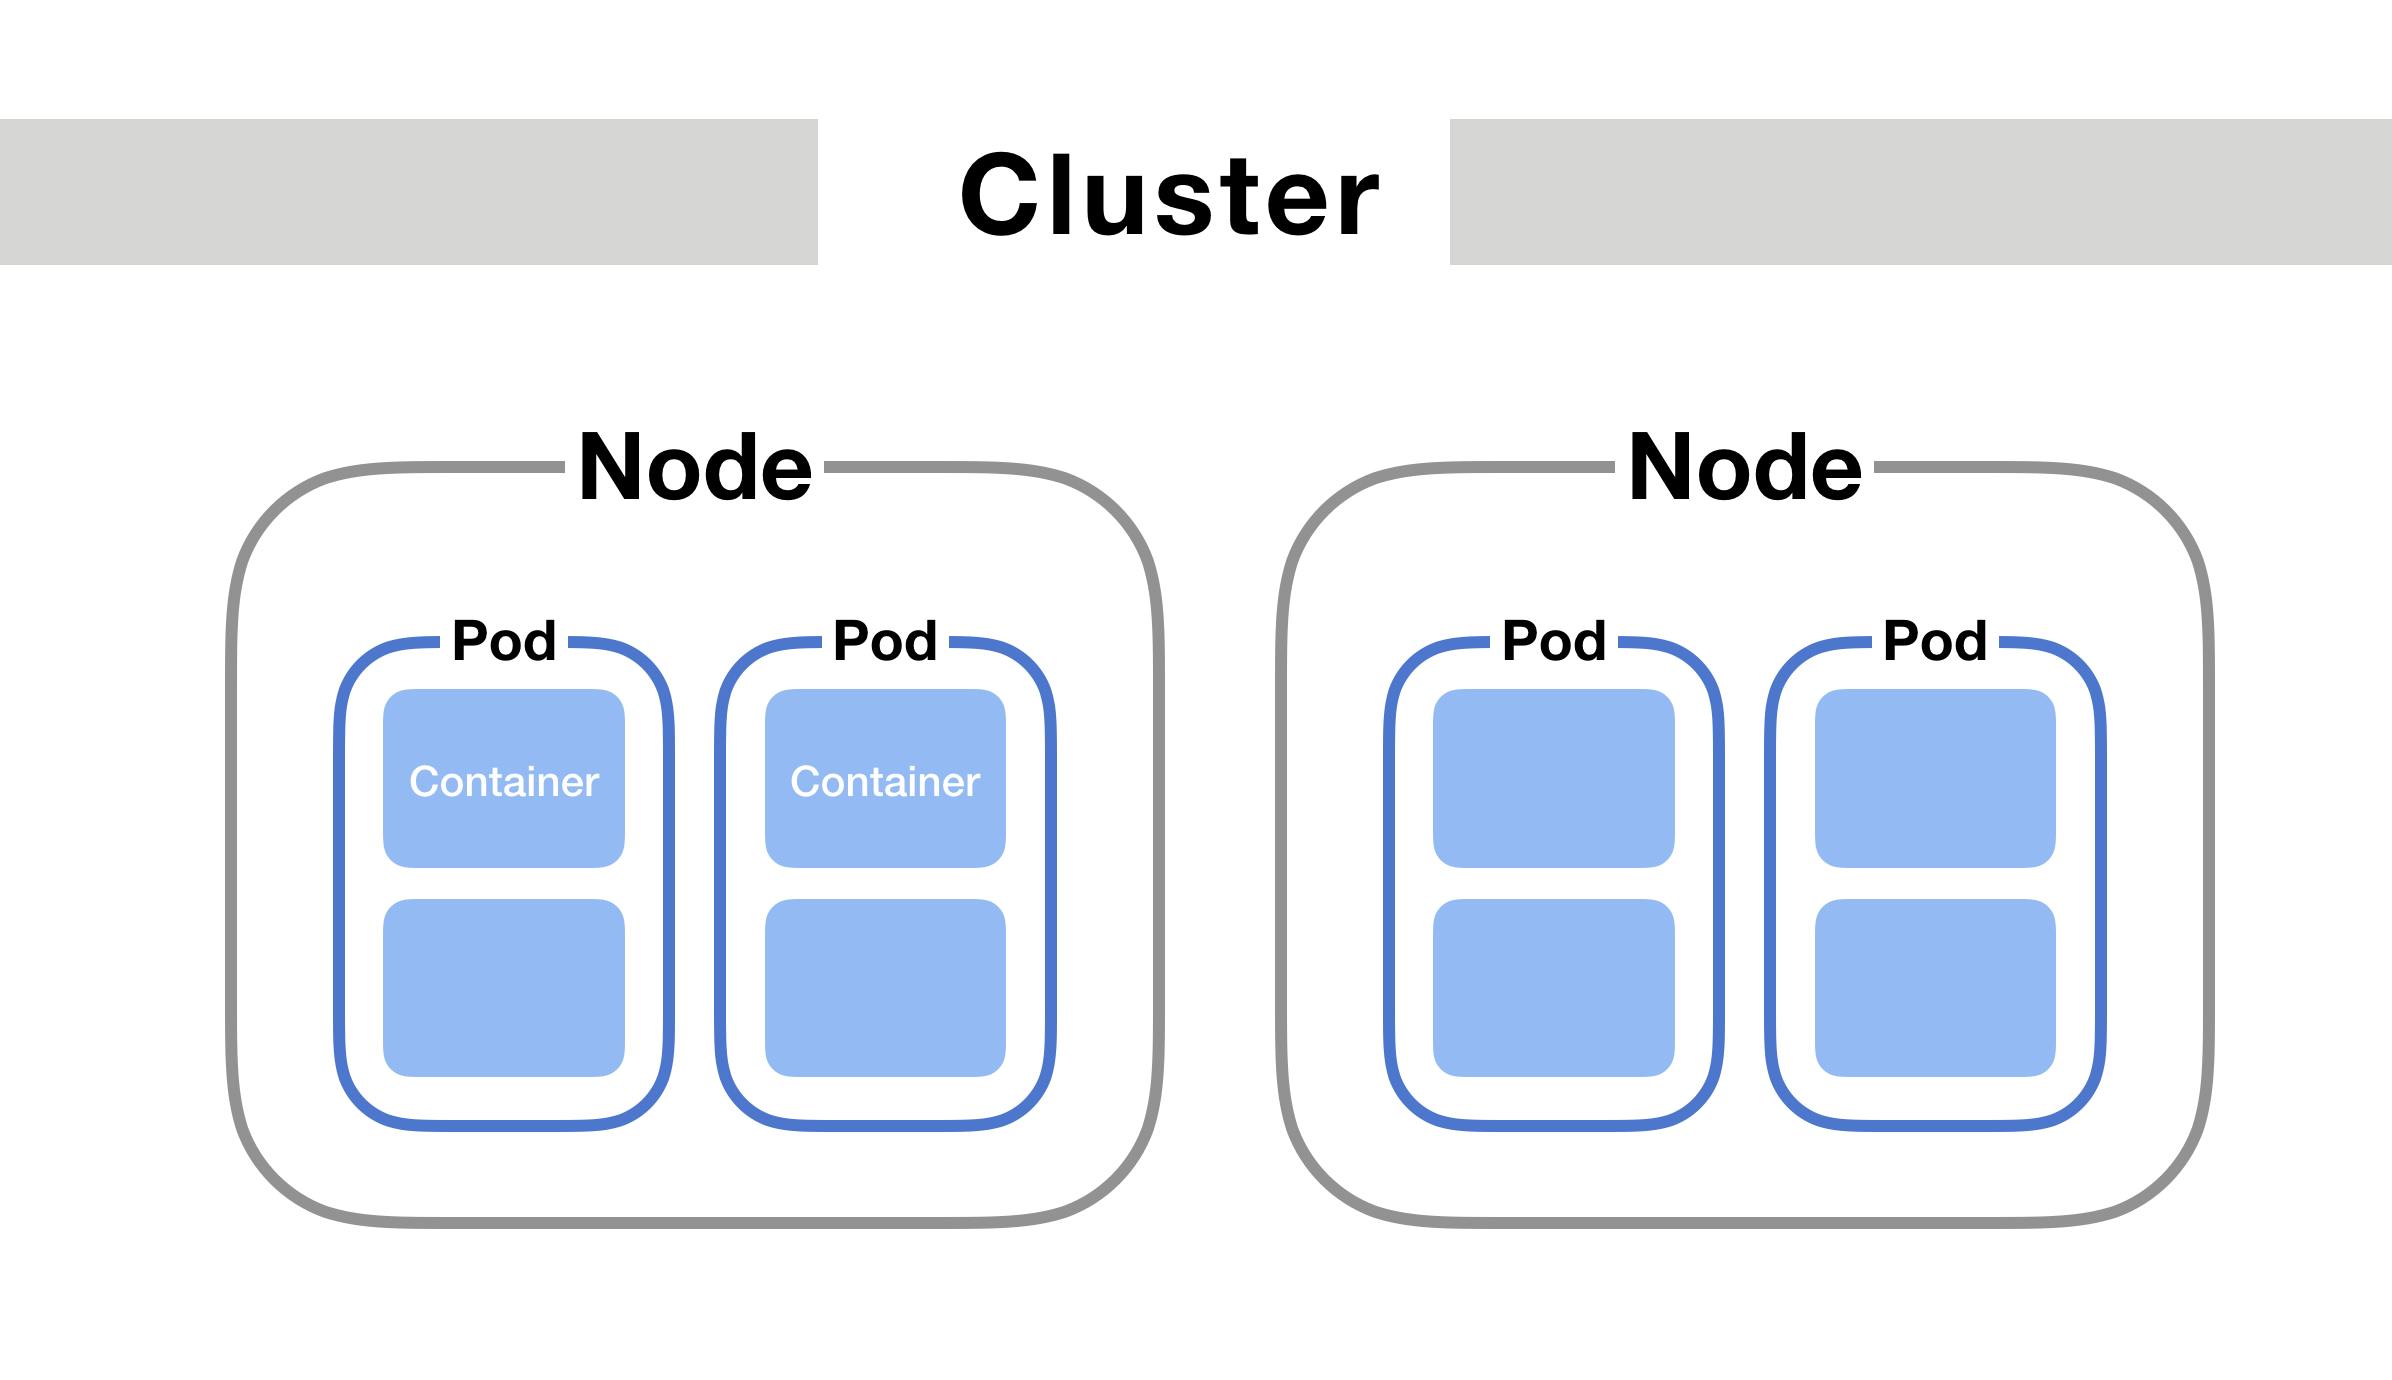
Now what k8s does is take multiple containers and groups them into one. This is what we call pods. Every pod is inside a Node which is a Worker Machine i.e this is where our cluster is using resources from.
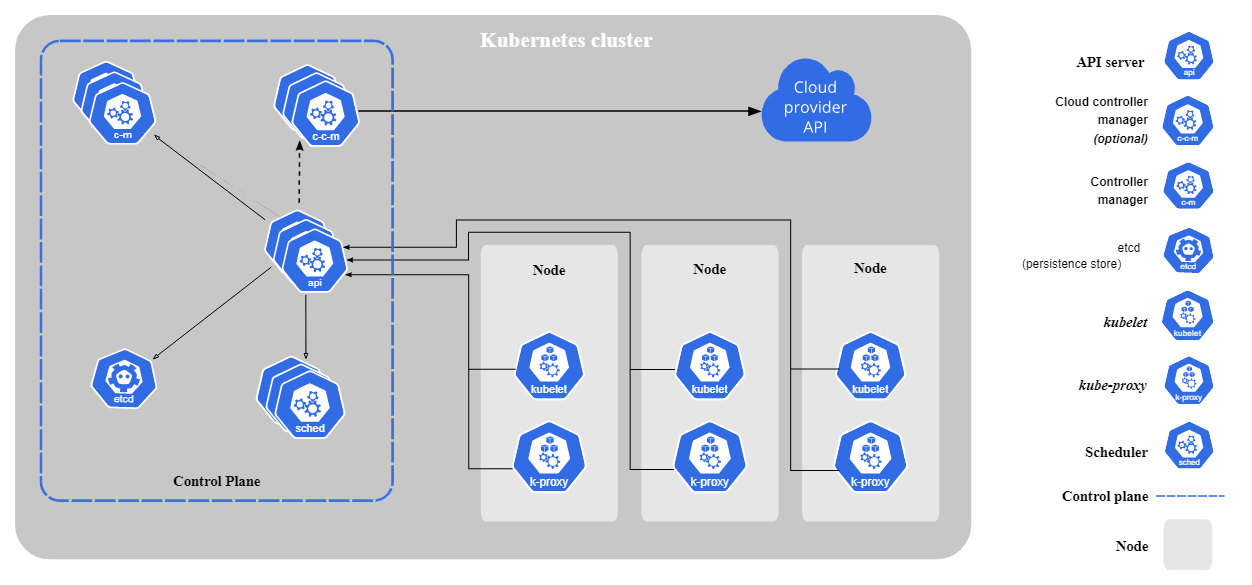
Now for the orchestration part, let's say you have deployed a cluster, and one of the pods goes down and needs a restart. Who will do this? Comes into the picture the Control Pane. The Control Pane does exactly what it sounds like, it controls the nodes in all clusters that are overseen by it. If a node or pod goes offline, it's the control pane that gives the command to the offline node/pod to restart. This way our deployment will always stay active.
If you want to learn more about Kubernetes, I highly recommend reading the docs as they are very informative
YAML
YAML is a data serialization language that is often used for writing configuration files. Depending on whom you ask, YAML stands for yet another markup language or YAML ain’t markup language (a recursive acronym), which emphasizes that YAML is for data, not documents.
YAML is a popular programming language because it is human-readable and easy to understand. It can also be used in conjunction with other programming languages.
We won't be diving into the syntax of YAML in this blog since our main goal is to see how we can write k8s manifests without having to write YAML.
JSON
If you've been a developer for a while, you've most probably heard and used JSON(JavaScript Object Notion). We will be using JSON to create our templates. The syntax of JSON is very similar to JavaScript. Hence it is quite easy to write. You can use bool, null, array, strings, and ints in JSON. Here is a basic JSON configuration that will make it easier to understand JSON
{"menu": {
  "id": "file",
  "value": "File",
  "popup": {
    "menuitem": [
      {"value": "New", "onclick": "CreateNewDoc()"},
      {"value": "Open", "onclick": "OpenDoc()"},
      {"value": "Close", "onclick": "CloseDoc()"}
    ]
  }
}}
The Fun Part
Alright, now that we've gotten all the prerequisites out of the way, let's get into the fun part and see how we can create custom templates in Monokle

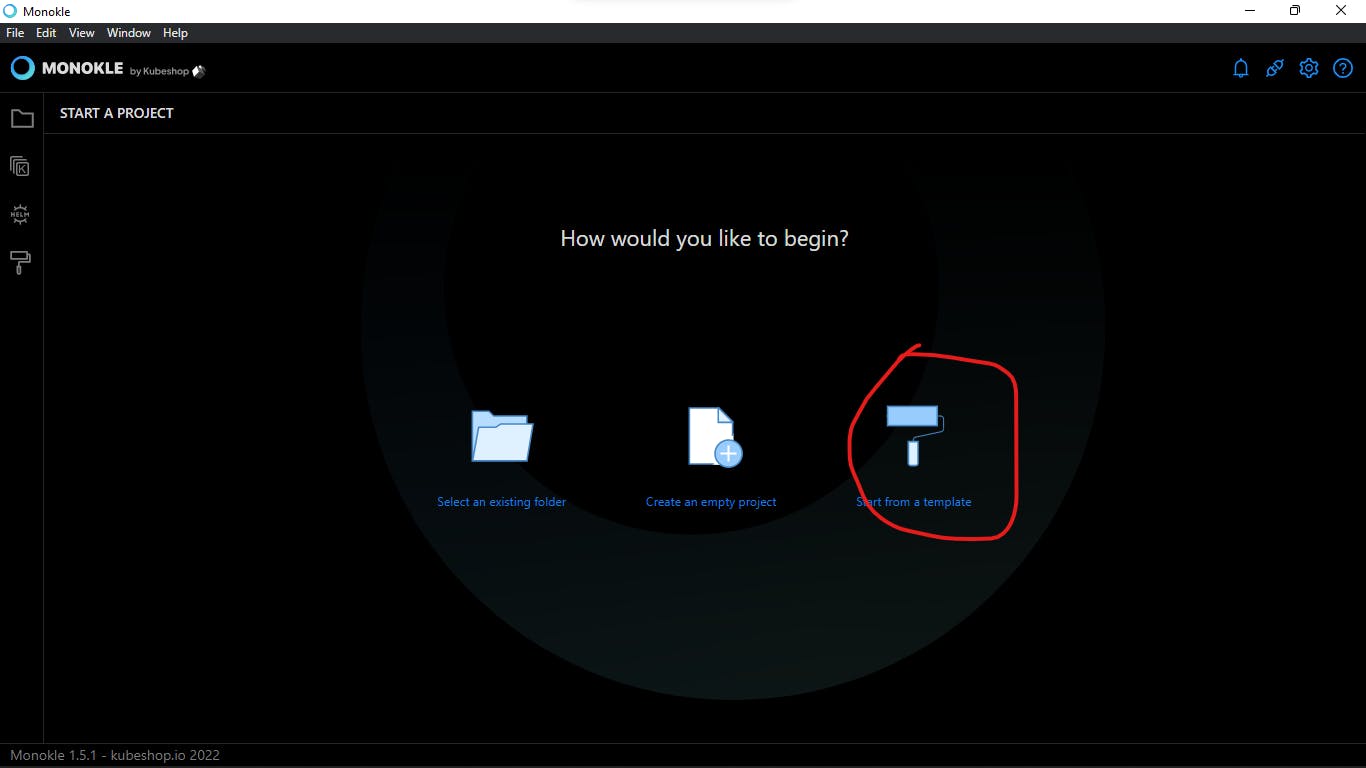
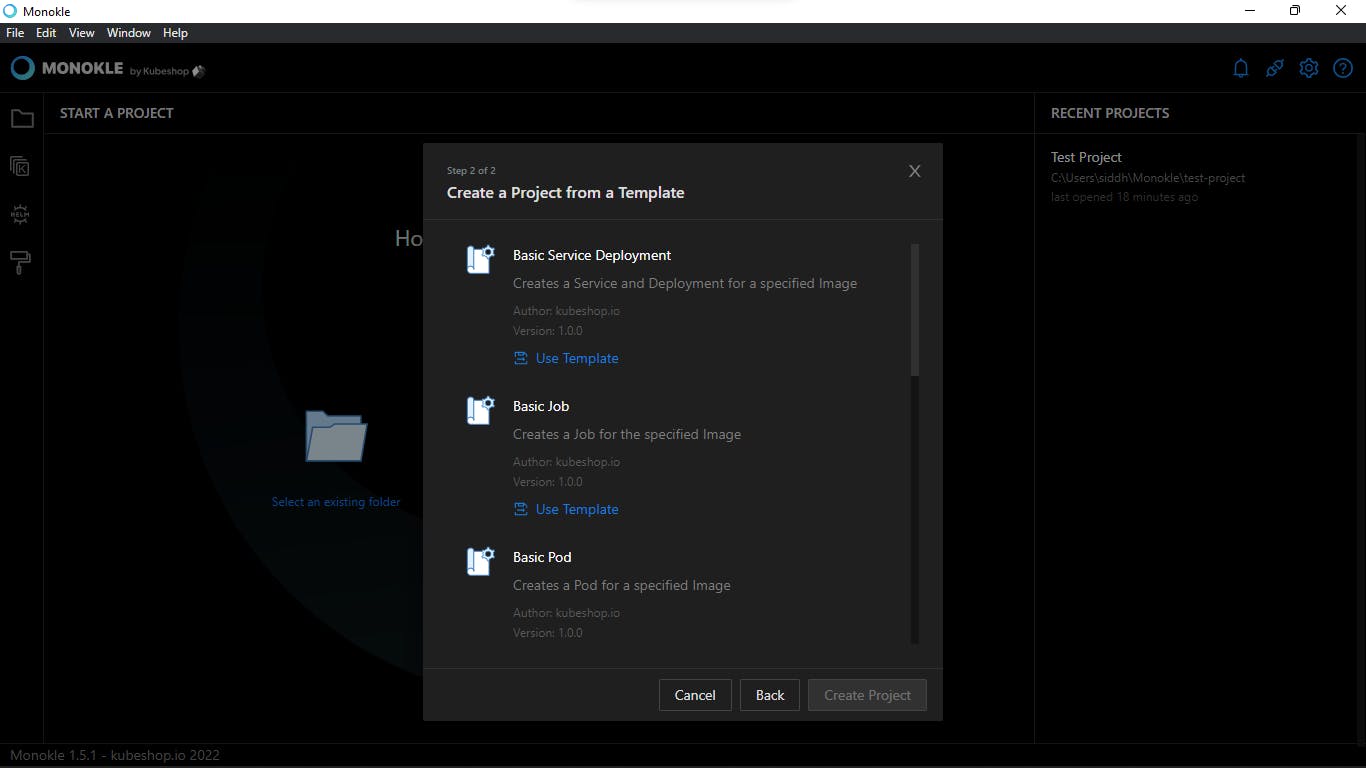
Monokle comes with a couple of prebuilt templates. In order to see those templates just follow the steps below
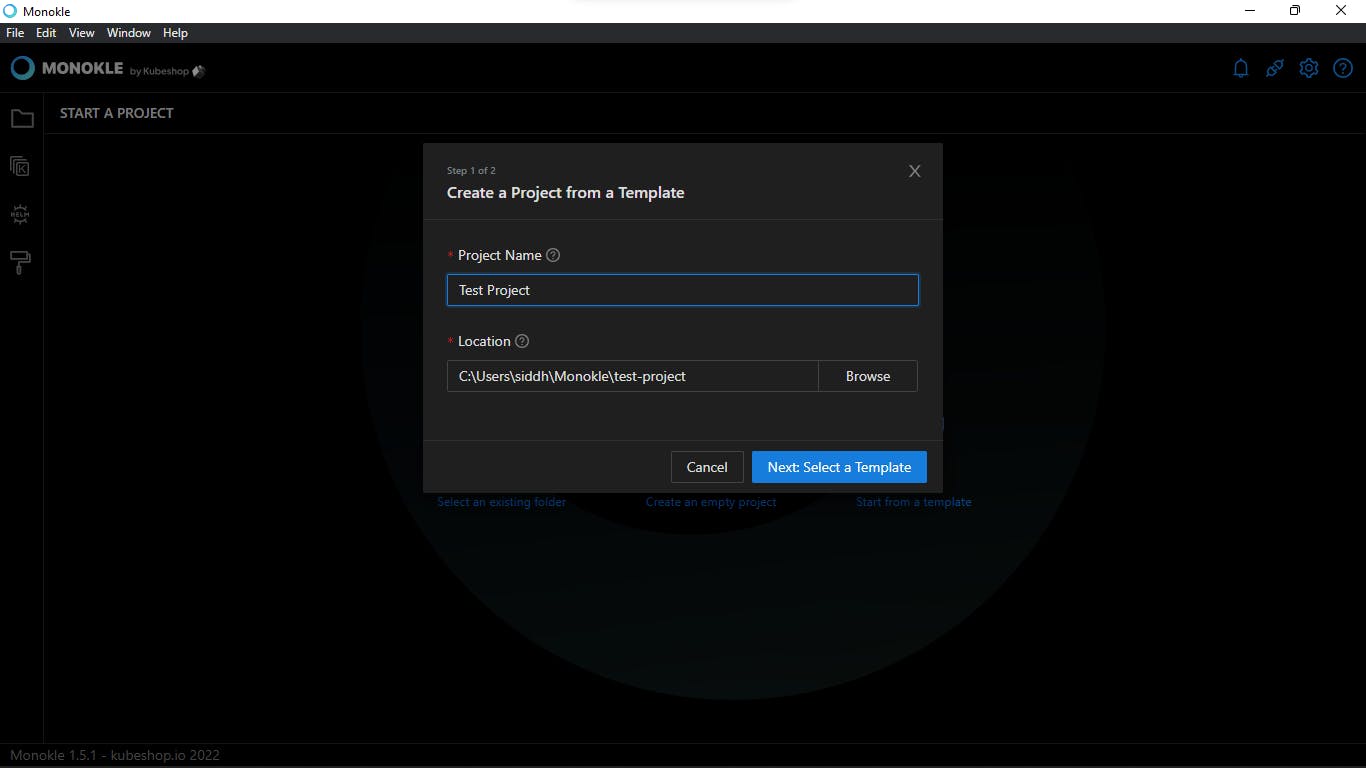
Click on Start from Template
Name your project
Select your template
I've selected a Basic Pod
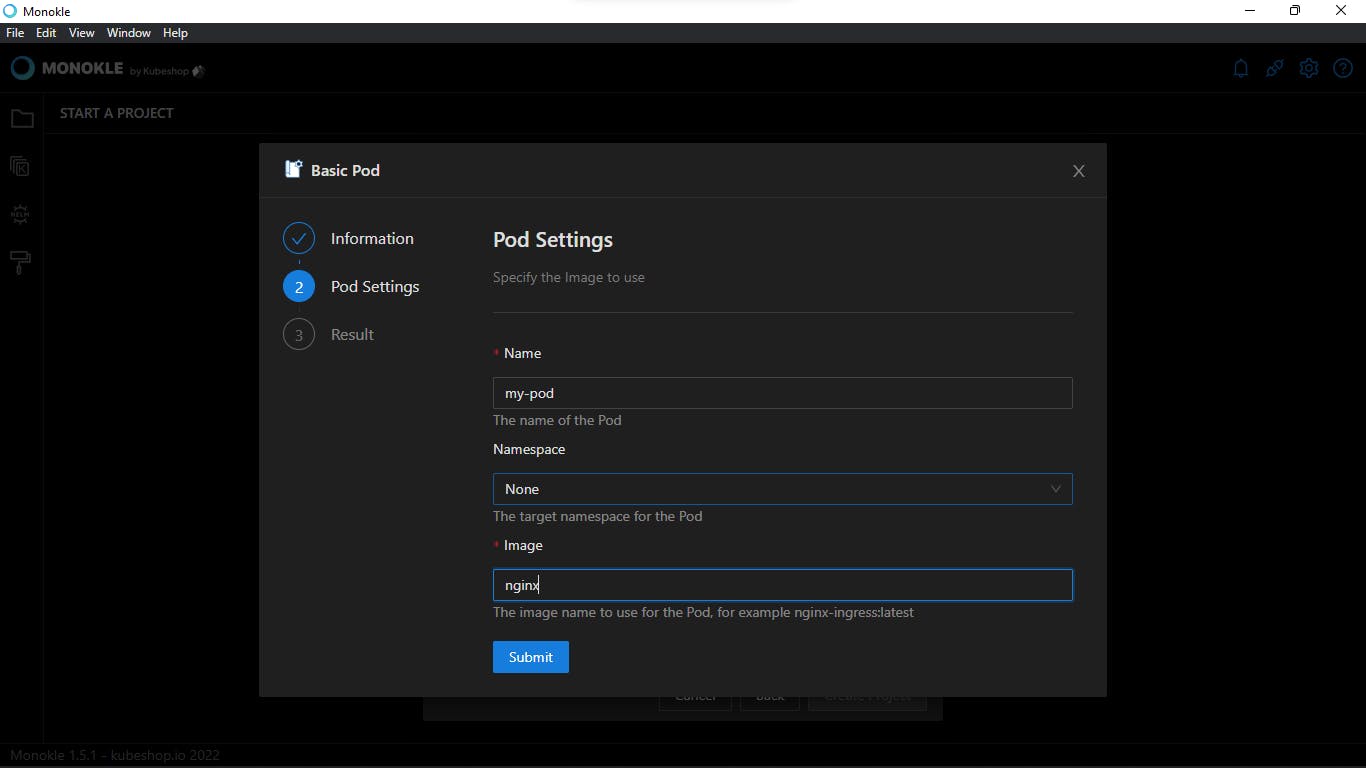
Configure your template
Voila
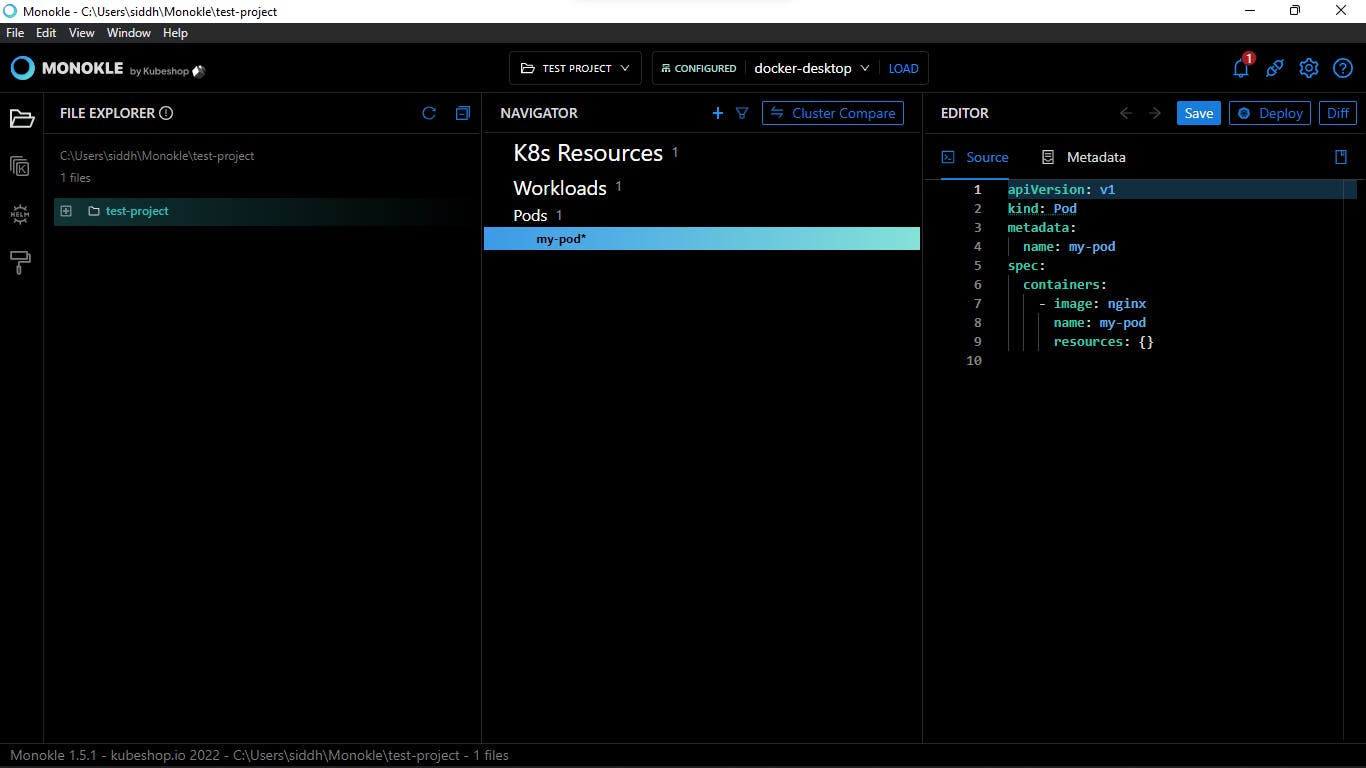
This is how we can a YAML file from templates. Now lets take a look at how we can make our own custom templates
In order to create a template for Monokle, we will need to define the JSON schema of the data which we want to use input. We will also need to create a UI schema to customize the visuals.
Here is an example JSON file that can create a Pod, we will call this monokle-template.json
{
  "name": "Basic Kubernetes Pod",
  "id": "io.kubeshop.monokle.templates.default.basic-pod-template",
  "author": "kubeshop.io",
  "version": "1.0.0",
  "description": "Creates a Pod for a specified Image",
  "repository": "",
  "type": "vanilla",
  "forms": [
    {
      "name": "Pod Settings",
      "description": "Specify the Image to use",
      "schema": "form-schema.json",
      "uiSchema": "form-ui-schema.json"
    }
  ],
  "manifests": [
    {
      "filePath": "template.yaml"
    }
  ],
  "resultMessage": "Pod resource created successfully!",
  "helpUrl": "https://github.com/kubeshop/monokle-default-templates-plugin"
}
This is how a Ui-Schema.json will look like
 {
  "name": {
    "ui:title": "Test-pod",
    "ui:help": "Pod-Nmae"
  },
  "namespace": {
    "ui:title": "Pod-1",
    "ui:help": "The target namespace for the Pod",
    "ui:widget": "namespaceSelection"
  },
  "image": {
    "ui:title": "Image",
    "ui:help": "The image name to use for the Pod, for example nginx-ingress:latest"
  }
}
And finally, we need a package.JSON which should look something like this
{
  "type": "object",
  "required": ["name", "image"],
  "properties": {
    "name": {
      "type": "string",
      "default": "my-pod"
    },
    "namespace": {
      "type": "string"
    },
    "image": {
      "type": "string"
    }
  }
}
In order to make this a custom template, you will have to keep all these 3 files, i.e monokle-template.json, ui-schema.json and package.json in one folder. In order to use them, you can either provide the folder path to Monokle, or you can push it to your GitHub repo and tell Monokle which repo to look for it.
Final Thoughts
With this, we've summarised Monokle, K8s, YAML, JSON and we've also seen how we can make our custom template for creating Kubernetes manifests in monokle.
KubeShop has tons of more projects that can help you with your Kubernetes development so do check them out.
Also, check out Kunal Kushwaha who is making some amazing cloud and DevOps content that can help you get started.