


Chrome is hands down one of the best browsers to work with. The debugging tools are great and you can add a lot of other functionality through extensions. These little programs other developers write and maintain can really make a difference in how you get work done. Although, there is a chance you won't find an extension that does exactly what you need it to.
The good news is that you can make your own! You don't even need to learn anything special. If you know how to write TypeScript, you can make your own Chrome extension. You'll learn exactly how to do that in this short tutorial. We'll cover some background, build the extension, and learn how to use it in Chrome.
Why you would make a custom extension
While you were testing your code, you might have thought about ways you could make it easier or ways you could automate it in the browser. A custom extension would let you do that. Making extensions is more about solving specific problems you have. The company you work for could implement a process for testing that you could write a quick extension for and give to the whole team.
Or you could write a few extensions just to practice your TypeScript skills in a meaningful way. It's important to not get caught in the hype of making the "best" extension or the most popular extension. Your custom code is for you and the problems you are trying to fix. Think of it as making your own little shortcut.
Writing the code for an extension
On a code level, a Chrome extension is just HTML, CSS, and JavaScript that lets you add functionality to the browser by using the APIs Chrome exposes. We're going to write our demo extension using React. The extension we're making won't do anything spectacular, but it will show you the basics of how you can start making extensions.
The first thing we'll do is make a new React project using create-react-app. In case you don't have create-react-app, install it in your directory first using this command.
npm install create-react-app
Now that you have a fresh app, let's edit one of the files to make this a Chrome extension. Go into the public folder and find the manifest.json file. It will already have some code in there for you, but here's how we will make it look.
{
    "manifest_version": 2,
    "short_name": "The Ultimate Help Tool",
    "name": "The Ultimate Help Tool",
    "description": "When you get stuck on a coding problem and you aren't sure what to do next, push this button",
    "version": "0.1",
    "browser_action": {
        "default_popup": "index.html"
    },
    "permissions": [
        "activeTab"
    ],
    "content_security_policy": "script-src 'self' 'sha256-5As******'; object-src 'self'",
    "author": "Milecia McG"
}
One thing to note is that your manifest_version should always be 2 because Google said so https://developer.chrome.com/extensions/manifestVersion. Also, the content_security_policy has to be set similar to this so that you'll be able to use your extension locally. We use the browser_action property to show that little icon in the upper right corner and to show the body of the extension when you click it. The permissions value is set to activeTab so that we can do our browser_action in the current tab. Next we will write the code for the App.js file. It's going to be really simple and it'll just have a link and title.
import React, { Component } from 'react';
import './App.css';

class App extends Component {
    render() {
        return (
            <div className="App">
                <h1>Save Me Now</h1>
                <a href="https://stackoverflow.com/" id="checkPage" target="_blank" rel="noopener noreferrer">Check this page now!</a>
            </div>
        );
    }
}

export default App;
Now that you have this little demo code finished, go ahead and build it with this command.
npm run build
Using it in Chrome
Making an extension isn't too bad right? Now you can test it in Chrome. Go to the browser and type this in a new tab.
chrome://extensions
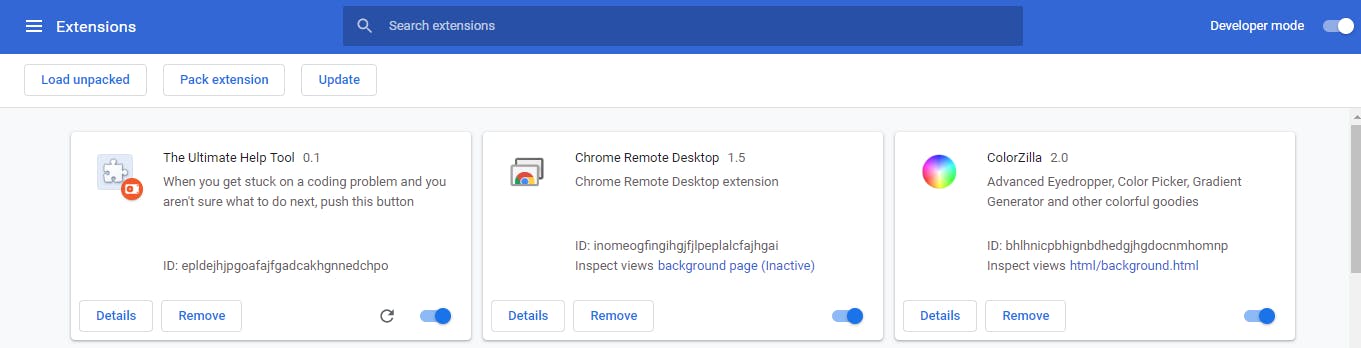
In the upper right corner, you'll see the Developer mode option. Go ahead and turn that on. You should see this.

Upload your build folder by clicking Load unpacked. Now you'll see your custom extension! It'll also show up as a puzzle piece in the top right corner of the Chrome browser.
Giving it to others
After you've tested your shiny new extension, you can share it with others easily. If you don't want to be bothered with the Chrome web store, you can always make a GitHub repo that people can clone from. Although, if you don't want people to have access to the source code, uploading an extension to the web store is a good option. It's a bit of a process, but they have some good documentation on how to get through the publishing process https://developer.chrome.com/webstore/publish.
Making Chrome extensions is another way you can practice your JavaScript and learn more about the frameworks. Or you can write some plain old JavaScript, HTML, and CSS. Plus, you could make something useful that everyone loves. Have you ever made or published an extension? Or have you made an extension-like thing for another browser? I know Firefox has their add-ons, but I haven't made one.
Hey! You should follow me on Twitter because reasons: https://twitter.com/FlippedCoding