


Getting started
This guide will teach you how to wire up core React Native libraries. By the end you’ll be able to:
- Create a scalable react native application skeleton with TypeScript
- Implement React Navigation - a library for switching screens in App
- Handle SVGs files with React Native Vector Icons and React-Native-svg
- Enforce code quality with ESLint and Prettier
- Test application with Jest and Detox
- Manage API Keys with environment variables - react-native-dotenv
The guide below will help you create a boilerplate, on the basis of which you can develop a React Native project. For those of you who’d like to have a quick look at the final code before we proceed to the detailed instructions, you’ll find it here: GitHub.
The article is divided into sections to help you pick the elements you may currently need in your projects. Enjoy!
Creating a new application
Assuming that you have your development environment already set up, let me show you how to begin creating the project. (The official React Native documentation will help those who still need to work on their environments.)
First, let’s generate a new project. For this we can use a built-in interface. Simply paste the following line to your terminal to create a project. I use an additional argument to generate it via a TypeScript template.
npx react-native init ProjectName --template react-native-template-typescript
Note that: Older versions of react-native-cli may fail your installation.
This is a good moment to check if your generated project works on android and iOS.
While developing our application we need to ensure that Metro bundler is running in a separate terminal. You can run Metro by pasting the following:
yarn start
iOS
Let’s try our iOS application. Package.json contains a predefined script for this operation:
yarn run ios
You should see a lot of running scripts, which are associated with building the package. In the meanwhile an iOS emulator will appear with our application displaying a welcome screen.
Android
While you can use any editor of your choice to develop your app, you will need to install Android Studio in order to set up the necessary tooling to build RN projects. If you have already set up an android environment, follow the steps below. If not, go to docs first.
To test our Android app, you need to run an android emulator in one of these two ways: 1.Through Android Studio 2.Via a terminal - docs
Next, run: yarn run android
You will see a welcome screen. This is a perfect moment to commit your changes to the repository. You’ve probably noticed that the generated project doesn’t have a git repository. Let’s initialize it!
git init
git add .
git commit -m "initial commit"
Enforce code quality with Prettier, ESLint and Husky
Prettier
It's an opinionated code formatter, which applies a set of rules on how code should look. It integrates with most editors.
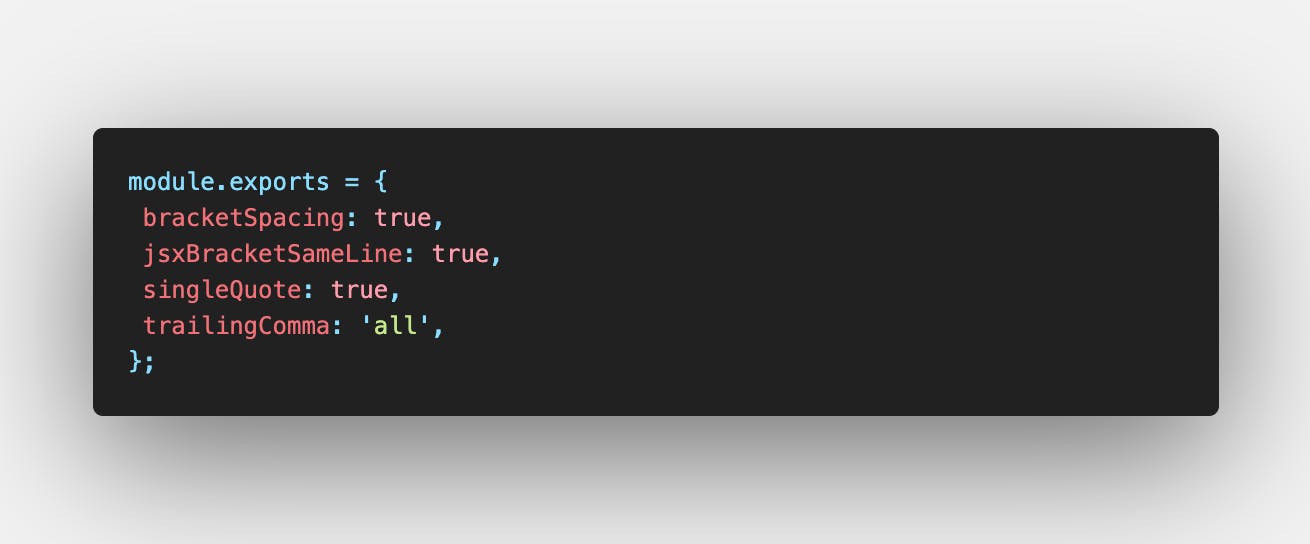
The project has already installed Prettier and a predefined configuration file located in .prettierrc.js.
The only thing you might want to change is bracketSpacing‘s value or singleQuote’s value. Your final configuration should like this:
If you want to implement additional settings, go to docs.
I also added a new script to package.json. This command formats all files with indicated extensions in your current directory and its sub-directories.
“prettier:write”: “npx prettier — write **/*.{js,jsx,ts,tsx,json} && npx prettier — write *.{js,jsx,ts,tsx,json}”
ESLint
This tool is used for analyzing code quality and coding style issues. ESLint is, by default, installed in the project package, however you may want to enhance the tool with additional plugins. There’s a variety of options available; here are some of my favourite ones:
yarn add -D eslint-config-airbnb-typescript eslint-config-prettier eslint-plugin-jsx-a11y eslint-plugin-react eslint-plugin-import
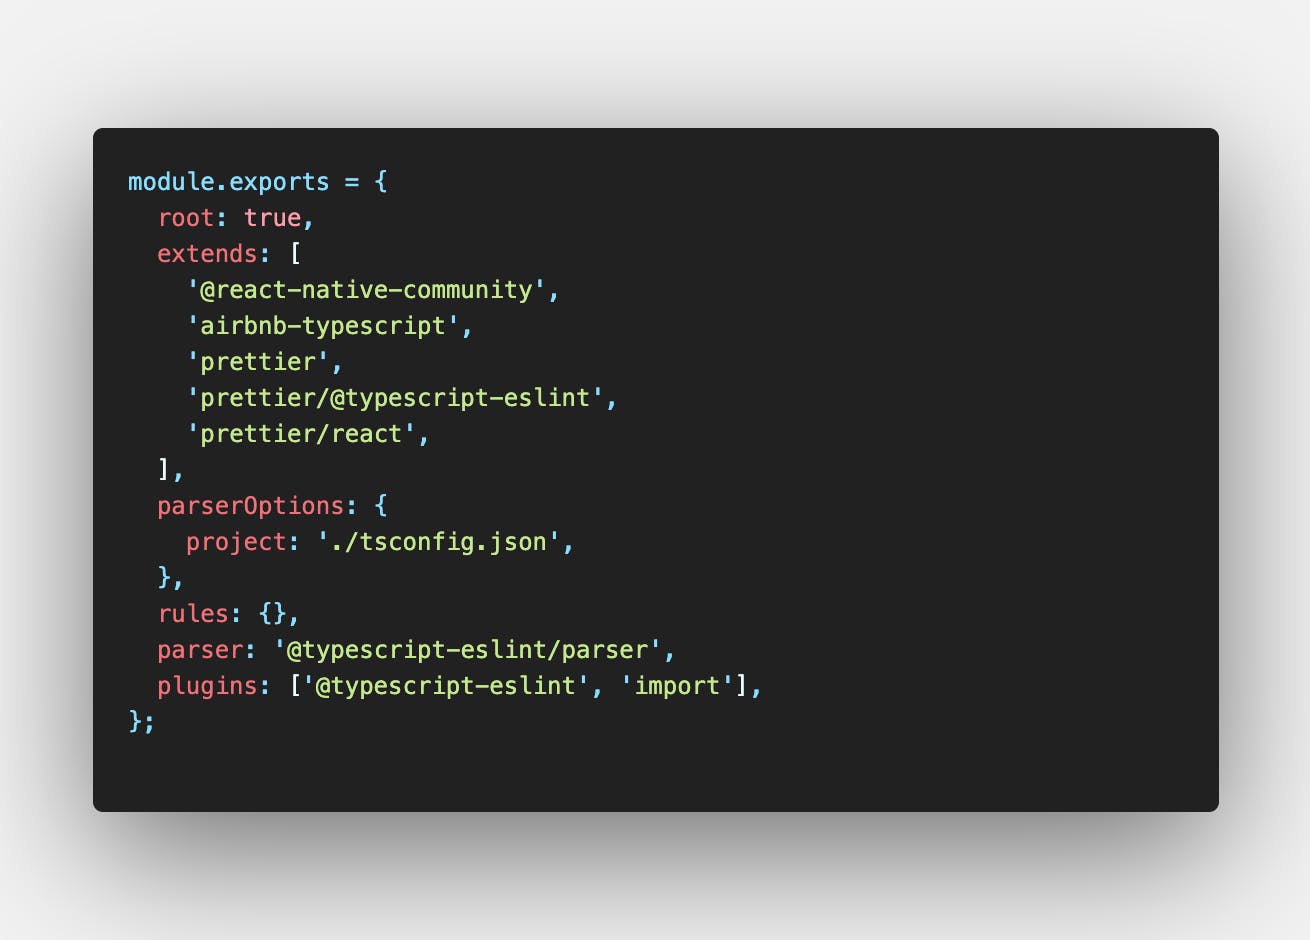
After installing the plugins you’ll have to extend your basic configuration file located in .eslintrc.js. Your final code should look like this:
Next, add a script to your package.json file so that your Husky hook can run it:
“lint”: “tsc — noEmit && eslint . — ext .js,.jsx,.ts,.tsx ./”,
“lint”: “tsc — noEmit && eslint . — ext .js,.jsx,.ts,.tsx ./”,
Husky can prevent incorrect git commits, pushes and more. Git hooks are scripts that are executed before or after an event. If husky runs Prettier, then “ugly” files will never be committed. Husky can run Prettier but can’t add the changed files to your commit.
This issue can be solved with pretty-quick, which can run a lint tool, like Prettier, and immediately add your fixed files to staged files.
Let’s install it!
yarn add -D husky pretty-quick
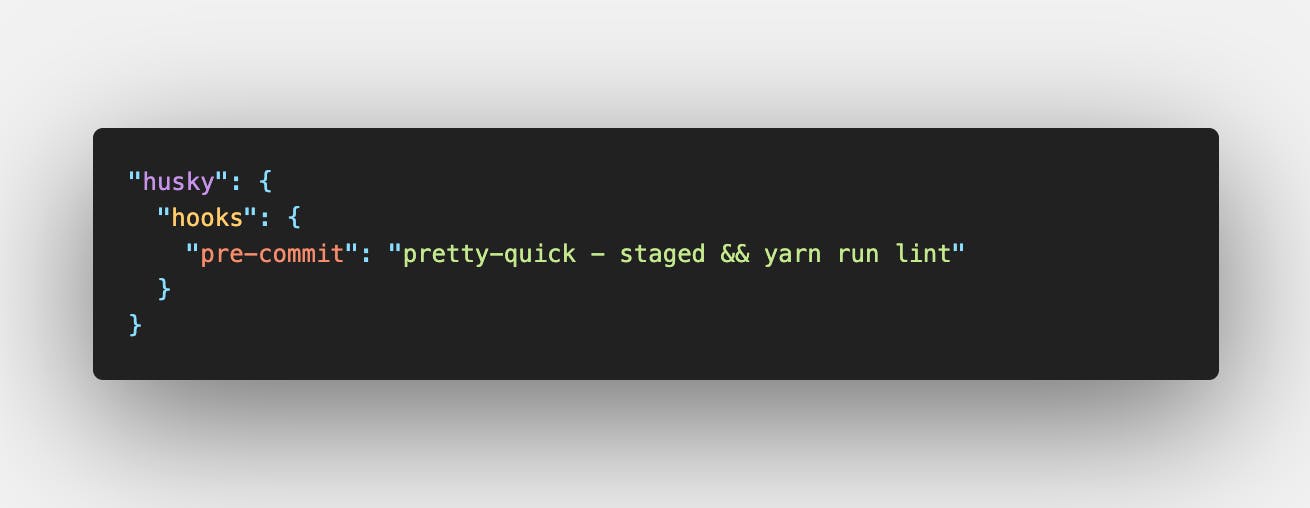
To configure husky, add the following lines of code to your package.json
Finally, let’s try our configurations and see what happens:
yarn run prettier:write
You should get information about written files. Then run linter:
yarn run lint — fix
Now let’s commit our changes and check a defined hook.
Setting aliases to clean up import statements
Everyone knows the struggle associated with a long import path like “../../../../../../constants.ts”. Ugly? Luckily, aliases are there to help.
To implement aliases support we need to install some dependencies. Run:
yarn add -D babel-plugin-module-resolver @typescript-eslint/eslint-plugin eslint-import-resolver-babel-module
There are a few steps to configure aliases correctly.
1 In your Typescript configuration file you have to add a few lines of code.
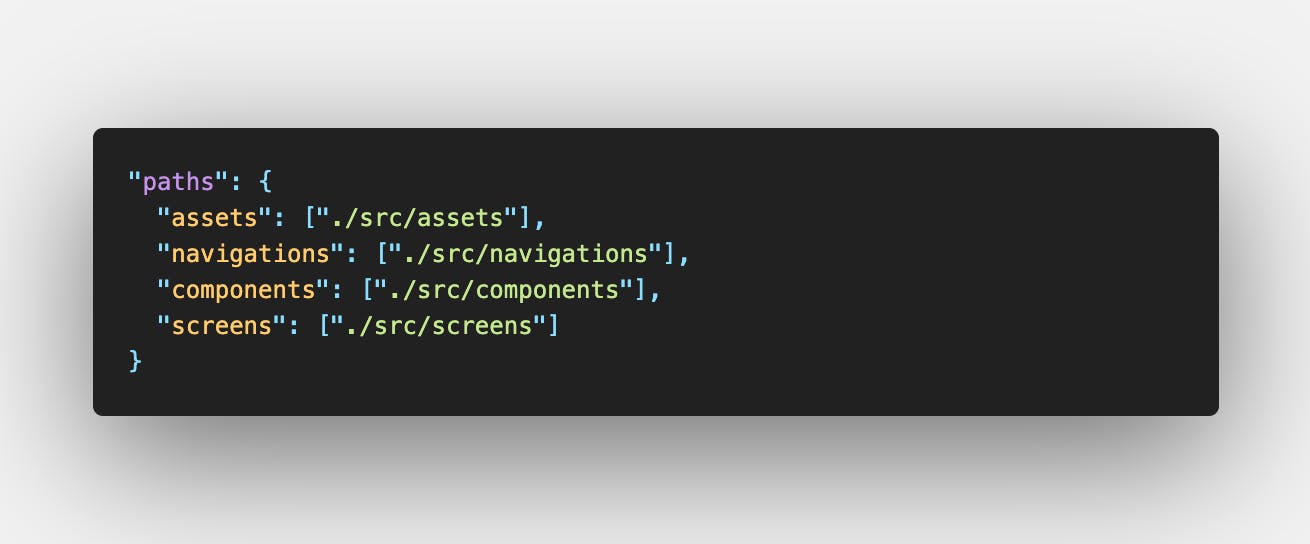
First of all you need to change the baseUrl value. For instance, in my project it is:

Now, you can define aliases for your directories.
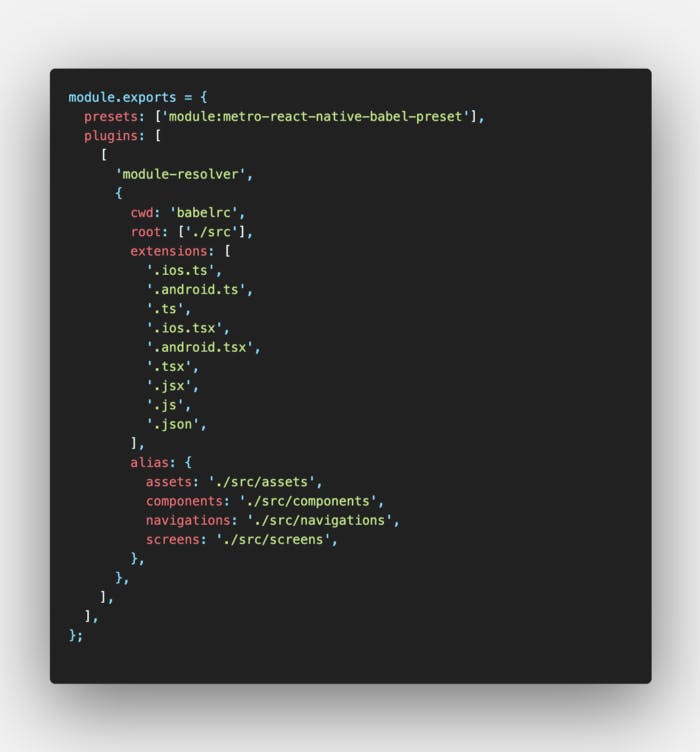
2 In Babel configuration file you also have to add aliases, so your configuration should look like this:
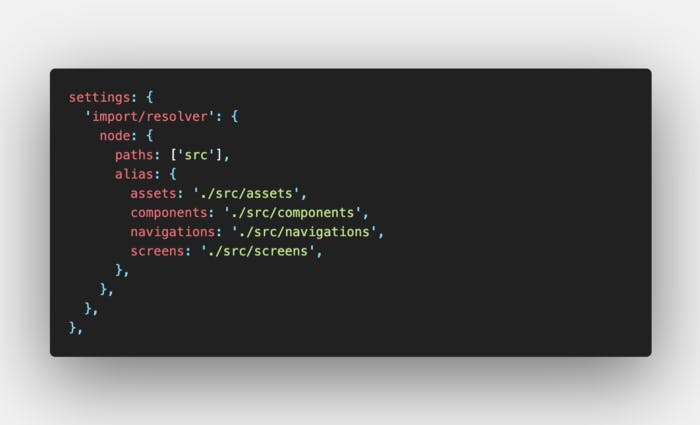
3 Additionally your ESLint configuration needs to be reconfigured to detect aliases. In .eslintrc.js just add:
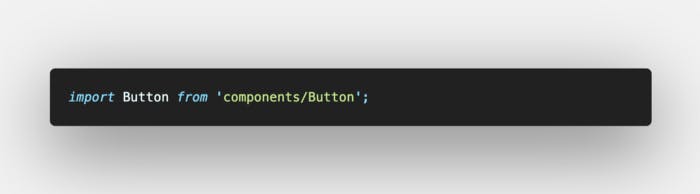
Let’s create a new component at src/components and try to import it into the main file’s app.
Handling SVGs
React-native-svg
To import an SVG file to your application you have to do some configuration.
react-native-svg library comes in handy here. It allows the use of SVGs with animations.
Let’s install it!
yarn add react-native-svg
After the installation you have to do an extra step to link the library with iOS:
cd ios && pod install
Well done! You can now use SVGs in your project.
React-native-vector-icons
Instead of using custom SVG files you can use a library, which provides popular icon sets - Vector Icons.
In your terminal run the following command:
yarn add react-native-vector-icons @types/react-native-vector-icons
iOS setup
In Podfile add:
pod ‘RNVectorIcons’, :path => ‘../node_modules/react-native-vector-icons’
Then, update your pods with:
pod update
And that’s it. Now you can use Vector Icons on iOS.
Note that:
If you are using use_frameworks! In PodFile you instead need to dynamically load the icon font by doing:
Icon.loadFont()
Android setup
Following the instructions of the library author you need to edit android/app/build.gradle and add the following:
apply from: “../../node_modules/react-native-vector-icons/fonts.gradle”
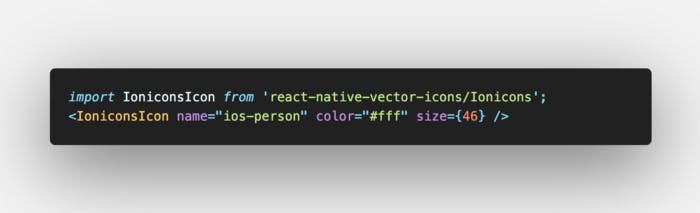
And that’s it. You can now import the installed icons:
Environment variables
To manage API keys in React Native without integrating with native code you can use react-native-dotenv to import environment variables from a .env file.
Run this command to add the dependency:
yarn add -D react-native-dotenv
Next, configure the library in the Babel configuration file. Simply add to the presets array module:react-native-dotenv.
After the configuration you need to create two files containing environment variables.
- .env
- .env.production
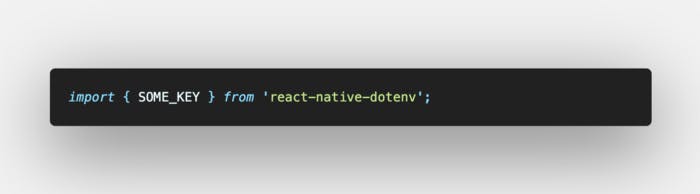
Now you can import your variable from .env
To test these files you can run an emulator in two different modes.
yarn run ios // development env
yarn run ios --configuration Release // production env
Navigation
For switching Screens in your app, use React Navigation.
First, install some dependencies
yarn add react-native-reanimated react-native-gesture-handler react-native-screens react-native-safe-area-context @react-native-community/masked-view @react-navigation/native
Next, link the libraries with your iOS project using pod:
cd ios && pod install
What’s important here is that you need to import a gesture-handler on top of the application (i.e. index.js, App.js). In case of skipping this step, your application can crash in production mode.
import ‘react-native-gesture-handler’;
Now create a basic navigation for your application based on a stack navigator. To do this you need to install an additional dependency
yarn add @react-navigation/stack
Before creating Navigator’s component you should prepare several screens for display.
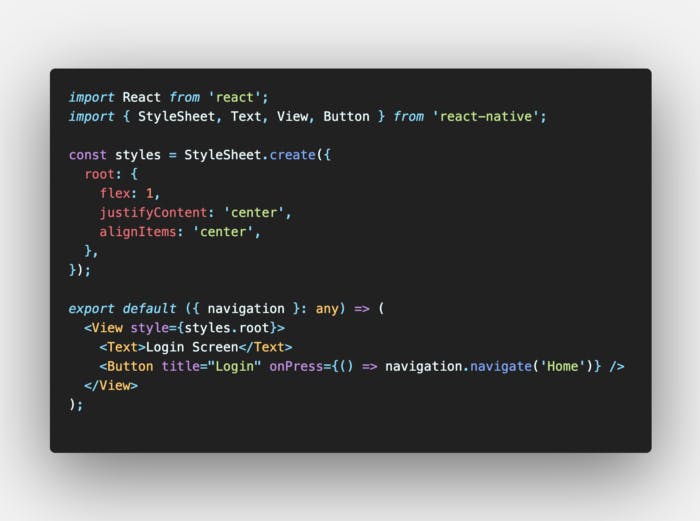
The application will probably need authorization, so firstly define LoginScreen:
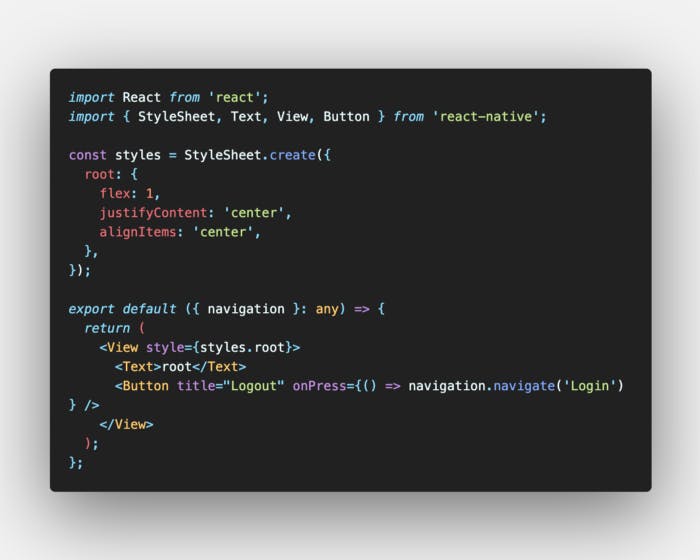
Then, create HomeScreen:
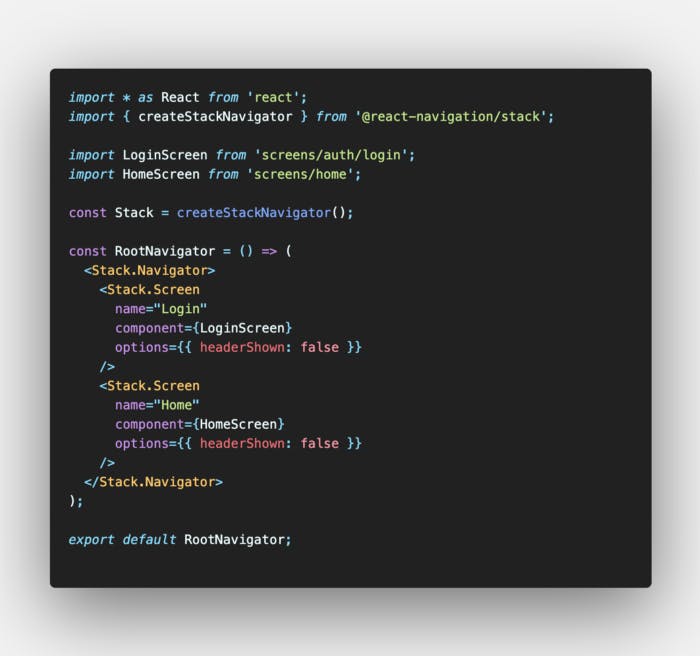
In src/navigations create RootNavigator.tsx and import the created screens.
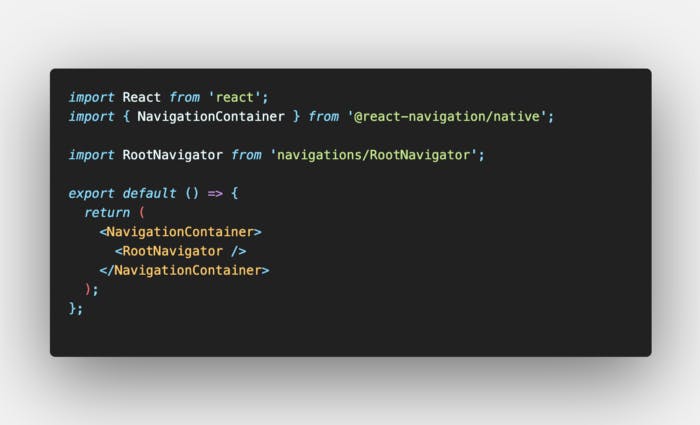
Now, you have to connect the navigation component with the rest of the application. In App.tsx remove all the generated code. This file provides a convenient place to wrap recently created RootNavigator with NavigationContainer.
Note that:
The container is responsible for managing app state and linking the navigator to the application environment.
After reloading of the application you should see an initial screen set in the navigator.
You’ve done it!
Now that you have your own TypeScript React Native boilerplate, you can begin creating RN projects!. If you want to, you can also clone this react native setup from my Github. Don’t forget to star my repository 🙂 If you found this article helpful, please hit the Like. If you have any question/request or if you run into any difficulties, let me know down below. I’d be happy to help.