


Earlier testers would often refrain from using record and replay tools like Selenium IDE for automation testing and would rather opt for using scripting frameworks like Selenium Webdriver, WebDriverIO, Cypress, etc. After all, why wouldn’t they, these tools have proved to be more effective and gave much more control over tests!
Even though Selenium IDE offered ease of usage, it had a lot of issues, it had no support for cross browser testing, running parallel tests, and more. This is the reason, when development for Selenium IDE stopped in 2017, a lot of testers were under the impression that Selenium IDE has died.
But this has changed recently, as Selenium IDE has gained traction once again and its usage is gradually increasing. The reason? Selenium IDE has overcome its previous limitation and now supports cross browser testing, parallel tests, and a lot more!
In one of our earlier blogs, Selenium IDE for test automation was included as one of the top automation testing trends to watch out for in 2020. In this Selenium IDE tutorial, I’ll tell you why you need to consider Selenium IDE for test automation.
What Is Selenium IDE?
Selenium IDE was introduced in 2006 as a record & replay tool used for the development of Selenium test cases. It is easy to get started with the IDE as no special setup is required.
To get started with Selenium test automation using Selenium IDE, you need to install the extension (or add-on) for the corresponding browser. The IDE provides a GUI for recording interactions with the website.
Although Selenium IDE was earlier available only for Firefox, it is now also available for Chrome as well. The latest version of Selenium IDE is 3.17.0. The IDE now comes with cross browser support and also supports parallel test execution. You can use the links down below to download the Chrome and Firefox extension for Selenium IDE.
Once the extension (or add-on) is installed, you can start recording the tests. The interactions with the website (under test) are recorded and categorized into the following categories.
- Command
- Target
- Value
- Description (Optional)
Key Features Of Selenium IDE
Selenium IDE is an easy to use tool that provides instant feedback and lets you run tests on any browser + OS combination using the SIDE (or command-line) runner for the Selenium IDE.
Below are some of the key features:
- Execute tests (and test-suites) – Selenium IDE lets you execute a specific test or a complete test-suite that comprises a group of tests.
- Cross browser testing – It can be used for automated browser testing as cross browser tests can be executed using the SIDE runner.
- Debugging – Setting breakpoints and pausing on exceptions makes it easy to debug tests from the IDE itself.
- Rich command-set – Selenium IDE supports a number of commands that can be used to raise asserts, insert waits, create loops, and more.
- Control Flow – Selenium IDE has an extensive set of commands that enable control flow structure. Commands such as if, if..else, etc. aid in executing conditional tests from the IDE.
- Test case reuse – The run command lets you reuse a particular test case inside another test case (or test suite).
- Grouping of Selenese commands – Selenium IDE supports grouping of Selenese commands (or set of Selenium commands) that lets you run tests. A sequence of Selenese commands makes a test script.
- Easy modification and comparison of test cases – Test scripts created using the Selenium IDE are stored as JSON files. This makes it easy to compare, modify, and inspect tests.
A sample test-script for our Selenium IDE tutorial (Google-Search.side) to search LambdaTest on Google is shown below:
{
  "id": "0cbf9be7-7cdf-4ab8-ae1e-ece61b57d861",
  "version": "2.0",
  "name": "Google Search",
  "url": "https://www.google.com",
  "tests": [{
    "id": "b3d88a58-3a4f-4189-8614-416817684027",
    "name": "Untitled",
    "commands": [{
      "id": "546f6852-8b27-40c6-9b69-ba88401879ff",
      "comment": "",
      "command": "open",
      "target": "/",
      "targets": [],
      "value": ""
    }, {
      "id": "6120c120-3234-4bc2-bed5-d1dde618704b",
      "comment": "",
      "command": "setWindowSize",
      "target": "1382x754",
      "targets": [],
      "value": ""
    }, {
      "id": "023d8f6e-a411-435d-89d0-e750d19de066",
      "comment": "",
      "command": "click",
      "target": "name=q",
      "targets": [
        ["name=q", "name"],
        ["css=.gLFyf", "css:finder"],
        ["xpath=//input[@name='q']", "xpath:attributes"],
        ["xpath=//form[@id='tsf']/div[2]/div/div/div/div[2]/input", "xpath:idRelative"],
        ["xpath=//div[2]/input", "xpath:position"]
      ],
      "value": ""
    }, {
      "id": "927b9fb7-7ade-4e86-be50-a3dec1baacf7",
      "comment": "",
      "command": "type",
      "target": "name=q",
      "targets": [
        ["name=q", "name"],
        ["css=.gLFyf", "css:finder"],
        ["xpath=//input[@name='q']", "xpath:attributes"],
        ["xpath=//form[@id='tsf']/div[2]/div/div/div/div[2]/input", "xpath:idRelative"],
        ["xpath=//div[2]/input", "xpath:position"]
      ],
      "value": "Lambdatest"
    }, {
      "id": "8f1cdac3-4e91-4ea1-bc08-7c43b15f5659",
      "comment": "",
      "command": "sendKeys",
      "target": "name=q",
      "targets": [
        ["name=q", "name"],
        ["css=.gLFyf", "css:finder"],
        ["xpath=//input[@name='q']", "xpath:attributes"],
        ["xpath=//form[@id='tsf']/div[2]/div/div/div/div[2]/input", "xpath:idRelative"],
        ["xpath=//div[2]/input", "xpath:position"]
      ],
      "value": "${KEY_ENTER}"
    }, {
      "id": "44a1d7f3-bb19-492f-bd66-2e1240f9a46c",
      "comment": "",
      "command": "click",
      "target": "css=.g > div > .rc .LC20lb",
      "targets": [
        ["css=.g > div > .rc .LC20lb", "css:finder"],
        ["xpath=//div[@id='rso']/div/div/div/div/a/h3", "xpath:idRelative"],
        ["xpath=//div/div/a/h3", "xpath:position"],
        ["xpath=//h3[contains(.,'LambdaTest: Most Powerful Cross Browser Testing Tool Online')]", "xpath:innerText"]
      ],
      "value": ""
    }]
  }],
  "suites": [{
    "id": "ac1e77d7-5be7-4359-baf9-b635ab97bb36",
    "name": "Default Suite",
    "persistSession": false,
    "parallel": false,
    "timeout": 300,
    "tests": ["b3d88a58-3a4f-4189-8614-416817684027"]
  }],
  "urls": ["https://www.google.com/"],
  "plugins": []
}
The growing list of questions tagged Selenium IDE on StackOverflow does indicate that testers into Selenium test automation are taking note of the Selenium IDE and there is growing interest in the community. It also helps the development team prioritize the next set of features that should make it in the future releases.
For testers into automated browser testing, Selenium IDE is a worthy option to explore as it lets you export the test cases (created using the IDE) to popular programming languages such as Python, C# with xUnit, and more. With curiosity mounting about the IDE, let us take a look at the positive aspects of the IDE in more detail in this Selenium IDE tutorial.
Why Selenium IDE Trending In The QA World
The Selenium IDE is far from perfect but the good part is that it is much more than a record & playback tool as it is more feature-driven. Though it cannot be considered a replacement of Selenium WebDriver that is widely used for Selenium test automation, it definitely adds value to automated browser testing. Let’s take a deep dive into the reasons with this Selenium IDE tutorial:
Growing Traction Around ‘Codeless Automation Testing Tools’
The demand for tools that help in codeless automation testing built on AI and visual modeling is expected to rise as they aid in the accelerated creation of test scenarios. This lowers the barrier to entry as testers do not require coding knowledge to come up with test cases. It also minimizes the time spent on repetitive test cases.
Getting started with Selenium test automation in this Selenium IDE tutorial requires only the installation of the add-on (or extension). Selenium IDE lets you generate test cases from the IDE by recording actions that are a part of the tests. “No code” tools are becoming increasingly popular and the development timeline of Selenium IDE makes the premise of codeless automation testing even more interesting!
Positive ‘Features Development’ Timeline
The Selenium IDE project development stopped in 2017. It was available only for the Firefox browser and it was announced that from Firefox 55 onwards, the Selenium IDE will no longer be supported.
The IDE was later re-built with modern APIs and important features for Selenium test automation such as parallel testing, cross browser support, test resiliency, and more are now a part of the Selenium IDE.
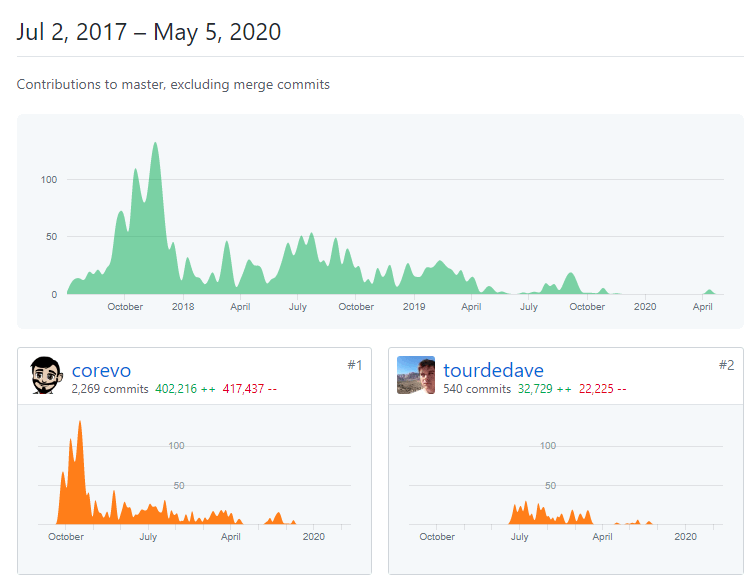
New Selenium IDE is open-source and you can find the code on GitHub. Like other tools in the Selenium test suite it is also managed by the Selenium Community.
The availability of a wide range of browsers has made cross browser testing extremely important as your web application needs to work seamlessly across different browsers. As mentioned before in this Selenium IDE tutorial, parallel test execution can be performed on different browsers and on Selenium WebDriver servers, without writing a single line of code!
This is possible using SIDE runner, the command-line test runner in Selenium IDE. To get started with automated browser testing in this Selenium IDE tutorial, you just need to install SIDE runner and get the necessary browser drivers if the tests have to be executed locally.
SIDE runner can be installed by triggering the following command from the terminal (npm package that is distributed with Node.js has to be installed before issuing the command):
npm install -g selenium-side-runner
Once the SIDE runner is installed, the following commands have to be executed to install the Selenium WebDrivers for different web browsers:
# Installation of Chrome WebDriver
npm install -g chromedriver
# Installation of Microsoft Edge Driver
npm install -g edgedriver
# Installation of Geckodriver for Firefox
npm install -g geckodriver
# Installation of IE WebDriver
npm install -g iedriver
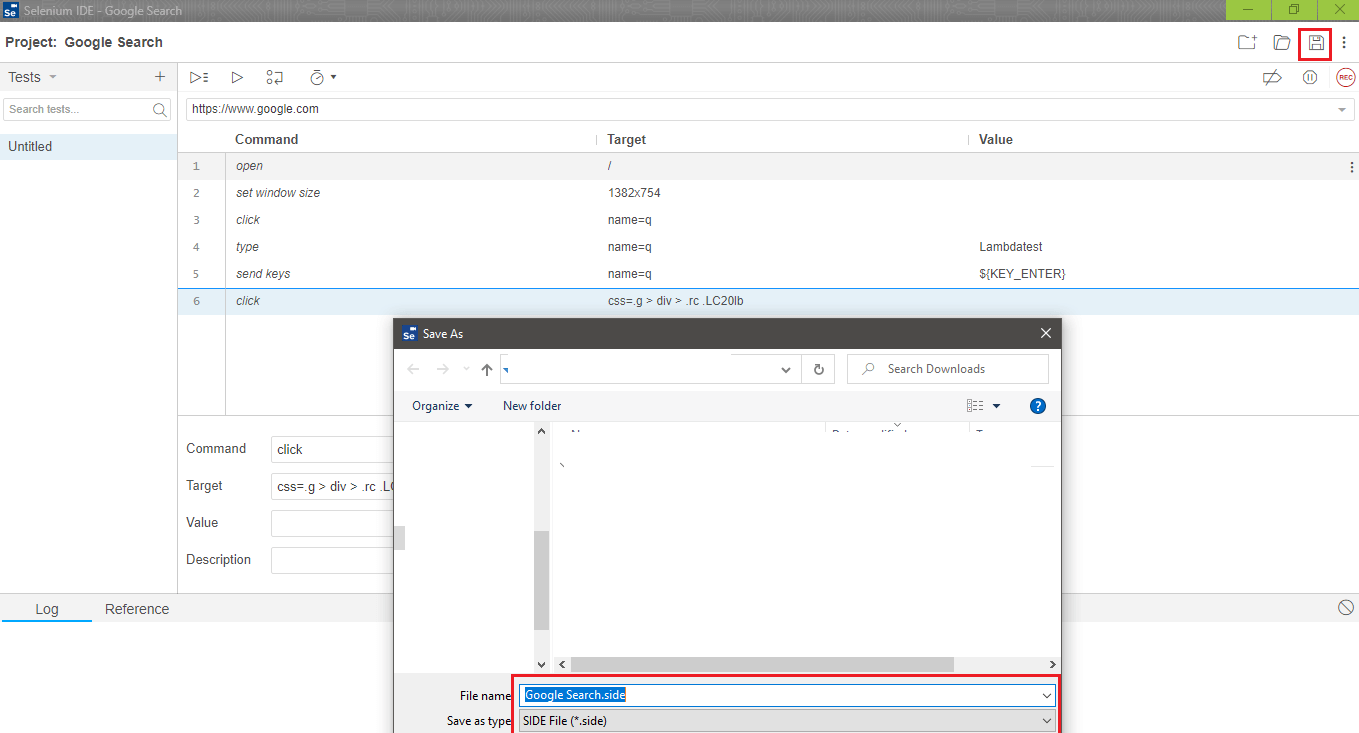
The test scenario recorded using the Selenium IDE has to be saved as a .side file.
The following commands can be used to execute the test on different browsers for local test execution in this Selenium IDE tutorial:
selenium-side-runner -c "browserName=chrome" <test.side>
selenium-side-runner -c "browserName='internet explorer'" <test.side>
selenium-side-runner -c "browserName=edge" <test.side>
selenium-side-runner -c "browserName=firefox" <test.side>
selenium-side-runner -c "browserName=safari"  <test.side>
Shown below is the execution snapshot of the Google Search (for LambdaTest) example in this Selenium IDE tutorial executed on Firefox:
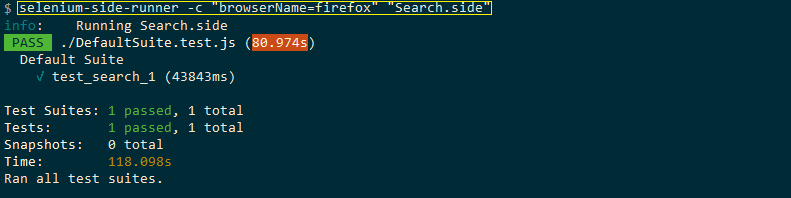
More details about SIDE Runner for parallel testing on Selenium Grid is available here.
Parallel execution of scripts via SIDE runner
The old Selenium IDE could only execute test cases (or test suites) in a serial manner. Parallel testing is extremely important when it comes to automated browser testing as it accelerates the testing process.
The new Selenium IDE lets you execute tests in parallel. Test parallelization in a test suite is possible by changing relevant settings in Selenium IDE. The SIDE runner also lets you execute tests in parallel by just inputting the number of parallel processes that have to be executed. The -w option is used to control the number of parallel processes that are running.
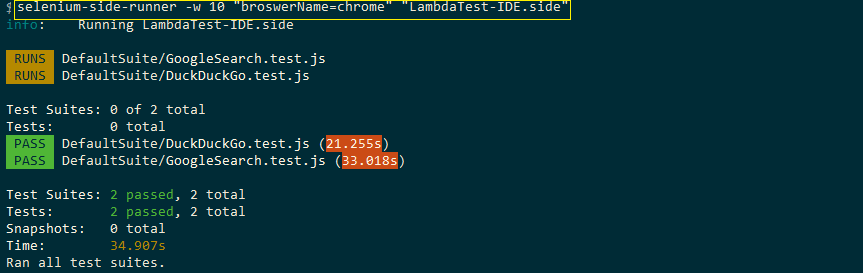
Shown below is the execution snapshot of a test suite that comprises two tests in this Selenium IDE tutorial– Google search for LambdaTest and DuckDuckGo search for LambdaTest.
Selenium IDE Now Provides More Resilient Tests
During the process of automation testing, you would have come across scenarios where an automation test that passed in the previous software release fails in the current release. This sight is common with Selenium test automation and is used for automated browser testing.
The web locators on which actions are performed (as a part of automation tests) might have changed due to changes in the UI code. As the product evolves, tests become more complex and failure of a certain test due to accessibility issues with certain object locators can reduce the test efficiency.
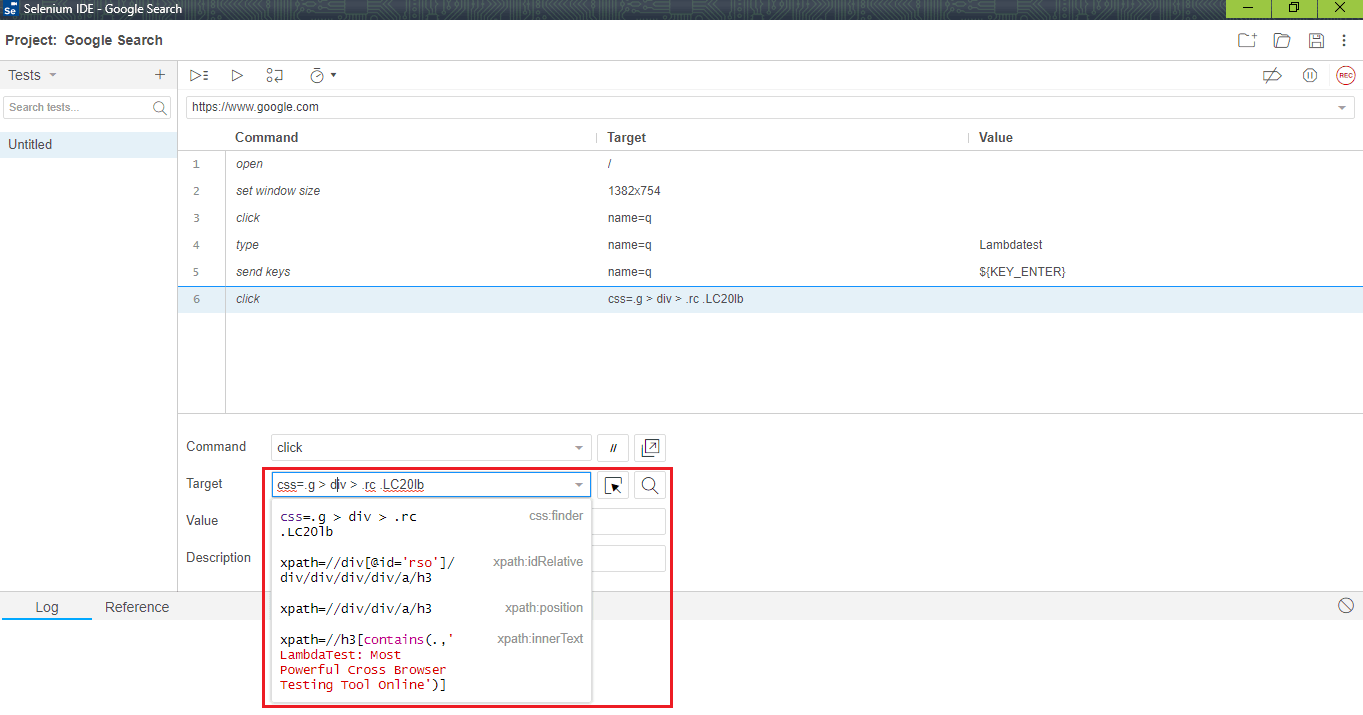
Selenium IDE builds resiliency in automation tests as it records multiple locators for each element that it interacts with. During playback, if Selenium IDE is unable to find a particular locator, it will try with all the other locators on the web page until one of them is successful.
Shown below is a Selenium IDE tutorial example of how the IDE builds test resiliency. Apart from locators based on CSS, Selenium IDE also captures the XPath expression for the Click command.
Support Offered By The New Selenium IDE
As mentioned earlier in this Selenium IDE tutorial, old Selenium IDE has a lot of limitations in functionality. But now it provides a lot of functionality that any tester won’t mind sticking to this tool. Here are some of the functionality Selenium IDE now Supports:
Support For Looping And Condition Logic
During the process of Selenium test automation, you would have come across scenarios where a set of commands have to be executed only when certain conditions are met. Examples are pop-ups (or notices) regarding users’ consent before you use any cookies, newsletter subscriptions, etc.
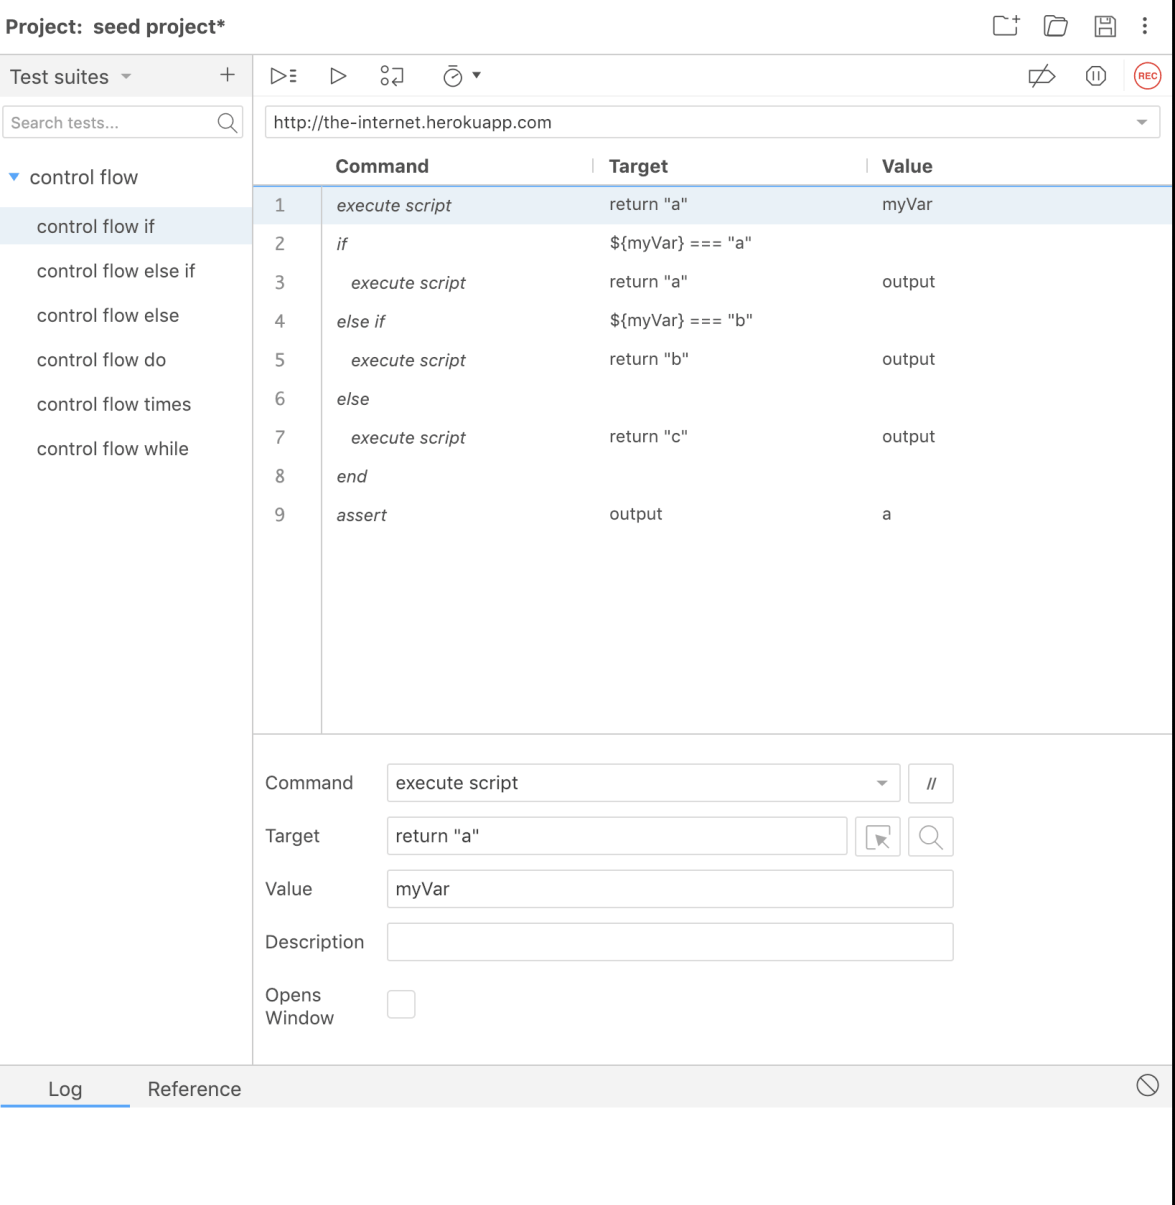
Conditional logic (or control flow) is possible with Selenium IDE through conditional branching that enables to change the behavior in the tests. It also supports looping through the tests where a set of commands can be executed repeatedly based on predefined criteria.
Some of the popular control flow commands that help with conditional branching and looping in Selenium IDE are:
- if, else if, else, end
- times, end
- do, repeat if
- while, end
Shown below is an example of conditional branching in this Selenium IDE tutorial:
Support for Embedded Code
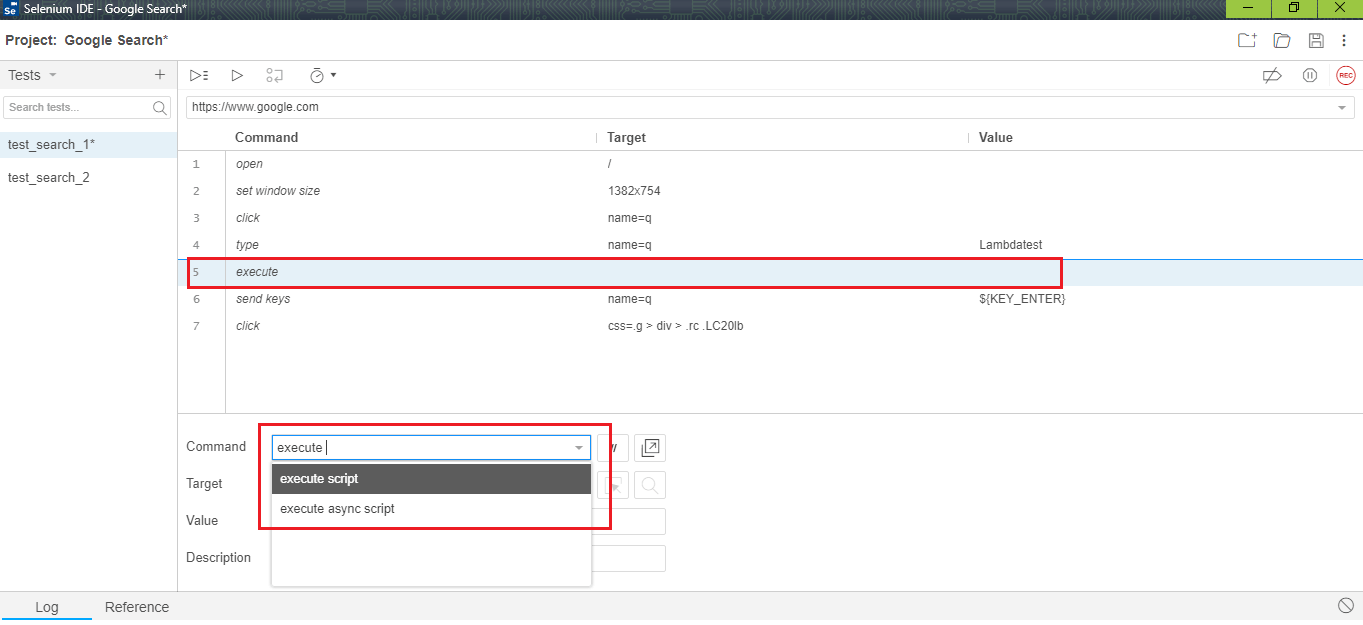
In this Selenium IDE you’ll see that the new IDE lets you leverage the advantage of JavaScript and its wide range of libraries via the execute script or execute async script commands. This lets you execute a JavaScript snippet from within the test script.
The test result of the script execution can be subsequently used in a control flow command to perform conditional execution.
To execute a JavaScript snippet, perform Insert new command at the location where the snippet needs to be called and then you need to execute the script.
Support For Editing Test Scripts
This looks like a basic feature but it was not a part of the old versions of Selenium IDE. If an old test script does not work in a new release, the entire script has to be recorded again. The entire purpose of automation (and even record & playback) testing is lost if editing of script is not possible.
With the new Selenium IDE, test modification was possible as the recorded tests (*.side) were stored in a JSON format. Selenium IDE also supported editing of test scripts where commands could be inserted, removed, or deleted. If you are well-versed with JSON and if minor edits need to be done, you can open the .side file and edit the test script accordingly. However, Selenium IDE should be used for editing test scripts where major changes are involved.
Shown below is an example of editing test scripts in this Selenium IDE tutorial:

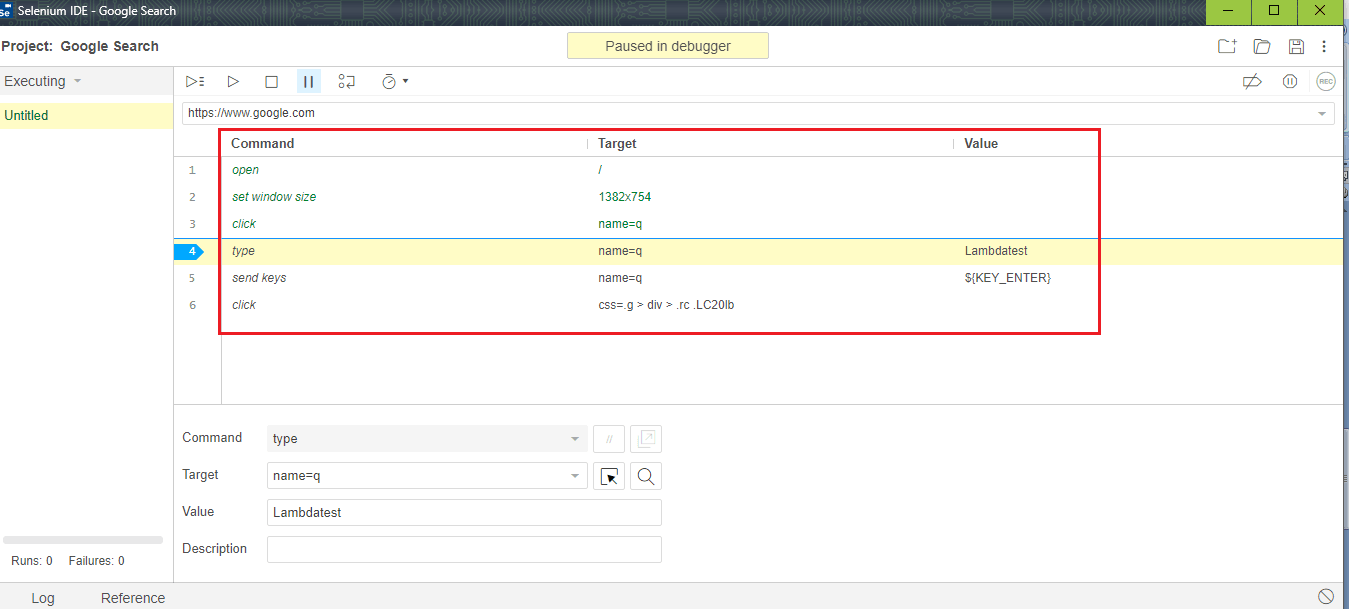
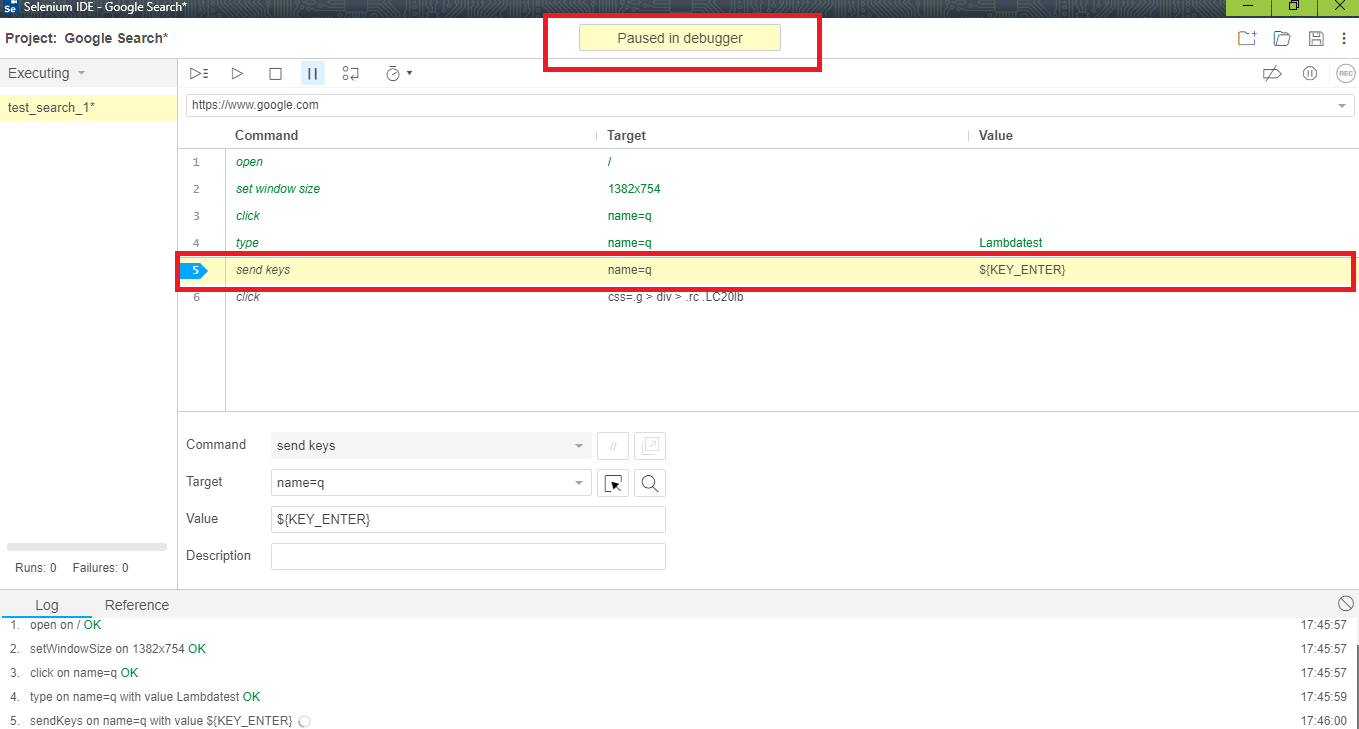
Support for Debugging
The old Selenium IDE did not have support for debugging test scripts. Just like lack of editing scripts, no support for debugging was also considered a deal-breaker for testers who wanted to use the IDE for Selenium test automation.
You also get features such as pausing on exceptions and setting breakpoints. Click on the location in the test script where a breakpoint has to be inserted and click on Toggle breakpoint. In the example below, the execution has halted at the location where it encounters a breakpoint:
Exporting test cases to popular programming languages
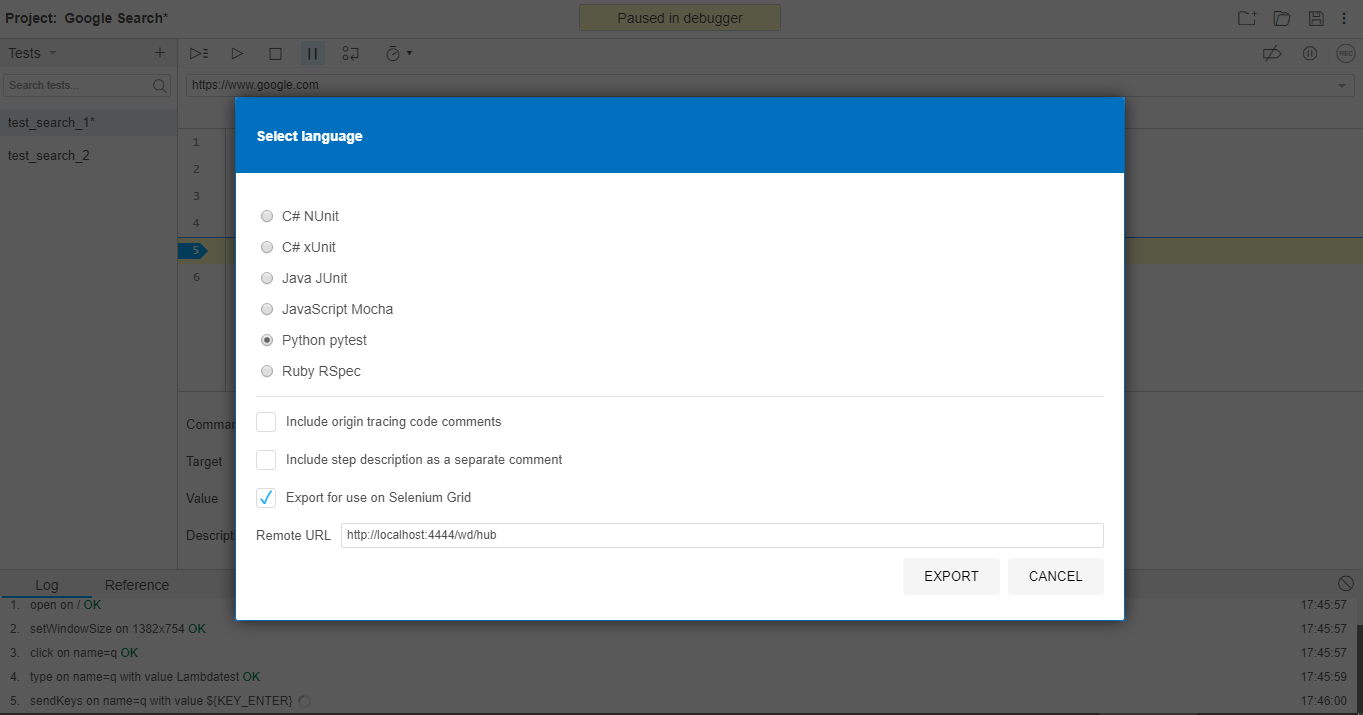
Using the ‘export’ feature in Selenium IDE, a test or a suite of tests can be exported to popular programming languages. Currently, the languages and test frameworks supported are:
- C# NUnit
- C# xUnit
- Java JUnit
- JavaScript Mocha
- Ruby RSpec
- Python PyTest
As mentioned in the official documentation of Selenium IDE, the intent is to support other programming language bindings for Selenium e.g. Java, JavaScript, C#, Python, and Ruby. The export feature can be a huge time saver if you want to come up with a Selenium test automation scenario for languages such as Python, C#, etc.
To export the test case/test suite, right-click on the test, select Export, and choose the programming language of your choice.
Reuse of Test Cases
There are cases where particular test logic needs to be executed across different tests. Re-creating the test logic (or test steps) for various tests is not a feasible solution. For example, the perquisite for performing automation testing on different sections of the LambdaTest website requires valid user-id & password using which the user logs into the platform. The pre-requisite (i.e. Login for signing into LambdaTest) can be created as a separate script.
Selenium IDE now supports modular tests that let you re-use one test case inside another. In the above example for this Selenium IDE tutorial, the Login logic can be invoked by different test scripts thereby easing the maintenance of the test suite. The run script command in Selenium IDE is used to invoke one script from another.
Extensibility with Plugins
The new Selenium IDE is extensible through the use of plugins. The detailed plugin guide for Selenium IDE is available here.
This makes it easier to integrate third-party services or introduce new commands to the IDE. Companies with integrated Selenium WebDriver offerings for Selenium test automation might get interested to develop plugins for Selenium IDE.
Conditional Waits for test automation
Waits are used in Selenium test automation to handle dynamic loading of elements on a web page (or web application). A test script that attempts to interact with a web element that is not yet loaded will lead to failure.
Now the Selenium IDE first waits for the page to load to ensure that web elements on which commands have to be executed are available on the page. Along with this, the IDE has options to control the test execution speed from the toolbar.
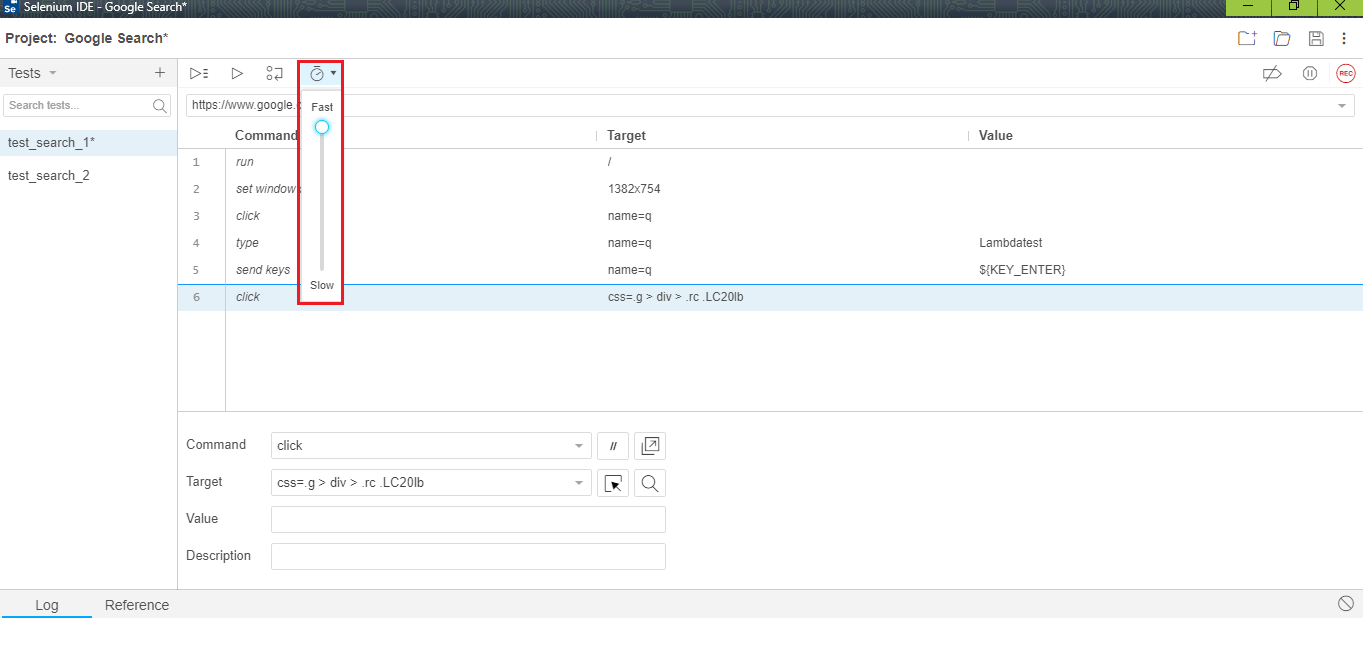
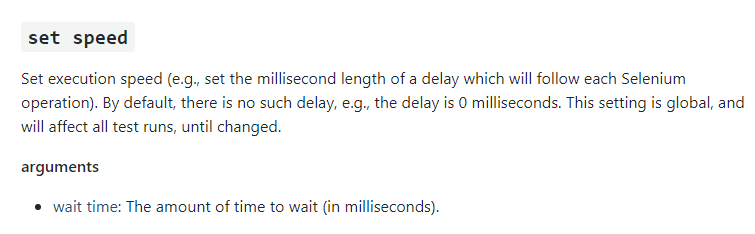
The IDE also provides a set speed command that lets you set the execution speed by adding a global delay that affects all the test runs until changed.
In circumstances where the built in wait strategies in the IDE does not suffice, there is also an option to use explicit wait commands in Selenium IDE such as wait for element editable, wait for element not present, wait for element not visible, etc. These commands are almost similar to commands that help in achieving conditional waits in Selenium WebDriver.
Integration into DevOps Toolchain
Popular Continuous Integration (CI) services (or tools) such as Jenkins, Travis, etc. let you upload input files. The Selenium IDE can be integrated into the DevOps toolchain as the SIDE runner (i.e. selenium-side-runner) can be called from the command line and .side file can fit into CI build scripts.
Management Of Selenium IDE Scripts In A Code Repository
Test scripts recorded using the new Selenium IDE are stored as JSON JavaScript Object Notation) files. This is unlike many other record & playback tools where the test scripts are stored in the binary format.
As scripts are stored in the JSON format, rudimentary operations on test scripts such as comparing, editing, and more are also applicable to the test scripts. Shown below is the snippet of the test script that we have used so far in the blog:
{
  "id": "6aac0257-09f5-49b5-b5bf-4cd1db292425",
  "version": "2.0",
  "name": "LambdaTest-IDE",
  "url": "https://www.google.com",
  "tests": [{
    "id": "43056bdf-0a55-432d-b4fb-1a7be839a490",
    "name": "GoogleSearch",
    "commands": [{
      "id": "6f6c3daa-9494-4d59-abd2-4aabdde5d8b7",
      "comment": "",
      "command": "open",
      "target": "https://www.google.com",
      "targets": [],
      "value": ""
    }, {
      "id": "bfda4546-878b-486b-b827-9670536de481",
      "comment": "",
      "command": "setWindowSize",
      "target": "691x377",
      "targets": [],
      "value": ""
    }, {
      "id": "2e519468-dfc9-4c5a-b0af-c994e44f379a",
      "comment": "",
      "command": "mouseOver",
      "target": "css=#hplogo > a > img",
      "targets": [
        ["css=#hplogo > a > img", "css:finder"],
        ["xpath=//img[@alt='Stay and Play at Home with Popular Past Google Doodles: Halloween (2016)']", "xpath:img"],
        ["xpath=//div[@id='hplogo']/a/img", "xpath:idRelative"],
        ["xpath=//img", "xpath:position"]
      ],
Hence, software version control platforms such as GitHub, GitLab, etc. can be used for maintaining the Selenium IDE scripts.
Wrapping It Up!
In this Selenium IDE tutorial, we explored how Selenium IDE is increasingly becoming popular in the test community with the plethora of features that aid in cross browser testing, parallel testing, along with easy maintenance of the test scripts. It also supports embedded code and is extensible via plugins.
Selenium IDE has become more than a simple record & playback tool with features that are in-line with the feature development of Selenium WebDriver. With the code export feature, it has become one of the ideal tools to get started with automated browser testing using the Selenium framework.
That’s all for this Selenium IDE tutorial! I hope you liked the article, help your peers know how crucial the IDE can be for them by sharing this Selenium IDE tutorial with them or by retweeting us. Happy Testing!!! 😃