


WebDriverIO framework is being widely used by the testing community to perform automation testing on both web applications and native mobile applications. The tests performed on WebdriverIO are simple and concise. Also, you can control browsers with just a few lines of code. All these reasons have made testers adopt WebDriverIO to fulfill their browser testing needs.
In this WebDriverIO tutorial, I am going to cover the WebDriverIO setup, where I’ll show you how to set up the WebDriverIO and run your first automation test. I’ll take a step-by-step approach to give you a detailed explanation of the installation process. I’ll answer any questions that might arise in your mind such as what is WebdriverIo, what are its prerequisites etc.
What is WebDriverIO?
WebdriverIO is a browser and automation test framework based in Node.js. Adding helper functions in WebDriverIO is really simple in WebDriverIO. Also, it can run both on WebDriver protocol and Chrome Devtools protocol, making it efficient for both Selenium Webdriver based cross browser testing or Chromium based automation. To top it off, since WebDriverIO is open source, you get a bunch of plugins for your automation needs.
The Key Features of WebDriverIO:
- Run automation tests both for web applications as well as native mobile apps
- Simple and Easy Syntax
- Integrating tests to third-party tools such as Appium.
- ‘Wdio setup wizard’ to make the setup simple and easy.
- Integrated test runner
WebDriverIO Vs Selenium WebDriver
Both WebDriverIO and Selenium WebDriver are open source and are used for browser testing. Selenium is used for automating browsers, while WebDriverIO is used for automating both browsers and native mobile apps.
By June 2020, Selenium WebDriver on GitHub received 18k stars, and 5.8K forks, while WebDriverIO has received 5.8 K stars and 1.7 K forks. It’s safe to assume that the Selenium Webdriver is stronger. But still, WebDriverIO has its own advantages, as it allows you to control web apps and mobile apps through just a few lines of code. Also, these test scripts are always simple and concise.
Prerequisites For Setting Up WebDriverIO
Now that you know what WebdriverIO is, I’ll further explore the prerequisite for setting up WebDriverIO.
- You need to install NodeJS in your machine before setting up WebDriverIO.
- Additionally, you’ll need to install VSCode IDE
Once you are ready with the above mentioned required tools, you can go ahead with the WebDriverIO setup.
Project Folder Structure
- Open a terminal and create a project folder
- Create a Project Name Folder, In my case, I am giving the project folder name as “WebDriverIOTutorials” and go inside that folder using below command
mkdir WebDriverIOTutorials && cd WebDriverIOTutorials
- Create NPM project ( package.json) by running below command on terminal
npm init -y
The -y is “Yes’. When you run the above command, it starts asking some questions and for those questions, you are saying Yes for all questions asked during initializing. If you do not wish to omit -y then you can do that but you have to give manual all answers. This will set default values set by the NPM project. This will Create package.json file.
Below is the example of with -y and without -y
With -y option:
npm init -y
Wrote to /Users/neeraj.kumar/Neeraj/Projects/WebDriverIO_Tutorial/WebDriverIOTutorials/package.json:

{
  "name": "WebDriverIOTutorials",
  "version": "1.0.0",
  "description": "",
  "main": "index.js",
  "scripts": {
    "test": "echo \"Error: no test specified\" && exit 1"
  },
  "keywords": [],
  "author": "",
  "license": "ISC"
}
Without -y option:
npm init
//Here I will walk you through creating a package.json file for this WebDriverIO tutorial
Reder `npm help json` for definitive documentation

Use `npm install <pkg>` to install a package and
save it as a dependency in the package.json file.

package name: (webdriveriotutorials)
version: (1.0.0)
description:
git repository:
author:
license: (ISC)
About to write to /Users/neeraj.kumar/Neeraj/Projects/WebDriverIO_Tutorial/WebDriverIOTutorials/package.json://

{
  "name": "webdriveriotutorials",
  "version": "1.0.0",
  "main": "index.js",
  "scripts": {
    "test": "echo \"Error: no test specified\" && exit 1"
  },
  "keywords": [],
  "author": "",
  "license": "ISC",
  "description": ""
}

Is this OK? (yes) y
Install WebdriverIO CLI
For this WebDriverIO tutorial, I’ll recommend you to use the test runner. You can find the test runner in @wdio/cli NPM package for WebdriverIO version 5.
Test runner has many great features that could help you during scaling Selenium test automation. In case you’re wondering what is WebdriverIO CLI, you can refer to their official documentation for more information.
In order to install WebDriverIO CLI, execute the below command in the terminal.
npm i --save-dev @wdio/cli
- i option is to install
--save-dev option is for save @wdio/cli library in local npm library under dev section
By running the above command, you’ll create dev dependency and save it in the package.json file. If you open package.json then you will find below entry
"devDependencies": {
   "@wdio/cli": "^6.0.12"
 }
Note:
- I am using the latest version of a dependency, incase you want to use particular dependency then use below command
- If permission deny error then use sudo before the command
npm i --save-dev @wdio/cli@<Version Number>
WebDriverIO Configuration
WebDriverIO configuration helps you to configure the different features available with WebDriverIO . These are the default configuration and you can change them later aswell.
- @wdio/local-runner
- @wdio/mocha-framework
- @wdio/spec-reporter
- @wdio-chromedriver-service
- @wdio/sync – chromedriver
In order configure, you need to write below command
./node_modules/.bin/wdio config -y
Again -y is Yes and you are giving your consent to all prompts asked during the configuration process.
This command will create a “wdio.conf.js” javascript configuration file and you change the configuration as per your need.
If you run the above command, you will see the following WebDriveIO dependencies installed
./node_modules/.bin/wdio config -y

=========================
WDIO Configuration Helper
=========================


Installing wdio packages:
- @wdio/local-runner
- @wdio/mocha-framework
- @wdio/spec-reporter
- wdio-chromedriver-service
- @wdio/sync
- chromedriver
Once installed, you should see below information on your console
Packages installed successfully, creating configuration file...

Configuration file was created successfully!
To run your tests, execute:
$ wdio run wdio.conf.js
If you want to perform Selenium test automation, then you need to execute
wdio run wdio.conf.js
At this stage, I have created folders related to the WebDriverIO setup. You can now start with writing WebDriverIO scripts. In WebDriverIO technical language, it calls the specs folder, you can give any name of the folder.
Create spec folder by running below command for Selenium test automation
mkdir -p ./test/specs
You will see below folder structure:
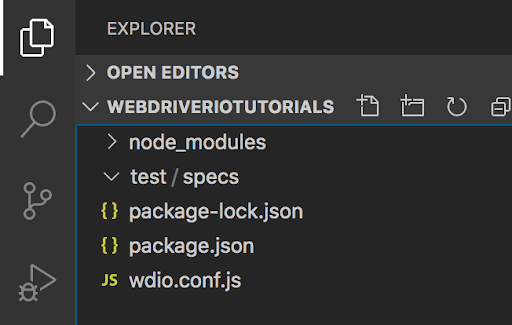
I have created a test/specs folder,where I’ll place all WebDriverIO testing files.
Now, let’s create one sample javascript file called sample.js under test/specs folder
touch ./test/specs/sample.js
Note: If you are running on Window, then create a text file with js extension.
Now, I will write a small Selenium test automation script which opens up the URL: https://www.lambdatest.com/
const assert = require('assert')

describe('LamdaTest page', () => {
   it('should have the Correct Page title', () => {
       browser.url('https://www.lambdatest.com/')
       const title = browser.getTitle()
       assert.strictEqual(title, 'Cross Browser Testing Tools | Free Automated Website Testing | LambdaTest')
   })
})
Execute the First WebDriverIO Script
Now you’re are ready to run your first WebDriverIO script. You just need to run the command shown below:
./node_modules/.bin/wdio run wdio.conf.js
I have created wdio.conf.js which get executed and there is one section called specs shown as below,
specs: [
       './test/specs/**/*.js'
   ],
Default, './test/specs/**/*.js' is mentioned , in this case, all js files get executed. In case you want to execute in particular then change write full file name.
Wrapping It Up!
In this WebDriverIO tutorial, you’ve seen that the WebDriverIO setup is very easy to follow. In comparison to selenium testing configuration, this seems to be very user friendly. There are many features you can configure manually which is very beneficial for automation testing. Additionally, 3rd party services which can be connected to cloud-based services like LamdaTest. Hope you found this WebDriverIO tutorial informative and now have answers to, what is WebDriverIO and how to run your first automation test script with WebDriverIO.
Feel free to share this article with your peers and help them in their journey of learning automation testing. In case of any doubts or questions, do reach out to us in the comment section below. That’s all for now.😊