Building a blog with Remix and Headless Hashnode GraphQL APIs

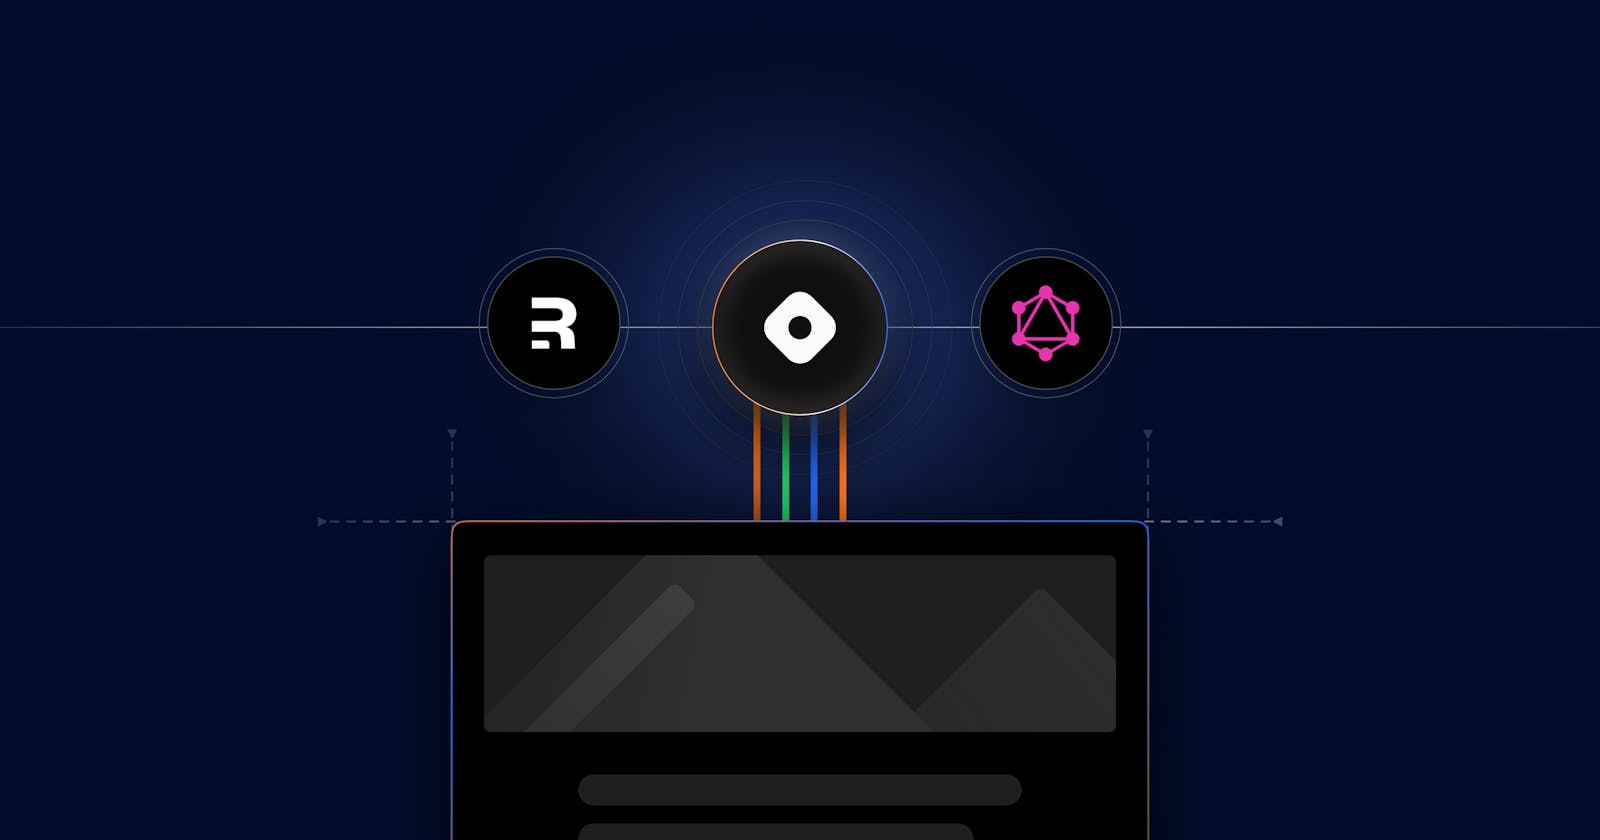
Table of contents
- Set up a front-end project with the Remix framework
- Set up TailwindCSS for styling the front-end
- Create the GraphQL client for accessing data with Hashnode GraphQL APIs
- Fetch data from headless Hashnode with Graphql APIs
- Component architecture for the blog front-end
- Let's create the blog front-end user interfaces
- Global styles to make the HTML content elegant
- Conclusion and what's next?
Developers love customizations, whether with the app they build, their portfolio website, or their blog. With some great blogging platforms offering outstanding features, it is relatively easy for developers and companies to get started with blogging today. However, most of them feel the pain regarding the customization and personalization of their blog.
For blogs, the demand for customization is not limited to changing the brand colour or replacing logos today. The ask is to get full control of it so that developers can build the front-end user interface of the blog completely the way that suits them, with whatever technology stack they want to use.
Welcome, Headless Hashnode. It is a headless CMS designed for building blogs with all batteries included. It’s like Headless Shopify, which can’t be used as a generic CMS but nails the eCommerce front end.
The offerings from the Headless Hashnode are in line with what individual bloggers and companies would look for:
The markdown-based WYSIWYG editor with out-of-the-box blogging features such as tags, reactions, comments, and author pages makes content creation fun.
Reviewing, collaborating, creating, and publishing content is essential for a team. The Headless Hashnode comes with a team blog feature for you to leverage collaboration in blogging.
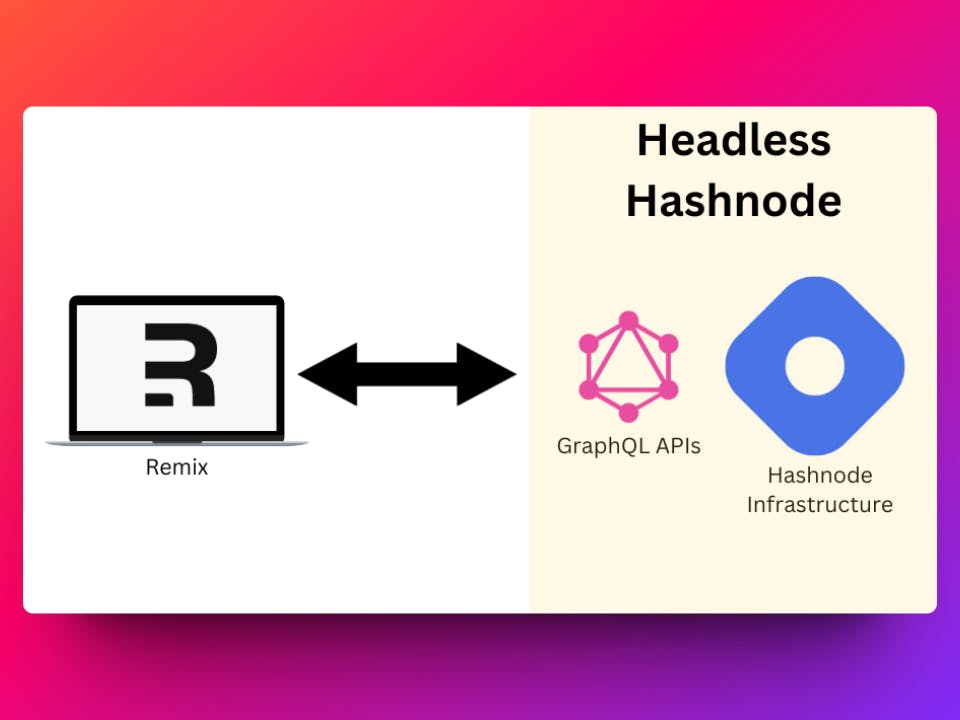
Rolling out your blog front-end while you still leverage the Hashnode infrastructure would be a dream for many bloggers. Headless Hashnode allows you to build your custom blog front-end while you can still manage your content inside the Hashnode infrastructure.
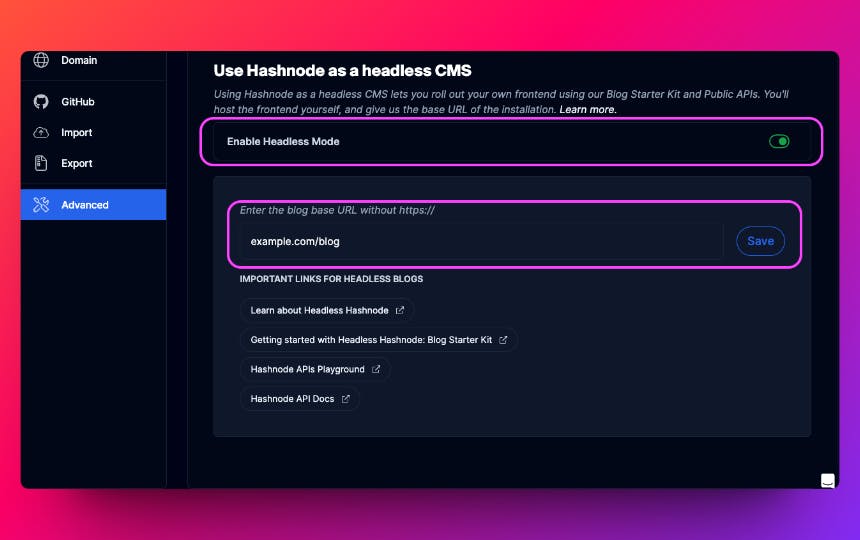
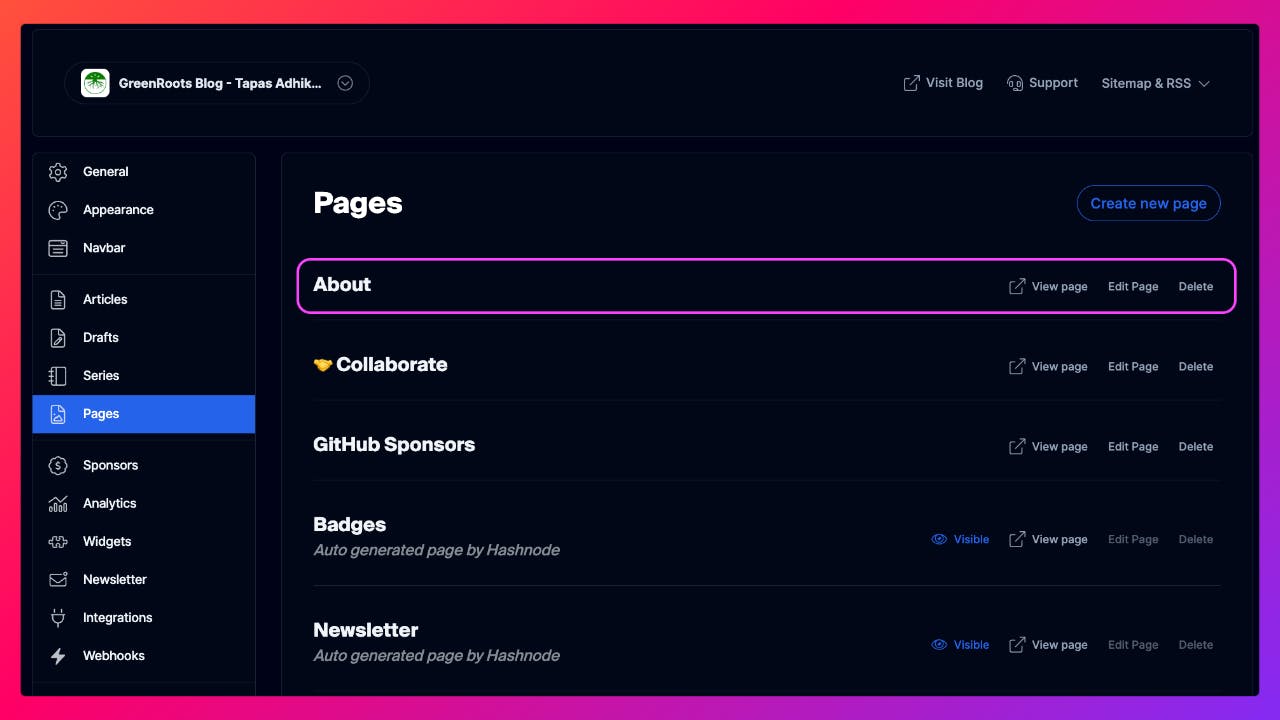
Many companies and individual bloggers would love to host their blog on their domain subpath like this: https://example.com/blog despite the fact they manage their blog content with Hashnode. The Headless Hashnode provides you with the ability to set it up easily. This configuration can be found under the Advanced menu of your blog dashboard:
In this post, we will explore Headless Hashnode with a full-stack web framework called Remix. We will build a custom blog front-end UI with Remix framework and Hashnode's GraphQL APIs.
I strongly encourage you to follow this with me and build it together. The Headless Hashnode is FREE for individual bloggers. It will be a paid product for teams, but Hashnode is running a beta program currently where the first 50 companies would get it for free forever. You can contact the Hashnode team by filling out this form.
Did you know Hashnode created an optimized open-source blog starter kit utilizing Next.js, TailwindCSS, and Headless Hashnode? Check it out here if interested.
Also, if you need to look into the source code of our custom blog front-end or the demo application, you are most welcome to find them here:
Let's get started.
Set up a front-end project with the Remix framework
Remix is a web framework that lets you build full-stack applications focusing on the user experience and web standards. It is easy to set up and get going with a background in ReactJS. If you are new to Remix but have knowledge of ReactJS, you can still follow this article without any hassle.
The first thing is to set up the Remix project. You must need Node.js v18.0.0 or above installed as a prerequisite. Open the terminal/command prompt and type this command to check the Node.js version:
node -v // For me the output is v18.18.2
If it gives you an error or doesn't have the preferred version, please download and install it from here.
Now copy-paste the following command and execute it from your command prompt:
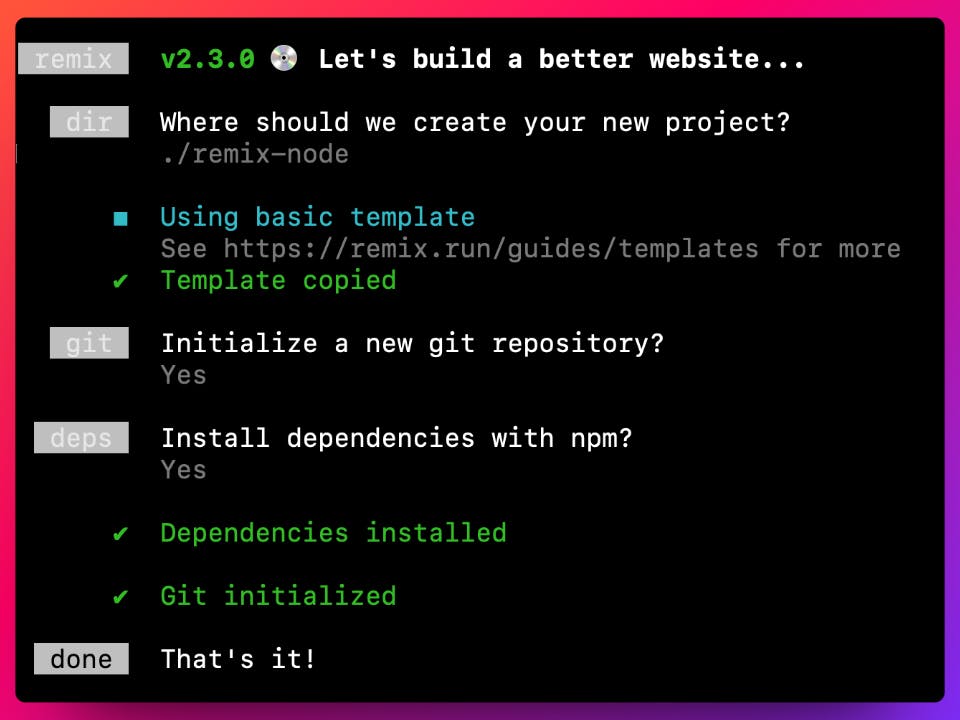
npx create-remix@latest
It will ask you a few basic questions like,
Where to create the project - Give a suitable directory name.
Whether to initialize a git repository - Opt for it.
Also, say yes to install dependencies.
After installing the dependencies, change the directory to your project directory and execute the following command:
npm run dev # Or, yarn dev
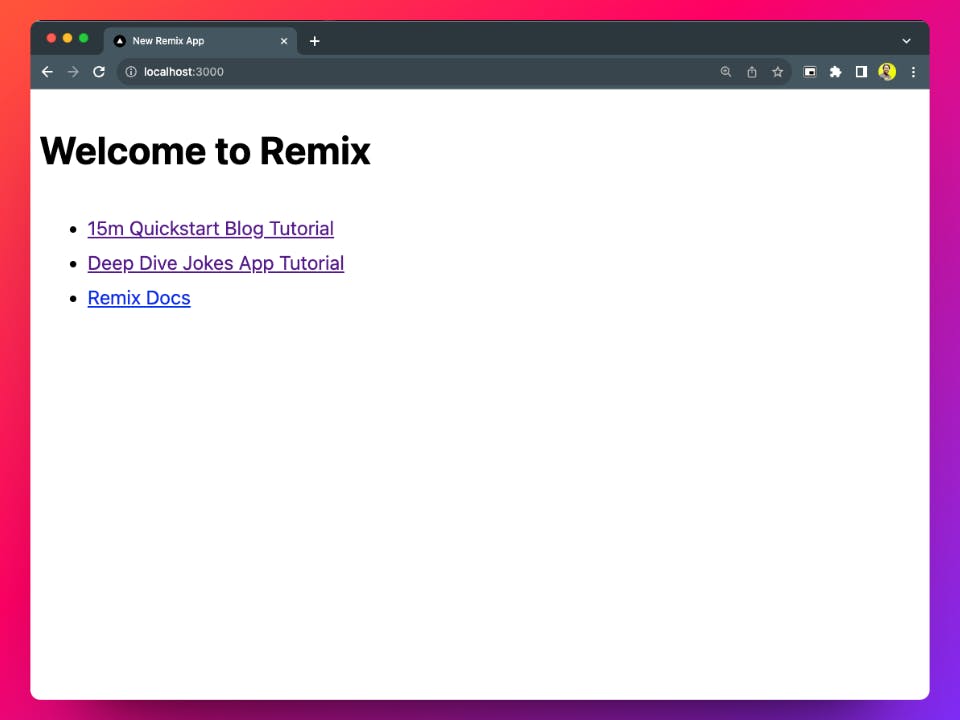
The node server will run locally, and the user interface will be served at http://localhost:3000 by default. Open a browser tab and access it. You should see an initial user interface like the one shown below.
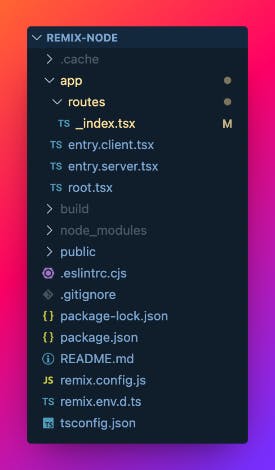
Now, use your favourite code editor/IDE to import the project directory so we can start the coding. Here is the screenshot of the project structure from my VS Code editor.
Remix supports TypeScript by default. However, we will use JavaScript to build the user interface, as most developers still feel comfortable. If you are a TypeScript lover like me, you can still follow this article and use the code in your TypeScript project with minimal tweaks.
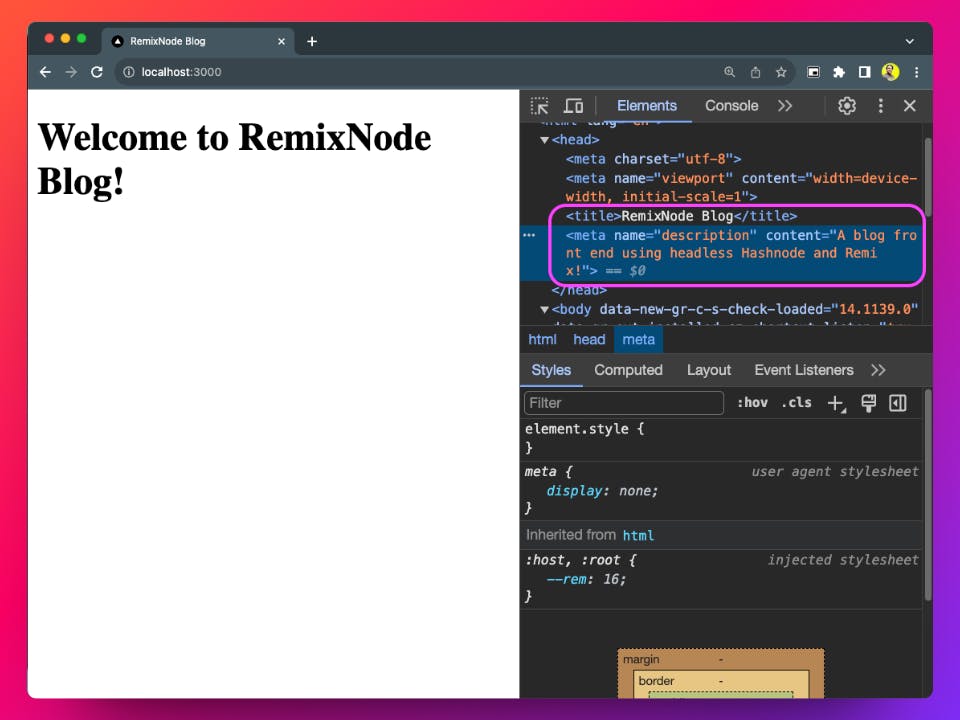
If you want, you can rename the _index.tsx file to _index.jsx as all other files we will create will be either a jsx or js file. Now copy and paste the following code snippet into the _index.jsx file:
// File: /app/routes/_index.jsx

import { MetaFunction } from "@remix-run/node";

export const meta = () => {
  return [
    { title: "RemixNode Blog" },
    {
      name: "description",
      content: "A blog front end using headless Hashnode and Remix!" },
  ];
};

export default function Index() {
  return (
    <div>
      <h1>Welcome to RemixNode Blog!!</h1>
    </div>
  );
}
You can see the user interface reflecting the change with the heading tag and the meta information we have provided for SEO purposes.
Set up TailwindCSS for styling the front-end
We will use TailwindCSS to style the blog front end. Let us install and set it up quickly. Please stop the local node server if it is running. Copy and paste the following commands in your command prompt and execute them.
npm install -D tailwindcss
npx tailwindcss init --ts
The above commands will install the TailwindCSS for you and create a configuration file called tailwind.config.ts. Please open the file and replace the content with the code below. Here, we have added the types of files TailwindCSS must honour and work for.
// File: /app/tailwind.config.ts
import type { Config } from 'tailwindcss'

export default {
  content: ['./app/**/*.{js,jsx,ts,tsx}'],
  theme: {
    extend: {},
  },
  plugins: [],
} satisfies Config
Now, inside the app/ directory, create a file tailwind.css with the following code.
@tailwind base;
@tailwind components;
@tailwind utilities;
Finally, import the tailwind.css file into the root.tsx file, and use it as the stylesheet.
// File: /app/root.tsx
import tailwindstylesheet from "~/tailwind.css";

export const links: LinksFunction = () => [
  { rel: "stylesheet", href: tailwindstylesheet },
];
Now, start the local node server again for us to continue the coding with the power of TailwindCSS.
npm run dev
Create the GraphQL client for accessing data with Hashnode GraphQL APIs
We will use Hashnode's GraphQL APIs to interact with the blog data in Hashnode. The APIs are hosted on https://gql.hashnode.com/, and you can explore them before consuming them in your application development. Here is the complete API documentation you can refer to: https://apidocs.hashnode.com/
However, we need a GraphQL client so our blog front-end UI can access the blog data using Hashnode's GraphQL APIs. Let's install graphql and graphql-request libraries to get a GraphQL client and handle queries.
npm install graphql graphql-request
Now, create a directory called lib/ under the app/ directory. Create a file called graphQLClient.js under the app/lib/ directory with the following code:
// File: /app/lib/graphQLClient.js

import { GraphQLClient } from "graphql-request";

export const getClient = () => {
  const client = new GraphQLClient(`https://gql.hashnode.com`);
  return client;
}
Here, we are creating the GraphQL client and making it accessible with the function getClient() so that any other part of the project can use it.
Fetch data from headless Hashnode with Graphql APIs
It's time we start writing the queries to fetch the blog data from the headless Hashnode. We will write three queries to handle these scenarios:
Fetch the latest 20 blog posts from a blog.
Fetch the details of a particular post from a blog.
Fetch the content of any static page(say, the About page) from a blog.
Create a directory called queries/ under the app/ directory. Now, create a file blog-data.js under the app/queries/ directory.
GraphQL query to fetch multiple posts from a blog
Copy and paste the following code into the blog-data.js file**.**
// File: /app/queries/blog-data.js

import { gql } from "graphql-request";
import { getClient } from "../lib/graphQLClient";

export const getAllPosts = async (tags) => {
  const client = getClient();

  const data = await client.request(
    gql`
      query allPosts($tags: [ObjectId!]) {
        publication(host: "blog.greenroots.info") {
          title
          posts(first: 20, filter:{tags: $tags}) {
            pageInfo{
              hasNextPage
              endCursor
            }
            edges {
              node {
                author{
                  name
                  profilePicture
                }
                title
                subtitle
                brief
                slug
                coverImage {
                  url
                }
                tags {
                  name
                  slug
                  id
                }
                publishedAt
                readTimeInMinutes
              }
            }
          }
        }
      }
    `,
    { tags: tags }
  );

  return data.publication.posts.edges;
};
Let's understand what's happening in the above code:
We import the getClient() function to make the API requests.
Then, we form a query to fetch 20 posts from a publication. Please note that the query method allPosts() takes a tags array as a parameter. This is because we will use the same query to fetch the posts filtered by one or more tags. When we pass no tags(empty array) as filter criteria, it returns all the posts.
We return all the necessary information for each post so we can use it in the user interface components soon.
GraphQL query to fetch particular post details of a blog
Now, let's write the query to fetch the details of a particular post. We will identify a post by its slug.
how-to-learn is the slug of the URL https://example.com/blog/how-to-learn.Copy and paste the following function in the same blog-data.js file.
// File: /app/queries/blog-data.js

export const getPost = async (slug) => {
  const client = getClient();

  const data = await client.request(
    gql`
      query postDetails($slug: String!) {
        publication(host: "blog.greenroots.info") {
          post(slug: $slug) {
            author{
              name
              profilePicture
            }
            publishedAt
            title
            subtitle
            readTimeInMinutes
            content{
              html
            }
            tags {
              name
              slug
              id
            }
            coverImage {
              url
            }
          }
        }
      }
    `,
    { slug: slug }
  );

  return data.publication.post;
};
GraphQL query to fetch a static page content
You can create static pages under your blog in Hashnode. These pages are extremely helpful when you want to keep content outside your blog posts, i.e., an About page, a Contact page, etc. The slug can automatically identify each page Hashnode creates when you create the pages in your blog dashboard.
In the code snippet below, we have a function that queries and gets the content of the About page from a specified publication. Please copy and paste the code into the blog-data.js file as before.
// File: /app/queries/blog-data.js

export const getPage = async () => {
  const client = getClient();

  const page = await client.request(
    gql`
      query pageData {
        publication(host: "blog.greenroots.info") {
          staticPage(slug: "about") {
            title
            content {
              html
            }
          }
          title
        }
      }
    `
  );
  return page.publication.staticPage;
};
That's it. We are done with all required data access. Now it's time to focus on the user interfaces where we will consume the data to build a super cool blog front-end.
Component architecture for the blog front-end
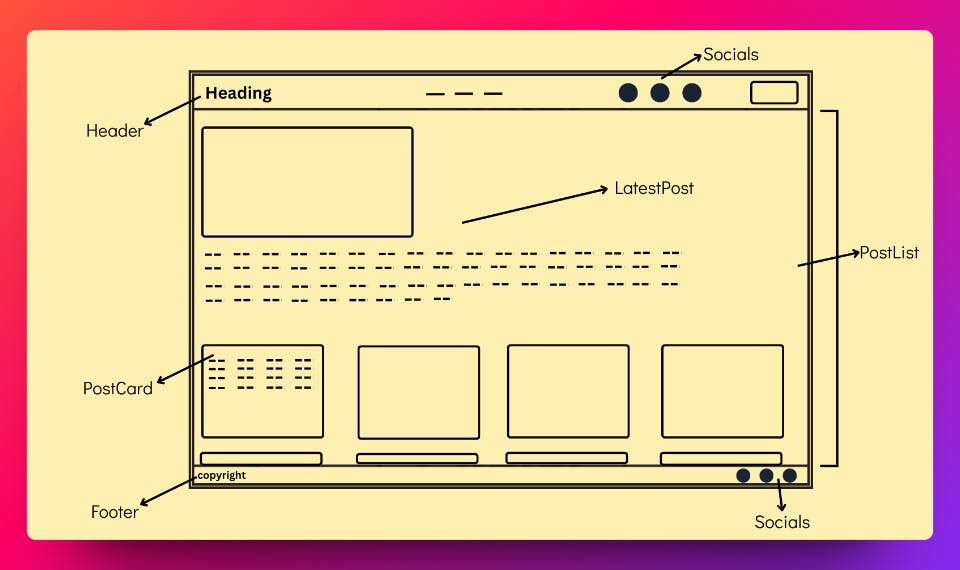
First, Let us visualize the user interfaces and the components we will need for the front-end app. Here is a low-fidelity wireframe of the post list page. We have marked components like Headers, Footers, PostList, Social, PostCard, etc.
Also, notice how these components are composed. For example, the Header and Footer components have the Socials component. Similarly, the PostList component has other components like LatestPost and PostCard.
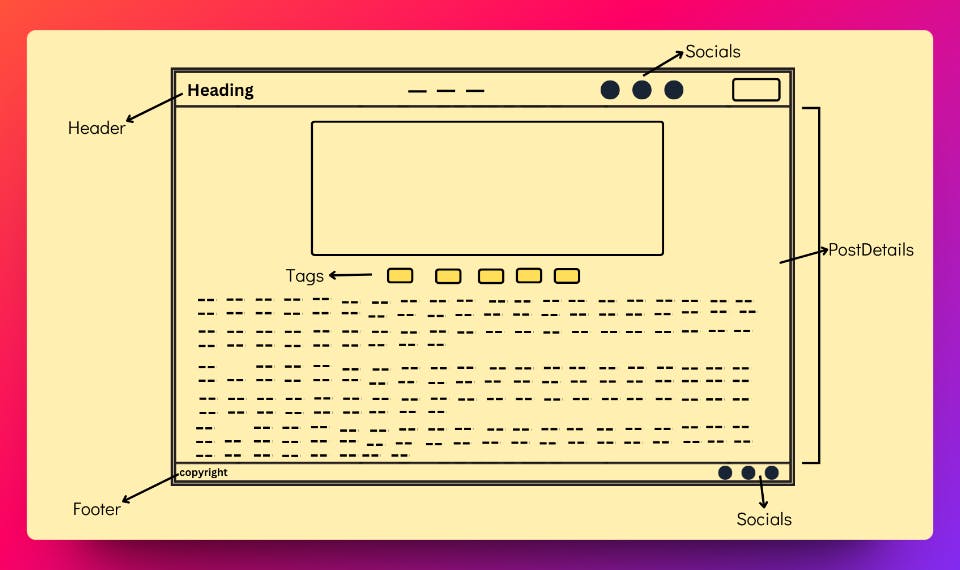
Now, let's take a look at the design of the post details page. Users will land on this page when they click on a post from the previous page. This page also has the Header and Footer components like the previous page. It doesn't have other components but has new components called PostDetails and a list of Tag components.
If you could imagine the design of an About page, it will have the same Header and Footer along with the content. Did you notice we have repeated the Header and Footer components multiple times across the pages? It's better if we make them part of a layout so we do not have to repeat them.
Here is the component hierarchy we can think of:
Layout.jsx
Header.jsx
- Social.jsx
Footer.jsx
- Social.jsx
PostList.jsx
LatestPost.jsx
PostCard.jsx
PostDetails.jsx
- Tag.jsx
Then, we will have four pages using the above component hierarchies:
Posts page(with the route /posts route)
Post details page(with the /posts/{slug} route)
Post by tags page(with the /tags/{tagId} route)
An About page(with the /about route)
Let's create the blog front-end user interfaces
With all this understanding, let us create them one by one.
Create a Layout
As planned, we will first create a layout. We need a header and footer for that. We have seen both the Header and Footer use a Social component. Let's create the Social component first.
Create a directory called components/ under the app/ directory and create a file Socials.jsx under it with the following code. It is a simple component with two links pointing to Twitter and GitHub profiles.
// File: /app/components/Socials.jsx

import twitter from "../../public/twitter.svg";
import github from "../../public/github.svg";

export default function Socials() {
  return (
    <>
      <a href="https://twitter.com/@tapasadhikary" target="_blank">
        <img className="w-full h-auto" src={twitter} alt="Twitter" />
      </a>
      <a href="https://github.com/atapas" target="_blank">
        <img className="w-full h-auto" src={github} alt="GitHub" />
      </a>
    </>
  );
}
Now, we will create the Header component. Create a file Header.jsx into the components/ directory with the following code:
// File: components/Header.jsx

import Socials from './Socials';

export default function Header() {
  return (
    <header className="flex justify-between items-center px-8 py-4 bg-[#020617] text-white">
      <h1 className="text-lg font-bold"><a href="/">RemixNode's Blog</a></h1>
      <nav className="flex space-x-6">
        <a href="/">Home</a>
        <a href="/posts">Blog</a>
        <a href="/about">About</a>
      </nav>
      <div className="flex items-center space-x-4">
        <Socials />
        <button className="inline-flex items-center justify-center rounded-md text-sm font-medium ring-offset-background transition-colors focus-visible:outline-none focus-visible:ring-2 focus-visible:ring-ring focus-visible:ring-offset-2 disabled:pointer-events-none disabled:opacity-50 border border-input hover:bg-accent hover:text-accent-foreground h-10 px-4 py-2 bg-black text-white">
          Sign Up
        </button>
      </div>
    </header>
  );
}
A straightforward ReactJS component that uses the Social component. It also has three navigation links and a signup button. It's time for the Footer component.
The footer will use the socials along with a copyright text. Create a file called Footer.jsx into the components/ directory with the following code:
// File: components/Footer.jsx

import Socials from './Socials';

export default function Footer() {
  return (
    <footer className="flex justify-between items-center px-8 py-4 bg-[#020617] text-white">
      <p>© 2023 RemixNode's Blog</p>
      <div className="flex items-center space-x-4">
        <Socials />
      </div>
    </footer>
  );
}
We can now create a Layout as we have the Header and Footer. A layout is a reusable component where you can pass the content as a child prop, and it will sit between the header and footer. Our layout does the same.
Create a file Layout.jsx into the components/ directory with the following code:
// components/Layout.jsx

import Header from './Header';
import Footer from './Footer';

export default function Layout({ children }) {
    return (
        <div className="flex flex-col min-h-screen">
            <Header />
            <main>
                {children}
            </main>
            <Footer />
        </div>
    );
}
Now, we have to use this Layout somewhere so that it remains available for all the pages we will create. Before that, we will export the Layout component from the index file under the components/ directory. Also, in future, if we want to export any other components, we will do them from the same index file.
Create an index.js file under the component/ directory with the following code:
// File: components/index.js

import Layout from "./Layout";

export {
  Layout,
};
Now open the root.tsx file under the app/ directory and import the Layout component. Then, in the APP function, find the <body> tag and wrap everything inside the <body> tag with the <Layout> component, as shown below.
// File: root.tsx

import { Layout } from './components';

// ------- ------- ------ ----- --
// ----- Above code as it was ----
// ------- ------- ------ ----- --
export default function App() {
  return (
    <html lang="en">
      <head>
        <meta charSet="utf-8" />
        <meta name="viewport" content="width=device-width, initial-scale=1" />
        <Meta />
        <Links />
      </head>
      <body>
        <Layout>
          <Outlet />
          <ScrollRestoration />
          <Scripts />
          <LiveReload />
        </Layout>
        <TailwindIndicator />
      </body>
    </html>
  );
}
Our layout is ready! Now access the app on your browser. You should see the header and footer with the page content we had created initially.

Create a page to list all posts
Let us now create the posts page to list all the posts. We have to create a route in the Remix application, and the route will have the page content. We will create a route called /posts. So, create a file posts._index.jsx under the app/routes directory with the following code:
Please note the file name format. The portion before the dot(.) is the route, and the portion after the underscore(_) is the page for the route. Hence, the file name
posts._index.jsxsignifies the /posts route, and under that, a page with index.jsx file.
With Remix, each routing module can export a loader() method to fetch the data asynchronously and the same data we can expect inside the component using the useLoaderData(). In the page component below, we fetch and return all the posts inside the loader() method. We access the fetched posts inside the Posts component using the useLoaderData() method and pass it as a prop to the PostList component.
// File: app/routes/posts._index.jsx

import {useLoaderData} from '@remix-run/react';

import {PostList} from '../components';
import {getAllPosts} from '../queries/blog-data';


export async function loader() {
  const posts = await getAllPosts();
  return posts ;
}

export default function Posts() {
  const posts = useLoaderData();
  return (
    <>
     <PostList posts={posts} />
    </>
  );
}
Now, we will create the PostList component. Create a file PostList.jsx under the components/ directory with the following code:
// File: app/components/PostList.jsx

import { Link } from "@remix-run/react";
import { PostCard, LatestPost } from ".";
import { getFormattedDate } from "../utils";

export default function PostList({ posts }) {
  // posts are sorted by time. Get the latest one.
  const latestPost = posts[0].node;
  // rest of the post to handle separately.
  const restPosts = posts.slice(1);

  return (
    <>
      <div className="px-8 py-8 bg-gray-100">
        <LatestPost post={latestPost} />
      </div>

      {
        restPosts.length > 0 && (
        <div className="px-8 py-16">
          <div className="grid gap-4 mt-4 grid-cols-1 md:grid-cols-2 lg:grid-cols-3">
            {
              restPosts.map((post) => (
                <PostCard key={post?.node?.slug} post={post?.node} />
              ))
            }
          </div>
          <button className="inline-flex items-center justify-center rounded-md text-sm font-medium ring-offset-background transition-colors focus-visible:outline-none focus-visible:ring-2 focus-visible:ring-ring focus-visible:ring-offset-2 disabled:pointer-events-none disabled:opacity-50 bg-black text-white hover:bg-black/90 h-10 px-4 py-2 mt-8">
            Show More Posts
          </button>
        </div>)
      }
    </>
  );
}
As we discussed in the design, the PostList component will show the latest post at the top and the rest as a card at the bottom. So, in the code above, we have passed the first post(latest) to the LatestPost component.
Then, we iterate over the rest of the posts and render a PostCard component for each post. We have also added a button to show more posts; however, we will not implement the functionality. Consider this as a task for you to complete!
Alright! Let's create the LatestPost component. Create a file LatestPost.jsx with the following code:
// File: app/components/LatestPost.jsx

import { Link } from "@remix-run/react";
import { getFormattedDate } from "../utils";

export default function LatestPost({ post }) {
  return (
    <Link to={`/posts/${post.slug}`}>
      <article className="mt-4">
        <h3 className="text-xl font-semibold">{post.title}</h3>
        <p className="text-gray-500">
          Posted on {getFormattedDate(post.publishedAt)}
        </p>
        <img
          alt="Cover image"
          className="mt-4 object-cover rounded-md xs:w-full sm:w-full md:w-2/3 lg:w-2/3 xl:w-1/2 2xl:w-1/3"
          src={post.coverImage?.url}
        />
        <p className="mt-4 text-gray-700">{post.brief}</p>
      </article>
    </Link>
  );
}
The component shows a post's basic details and links it with a route called /posts/{slug} that we will create in a while.
The PostCard component also shows information similar to the LatestPost component, but the component structures are different. Create a file PostCard.jsx under the directory components/ with the following code**:**
// File: app/components/PostCard.jsx

import { Link } from "@remix-run/react";
import { getFormattedDate } from "../utils";

export default function PostCard({ post }) {
  return (
    <div className="card bg-white shadow-lg rounded-lg overflow-hidden">
      <Link to={`/posts/${post.slug}`}>
        <img
          alt="Cover image for A Guide to CSS Flexbox"
          className="object-cover w-full h-auto"
          src={post.coverImage.url}
        />
        <h3 className="text-xl font-semibold p-4">{post.title}</h3>
        <p className="text-gray-500 p-4">Posted on {getFormattedDate(post.publishedAt)}</p>
        <p className="mt-2 text-gray-700 p-4">
          {post.brief}
        </p>
      </Link>
    </div>
  );
}
The LatestPost and PostCard components use a method getFormattedDate() to format the post's publication date. Let's create a utility method. Create a directory named utils/ under the app/ directory and a file called index.js under the app/util/ directory with this code:
// FIle: app/utils/index.js

export const getFormattedDate = (dateString) => {
  return new Intl.DateTimeFormat('en-US', {
    year: "numeric",
    month: "long",
    day: "numeric",
    }).format(new Date(dateString));
}
Great! Finally, let's export all the newly created components from the /components/index.js file as we previously did with the Layout component.
// File: /components/index.js

import Layout from "./Layout";
import PostList from "./PostList";
import PostCard from "./PostCard";
import LatestPost from "./LatestPost";

export {
  Layout,
  PostList,
  PostCard,
  LatestPost,
};
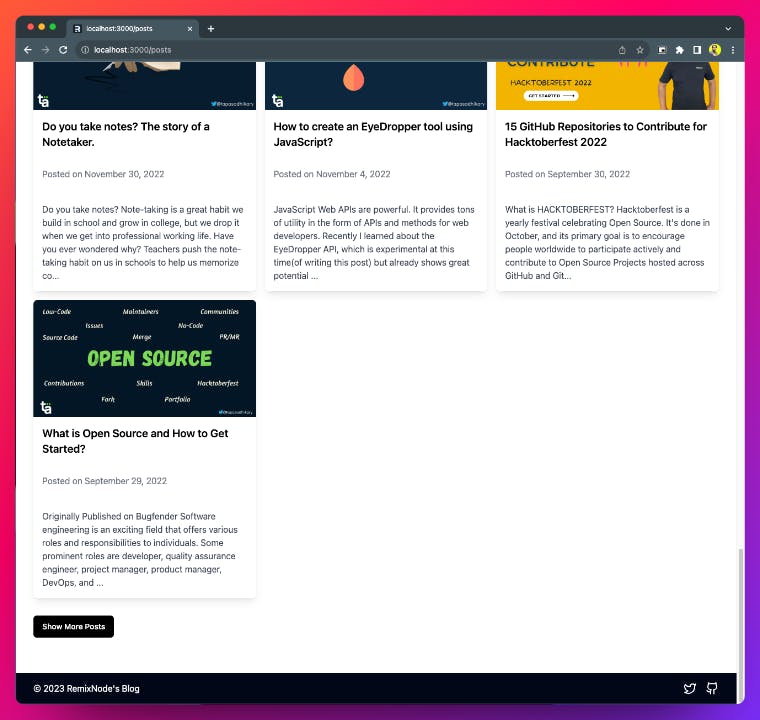
That's it. We have a post-list page. Please access the route as http://localhost:3000/posts, and you should see a post list page like the following:
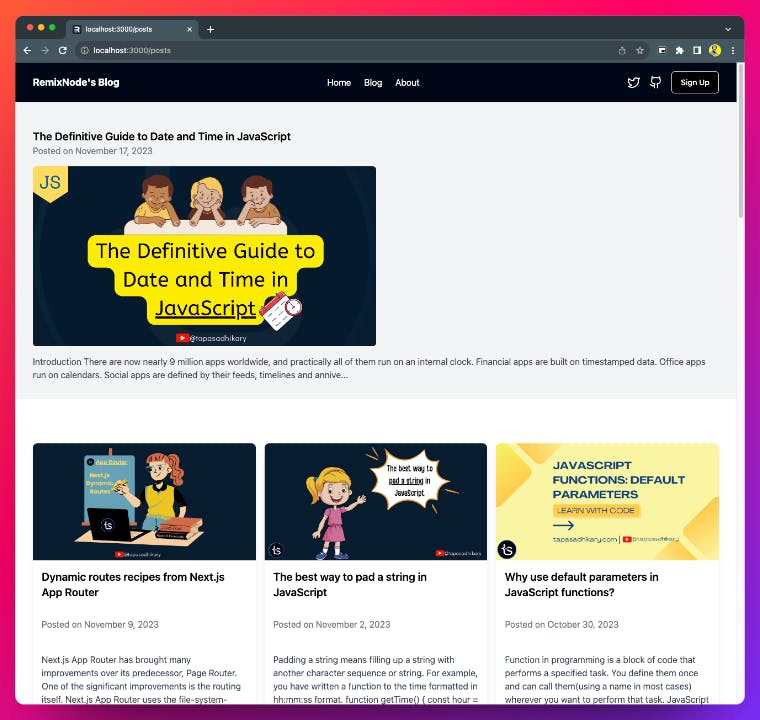
The page should show 20 posts, and when you scroll down, you will get the Show More Posts button at the bottom. Don't forget to implement the functionality for it. I have left a clue for you at the end of this article.
Create the post details page
We will create a new route to handle the post details page. The route will be in /posts/${slug} format. So, create a file posts.$slug.jsx under the app/routes/ directory with this code:
// File: app/routes/posts.$slug.jsx

import { useLoaderData } from "@remix-run/react";
import { getPost } from "../queries/blog-data";
import { PostDetails } from "../components";

export async function loader({ params }) {
  const { slug } = params; // get the post slug
  const post = await getPost(slug);
  return post;// return the post data
}

export default function PostSlug() {
  const post = useLoaderData();
  return (
    <PostDetails post={post} />
  );
}
The above code is a page component for a route. It can get a loader() function to perform asynchronous calls to fetch data. We call the getPost() method, passing the slug to get the details of a post. The fetched post details will be available to the component through the useLoaderData() method. As we get the post details, we pass it as a prop to the PostDetails component.
Create a PostDetails.jsx file under the app/components directory with this code:
// File: app/components/PostDetails.jsx

import { Tag } from ".";

export default function PostDetails({ post }) {
  return (
    <article className="bg-white p-3 mt-3 flex flex-col justify-center items-center">
      <img className="rounded-lg" src={post.coverImage?.url} alt={post.title} />
      <h1 className="text-4xl font-bold pt-5">{post?.title}</h1>
      <h2 className="text-xl pt-3 pb-3">{post.subtitle}</h2>
      <div className="flex mb-4">
      {
        post.tags.map((tag) => (
          <Tag tag={tag} key={tag.id} />
        ))
      }
      </div>
      <div
        className="post-details"
        dangerouslySetInnerHTML={{ __html: post.content.html }} />
    </article>
  );
}
The PostDetails component gets a post as a prop and shows a few details, like the title, subtitle, and the post's main content. Notice we also use a Tag component to render the tags on the PostDetails page. Let's create the Tag component. Also, note we fetch the page content as HTML and push it to the div using dangerouslySetInnerHTML.
Tag is a simple component that displays tag name and link them to a route called /tags/{tagId} so that we can show the posts matching a tag. Create a file Tag.jsx with the following code under components/ directory.
// File: app/components/Tag.jsx

export default function Tag({ tag }) {
  return (
    <div className="m-1 bg-gray-500 text-white rounded-md p-1 text-sm">
      <a href={`/tags/${tag.id}`}>{tag.name}</a>
    </div>
  );
}
Finally, let's add the newly created components in the /components/index.js file to export them.
// File: app/components/index.js

import Layout from "./Layout";
import PostList from "./PostList";
import PostCard from "./PostCard";
import PostDetails from "./PostDetails";
import Tag from "./Tag";
import LatestPost from "./LatestPost";

export {
  Layout,
  PostList,
  PostCard,
  PostDetails,
  Tag,
  LatestPost,
};
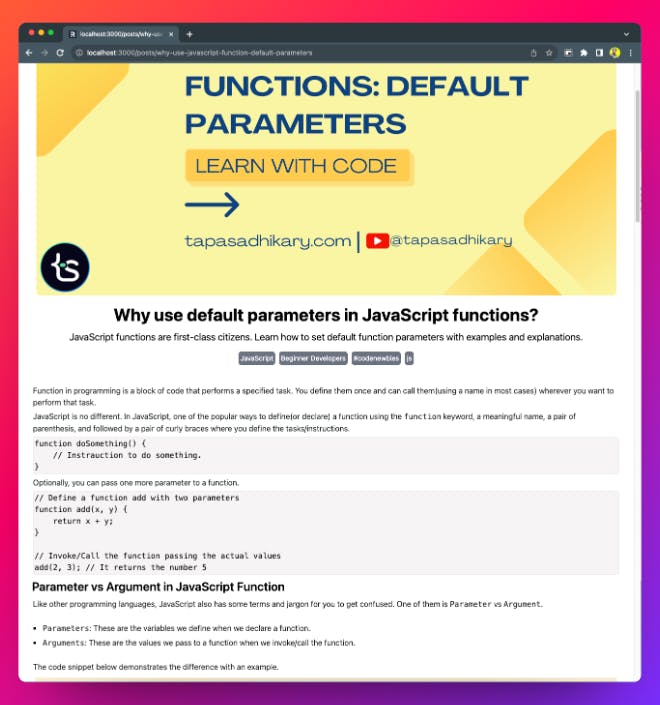
Nice! Now, each of the posts from the post list page is linked to a post details page, and you can navigate to them easily by clicking the postcards. Here is an example of the post details page content:
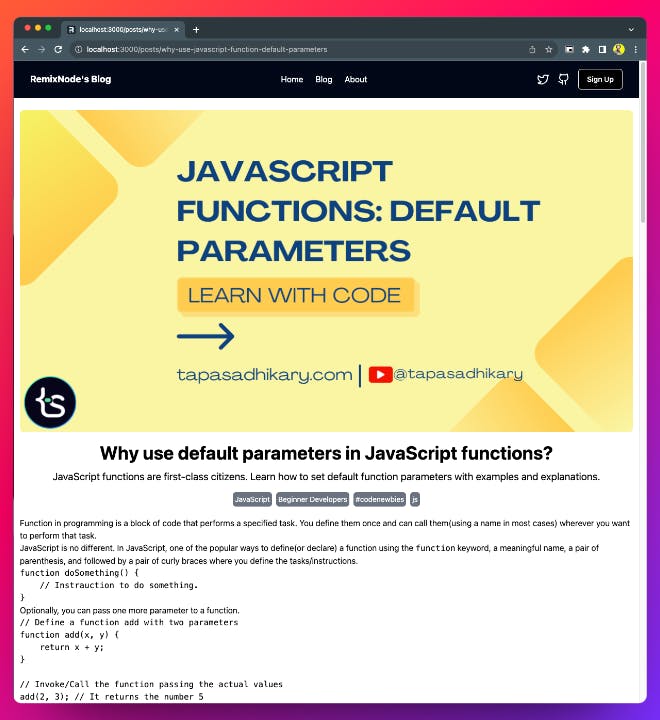
However, clicking on any tags on the post details page will get a 404 Not Found error.

We have not implemented the /tags/{tagId} route yet. Let's do that.
List the posts by tag
Our query to fetch all posts is smart enough to handle the posts by a particular tag. We just need to pass the tag as an array element to the getAllPosts() method. Create a route tags.$id.jsx under the app/routes/ directory with the following code:
// File: app/routes/tags.$id.jsx

import { Link, useLoaderData } from "@remix-run/react";
import { getAllPosts } from "../queries/blog-data";
import { PostCard, PostList } from "../components";

export async function loader({ params }) {
  const { id } = params; // get the tag id
  const posts = await getAllPosts([id]);
  const data = {posts, id};
  return data;// return all the posts
}

export default function PostByTag() {
  const {posts, id} = useLoaderData();
  const tags = posts[0].node.tags;
  const foundTag = tags.find((tag) => tag.id === id);

  return (
    <div className="flex flex-col">
      <div className="flex pt-4 pl-4 mb-8 text-2xl">
        <p className="mr-2">
          {posts.length} posts found for the tag <strong>{foundTag.name}</strong>
        </p>
        <span className="mr-2">|</span>
        <Link
          className="underline"
          to="/posts"
          >
            See all the posts
          </Link>
      </div>
      <PostList posts={posts} />
    </div>
  );
}
Here, we fetch all the posts by a tag and then pass the posts to the PostList component we had created previously.
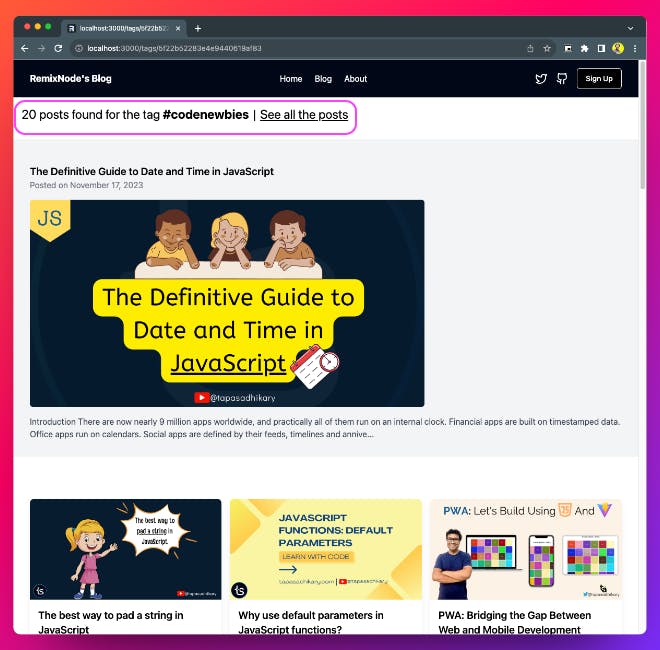
Now, if you click on any of the tags from the post details page, it will take you to a page that lists all the posts matching that tag. We have also added the code to show the number of posts matching the tag with the tag name and a link to navigate the post list page(/posts route).
Create the static about page
The last thing left for us is to create the static page. Create a route for the About page by creating a file about._index.jsx under the routes/ directory with the following code:
// File: app/routes/about._index.jsx

import { useLoaderData } from "@remix-run/react";
import { getPage } from "../queries/blog-data";
import { PostCard, PostList } from "../components";

export async function loader() {
  const page = getPage();
  return page;
}

export default function About() {
  const page = useLoaderData();
  return(
    <div className="flex flex-col justify-center p-2">
      <div
        className="about-content"
        dangerouslySetInnerHTML={{ __html: page.content.html }} />
    </div>
  )
}
As we have done a few times previously, we can use the loader() method to fetch the page details and use that to render the content on the page. Note we fetch the page content as HTML and push it to the div using dangerouslySetInnerHTML.
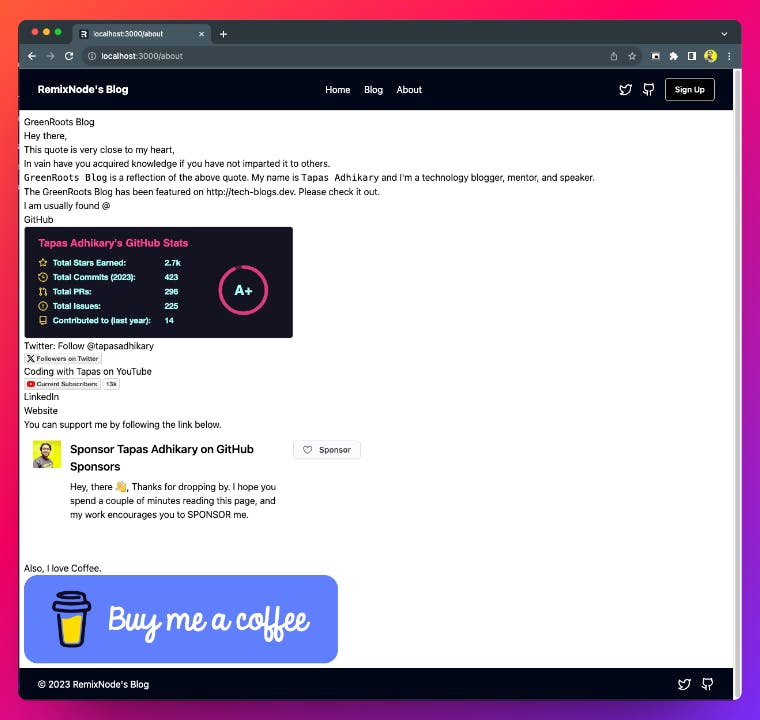
Here is our About page.
Global styles to make the HTML content elegant
Here are a few tips to make the content on the page elegant. We inject the HTML content into the DOM for the post details and About page.
 <div
    className="post-details"
    dangerouslySetInnerHTML={{ __html: post.content.html }} />
Here is the DOM structure for the code above.
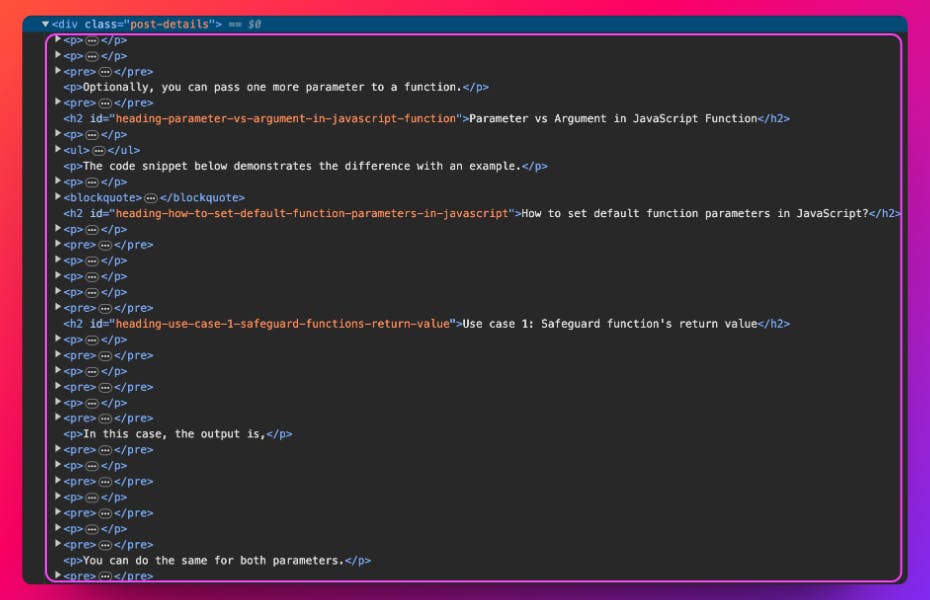
You can style each element using the style we added to the div tag post-details in the above example. To do that, create a file called global.css under the styles/ directory with this content.
hr{
  padding: 10px;
}

blockquote {
  background: #f9f9f9;
  border-left: 10px solid #ccc;
  margin: 1.5em 10px;
  padding: 0.5em 10px;
  quotes: "\201C""\201D""\2018""\2019";
}
blockquote:before {
  color: #ccc;
  content: open-quote;
  font-size: 4em;
  line-height: 0.1em;
  margin-right: 0.25em;
  vertical-align: -0.4em;
}
blockquote p {
  display: inline;
}

.post-details{
  padding: 1rem;
  width: 100%;
}

.post-details p{
  color: rgb(17, 22, 20);
  margin: 2px;
}

.post-details h2{
  font-size: 25px;
  margin-top: 5px;
  margin-bottom: 5px;
  font-weight: 600;
}

.post-details h3{
  font-size: 20px;
  margin-top: 5px;
  margin-bottom: 5px;
  font-weight: 600;
}

.post-details img{
  margin: 0 auto;
  padding: 5px;
}

.post-details UL {
  margin: 5px;
  padding: 15px;
}
.post-details li{
  list-style: square;
}

.post-details p{
  margin-top: 5px;
  margin-bottom: 5px;
}

.post-details a{
 text-decoration: underline;
}

.post-details pre{
  border: 1px solid #ebebeb;
  border-radius: 5px;
  padding: 2px;
  margin: 2px;
  background-color: rgb(246, 244, 244);
}

.about-content {
  padding: 1rem;
  width: 100%;
}

.about-content h1{
  font-size: 25px;
  margin-top: 5px;
  margin-bottom: 5px;
}

.about-content p{
  margin-top: 5px;
  margin-bottom: 5px;
}

.about-content UL{
  margin: 5px;
  padding: 5px;
}

.about-content UL LI {
  padding: 5px;
  margin: 5px;
}

.about-content UL LI a{
  margin-right: 2px;
  text-decoration: underline;
}
Then import the global.css file into the root.tsx file, and add the style definition to the links as we did for the tailwind.css file.
// File: app/root.tsx

// ------- ------- ------ ----- --
// ----- Above code as it was ----
// ------- ------- ------ ----- --
import styles from "~/styles/global.css";

// ------- ------- ------ ----- --
// ----- Above code as it was ----
// ------- ------- ------ ----- --

export const links: LinksFunction = () => [
  { rel: "stylesheet", href: tailwindstylesheet },
  { rel: "stylesheet", href: styles },
];

// ------- ------- ------ ----- --
// ----- Below code as it was ----
// ------- ------- ------ ----- --
See that. Now the post details page content looks much better. You can do a similar thing for the About page content as well.
Hurray! We have now built a working blog front-end using the Headless Hashnode and Remix framework. I have deployed the same application here. Please take a look.
Conclusion and what's next?
I hope you found this article insightful and that it gave you enough details and confidence to build a blog front-end using the Headless Hashnode and Remix framework.
Headless Hashnode is a compelling headless CMS for bloggers and companies to be creative on the data and infrastructure that provides many smart features. If you want to learn more about comparing Headless Hashnode with other headless CMS available, I strongly recommend this read.
All the source code used in this article is available as Open Source on this GitHub repository.
Do you want to extend it further? The query we had written to get all posts already got pagination support.
pageInfo{
   hasNextPage
   endCursor
}
It's time to build the functionality to load more posts on the post list page. All the best with that, and see you soon with the next article.