React custom hooks to fetch data from Headless Hashnode

The Headless Hashnode is a remarkable approach allowing individual bloggers or corporations to create customized and personalized blog frontend user interfaces.
With Headless Hashnode, you can use Hashnode's robust and user-friendly infrastructure to create, manage, and publish your blog posts. At the same time, you have the luxury of creating your blog frontend user interfaces using any technologies that suit you.
Talking about user interface technologies, ReactJS is still ahead of its counterparts regarding usage, adoption, and ecosystem. Along with ReactJS, other popular frameworks like Next.js started taking the lead in building websites for complex applications.
The Headless Hashnode provides GraphQL APIs to interact with your post, page, and user data. The APIs are hosted on https://gql.hashnode.com/, and you can explore them before consuming them in your application development.
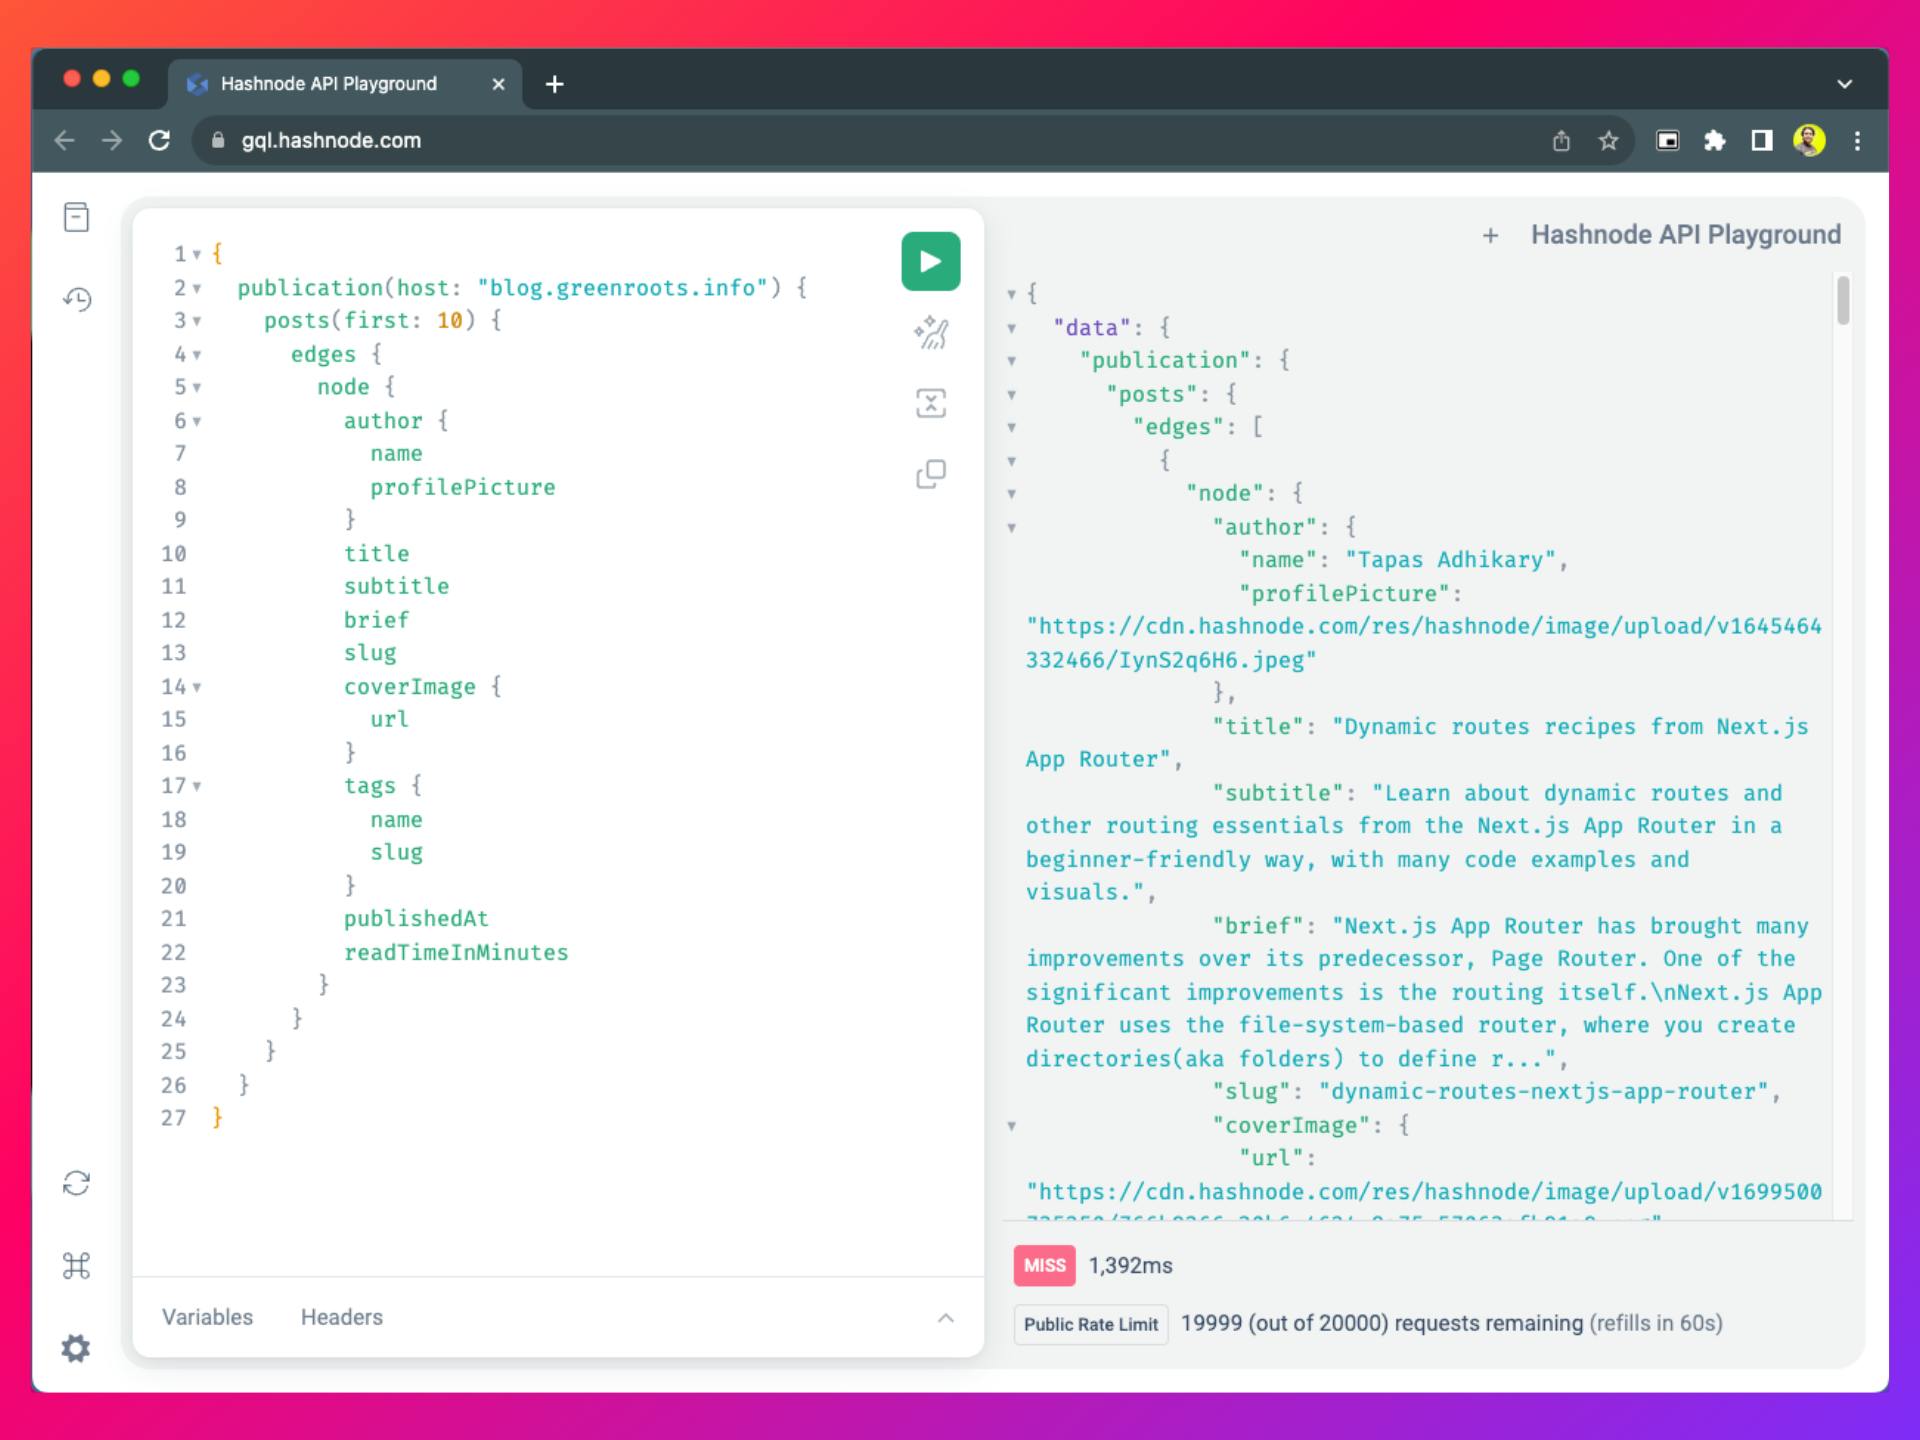
Here is the complete API documentation you can refer to: https://apidocs.hashnode.com/.
In this article, we will take you through the steps of using these APIs in a ReactJS application. But hold on, we will not use them directly in a ReactJS app, and rather, we will create reusable custom hooks to interact with the GraphQL APIs and fetch the blog post data. Sounds interesting? Let's get started.
Set up a ReactJS project with dependencies
Let us first set up a ReactJS project using Vite. Please make sure you have Node.js version 18+ installed. You can check it with the following command,
node -v
If you get an error or the Node.js version is less than v18.x, please download and install the required version. Now, use the following command to create a react project with vite using an existing project template.
npm create vite@latest headless-hashnode-hooks -- --template react
Here, the headless-hashnode-hooks is the name of the project. The vite project creation process will make a directory with the same name. Change the directory to the project directory, install dependencies, and start the server locally.
> cd headless-hashnode-hooks
> npm install
> npm run dev
You should find the application running locally on the URL http://localhost:5173 by default. You can now open the project folder in your favourite code editor.
Set up a GraphQL client
The next thing is to set up a GraphQL client so that we can interact with the Headless Hashnode's GraphQL APIs. We will need a couple of dependencies to install to create a GraphQL client instance and to make requests to the endpoints.
Open another terminal at the root of your project folder and use the following command to install the graphql-request and graphql libraries.
npm install graphql-request graphql
Now, go to your code editor and create a directory called lib/ under the src/ directory. Create a file called graphQLClient.js under the directory src/lib/ with the following code,
// A basic graphQL client to connect to the Hashnode's GraphQL APIs.

import { GraphQLClient } from "graphql-request";

export const getClient = () => {
  const client = new GraphQLClient(`https://gql.hashnode.com`);
  return client;
}
The above code exports a function that returns an instance of the graphql client. We will import and call this function to connect and query the Hashnode GraphQL APIs in a while.
Set up the query to fetch all posts
Now, we will set up a query to fetch all the posts from a publication. Time to create another directory called queries/ under the src/ directory. Also, create a file called blog-data.js file under the src/queries/ directory with the following code,
import { gql } from "graphql-request";
import { getClient } from "../lib/graphQLClient";

export const getAllPosts = async (host, first=10, endCursor, tags) => {
  const client = getClient();

  const data = await client.request(
    gql`
      query allPosts($first: Int!, $host: String, $endCursor: String, $tags: [ObjectId!]) {
        publication(host: $host) {
          title
          posts(first: $first, after: $endCursor, filter:{tags: $tags}) {
            totalDocuments
            pageInfo{
              hasNextPage
              endCursor
            }
            edges {
              node {
                author{
                  name
                  profilePicture
                }
                title
                subtitle
                brief
                slug
                coverImage {
                  url
                }
                tags {
                  name
                  slug
                  id
                }
                publishedAt
                readTimeInMinutes
              }
            }
          }
        }
      }
    `,
    {
      first: first,
      host: host,
      endCursor: endCursor,
      tags: tags,
     }
  );

  return data?.publication?.posts;
};
The above code is doing a bunch of things. Let us go over them one by one:
First, we import the GraphQL client we created before.
Then, we use the client to send a request to fetch all the posts from a publication.
You can pass details like the number of posts per page, publication name, cursor ID to resume post fetching from the next page, and a list of tags to filter the posts by them.
Finally, it returns a list of posts from the function, and we export the getAllPosts() function.
Write a custom hook to fetch the posts
It's time to start writing the custom hook to fetch the posts. We will import and use the getAllPosts() function from the blog-data file we created.
Create a directory called hooks/ under the src/ directory. Now, create a file useHashnodePosts.js under the src/hooks/ directory with the following code,
import { useState, useEffect, useCallback } from "react";

import { getAllPosts } from "../queries/blog-data";

export default function useHashnodePosts(settings = {}) {
  //TODO: Code will come here
}
As you see, we have imported a few standard hooks from ReactJS to use them in our custom hook. We have also imported the getAllPosts() function from the blog-data file.
Then we have defined the hook(all the hooks in ReactJS must start with the word use, by rule). The hook accepts a parameter called settings, through which we can pass many input arguments.
We will create a few states we need to maintain in the hook. The getAllPosts() function gives us a structured response from the Headless Hashnode's GraphQL API. We can fetch information like an array of posts, the total number of posts, whether there are more posts on the next page, etc.
To maintain these data, we need to create states inside the hook. Please copy and paste the code added to the useHashnodePosts hook below.
// --- existing code ---

export default function useHashnodePosts(settings = {}) {

    const [pageInfo, setPageInfo] = useState({});
    const [posts, setPosts] = useState([]);
    const [loading, setLoading] = useState(false);
    const [error, setError] = useState();
    const [totalDocs, setTotalDocs] = useState(0);

    const { host, first, endCursor, tags } = settings;

}
The above states can be described as,
pageInfo: It is an object consisting of the information of the next page data.
posts: An array of post nodes from a publication.
loading: A state to manage loading indicators while the post data is being fetched.
error: A state to show an error message in case of an error condition.
totalDocs: The total number of posts available in a publication.
Also, note we have destructured the settings object to extract the inputs to the hook. We will use them shortly.
Now, we will call the function with the required inputs to fetch the posts and all other details. To do that, copy the following code under the existing code inside the useHashnodePosts function.
// --- existing code ---

export default function useHashnodePosts(settings = {}) {

   // --- existing code ---

    const getPosts = useCallback(
        async (host, first, endCursor, tags, loadMore) => {
          try {
            setLoading(true);
            const res = await getAllPosts(host, first, endCursor, tags);
            setPageInfo(res.pageInfo);
            if (loadMore) {
              setPosts((prev) => [...prev, ...res.edges]);
            } else {
              setPosts(res.edges);
            }
            setTotalDocs(res.totalDocuments);
            setLoading(false);
          } catch (err) {
            console.error("Error fetching blog data: ", err);
            setError(err);
          } finally {
            setLoading(false);
          }
        }, []
  );

  useEffect(() => {
    getPosts(host, first, endCursor, tags, false);
  }, [host, first, endCursor, tags]);

  const loadMorePost = useCallback(() => {
     getPosts(host, first, pageInfo.endCursor, tags, true);
  }, [pageInfo.endCursor]);
}
Let's explain all that is happening in the above code:
We use the useCallback hook from ReactJS to memorize the getAllPosts() function call. Upon receiving the response, we set the posts state with all the posts.
We set the page info to know if more posts are available on the next page and the cursor to retrieve them.
We handle the error and loading state.
The useEffect hook from ReactJS runs the fetch posts call every time the input dependency changes.
The loadMorePost() method helps to load more posts from the next pages to support pagination.
We have done most of it. The only thing that is pending is to return the data and loadMorePost() function so that any consumer of this custom hook can use them to show the fetched posts and can query more posts from the additional pages to support pagination on the user interface.
Add the following return statement at the end of the useHashnodePosts() function.
// --- existing code ---

export default function useHashnodePosts(settings = {}) {

   // --- existing code ---

   return {
       loading,
       error,
       pageInfo,
       totalDocs,
       posts,
       loadMorePost,
  };
}
Here is the complete code of the useHashnodePosts custom hook.
import { getAllPosts } from "../queries/blog-data";
import { useState, useEffect, useCallback } from "react";

export default function useHashnodePosts(settings = {}) {
  const [pageInfo, setPageInfo] = useState({});
  const [posts, setPosts] = useState([]);
  const [loading, setLoading] = useState(false);
  const [error, setError] = useState();
  const [totalDocs, setTotalDocs] = useState(0);

  const { host, first, endCursor, tags } = settings;

  const getPosts = useCallback(
    async (host, first, endCursor, tags, loadMore) => {
      try {
        setLoading(true);
        const res = await getAllPosts(host, first, endCursor, tags);
        setPageInfo(res.pageInfo);
        if (loadMore) {
          setPosts((prev) => [...prev, ...res.edges]);
        } else {
          setPosts(res.edges);
        }
        setTotalDocs(res.totalDocuments);
        setLoading(false);
      } catch (err) {
        console.error("Error fetching blog data: ", err);
        setError(err);
      } finally {
        setLoading(false);
      }
    },
    []
  );

  useEffect(() => {
    getPosts(host, first, endCursor, tags, false);
  }, [host, first, endCursor, tags]);

  const loadMorePost = useCallback(() => {
    getPosts(host, first, pageInfo.endCursor, tags, true);
  }, [pageInfo.endCursor]);

  return {
    loading,
    error,
    pageInfo,
    totalDocs,
    posts,
    loadMorePost,
  };
}
Now create an index.js file under the src/hooks/ directory with the following code,
import useHashnodePosts from "./useHashnodePosts";

export {useHashnodePosts};
We have a single index file to import multiple custom hooks(we will create more shortly) and export as named export.
Use the custom hook in a ReactJS application
As we have created the hook, we can't wait to use it in a ReactJS(you can do the same in any other React-based frameworks like Next.js/Gatsby, etc.) application.
In our project, open the App.jsx file and replace its content with the following code,
import "./App.css";

import { useHashnodePosts } from "./hooks";

function App() {
  const settings = {
    host: "blog.greenroots.info",
    first: 20,
  };

  const {
    loading,
    error,
    pageInfo,
    totalDocs,
    posts,
    loadMorePost } = useHashnodePosts(settings);

    return (
      <div className="post-container">
        <h1>Posts from the {settings.host}</h1>

        <ul className="post-list">
          {loading ? (
            <p>Loading posts....</p>
          ) : (
            posts.map((post) => (
              <li key={post?.node?.id} className="post-card">
                <img
                  src={post?.node?.coverImage.url}
                  title={post?.node?.title}
                  width="100%"
                  height="auto"
                />
                <h2>{post?.node?.title}</h2>
                <p>{post?.node?.brief}</p>
              </li>
            ))
          )}
        </ul>
      </div>
    );
}

export default App;
So what's going on in the App.jsx file?
We imported the useHashnodePosts custom hook.
Then, inside the component, we have called the hook by passing the required settings, i.e., the publication hostname and how many posts we want to fetch at a go. Please note that the Headless Hashnode supports a maximum of 20 posts to fetch per page.
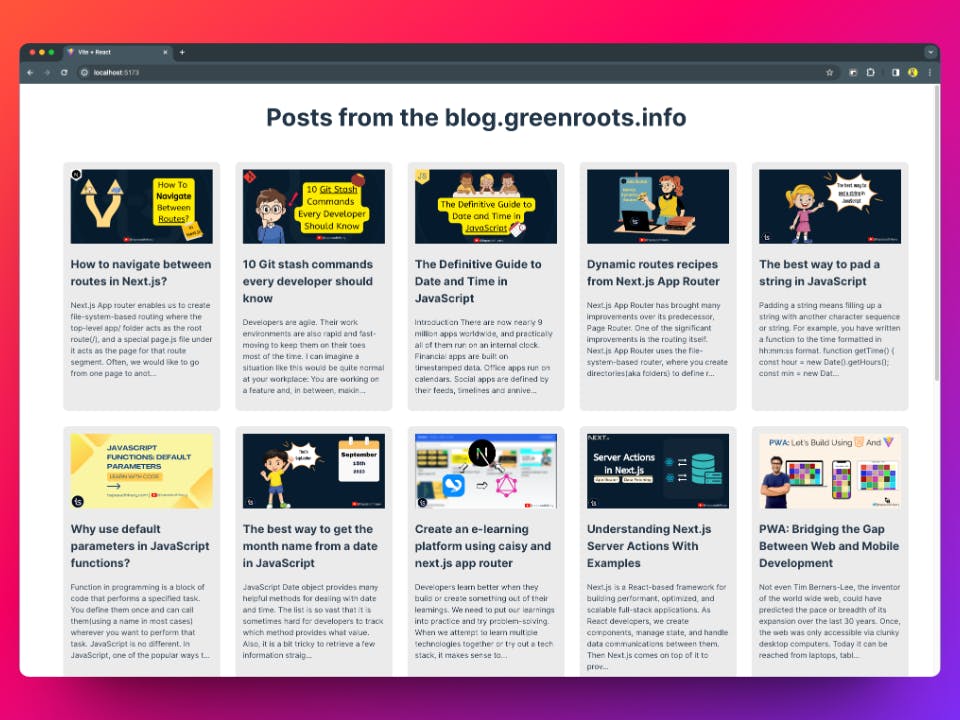
After that, in the JSX, we iterate over all the posts and show the cover image, post title, and the post brief as a card for each post.
Now, open the App.css file and replace its content with the following code,
li{
  list-style: none;
}

.post-container {
  display: flex;
  flex-direction: column;
  justify-content: center;
  align-items: center;
}

.post-list{
  display: flex;
  flex-wrap: wrap;
  justify-content: center;
}

.post-card{
  background-color: #ebebeb;
  margin: 1rem;
  padding: 1rem;
  width: 300px;
  border-radius: 10px;
}
That's it. Now, you have a page built with ReactJS and its custom hook to show posts from a publication hosted on the Hashnode infrastructure. Isn't that amazing? If you access the user interface on the browser, it will look like this:
Follow the same pattern to create more custom hooks
Now, we can follow a similar pattern to create more custom hooks to deal with other APIs from the Headless Hashnode. For example, if we want to fetch the content of a specific post, we can now write a new function inside the blog-data.js file like this,
// blog-data.js file

export const getPost = async (host, slug) => {
  const client = getClient();

  const data = await client.request(
    gql`
      query postDetails($host: String, $slug: String!) {
        publication(host: $host) {
          post(slug: $slug) {
            author{
              name
              profilePicture
            }
            publishedAt
            title
            subtitle
            readTimeInMinutes
            content{
              html
            }
            tags {
              name
              slug
              id
            }
            coverImage {
              url
            }
            replyCount
            reactionCount
            featuredAt
            featured
            comments(first: 10){
              totalDocuments
            }
          }
        }
      }
    `,
    {
      host: host,
      slug: slug
    }
  );

  return data?.publication?.post;
};
The above function expects a publication hostname and a post's slug to return all the details about the post. Please note the content part in the response,
content{
   html
}
We are returning the post content as HTML; we can also return it in the markdown format.
Just like before, we can now create a file called useHashnodePostDetails.js under the hooks/ directory with the following content,
import { getPost } from "../queries/blog-data";
import { useState, useEffect } from "react";

export default function useHashnodePostDetails(settings = {}) {

  const [post, setPost] = useState({});
  const [loading, setLoading] = useState(false);
  const [error, setError] = useState();

  const { host, slug } = settings;

  useEffect(() => {
    const getPostDetails = async () => {
      try{
        setLoading(true);
        const res = await getPost(host, slug);
        setPost(res);
        setLoading(false);
      }catch(err){
        console.error("Error fetching blog data: ", err);
        setError(err);
      }finally{
        setLoading(false);
      }
    };

    getPostDetails();
  }, [host, slug]);

  return {
    loading,
    error,
    post
  };
}
That's our new custom hook. The hook invokes the function we created just before with the required arguments and returns the post details as a response, along with the loading and error states.
You can now import and name export the new hook from the hooks/index.js file like before,
import useHashnodePosts from "./useHashnodePosts";
import useHashnodePostDetails from "./useHashnodePostDetails";

export {
  useHashnodePosts,
  useHashnodePostDetails
};
Congratulations!!! Now, another hook is available to use in your ReactJS application.
Did you know about the hashnode-client open source project?
Creating these custom hooks is a great idea to create reusable items for your project. We would also like to let you know the availability of an NPM package with similar hooks we discussed in this article.
You can take a look into them and use them in your project following the documentation:
Link to the hashnode-client NPM Package.
The source code of this package is being maintained as an Open Source project. It means you can always contribute and add more features or help fix existing issues.
Link to the Source Code on GitHub
The community also created a playground called Hashnode Diaries, using the package to showcase posts from any Hshnode publication. Give it a try!
Link to the Hashnode Diaries
Conclusion
I hope you found the article insightful and that it will help you use Headless Hashnode's GraphQL APIs to create reusable ReactJS custom hooks.
Headless Hashnode is a compelling headless CMS for bloggers and companies to be creative on the data and infrastructure that provides many smart features. If you want to learn more about comparing Headless Hashnode with other headless CMS available, we strongly recommend this read.
See you with the next article soon.