Integrating Hashnode Headless CMS With Ecommerce Platforms for Content-Driven Commerce

Over the years, e-commerce has evolved from the times of marketplaces like Froogle (Google Shopping), Amazon, eBay, Etsy, and AliExpress to the rise of modern e-commerce platforms like Shopify, WooCommerce, Magento, Commerce Layer, etc. These platforms allow entrepreneurs and businesses to sell products in a marketplace or use their platform to build e-commerce stores. In both ways, businesses are able to maintain an inventory of products, and customers can purchase them from a storefront. Over time, content emerged as a pivotal force for driving consumer engagement, brand loyalty, and sales. It's become evident that delivering valuable, informative, and entertaining content to potential customers is vital for the success of e-commerce business, which is why the Ads industry thrives. But to convert new customers from either Ads or organic SEO, you need to lead them to a place where they can find enough information to decide on purchasing. By seamlessly integrating engaging content with product data and vice versa, businesses can offer customers an immersive shopping experience that not only showcases their products but also educates and entertains customers.
In this tutorial, I will show you how to use the content-driven commerce approach to improve your top-of-funnel (TOF) and middle-of-funnel (MOF) marketing goals by creating a business blog. More importantly, I will show you why you should integrate Hashnode Headless CMS with your ecommerce store. We'll explore how this integration can revolutionize your approach to content-driven commerce, enabling you to deliver compelling experiences that drive brand awareness, conversions, and foster long-term customer relationships.
Prerequisites
To get the best out of this tutorial, you need to have the following:
An existing Hashnode account (you can create one here).
An existing ecommerce store built using any platform (I will also show you one).
The ability to navigate through a web browser, IDE, and terminal on your computer.
A smile on your face :).
The State of Content-Driven Commerce
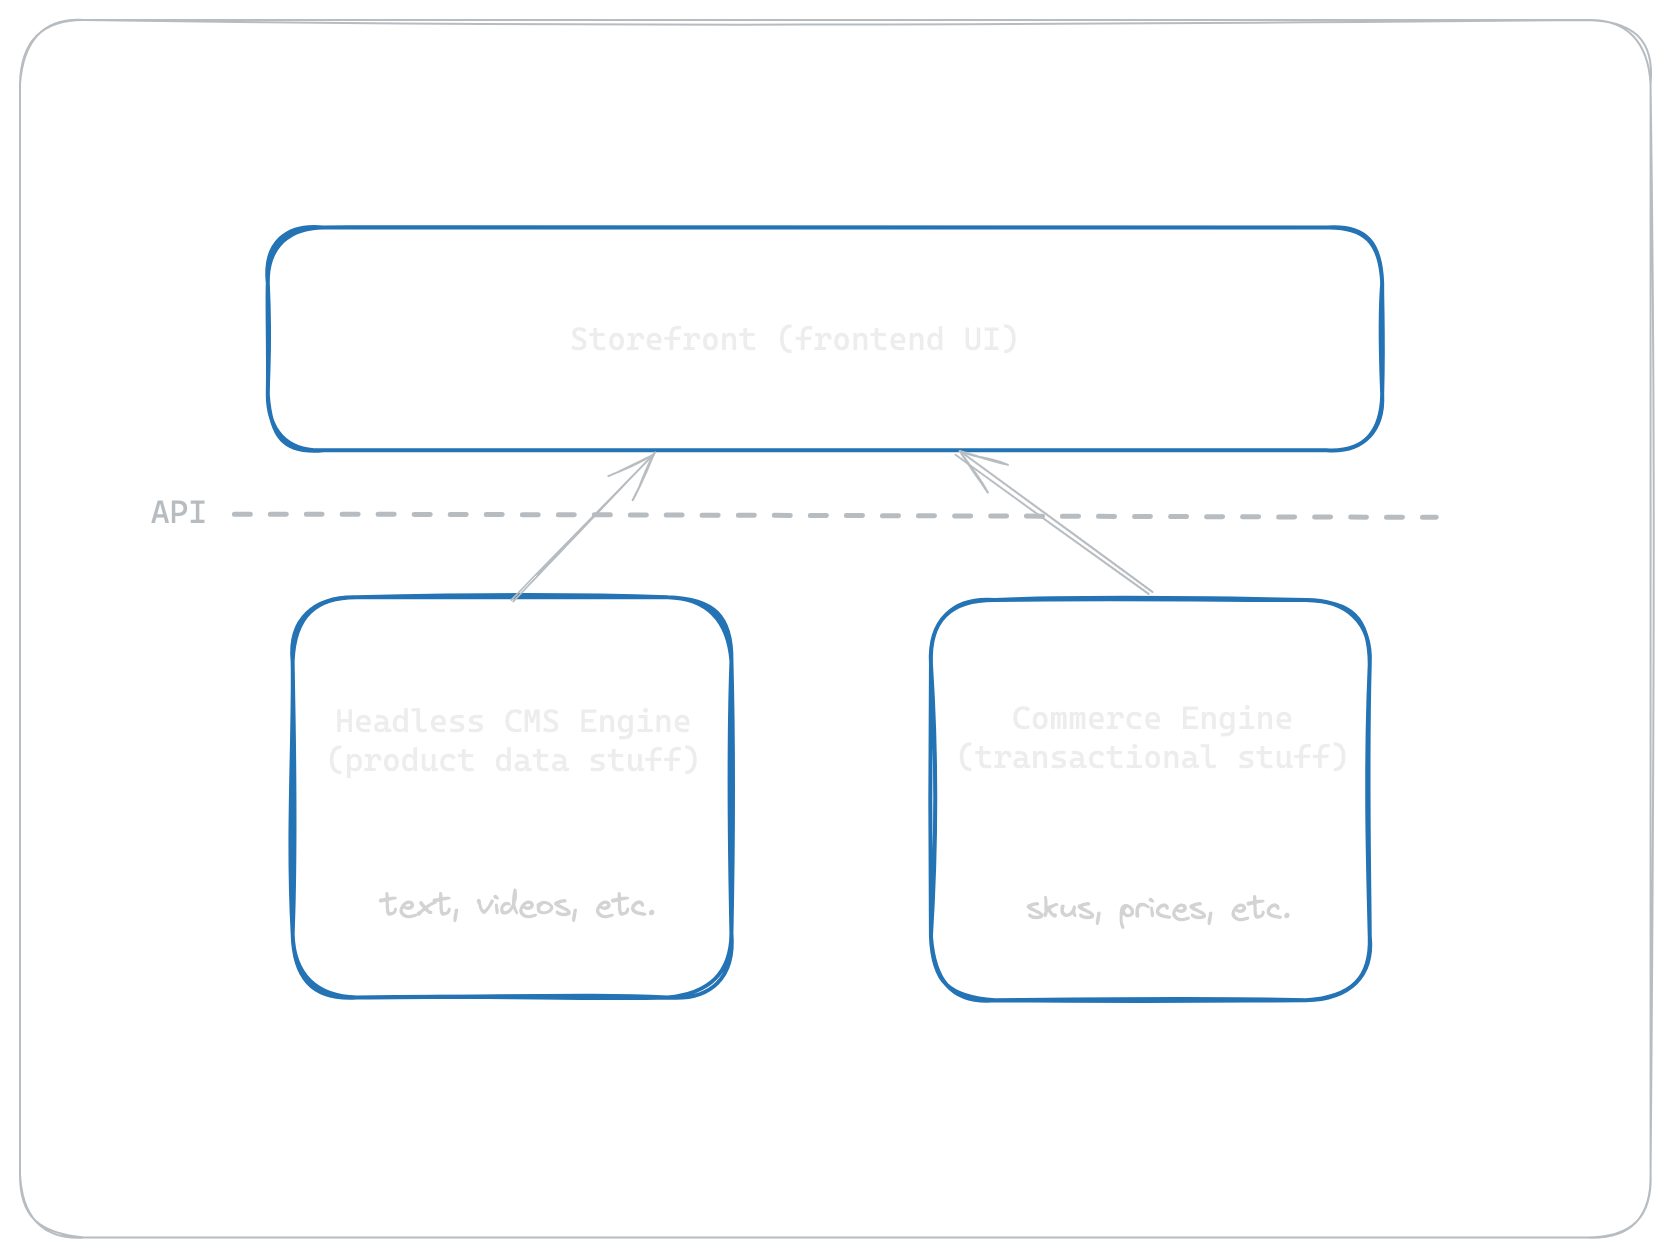
Usually, brands build their e-commerce stores with a monolith, headless, or composable architecture (don't panic, these are just expensive words that explains how the ingredients that make up an e-commerce store are used to actually cook the store 😅). They handle the commerce logic with a custom implementation or use platforms like Shopify, Magento, etc. and product content using dedicated CMSs like Contentful, Sanity, etc.
After sorting the technical details, what comes next is how to generate revenue with that beautiful ecommerce website. According to Insider Intelligence, we expect global e-commerce sales to hit $6.3 trillion worldwide in 2024 with 2.71 billion people shopping online. This rise will lead to increased demand and competition, forcing businesses to find innovative ways to find potential customers wherever they are and convert them. One of such ways is content!
In today's competitive age, more than simply having a storefront is required to win customers' hearts. Customers expect more than just a list of products and categories; they want a curated experience that guides them through their purchasing journey. Content-driven commerce allows businesses to integrate engaging content with their e-commerce product data to deliver an attractive shopping experience. This usually includes product images and videos on a product page, but it shouldn't stop there. As an e-commerce business owner or a marketing specialist working for an e-commerce business, you need to leverage other content commerce activities in your marketing funnel activities. These activities can include:
Writing about new product launches, product news, targeted articles, buyer guides, hot and trending highlights, product comparisons, etc.
Announcing new discounts, giveaways, sales events, or special promo offers.
Curating gift guides for different seasons, holidays, and personas.
Collaborating with brand ambassadors or influencers to create promotional content, product guides, product tips, etc., featuring your products.
Telling customer stories and highlighting exceptional customer reviews to build trust and credibility like Nike and Adidas does.
And many more!
With this approach, you can also make your blog a marketplace where customers can directly shop from by promoting your brand and products or curating catalogs arranged by tags and categories. A good example is The Strategist, a site for helping people shop smartly with different curated products packaged with good storytelling. These types of SEO-optimized content will bring more inbound traffic and potential customers to your store. Imagine a customer searching for the query "What can I buy for my wife who loves running?" and the search engine recommends a content piece from your store's blog that suggests different sportswear products and enough information to make the reader decide to purchase on your store 🤯.
All the content ideas above suggest that you need a blog! Somewhere, you can write and publish different articles, arrange them together, and deliver them on the internet. When you add a business blog to your e-commerce store, you can use these content pieces to improve the SEO/SEM of your e-commerce business, drive sales, and increase retention. While there are so many ways you might want to do this, I'd like to introduce you to Hashnode Headless CMS, a powerful CMS optimized for building blogs for independent publishers and brands.
Hashnode for Ecommerce Brands
Hashnode was built to provide a hassle-free blogging platform for developers and engineering teams. One of the key selling features is the great editor, the ability to set up a custom domain easily, and an API you can use to fetch your posts anywhere else you want. Recently, Hashnode announced a new product that extends the capabilities of their API, offering more customization for blog owners. You now get the option to use their upgraded GraphQL APIs to build your blog's UI using any tech stack of your choosing or use their superb Next.js starter kit. Now, e-commerce businesses like yours can create a team blog and customize it to match the styling of your e-commerce store!
As discussed earlier, having a blog is key for e-commerce businesses wanting to win. You can create one using all the traditional existing platforms or even an actual headless CMS, but Hashnode offers even more benefits than those. Most traditional CMSs lack an editorial content review process and are not cost-efficient, amongst other key issues, unlike Hashnode, which is optimized for blogging from the roots (including SEO, unique features, editor, etc.). Using Hashnode Headless CMS will offer you the following:
A powerful editor: With both a WYSIWYG and markdown editor, you can structure your text, add callouts, widgets, embeds (including product videos and direct links to purchase or checkout products!), etc. There are also AI features you can use to generate outlines, optimize your content for SEO, etc.
A seamless content review process: You can create a team blog and add multiple employees with different permissions. Each staff member can submit their article drafts, and the editors can review them before publishing.
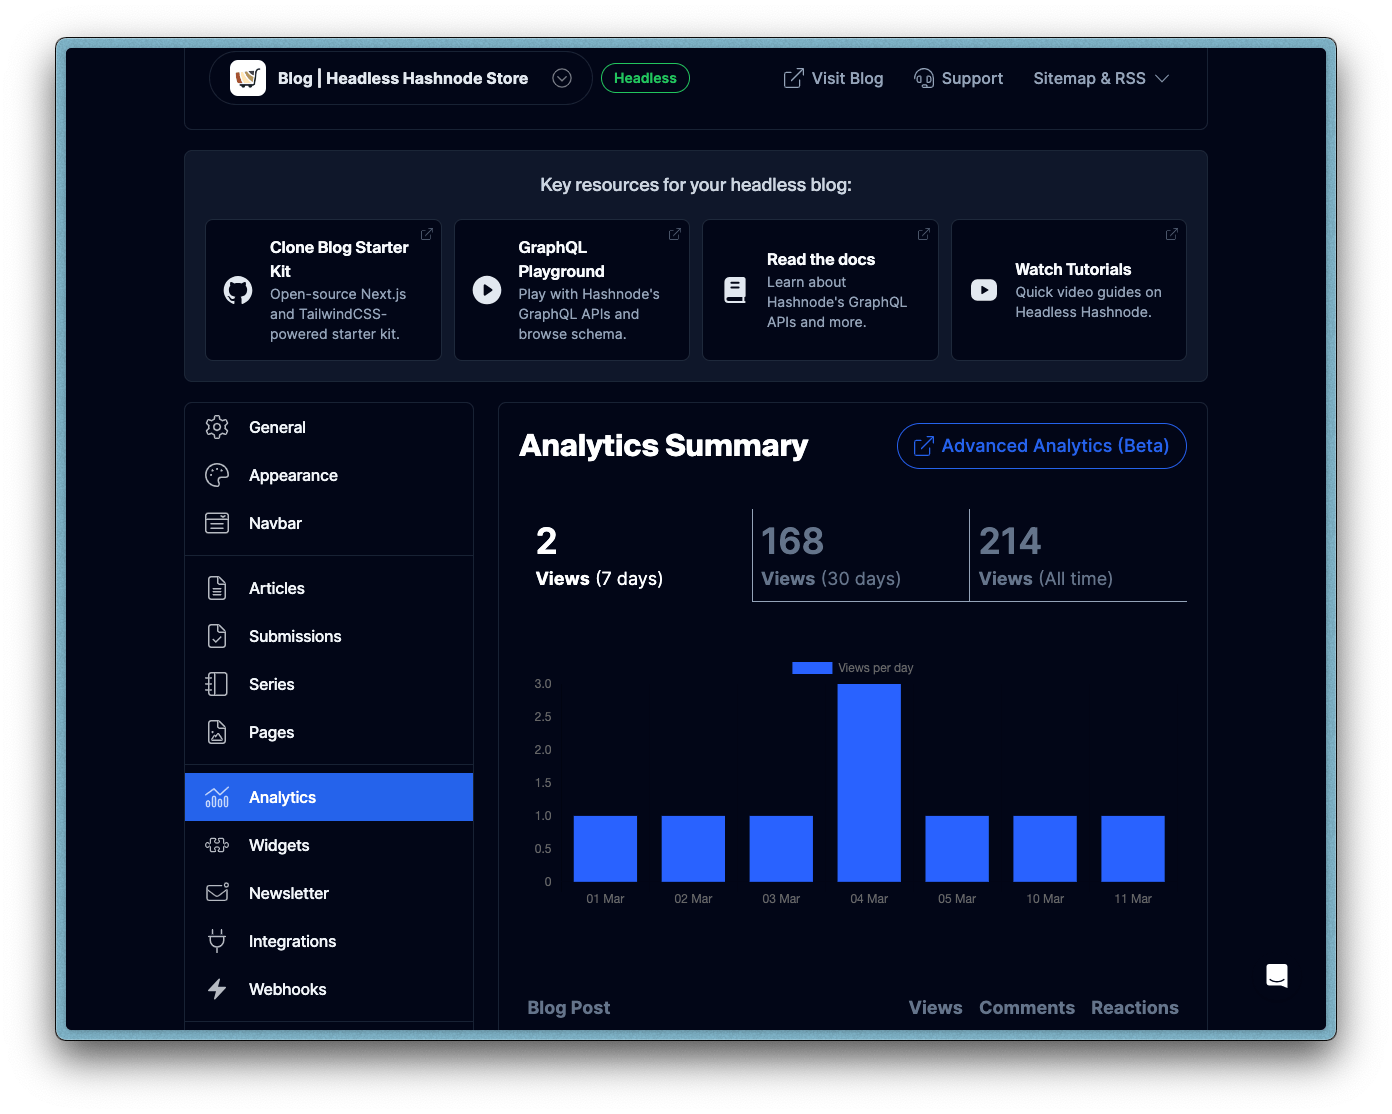
In-built analytics dashboard: You view the data (views, unique visitors, demographics, device details, etc.) in the Hashnode dashboard or the advanced public analytics dashboard like this one.
Tags and series: You can add multiple tags to blog posts, making it easier for your readers to filter posts. In the demo blog, I have created (which I will show you soon), you can see this in action with the #product-releases tag. You can also create series, add multiple posts to them, and pin them on your blog's navbar like this one!
Webhooks: You can set up a webhook integration to trigger some external automation (with platforms like Zapier, n8n, etc.) when certain events occur (like a published blog post). You can use this to make an automated social media post or send notifications to unique customers in your loyalty program.

There are just so many more features you can access right on the spot once you create a blog with Headless Hashnode CMS. You can utilize all these features to supercharge your e-commerce business at a low cost and with little to no technical knowledge. All you need is to have one of your tech support staff (or do it yourself if you have the experience) set up the blog, and your content team can click around in the dashboard to set up the blog as you desire and publish new posts! Even better, if your e-commerce store sells products for developers like mechanical keyboards, blue-light glasses, electronics, etc., you can list your blog posts on the Hashnode community feed, which is viewed by thousands of developers like me.
Integrating Hashnode with an Ecommerce Store
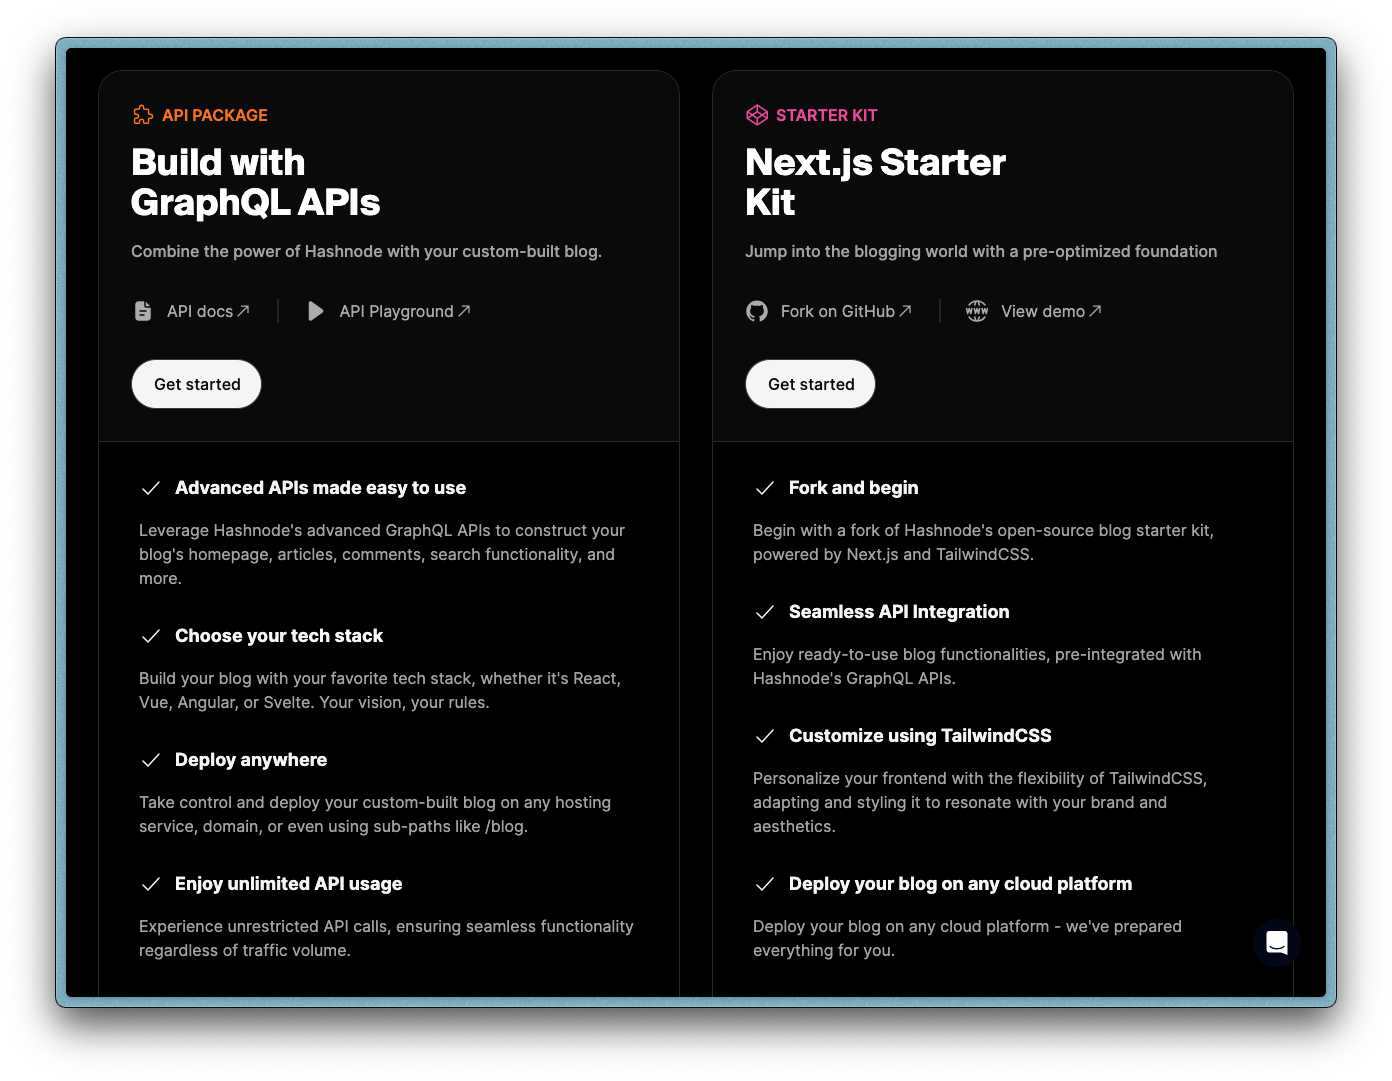
Now that you're familiar with the numerous benefits of Headless Hashnode let's create one from scratch and sync it with the ecommerce store. There are different ways you can use Headless Hashnode; you can:
Use the GraphQL API to build a custom blog using any tech stack you want (there's documentation you can read to do this) and deploy anywhere.
Use the pre-built Next.js Starter Kit that comes with all the UI components you need and deploy anywhere. You can also extend the UI and add further features you need. This will save you all the development time and enable you to ship your blog before you need to drink another cup of water :).
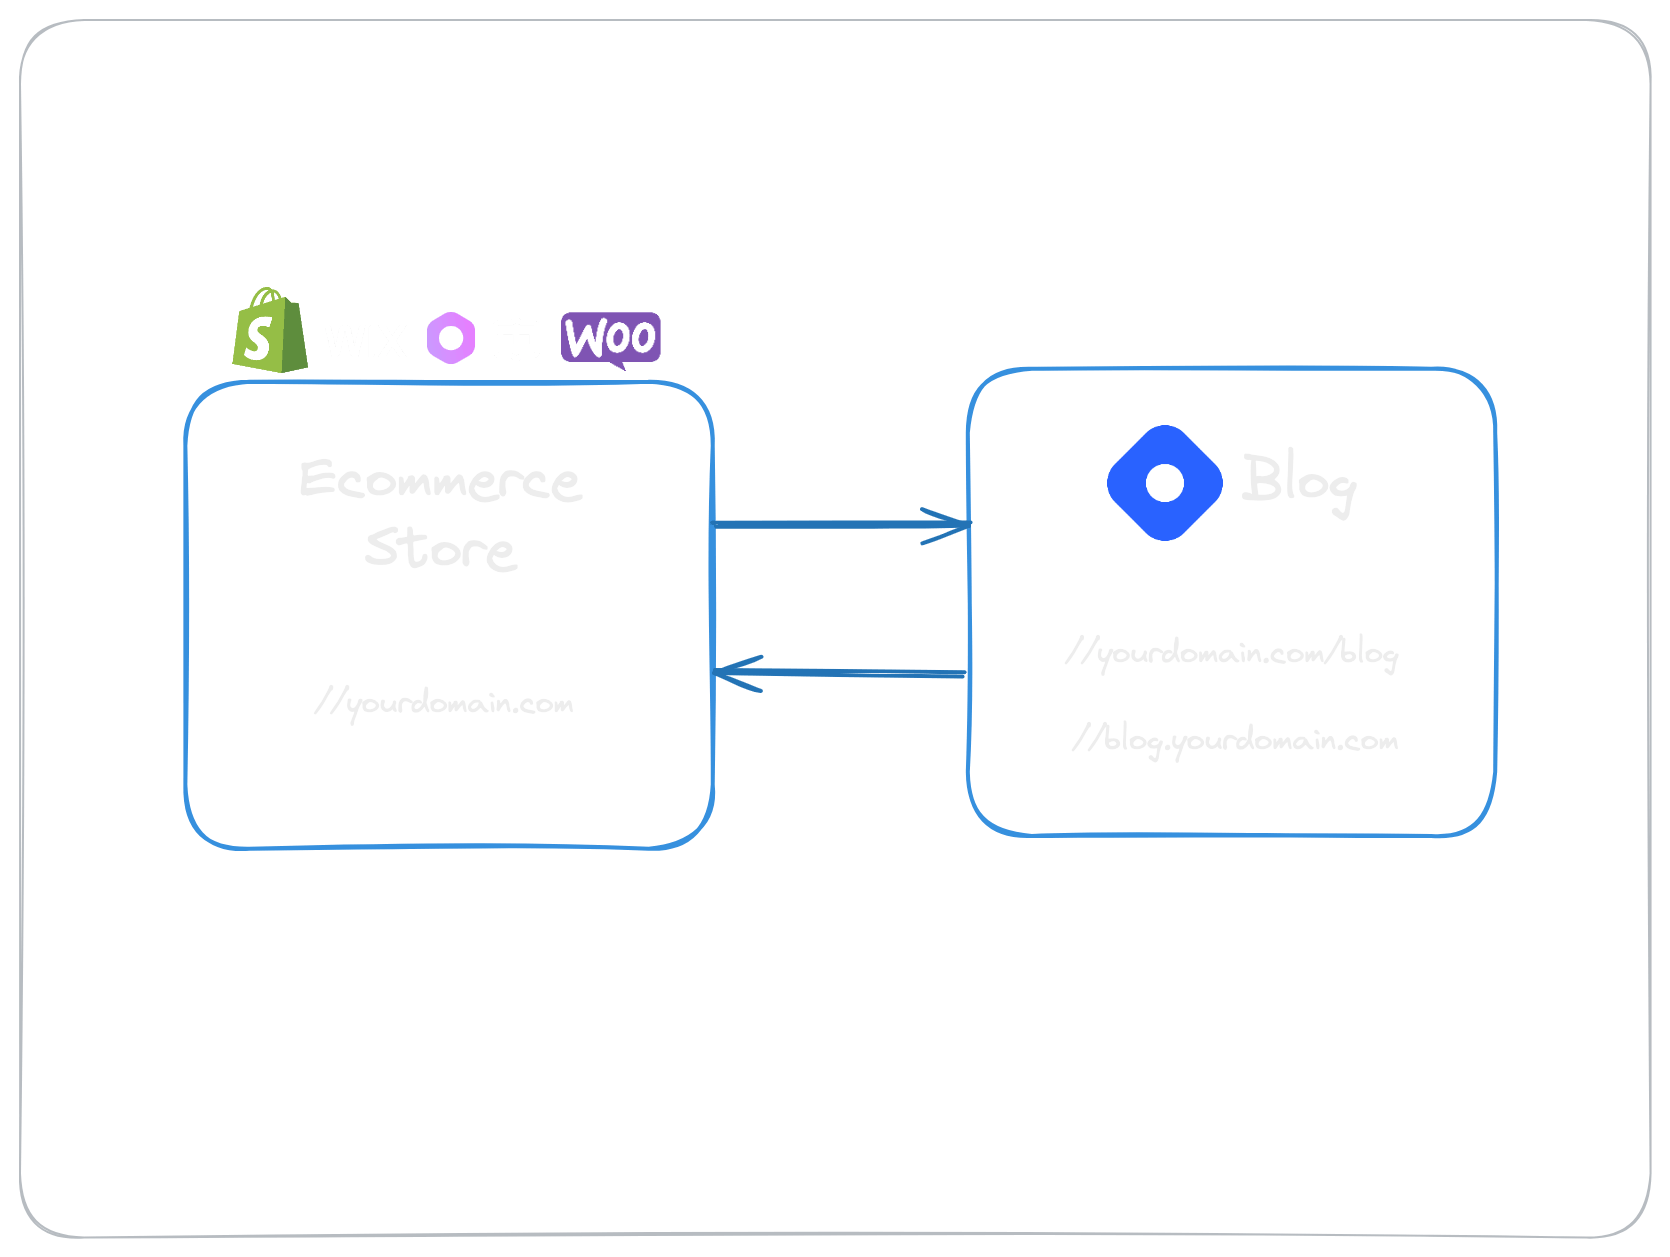
For this tutorial, we will use the Starter Kit approach and set up a blog on a sub-path like yourdomain.com/blog, but you can also use a subdomain like blog.yourdomain.com. You can even go for non-traditional names like /articles, /hub, /stories, etc. 🙂. This way, your customers can find your blog from the store and vice versa.
Building a Demo Ecommerce Store
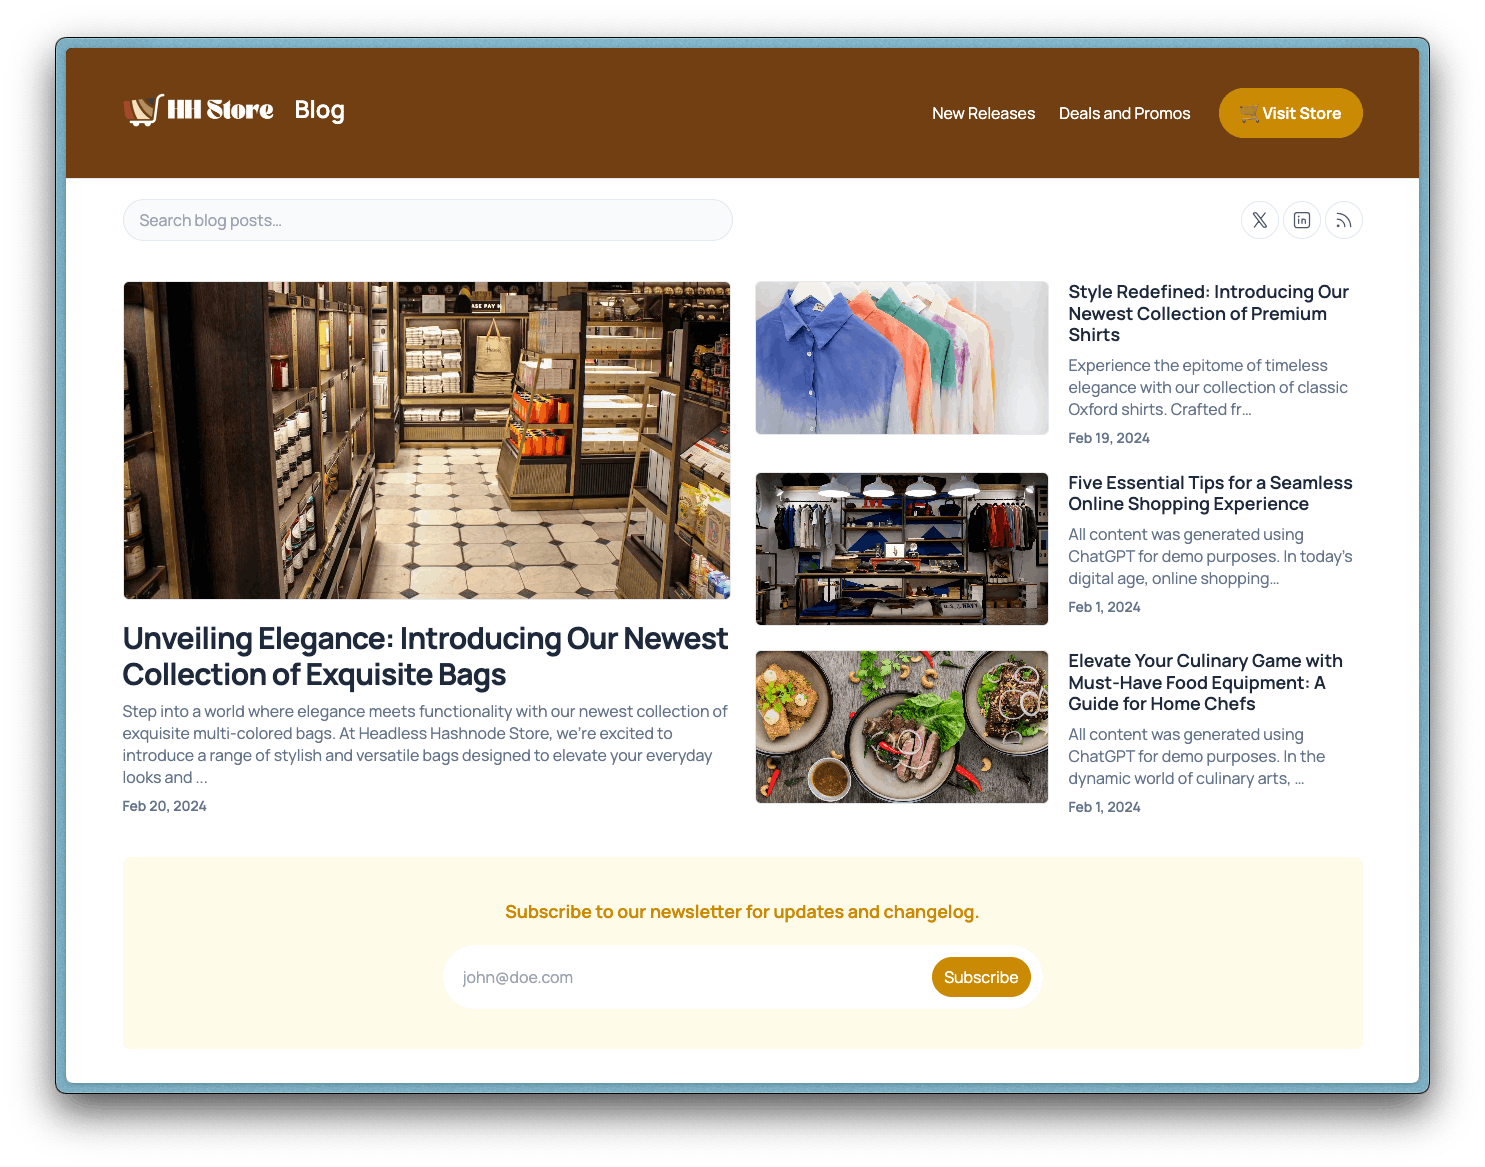
To show you the power of Headless Hashnode coupled with an e-commerce store, I have built a demo international e-commerce store using the commercelayer-sanity-template and deployed it with Vercel on the https://hh-store.vercel.app domain. This store comes with:
A user-friendly and performant storefront (with products, categories, i18n, cart, checkout, demo data, etc.) built with TypeScript, React18, Nextjs, Commerce Layer React Components library, and Tailwind CSS.
International transactional functionalities powered by Commerce Layer API.
Structured content and a customizable Sanity CMS authoring environment (including demo data), accessible on
<domain>/studio.PSD2-compliant and production-ready checkout functionality powered by Commerce Layer React Checkout application.
Localization support (including Italian and French translations).
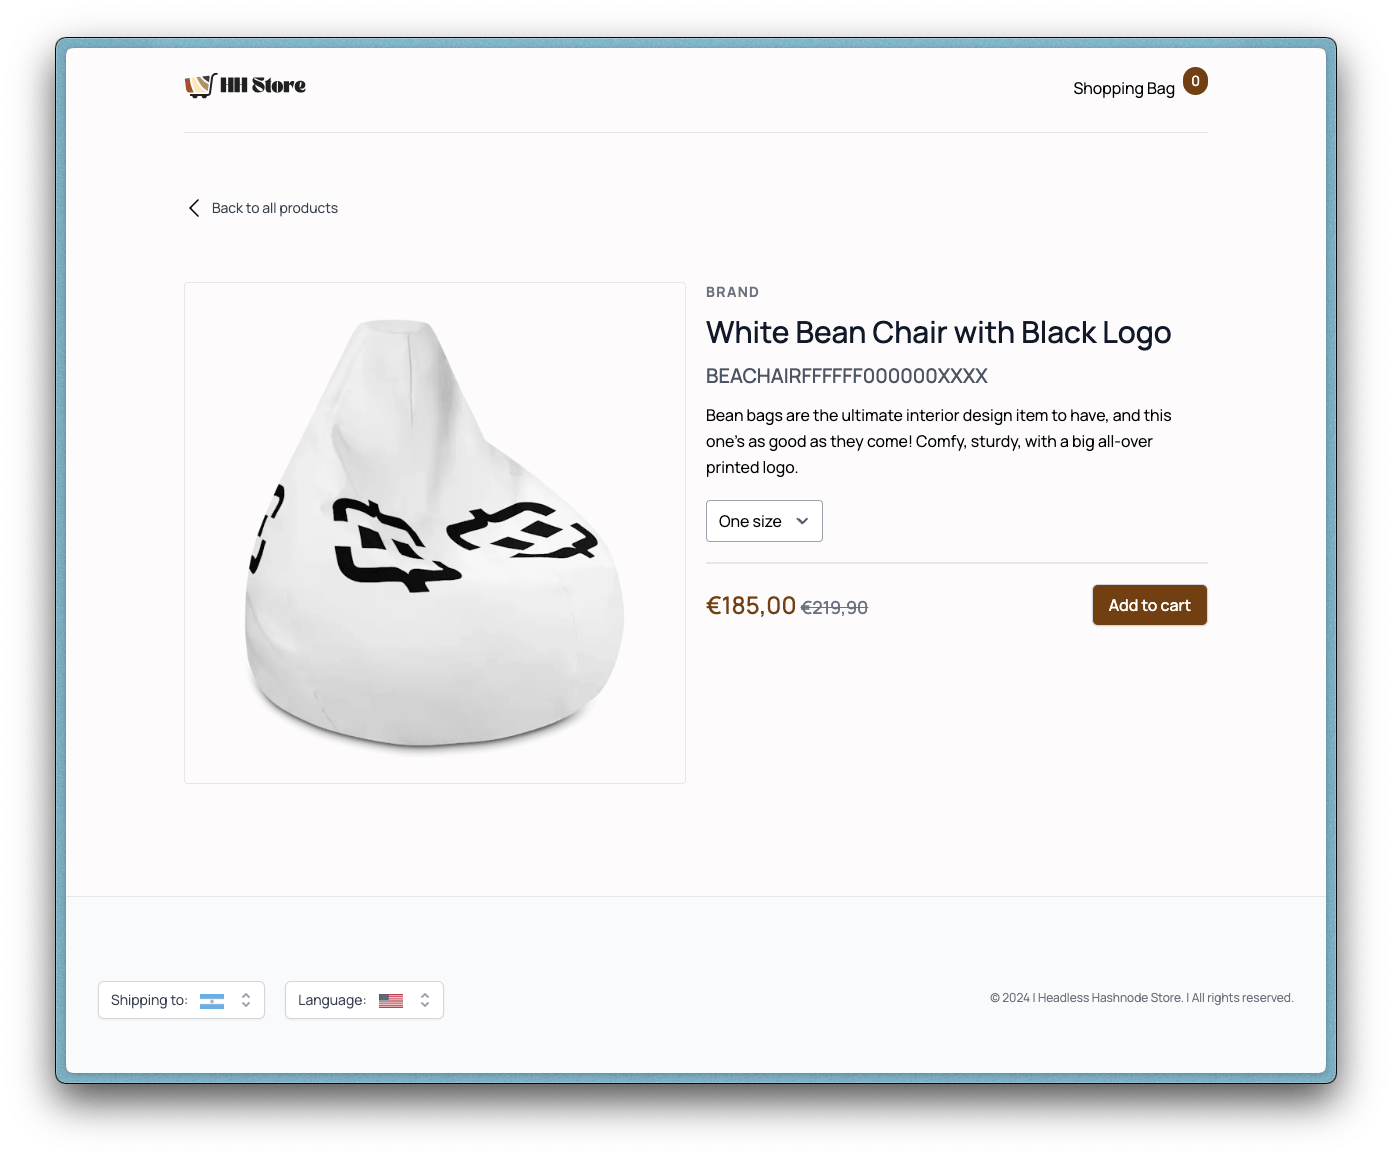
You can create your store using any tech stack or even platform of your choosing, like Shopify, WooCommerce, Medusa, Wix, Swell, Magento, etc. The image below shows what the deployed version looks like (you can also test it live here):


To learn how to build the e-commerce store in detail, I advise you to read this comprehensive documentation. But here's a quick guide on what you need to do.
1. Create a free Commerce Layer and Sanity CMS account. With Commerce Layer, you will create your inventory (markets, SKUs, prices, stock locations, stock items, etc.), and in Sanity, you will add all the product content (text, images, etc.). This is because some ecommerce platforms separate transactional logic from content for many reasons and benefits. For this tutorial, there will be seed data to import.
2. Clone or fork the template (learn how to do this).
3. Rename the /env.local.example file to .env.local and add the following required credentials:
| Variable | Description |
BUILD_LANGUAGES | The supported locales (the default is en-US, it-IT, fr-FR). |
NEXT_PUBLIC_CL_CLIENT_ID | Your Commerce Layer sales channels application client ID (you can create this automatically by following this onboarding guide or manually on the dashboard. |
NEXT_PUBLIC_CL_ENDPOINT | Your Commerce Layer organization's base endpoint (you can copy this on the dashboard. |
NEXT_PUBLIC_SANITY_PROJECT_ID | Sanity project ID (you can get this from sanity.io/manage after creating a new project with the npm -y create sanity@latest CLI command or this quick start wizard. |
NEXT_PUBLIC_SANITY_DATASET | Sanity dataset (you can get this from the dashboard. |
NEXT_PUBLIC_SANITY_API_VERSION | Sanity API version in the ISO date format, e.g 2022-02-15 (you can learn more about this in this documentation). |
NEXT_PUBLIC_SANITY_TOKEN | Sanity API token (you can get this from the dashboard. |
4. Install the required dependencies with the command below:
pnpm install
5. Start the development server with the command below:
pnpm run dev
The store should start running now on localhost:3000. As mentioned earlier, kindly read the documentation to learn more (including how to import the seed data for both the transactional commerce data and product content data). We won't cover all of these since it's out of scope for this tutorial. If you're reading this tutorial, I'd assume you already have your sleek ecommerce store set up somewhere using your chosen e-commerce platform :).
Building the Blog with Hashnode Headless CMS
Now that we have an e-commerce store running, let's set up a new Headless Hashnode Blog using the Starter Kit! First, ensure you have created a Hashnode account and a Team Blog. You can use Headless Hashnode with the Personal Blog too, but the Team Blog offers more features suitable for an ecommerce business. Headless Hashnode for team blogs is currently in beta, but you can fill out this form to inquire about pricing and additional details.
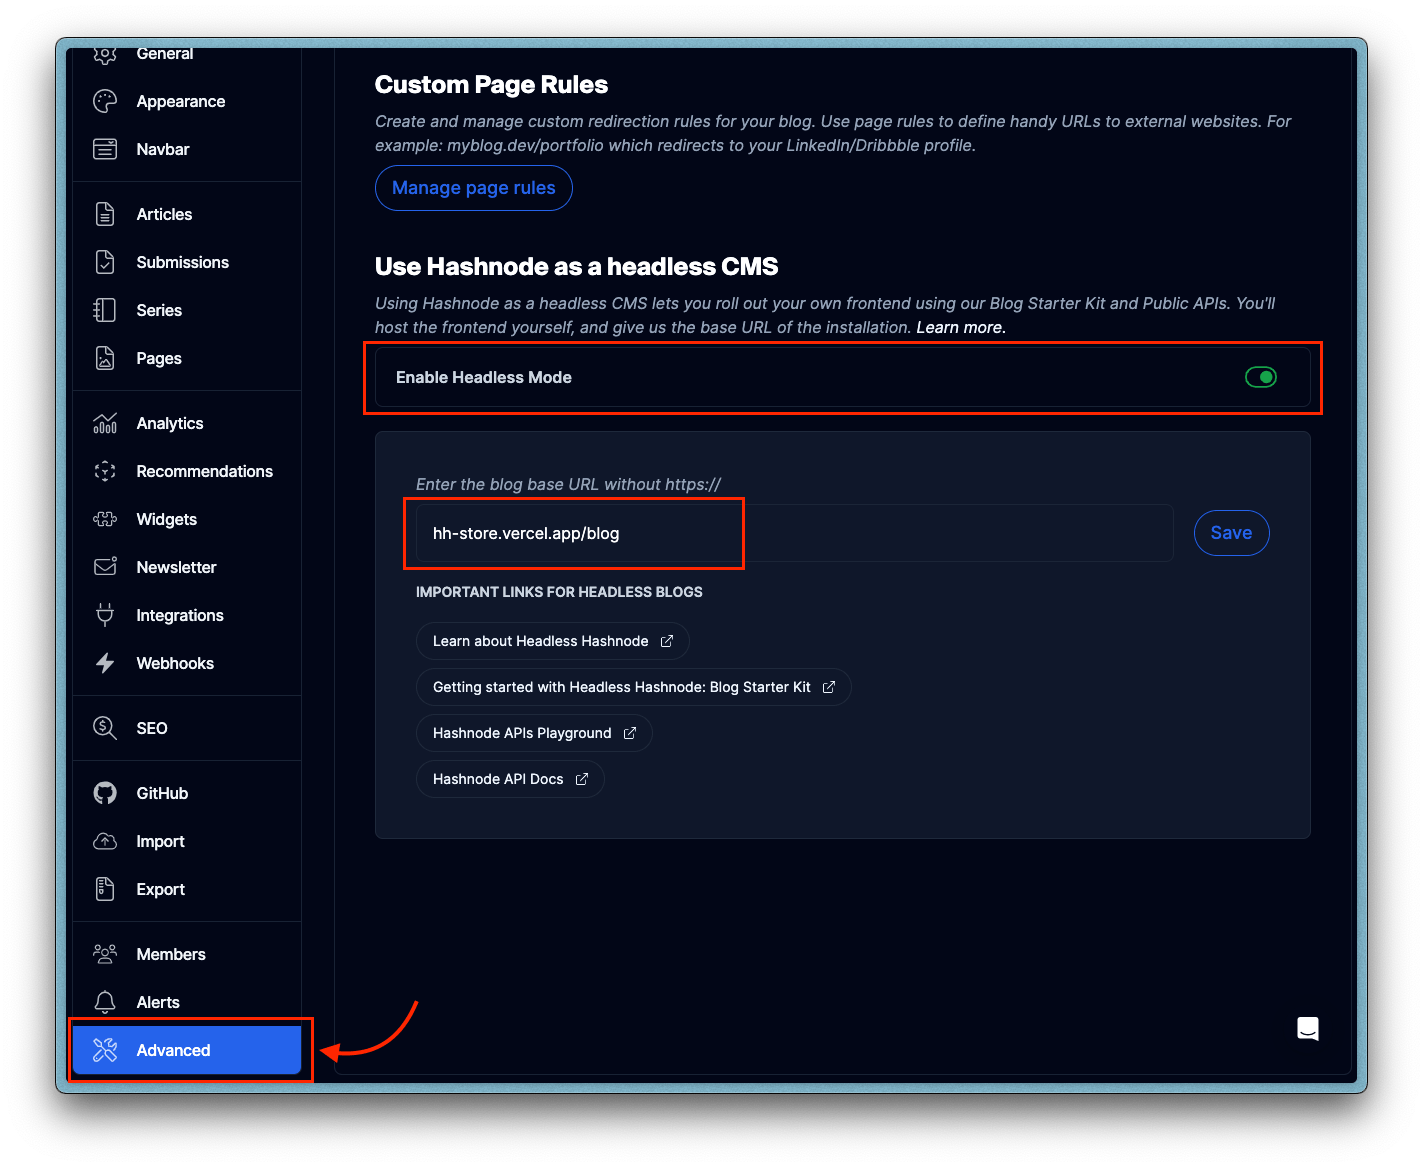
Once your blog is up and running, head to the "Advanced" tab (just at the left-bottom section of the page) in the dashboard and toggle the "Enable Headless Mode" option. This will let Hashnode know that you intend to host your blog yourself, and you can provide the base URL. In this case, my store is deployed on https://hh-store.vercel.app, and I intend to host the blog on the https://hh-store.vercel.app/blog subpath.
Now that we have this configured follow the steps below to get your blog shipped:
1. Head to the open-sourced GitHub repository and fork the Starket Kit into your personal or organization account. The project comes with different themes in a monorepo, which you can find in the packages/blog-starter-kit/themes directory. For this tutorial, we will use the enterprise theme.
2. Now, you will deploy your fork of the repository to Vercel, a cloud hosting platform. Once you're signed in, click on the "Add New" button at the top right section of the page and select "Project". You will then be redirected to a new page.
3. In the new page, choose the repository you want to import (the same one you forked earlier).
4. Select packages/blog-starter-kit/themes/enterprise as the Root Directory and Next.js as the Framework Preset, and then enter the environmental variables seen below.
NEXT_PUBLIC_HASHNODE_GQL_ENDPOINT=https://gql.hashnode.com
NEXT_PUBLIC_HASHNODE_PUBLICATION_HOST=hh-store.hashnode.dev
NEXT_PUBLIC_BASE_URL=/blog
NEXT_PUBLIC_MODE=production

NEXT_PUBLIC_HASHNODE_PUBLICATION_HOST should contain your Hashnode blog's default URL (yourhandle.hashnode.dev), and NEXT_PUBLIC_BASE_URL is the subpath you want to deploy the blog on. If you're deploying on a subdomain, you can exclude this variable, proceed to deploy the project, and then connect the custom domain in Vercel. The same process will apply if you're using any other cloud hosting platform.
With this process, I have deployed the blog on a new domain: https://hh-store-blog.vercel.app (you can choose any name you want here). But since we chose the subpath method, we need to add rewrites to the deployed ecommerce store. Since the store is also built with Nextjs, we can update the next.config.js file like so:
const nextConfig = {
  async rewrites() {
    return [
      {
        source: "/blog",
        destination: "https://hh-store-blog.vercel.app/blog"
      },
      {
        source: "/blog/:path*",
        destination: "https://hh-store-blog.vercel.app/blog/:path*"
      }
    ];
  }
};

export default nextConfig;
Nextjs Rewrites allow us to map an incoming request path to a different destination path. So when a user goes to https://hh-store.vercel.app (the store) and clicks a link to the /blog subpath, it will render the project in https://hh-store-blog.vercel.app/blog (the blog) on the same subpath. And that's about it!
Conclusion
You will agree with me now that Headless Hashnode is more suited for your next blog. You can even create an independent business from this, like The Strategist, without owning an e-commerce business and leveraging the content-driven approach to offer value to e-commerce brands and customers. I look forward to seeing the ideas you will bring to life from this; please let us know whenever you do :).
For the purpose of this tutorial, I have consolidated both the code for the ecommerce store and blog in this GitHub repository, just in case you want to explore all the customizations I have done. It's not a monorepo, and both projects are currently not sharing any data. I only extracted the enterprise theme from the starterkit and pulled in the ecommerce store. But for your case, you might want to share some UI between your store and blog (like header and footer), so you might consider going this route then. That said, you can now customize the blog as you desire and start publishing engaging content for your brand and customers.
As Guillermo Rauch said, Hashnode reminds us of what Substack did for journalists; but now, Hashnode is doing something for enterprise teams, e-commerce entrepreneurs, and businesses. I hope you enjoyed reading this tutorial and learned something new. You should also read this one to learn more about how Headless Hashnode offers more benefits than the traditional CMS platforms.