


Do you like NodeJS? Are you interested in microservices but don’t know how to create them? Stay with me! I will show you how easy it is to create a microservice with the Moleculer microservices framework in NodeJS.
What are we going to do?
We are going to create a microservice, which can store data in a memory DB and publish access via HTTP port (API Gateway) with REST API.
What you need is…
Are you ready?
Step 1: Install Moleculer CLI tool
We are going to create a Moleculer project from a template. For this we use the official Moleculer CLI tool. You can install it with the following command:
npm install -g moleculer-cli
Step 2: Create a new microservice project
moleculer init project-simple my-first-service
This command creates a new Moleculer-based project to the my-first-service folder. It will ask the followings:
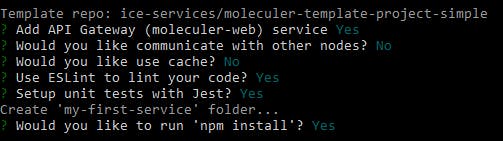
If the command is executed there will be a my-first-service folder containing a NodeJS project prepared to the Moleculer framework.
├── index.js
├── moleculer.config.js
├── package.json
├── README.md
├── services
│   ├── api.service.js
│   ├── greeter.service.js
└── test
    └── unit
       ├── greeter.spec.js
       └── index.spec.js
Step in to this folder with cd my-first-service command.
Step 3: Install Moleculer DB module
We use the moleculer-db module as a mixin to store data in our service.
Install it with the following command:
npm install moleculer-db --save
The moleculer-db is not stable currently. It is still under development, but you can use it for testing and prototyping.
Step 4: Create a new service
Open the created folder in your text editor. It has a services folder containing the services. The api.service.js is the API gateway service. It will publish your new one. The greeter.service.js is an example.
Make a products.service.js file in the services folder and paste the following code to the file to create a new service to store products:
The moleculer-db module is a universal data store module. It has common CRUD actions (create, list, find, get, update, remove). If you don’t set an adapter it will use the built-in NeDB adapter and will store data in the memory.
Start your project with the npm run dev command. It will publish your service on the port 3000 (default). Open the http://localhost:3000/products/list url in the Postman and you’ll get a response from your service.
Congratulations, you have created your REST microservice!
Once the services started, the console will switch to REPL mode. In REPL mode you can get information about your services, call them, emit events …etc. You can read more about REPL commands here.
With
npm run devcommand the broker switches to hot reloading mode, so you can modify & test your services without restarting.Press the
qkey to exit from REPL mode and stop the services.
Step 5: Configure REST in the API Gateway service
To access the new product service via REST API open the api.service.js file and modify it according to the following code (add thealiases block):
The "REST products" key in aliases creates the common REST paths and links them to the products service actions.
"GET products": "products.list",
"GET products/:id": "products.get",
"POST products": "products.create",
"PUT products/:id": "products.update",
"DELETE products/:id": "products.remove"
You can read more about aliases in Moleculer Web documentation.
Save changes and the service will be hot reloaded. Now you can test your service with Postman.
- Create a product:
POST localhost:3000/products - Get a product by ID:
GET localhost:3000/products/12345 - List products:
GET localhost:3000/products - Update a product:
PUT localhost:3000/products/12345 - Delete a product:
DELETE localhost:3000/products/12345
Conclusion
You have created your first microservice successfully. Okay, I know that it was a very simple demo. It doesn’t contain persistent store, authentication, authorization, scaling …etc. But you can see how easy it is to create a basic microservices with the Moleculer framework which is able to store your data and you can access it via REST API.
✨ Bonus steps
Dockerize your microservice
If you wish to run your service in a Docker container, follow these instructions:
Create a Dockerfile with the following content in the project folder:
Please note! It will also copy the
node_modulesfolder into the image. If you don’t want it, create a.dockerignorefile and put thenode_modulestext into it.
Build image:
docker build -t my-first-service .
Start your service in a container:
docker run -d -p 3000:3000 my-first-service
Interesting blog post how to dockerize a NodeJS application better (fromNodeSource):
8 Protips to Start Killing It When Dockerizing Node.js _Containers are the best way to deploy Node.js applications to production. Containers provide a wide variety of benefits…_nodesource.com
The default
FROM node:6image is very huge (~600MB). If you need a smaller one, change it toFROM node:6-alpineinDockerfile. The alpine version is only ~50MB.
Store data in MongoDB
There is an official MongoDB adapter for the Moleculer DB module. You can set it in your service and your data will be stored in a MongoDB collection.
Install the adapter:
npm install moleculer-db-adapter-mongo --save
Set up adapter into your service:
It’s done. From now every products will be stored in your MongoDB.
If you want to learn more about Moleculer framework, check out our website https://moleculer.services or github.
Follow us on Twitter at @MoleculerJS or join to our Gitter chat.