


Before we get started let us understand what selenium is:
Selenium is a test automation framework that allows you to automate web app testing. With languages like Java, Python, Ruby, and C#, you can write test scripts to run against browsers and VMs. Some teams do this themselves, and some rely on a cloud-based solution.
How Is Selenium Used for Automated Testing?
Selenium is an automated testing framework. The framework executes test scripts against different web browsers, like Chrome, Firefox, and Safari.
What Cannot Be Automated Using Selenium?
Selenium cannot automate mobile app tests, as it is only for web app testing. Selenium cannot automate captcha. Selenium WebDriver cannot read bar codes. And Selenium cannot automate OTP submissions either.
What Types of Testing Can Be Done Using Selenium?
There are many types of testing that can be done with Selenium. You can do smoke testing, sanity, testing, UI testing, regression testing, and more.
How Do You Write a Selenium Test?
The Selenium framework supports numerous languages. You can write a test script using Java, Python, Ruby, C#, JavaScript, Perl, or PHP. You may need to import a few packages or statements into your code. You can also use XPath in Selenium to find objects.
When Should Selenium Be Used?
Selenium should be used to automate web tests that occur frequently and are repetitive. If it is time-consuming to do manually and the requirements are low risk, then the test should be automated with Selenium.
TLDR, Selenium automates browsers. That's it!
For this tutorial, we will be designing automation that will automatically search Google and take a screenshot of the result.
Tools we will need:
Python:- We will be using python for this tutorial however you can use any programming language that is supported by selenium
Chrome browser and Chrome driver:- WebDriver drives the browser using the browser’s built-in support for automation. Here is a list of every browser and driver supported by selenium. Install browser drivers | Selenium
vscode:- Cause its the best
Some time and patience.
Ok, let's get started now.
Setting up the environment
First, we will be installing the selenium library for python. Open up a terminal or a command prompt and type the following command.
pip install selenium
This will install the latest bindings for Selenium WebDriver.
once that is done now it is time to install the web driver. As previously mentioned we will be using the Chrome web driver for this tutorial.
Go to the about section in your chrome browser and make a note of the version.

As of making this tutorial the latest version is : 103.0.5060.114
Now go to this website webdriver and download the file which matches your chrome version.
Extract the zip and note the path of the file.
Lets get to the actual coding part:
Open up the vscode and create a new python file and type the following line.
from selenium import webdriver
from selenium.webdriver.common.by import By
from selenium.webdriver.common.keys import Keys
This will import the webdriver from the selenium bindings.
Now lets define the driver:
driver = webdriver.Chrome("path_to_the_webdriver")
Type the path to the file which we downloaded between the paranthesis.
Then, we will make selenium navigate to the Google URL.
driver.get("google.com")
if everything goes right then you will see a new chrome window opened and redirected to Google.
Now let's add an user input so that the automation can search Google based on this input
user_input=input("Search here:")
Now let's to locate the Google search text box with the help of its Name attribute value. Go to google.com and right click on the search box and click inspect element.
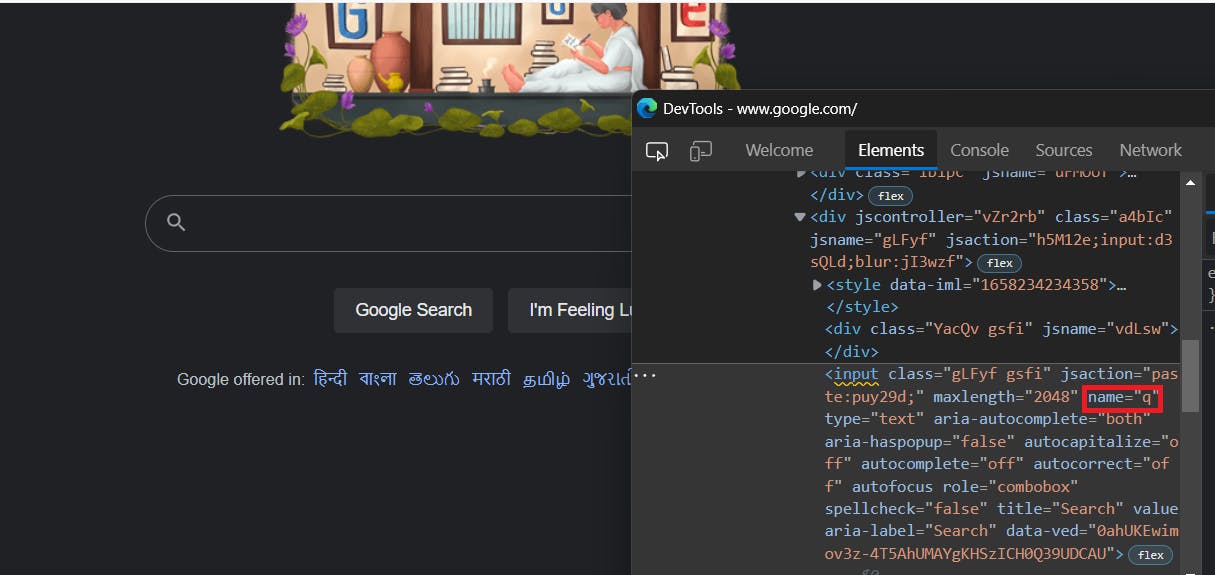
As we can see, the name of the element is q
Now we can make the automation find the search box by driver.find attribute
search_box = driver.find_element(By.NAME, 'q')
Here is every possible way to locate an element in selenium :locate Element
we can now make the automation type on the search_box by using the send_keys function
search_box.send_keys(user_input)
search_box.send_keys(Keys.RETURN) #to press enter on the search box
Now lets get the screen shot
driver.save_screenshot('name_of_the_screen_shot._format')
In order to open the captured screenshot lets use another python library named Images. Pip Install this library and import the library to the main file. Use Image.open() function to open the screen shot and show() to show the screenshot.
So the final code file should look like this.
from selenium import webdriver
from PIL import Image
from selenium.webdriver.common.by import By
from selenium.webdriver.common.keys import Keys
driver = webdriver.Chrome("_path_to_the_webdriver")
driver.get("google.com")
user_input=input("Search here: ")
search_box = driver.find_element(By.NAME, 'q')
search_box.send_keys(user_input)
search_box.send_keys(Keys.RETURN)
driver.save_screenshot('_name_of_the_screenshot')
image = Image.open("_name_of_the_screenshot")
image.show()
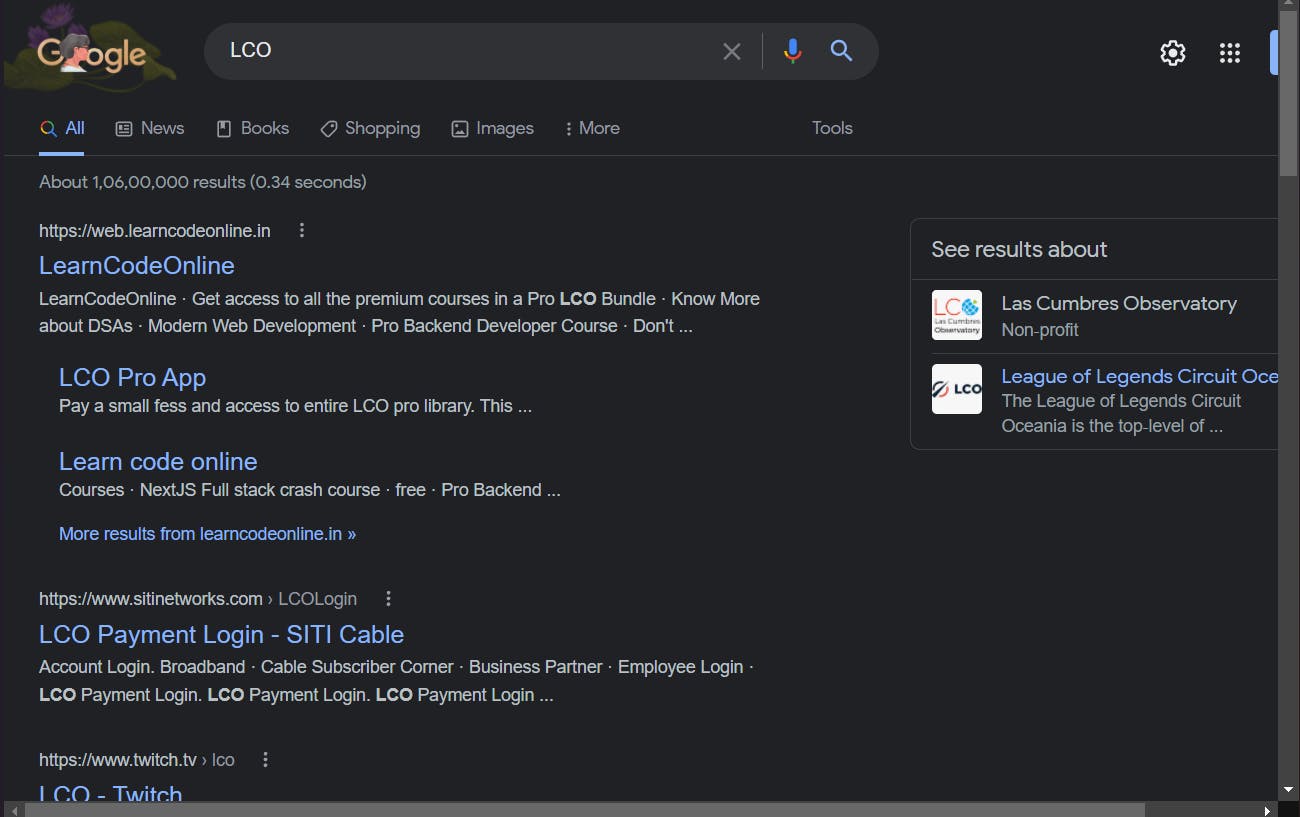
The Output:

Thank you for reading!
I hope this post will help you in your journey. Happy learning!