
Chrome Extension Tutorial
In this article, we’ll develop a chrome extension using which the user can get Random jokes.


Chrome Extension Tutorial
In this article, we’ll develop a chrome extension using which the user can get Random jokes.
The code is hosted here: %GitHub. The Blog explained for the main extension can be found here(in the main extension’s repo). Note that the project is still a Work in Progress at the time of writing this article.
Let’s get started. Broadly speaking, we’ll divide this article into 3 parts. In the first part, we’ll hook up the extension so that we can access our in-development extension in Chrome. In the second part, we’ll have a look at a basic extension and talk about the code and the architecture. In the third part, we’ll develop the main extension.
1. Testing our extension during development
To test and debug our extension during the development phase, we’ll follow the below steps to get a basic extension up and running.
- Create the manifest.json file and the project structure as shown above or download them from the link at the top of the article.
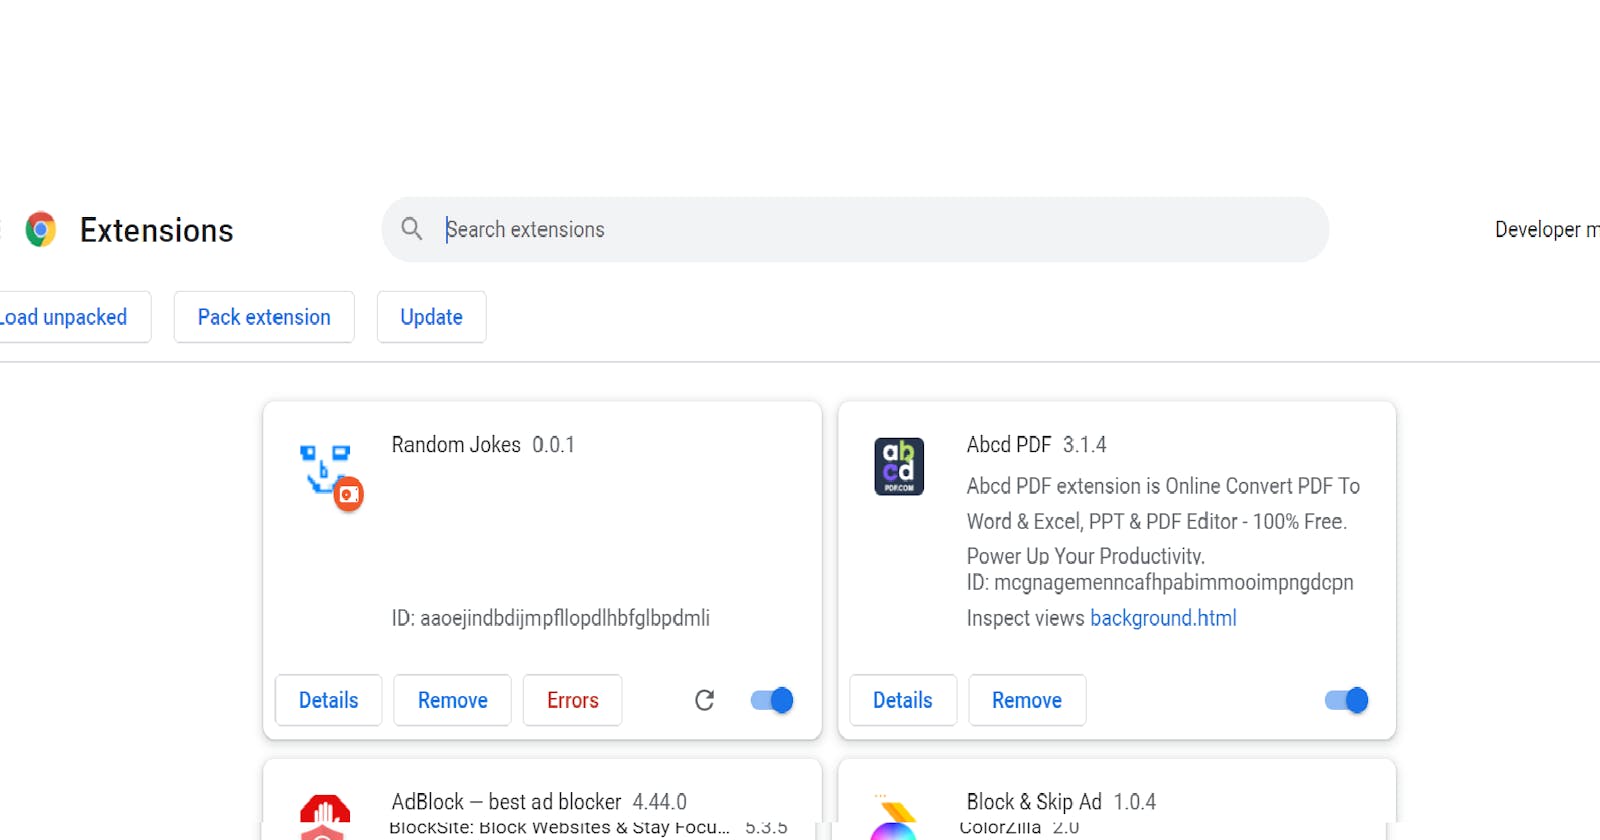
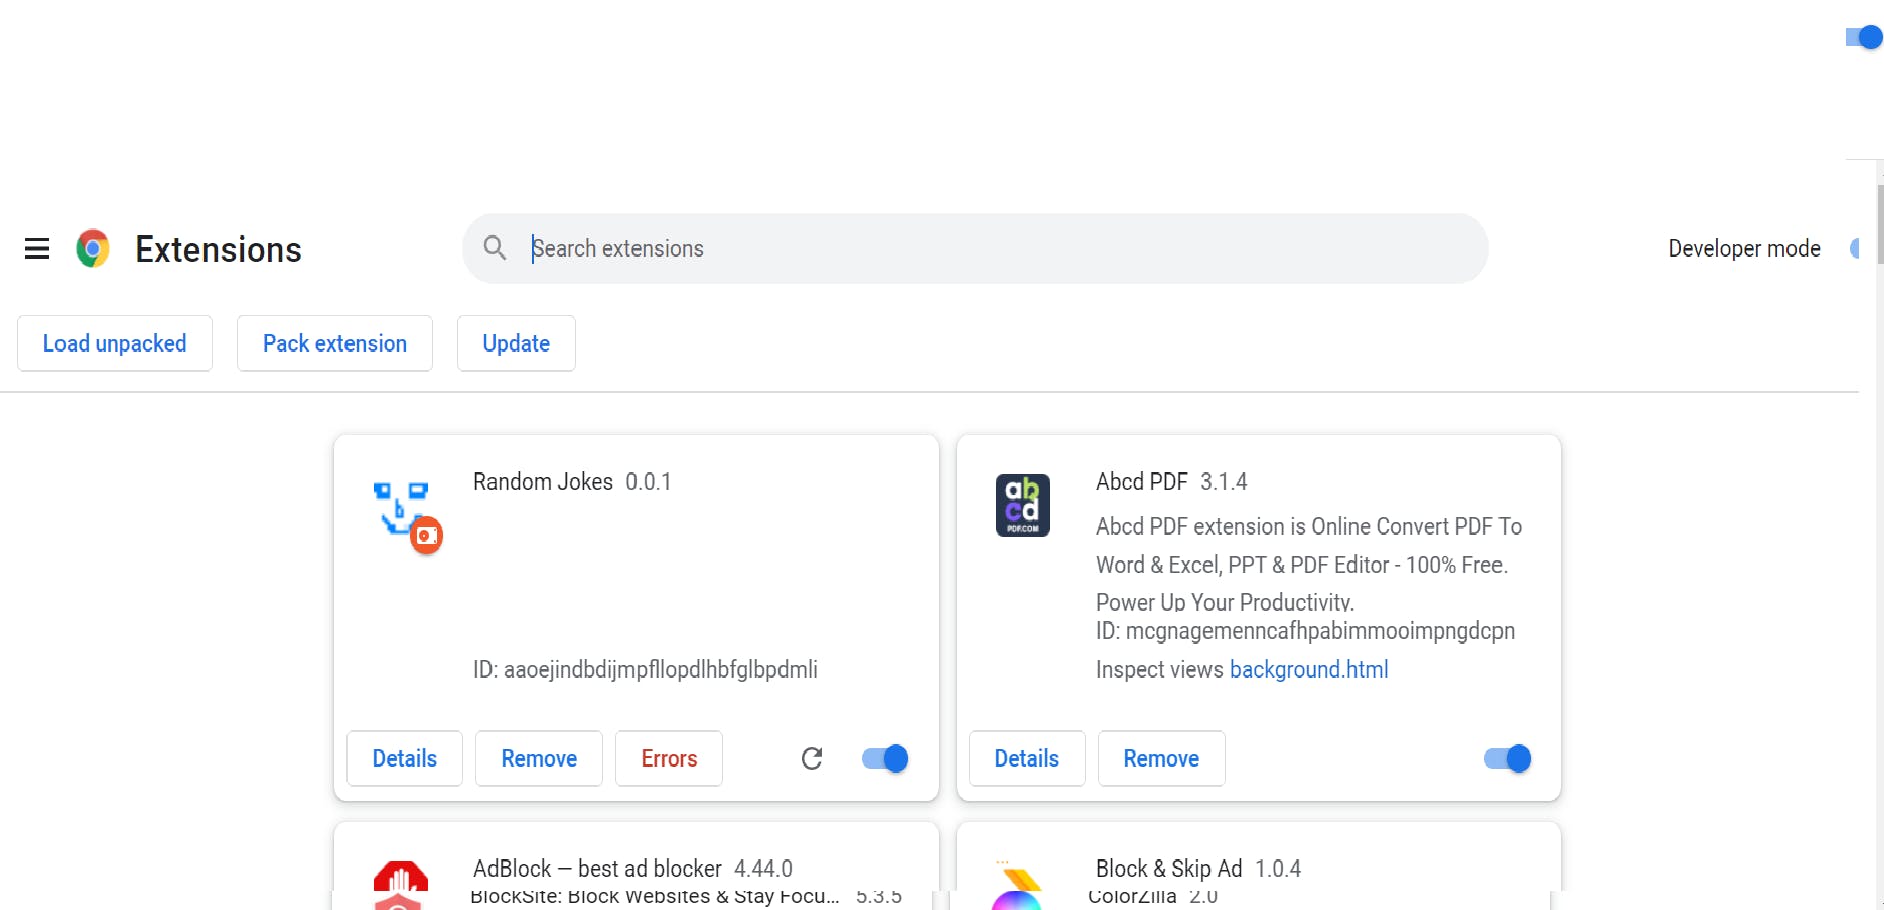
- Go to chrome://extensions from your browser.
- Toggle the ‘Developer Mode’ to ON.
- Click on the ‘Load Unpacked’ option to load the Extension folder for the test, debug, and further development.
- At this point, you should see your Extension on the right side of the address bar of the chrome.
Now that we have loaded our Extension folder on chrome, we are ready to build a basic chrome extension and test it out.
2. Basic Chrome Extension – Hello World!
We’ll build an extension that will say, “Hello World!” when the user clicks on the Extension icon. The code can be found here.
Clicking the ‘’ icon opens the popup.html with a Some Demo-Text, message
For that, we’ll need the following files.
manifest.json – To hold information about the Chrome extension. popup.html – To say, “Hello World!” when the user clicks on the extension icon. popup.js – No significant work of this file at this point. Although, we’ll keep it here. background.js – To load up the extension with the basic backend functionality. Not required for the Hi, there! Extension.
manifest.json file
{
  "name": "Hello World",
  "description": "Build an Extension!",
  "version": "1.0",
  "manifest_version": 3
}
Load an unpacked extension
The directory holding the manifest file can be added as an extension in developer mode in its current state. To load an unpacked extension in developer mode, follow these steps:
- Open the Extension Management page by navigating to chrome://extensions.
- Alternatively, open this page by clicking on the Extensions menu button and selecting Manage Extensions at the bottom of the menu.
- Alternatively, open this page by clicking on the Chrome menu, hovering over More Tools then selecting Extensions
- Enable Developer Mode by clicking the toggle switch next to Developer mode.
- Click the Load unpacked button and select the extension directory.
Let’s look at the key-value pairs in the manifest.json file in more detail.
name – This is the name of the extension. In the browser screen snapshot, you can see this as ‘Hi, there! Extension. version – This is the version of the extension. It’s taken as 1.0 because when we upload it for review to the chrome web store, it would be 1.0 initially. In the development phase, you may name it as 0.0, then 0.1, and so on as well. description – Description of the extension. It’s a good practice to keep it concise. permissions – The permissions key-value pair holds the different permission that the Extension requires access to work properly. The value is an array of strings. The elements of the array can be either known strings, or a pattern match(usually used to match web addresses). For example, youtube.com -> permits the extension for all links with the domain name youtube.com. Here, the ‘’ is a wildcard pattern. Also, note that some of the permissions declared here may need the user’s explicit approval as well. You can read more about permissions in the official docs. options_page – The options page is used to give a user more options. The user can access the options page by either right-clicking on the extension and clicking on the ‘options’ button from the menu, or going to the options page from the ‘chrome://extensions’ page. The setting used in the above manifest will cause the options.html page to open in a new tab. It is also possible to open the ‘options’ page in the same tab in an embedded manner. In the basic ‘Hello World’ extension, we don’t need this option. You can read more about the ‘options’ in the official docs. perhaps add more here background – background script(s) is declared here. The background script is used to listen to events and react to them, as the extension is an event-driven paradigm. A background page is loaded when it is needed and unloaded when it goes idle, i.e., the background script will keep running while it is performing an action and unload after the action is performed. In our ‘Hi, there!’ extension, we haven’t used the background script functionality. You can also notice that the “persistent” key is set to false because it’s the standard practice, and as mentioned in the docs, the only time we should set “persistent” to true is when the extension is using the chrome.webRequest API to block or modify network requests, which we’re not doing. browser action – The browser action is used by the Extension to put the icon on the right side of chrome’s address bar. The extension then listens for clicks, and when the icon is clicked, it does something. In our case, it opens the popup.html page containing the Hello World! greeting. The ‘default title’ field value is a string that is displayed when the user hovers over the extension’s icon. manifest version – At the time of writing this article, developers are being encouraged to try out the soon-to-be-launched manifest version 3. However, version 2 is still available and familiar, so we’ll use version 2. For version 3, you can start here.
Add functionality
The extension is now installed, but it doesn't currently do anything because we haven't told it what to do or when to do it. Let's fix that by adding some code to store a background color value.
Register the background script in the manifest
Background scripts, like many other important components, must be registered in the manifest. Registering a background script in the manifest tells the extension which files to reference, and how that file should behave.
{
  "name": "Getting Started Example",
  "description": "Build an Extension!",
  "version": "1.0",
  "manifest_version": 3,
  "background": {
    "service_worker": "background.js"
  }
}
Chrome is now aware that the extension includes a service worker. When you reload the extension, Chrome will scan the specified file for additional instructions, such as important events it needs to listen for.
Create the background script
This extension will need information from a persistent variable as soon as it's installed. Start by including a listening event for runtime. on Installed in the background script. Inside the on Installed listener, the extension will set a value using the storage API. This will allow multiple extension components to access that value and update it. Inside the extension's directory create a file named background.js and add the following code.
let color = '#187FC4';

chrome.runtime.onInstalled.addListener(() => {
  chrome.storage.sync.set({ color });
  console.log('Default background color set to %cgreen', `color: ${color}`);
});
Add the storage permission
Most APIs, including the storage API, must be registered under the "permissions" field in the manifest for the extension to use them.
{
  "name": "Getting Started Example",
  "description": "Build an Extension!",
  "version": "1.0",
  "manifest_version": 3,
  "background": {
    "service_worker": "background.js"
  },
  "permissions": ["storage"]
}
Inspect the background script
Navigate back to the extension management page and click the Reload link. A new field, Inspect views, becomes available with a blue link, service worker.
Then, click the link to view the background script's console log, "Default background color set to green
Introduce a user interface
Extensions can have many forms of a user interface; this one will use a popup. Create and add a file named popup.html to the extension's directory. This extension uses a button to change the background color.
<!DOCTYPE html>
<html>
  <head>
    <link rel="stylesheet" href="button.css">
  </head>
  <body>
    <button id="changeColor"></button>
  </body>
</html>
--Like the background script, this file must be declared in the manifest in order for Chrome to present it in the extension's popup. To do this, add an action object to the manifest and set popup.html as the action's default_popup.
  "name": "Getting Started Example",
  "description": "Build an Extension!",
  "version": "1.0",
  "manifest_version": 3,
  "background": {
    "service_worker": "background.js"
  },
  "permissions": ["storage"],
  "action": {
    "default_popup": "popup.html"
  }
}
This popup's HTML references an external CSS file named button.css. Add another file to the extension's directory, name it appropriately, and add the following code.
```button { height: 30px; width: 30px; outline: none; margin: 10px; border: none; border-radius: 2px; }
button.current { box-shadow: 0 0 0 2px white, 0 0 0 4px black; }
Designation for toolbar icons is also included under action in the default_icons field. Download the images folder here, unzip it, and place it in the extension's directory. Update the manifest so the extension knows how to use the images.


```{
  "name": "Getting Started Example",
  "description": "Build an Extension!",
  "version": "1.0",
  "manifest_version": 3,
  "background": {
    "service_worker": "background.js"
  },
  "permissions": ["storage"],
  "action": {
    "default_popup": "popup.html",
    "default_icon": {
      "16": "/images/get_started16.png",
      "32": "/images/get_started32.png",
      "48": "/images/get_started48.png",
      "128": "/images/get_started128.png"
    }
  }
}
Extensions also display images on the extension management page, the permissions warning, and the favicon. These images are designated in the manifest under icons.
{
  "name": "Getting Started Example",
  "description": "Build an Extension!",
  "version": "1.0",
  "manifest_version": 3,
  "background": {
    "service_worker": "background.js"
  },
  "permissions": ["storage"],
  "action": {
    "default_popup": "popup.html",
    "default_icon": {
      "16": "/images/get_started16.png",
      "32": "/images/get_started32.png",
      "48": "/images/get_started48.png",
      "128": "/images/get_started128.png"
    }
  },
  "icons": {
    "16": "/images/get_started16.png",
    "32": "/images/get_started32.png",
    "48": "/images/get_started48.png",
    "128": "/images/get_started128.png"
  }
}
-- By default, extensions appear in the extensions menu (the puzzle piece). Pinning the extension will display the icon in the toolbar.
Main Extension – Random Jokes
Source Code:
1. manifest.json:
    "name": "Random Jokes",
    "version": "0.0.1",
    "manifest_version": 2,
    "browser_action": {
        "default_popup": "popup.html",
        "default_icon": "logo.png"
    },
    "icons": {
        "128": "logo.png"
    }
}
2. popup.html:
<!DOCTYPE html>
<html lang="en">
  <head>
    <meta charset="UTF-8" />
    <meta http-equiv="X-UA-Compatible" content="IE=edge" />
    <meta name="viewport" content="width=device-width, initial-scale=1.0" />
    <link rel="stylesheet" href="style.css" />
    <title>Random Jokes</title>
  </head>
  <body>
    <div class="main">
      <h1>Jokes</h1>
      <p id="jokeElement">Loading...</p>
    </div>
    <script src="script.js"></script>
  </body>
</html>
3. Script.js
fetch('icanhazdadjoke.com/slack') // Apis to get Random Jokes
    .then(data => data.json())
    .then(jokeData => {
        const jokeText = jokeData.attachments[0].text;
        const jokeElement = document.getElementById('jokeElement');

        jokeElement.innerHTML = jokeText;
    })
4. Style.css
@import url('fonts.googleapis.com/css2?family=Poppins:i…);


body {
  font-family: 'Poppins', Helvetica, Arial, sansPoppins;
  width: 300px;
  height: 300px;
  background: rgb(2, 0, 36);
  background: linear-gradient(
    90deg,
    rgb(30, 28, 63) 0%,
    rgba(9, 9, 121, 1) 19%,
    rgba(0, 212, 255, 1) 100%
  );
  border-radius: 5px;
  display: flex;
  justify-content: center;
}


.main {
  display: flex;
  flex-direction: column;
  justify-content: center;
  align-items: center;
}

h1 {
  display: block;
  color: white;
}

p {
  display: block;
  font-size: 22px;
  border-radius: 6px;
  color: var(--dark-primary-clr);
  border: 2px solid White;
  padding: 10px;
}
** Further Development Scope for you to try out
Feel free to raise a PR or issue on the repo. Improve the UI/UX of the extension Design the icons and store them in the project directory for custom extension icons **
Take the next step
- Congratulations! The directory now holds a fully functional, albeit simplistic, Chrome extension