


The Future of NFTs
You've heard of NFTs. Maybe you think of them digital pictures that you can own--or maybe you can't because they're obscenely expensive. Maybe you consider them a fad or a bubble that will one day burst, like crypto itself. But maybe it won't die. Maybe it's just the start. Maybe it's evolving, growing and expanding as we speak. Maybe there's more to it than digital pictures.
And there is. The future is not just near, it is here. Consider this--while you can own an NFT, sure, what if maybe an NFT could own an NFT? Instead of owning a static file, you could own a composable set of NFTs. Take, for example, a character, some character NFT, but only a body. And there are items—let's say a 🧢 hat, or a 🥋 belt, or a 🔪 weapon. Each of these are NFTs on their own, which you can purchase and give to your character NFT. Thus, your NFT is now composable. You can build and decorate it as you like.
Let’s take it a step further. Consider the weapon is a 🪄magic wand, and the magic wand itself can own perhaps a special 💎 gem or 🏅 gold-plating. This nested ownership can run well beyond just one level deep.
Let's go even further. Now that an NFT owns another NFT, consider how it can be represented. For example, consider that the 🗡sword could be equipped in your right hand, or your left hand (or stowed away in your belt). Or let's go even further. Consider the possibility that your magic wand takes on different features depending upon the 💎 gems it has equipped...or maybe depending on the ⏰ time of day...or depending on its experience.
It’s not just visual, either. Consider you have a 🎶 music 🎶 NFT that can be owned by your character and equipped as a 🎵 song 🎵. Or consider that your character NFT itself can be represented differently into multiple games. Consider that this same character NFT can be represented in future games that 🤯 haven't yet been developed 🤯.
These ideas are indeed not just being developed--they are already here. While you've heard of NFTs, you likely haven't heard of RMRK (pronounced "remark"). RMRK is an advanced NFT standard, introducing nested ownership (an NFT can own another NFT), multi-resource representation (a sword can be equipped into one's right or left hand), forward-compatibility (resources can be added to NFTs to make them usable in future projects), and conditionality (resources represented based on certain conditions).
Fundamentally, RMRK is a standard. It has been defined, but it is also being implemented. The inaugural proof-of-concept implementation is Kanaria, built by the official RMRK team. Kanaria are birds that can own headware, backgrounds, handheld items, foregrounds and more, and are destined to live in the land called Skybreach.
There is also a community marketplace for building your own NFTs on the RMRK2.0 standard called Singular, using the Kusama blockchain. Built already on the standard are Mushroom Topia, Evrloot, and Stickies, to name a few. These are composable, buildable, evolvable NFTs, built on the RMRK2.0 standard.
Overview of Demo
Today, we'll build our own minimal RMRK2.0 project, and we're going to do it the hard way. At scale, there is automation to speed this process up, but today we will go through this slowly and manually. The benefit of introducing the hard way first is a deeper base understanding. 🚶 Walking slowly will help us 🏃 run fast later!
In order to participate in this first-hand, you'll need a Polkadot wallet, the Polkadot.js extension, and about 0.01KSM (around $1 USD, though you'll probably use well less than that).
What we're going to create is a simplified version of Stickies. We will create a Stickie (a stick figure), and a Stick. Then, we'll make the Stick equippable into either the right or left hand of the Stickie. Then we'll equip the Stick, and see it work!
Creating KSM Wallet
First, let's create a KSM wallet with the Polkadot JS extension.
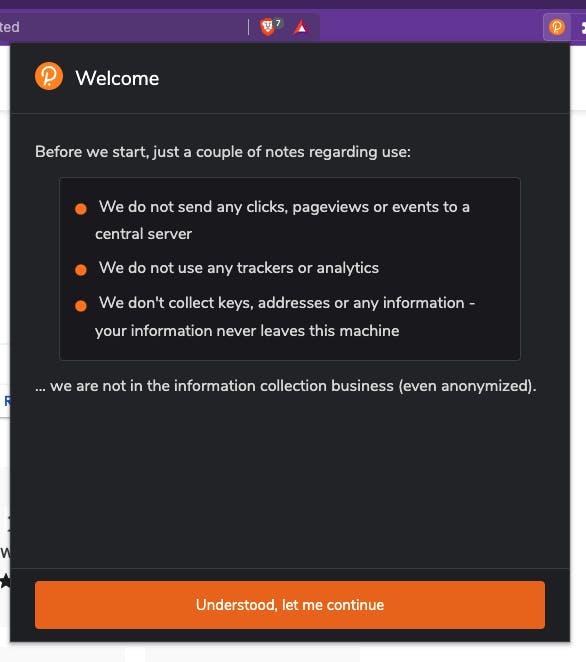
- Download and install the extension, then accept the welcome message.
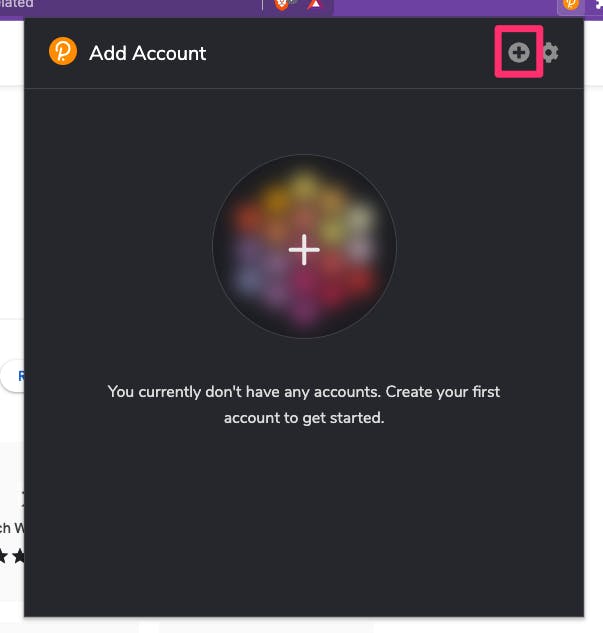
- Click the plus icon to add an account
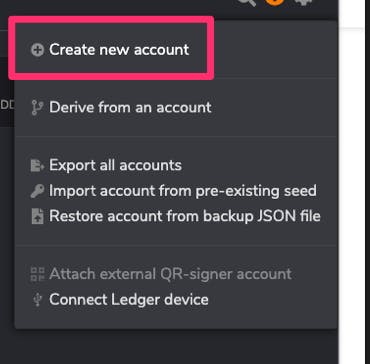
- Create new account
- Write down your 12-word seed phrase. This is the most important twelve words in your digital life. Even if you think "I'm just playing around, I don't need this", maybe you'll eventually actually want to use them. If you don't save them now, you'll never see them again. Then, click the checkbox and click Next step

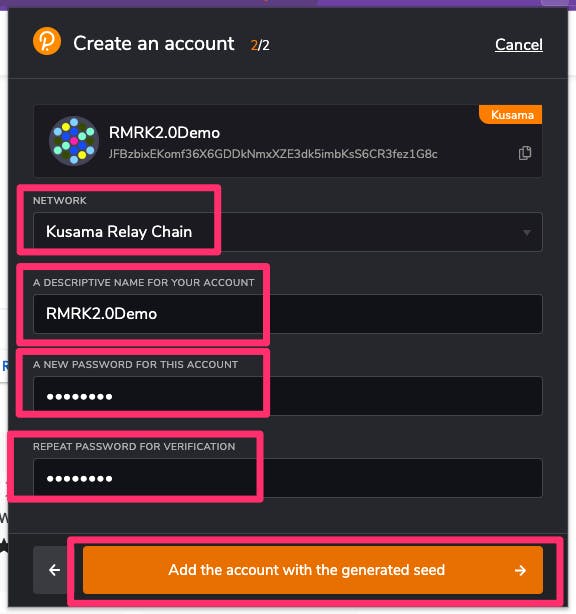
- For Network, select Kusama Relay Chain, give the account some name, and enter password to access your account locally in the browser (this is important if your physical machine gets hacked).
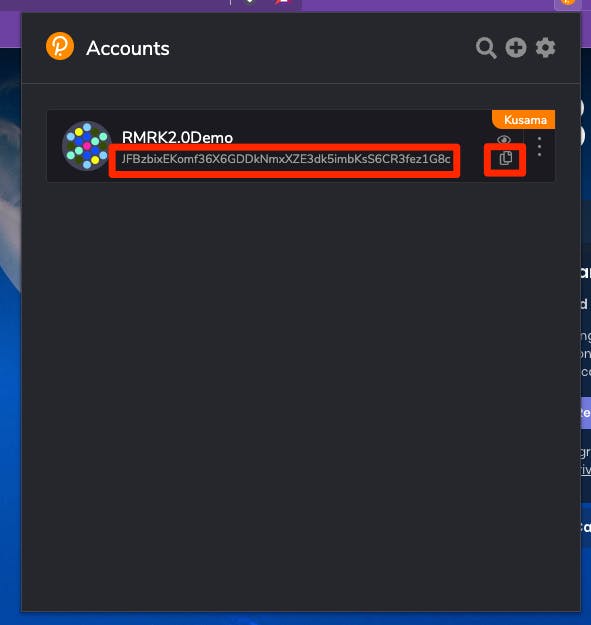
Now that we have a KSM wallet, we have a KSM address. Our KSM wallet address is visible in the extension, and we can copy it by clicking the Copy icon.
We now need to find someone to give us a small amount of KSM. You might ask someone on Twitter (I'm @blocksbrandon, though I don't have a ton of money, but I can try to help if you're nice enough [maybe]). You can also check CoinMarketCap for the different centralized exchanges to get KSM. Just send 0.01KSM to the wallet address you copied.
Polkadot JS UI
Much of the next phase of our experiment will be happening in the Polkadot.js app, so let's get that set up.
- Navigate to https://polkadot.js.org/apps/#/explorer
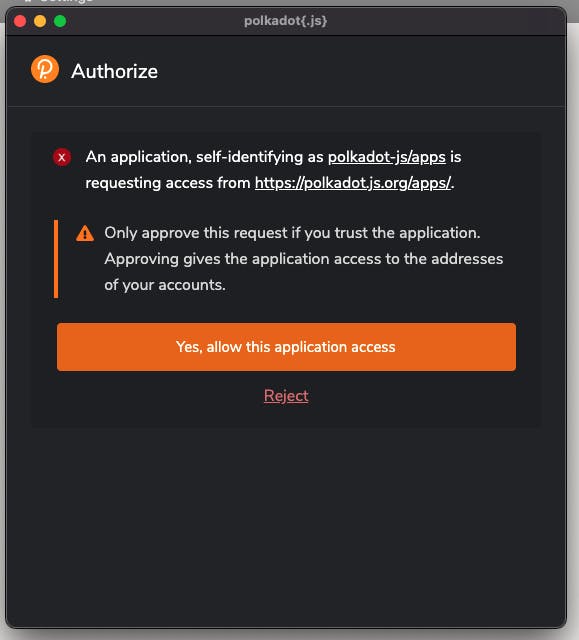
- Authorize the app to see the wallet addresses in the Polkadot extension
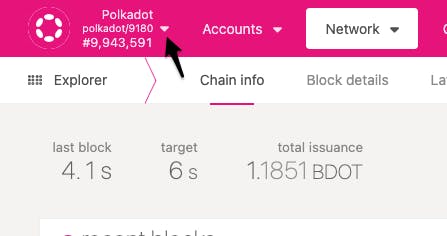
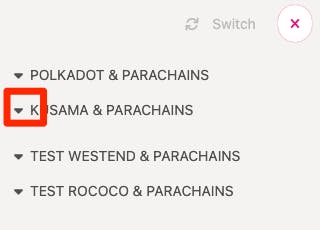
- By default, the view will be for Polkadot, but we want to see Kusama. Click the dropdown arrow
- Click the arrow to contract the Polkadot section
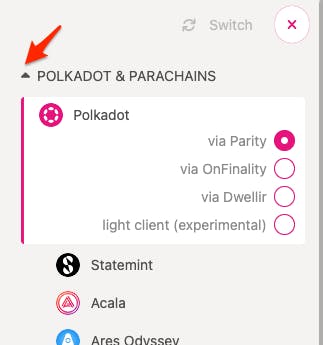
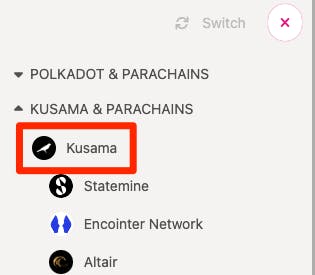
- Click the dropdown arrow to expand Kusama
- Click Kusama to expand the top-level Kusama chain options
- Select "via OnFinality" then "Switch"
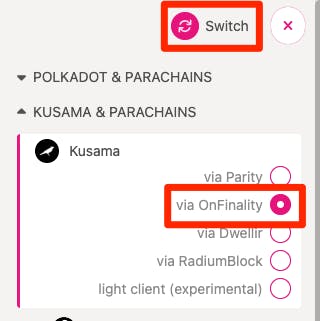
- We confirm the network has switched from Polkadot to Kusama because we see that the banner has changed from Polkadot's magenta color to Kusama's black

- Next let's confirm our account is connected and has 0.01KSM. Navigate to Accounts > Accounts
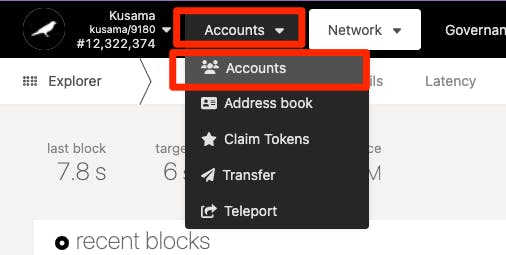
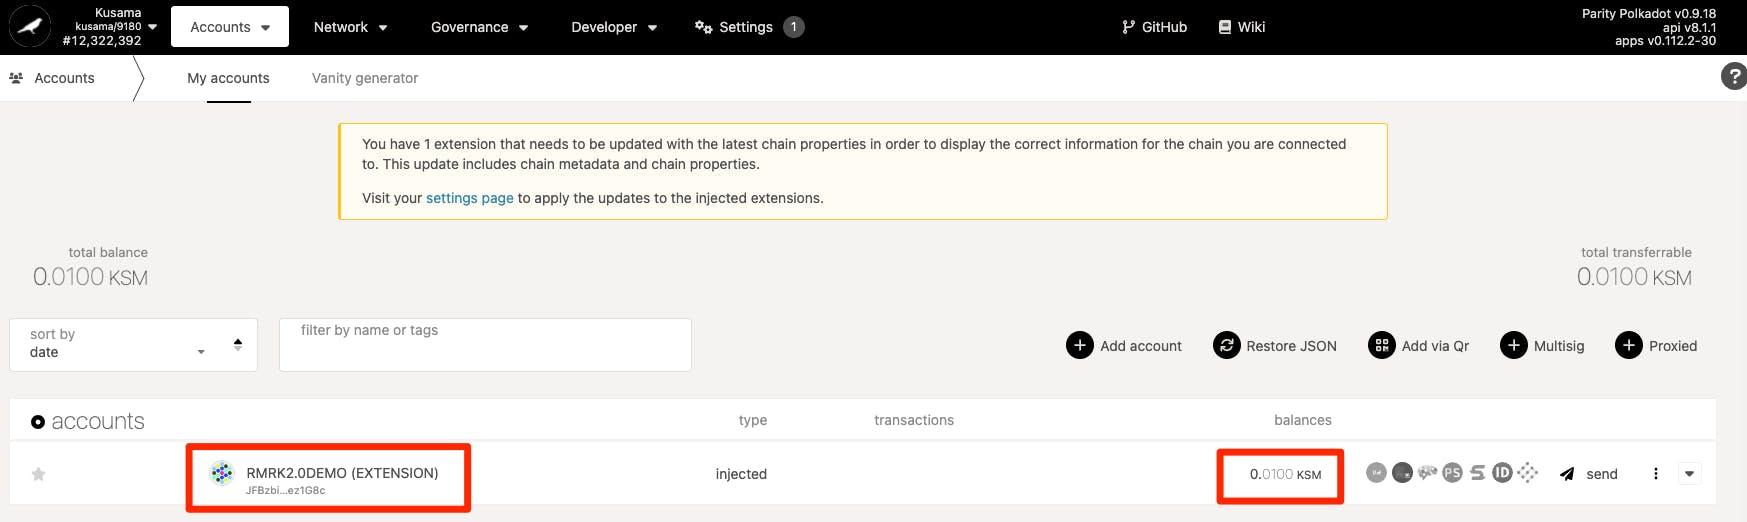
- Our account is there, and we have a balance
Now it's time for the fun! Let's create our Stickies.
IPFS and Pinata
Before actually creating, let's discuss IPFS for a moment. We'll be using IPFS for "pinning" (essentially "uploading") data to this massive decentralized filesystem. Data we'll pin includes images and metadata. For our purposes, we'll use Pinata which has a free level of access that is perfectly sufficient for our purposes. Head to Pinata and create an account. Once you have an account, you'll be able to upload files quite simply (which we'll do numerous times).

You can practice by uploading a dummy .txt document. Keep in mind this is a publicly-accessible service, so anything you upload is freely available to anyone. Once you upload something, you'll see it has a "CID" (content identifier). This is synonymous with IPFS hash. We will need this information often.

Creating Images with Krita
For creating all of the images, I'm on a Mac and will be using Krita. Likely you can use pretty much any image creating software.
We will need several images, which I've created with Krita and uploaded to Pinata. In the case of SVG files, I've converted the PNG files created with Krita to SVG with an Online SVG Converter. These are the images we will be using:
Collection thumbnail (PNG). Hash: QmZzmvAG1LBm2iQUycVzM5aykotMrfoBcofo9NrBP8rXvL

Main Stickie Body With Smile (PNG). Hash: QmYKh5BKNP6wHmsvxWJwT1LZowge1isBYNUYs9vnXhhGGQ

Base Stickie Body (SVG). Hash: Qmd3EwaSGsTbzTrSUm95aqwZQTXwR9gSs17ZpAtCsrvhUV
Primary Stick Image (PNG). Hash: QmNotsRxQ32fxH7ANFtDTcT4WzjPDAtX24Nha2QAfWxP5T

Stick Image Right Hand (SVG) transparent background Hash: Qmbmu4hYQPztDBWigB8Fne1P8uy8qexBe4EhJCstBqxxVc

Stick Image Left Hand (SVG) transparent background Hash: QmRjewZKtenzs7dKCs3e8fJkR9zqtzwMsjjbJZDyPxR5i7

Create Collection
Any NFT created will first need a Collection. This process is much easier via the Singular 2.0 User Interface, but we are doing everything manually. So we need the following:
- image is the IPFS hash for the Collection image: Image #1, QmZzmvAG1LBm2iQUycVzM5aykotMrfoBcofo9NrBP8rXvL. You can see for yourself here.
- description for the Collection ("This is a demo collection for RMRK2.0")
- max number of NFTs that can be created (10 for our case).
- issuer is the KSM address of the account that will be allowed to create NFTs in this collection. This is your KSM public address. Mine is JFBzbixEKomf36X6GDDkNmxXZE3dk5imbKsS6CR3fez1G8c.
- symbol is the Collection symbol, which we make up. I'll pick "TEST_RMRK_2_COLLECTION". Note: you'll want to change this slightly, as it might conflict with mine.
- id is usually derived from your public address + symbol, but to make it simpler, we'll just use a made-up number + "-" + symbol, so we'll use 12345abcde-TEST_RMRK_2_COLLECTION. Note: you'll want to change this slightly, as it might conflict with my creation.
Now, the description and image fields need to be part of a metadata file, which we need the hash for. So we can create a JSON file similar to this example, and upload it to Pinata to get the hash. Here is my finished metadata. The hash for the metadata is Qmdq43q12TwJZ8oQbpMxck3GxjVeZRftmuGSqLcYzovx3S
⚠️ WARNING: When using IPFS links (like in image), the format is ipfs://ipfs/[HASH]. Do not use just the hash alone. This is a common mistake made, and will lead to failure here and elsewhere. ⚠️
We'll use that metadata hash along with the max, issuer, symbol, and id to compose another JSON object, similar to the JSON object mentioned in the Collection spec Here is my finished product:
{
  "max":10,
  "issuer":"JFBzbixEKomf36X6GDDkNmxXZE3dk5imbKsS6CR3fez1G8c",
  "symbol":"TEST_RMRK_2_COLLECTION",
  "id":"123-TEST_RMRK_2_COLLECTION",
  "metadata":"ipfs://ipfs/Qmdq43q12TwJZ8oQbpMxck3GxjVeZR…"
}
We need to URL encode this. We'll use an online tool to convert the above into a URL-encoded version of the same.
%7B%0A%20%20%22max%22%3A10%2C%0A%20%20%22issuer%22%3A%22JFBzbixEKomf36X6GDDkNmxXZE3dk5imbKsS6CR3fez1G8c%22%2C%0A%20%20%22symbol%22%3A%22TEST_RMRK_2_COLLECTION%22%2C%0A%20%20%22id%22%3A%22123-TEST_RMRK_2_COLLECTION%22%2C%0A%20%20%22metadata%22%3A%22ipfs%3A%2F%2Fipfs%2FQmdq43q12TwJZ8oQbpMxck3GxjVeZRftmuGSqLcYzovx3S%22%0A%7D
Now, if we look at the Collection spec, we can see the format we need is as follows:
rmrk::CREATE::{version}::{html_encoded_json}
We are using RMRK version 2.0.0, and we have our html_encoded_json, so what we need to send to the Kusama blockchain is the following:
rmrk::CREATE::2.0.0::%7B%0A%20%20%22max%22%3A10%2C%0A%20%20%22issuer%22%3A%22JFBzbixEKomf36X6GDDkNmxXZE3dk5imbKsS6CR3fez1G8c%22%2C%0A%20%20%22symbol%22%3A%22TEST_RMRK_2_COLLECTION%22%2C%0A%20%20%22id%22%3A%22123-TEST_RMRK_2_COLLECTION%22%2C%0A%20%20%22metadata%22%3A%22ipfs%3A%2F%2Fipfs%2FQmdq43q12TwJZ8oQbpMxck3GxjVeZRftmuGSqLcYzovx3S%22%0A%7D
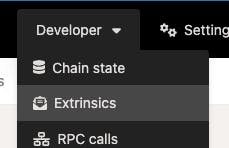
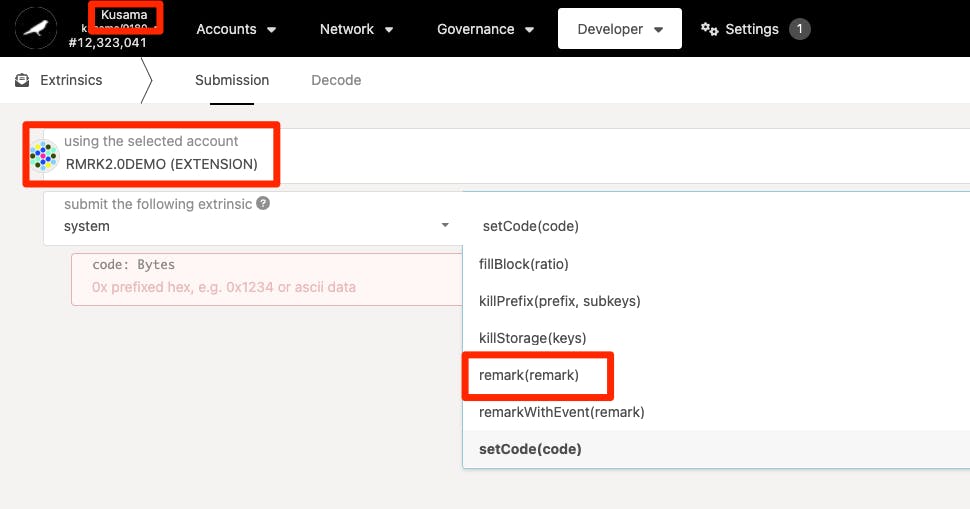
To send a remark to the blockchain, we'll use the same Polkadot JS app that we used to confirm the account balance. First, ensure that you're working in the Kusama chain (is the banner black?). Then, navigate to Developer > Extrinsics
Ensure you are using your newly-created account (with the KSM balance), and change setCode(code) to remark(remark)
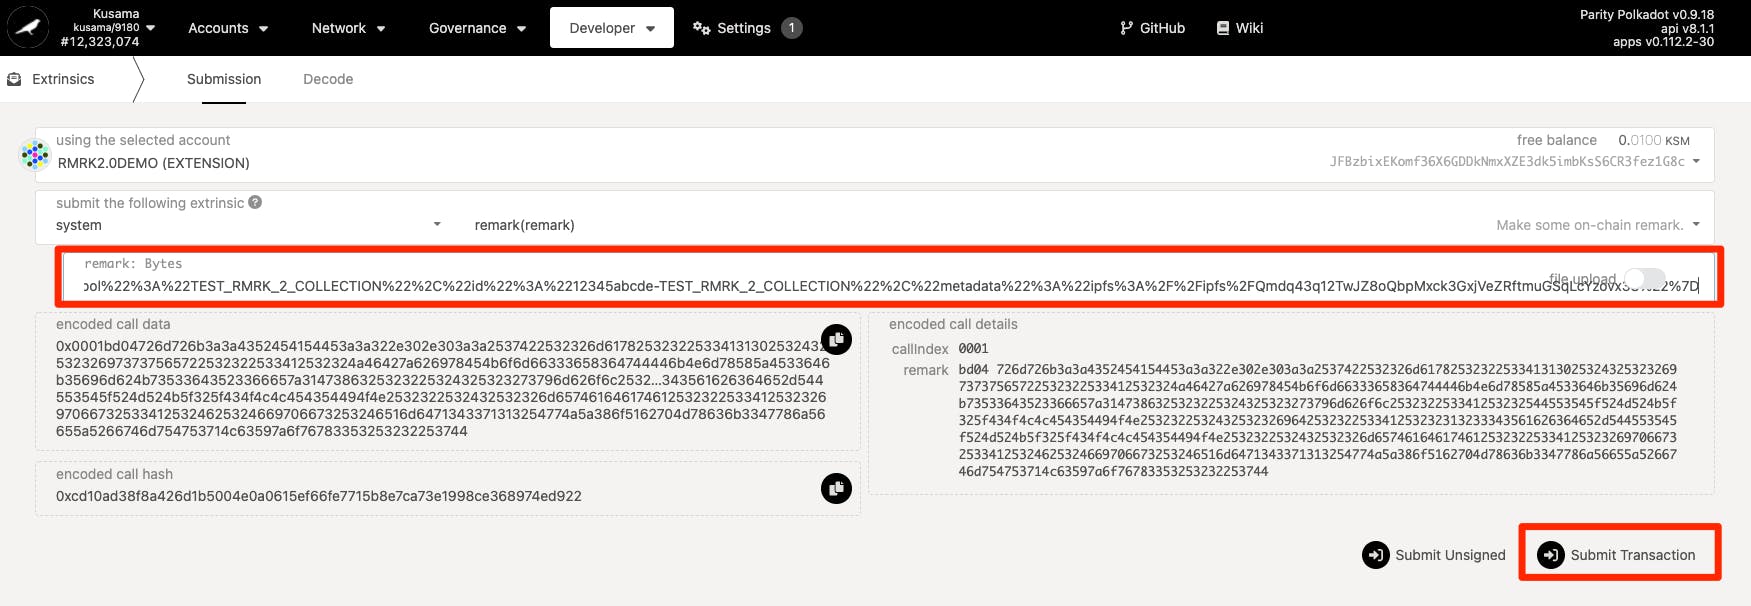
Paste the complete remark from above into the remark: Bytes field, then click Submit Transaction.
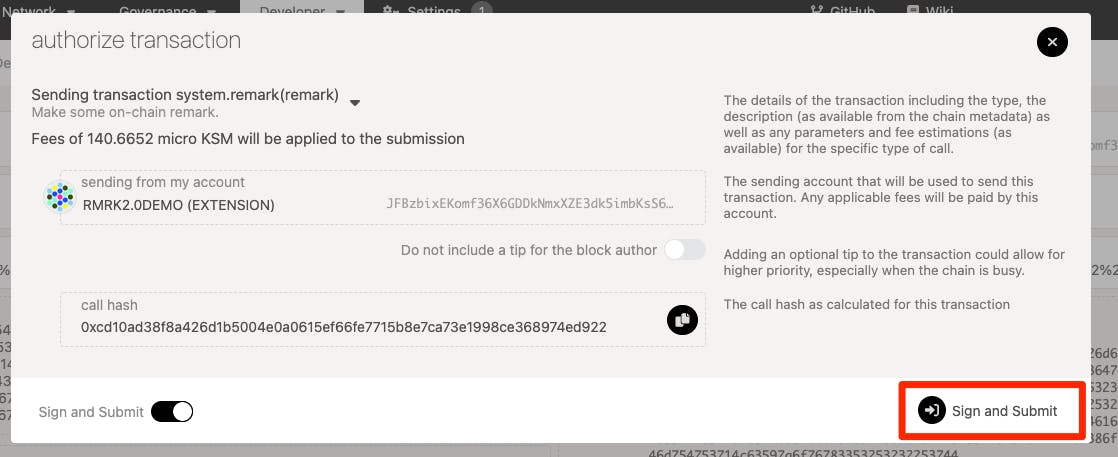
Click Sign and Submit
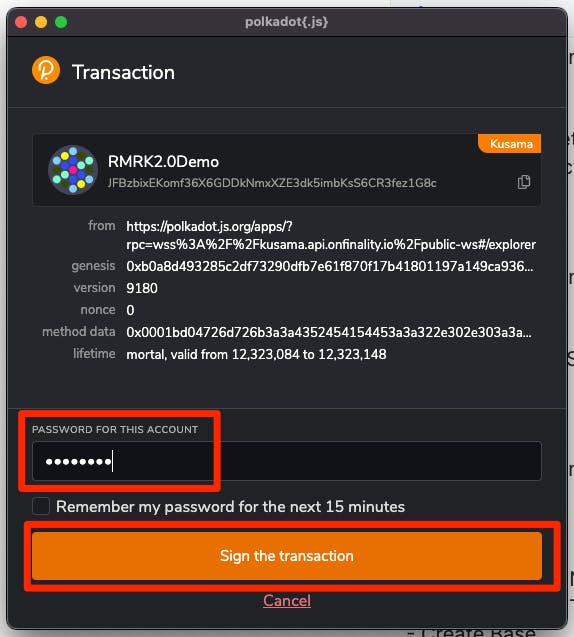
Enter your password and Sign the transaction.
The transaction has been submitted. If we check fairly quickly, we can see the transaction on the blockchain by navigating to Network > Explorer. Note that this is not vitally necessary for Collections, but will be necessary when we get to creating a Base, so it's good to practice.
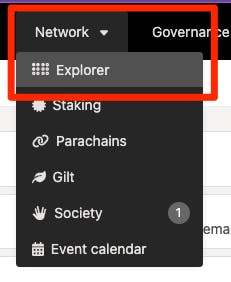
Click on the latest block (the first entry below recent blocks)

Look for something called system.remark under extrinsics. If it is not there, click on the parent hash to check in the previous block. Note that blocks are about 6 seconds, so if you wait too long, this will be a long process.
When you find a system.remark, expand it. It may be a different remark, or it may be yours. Here is what my remark looks like, on block 12,338,772. Note that even though the full remark is cut off, if you double-click to highlight, then copy, it will copy the full remark.

It may take a few minutes for the front-end UI to populate, but once it does, the collection will be visible at singular.app/collections/your-collection-id. So in my case, it is singular.app/collections/123-TEST_RMRK_2_C… (again, this would be a reason why you should change the id field above when creating the collection).
We have created the Collection! For this demo, going forward we will need to recall our Collection ID is 123-TEST_RMRK_2_COLLECTION.
Create Stickies NFT
Next, we will create our Stickie NFT. This will be the primary "character" or "player", though we won't address composability just yet. NFTs themselves can be considered placeholders. The real power gets unleashed when we add resources to them, which we will do later.
Checking the MINT standard, we see that we need the following:
- collection: 123-TEST_RMRK_2_COLLECTION, from above)
- symbol: we'll use TEST_STICKIE_MAN
- transferable: 0 or 1, whether the NFT is transferable, we'll use 1
- sn: serial number, we'll use 0001
- metadata: IPFS hash of metadata (completed example is hash QmZahb7UAQn6a7D8yyrjYvwiz9z7dej1L6rLtT24ppJ97C, which contains the following (some non-required fields I'm not including):
- image is the main image (Image #2 from above) hash, which is QmYKh5BKNP6wHmsvxWJwT1LZowge1isBYNUYs9vnXhhGGQ and is entered in the metadata field as ipfs://ipfs/QmYKh5BKNP6wHmsvxWJwT1LZowge1i….
- description: description (This is a test Stickie)
- name: some name (Test Stickie # 1)
NOTE: You need to work backwards here, uploading the image first to get the image hash, which is then used in the metadata, which you upload to get the metadata hash.
Compiled into a JSON object, our example looks like this:
{
  "collection": "123-TEST_RMRK_2_COLLECTION",
  "symbol": "TEST_STICKIE_MAN",
  "transferable": 1,
  "sn": "0001",
  "metadata": "ipfs://ipfs/QmZahb7UAQn6a7D8yyrjYvwiz9z7de…"
}
We then URL encode this:
%7B%0A%20%20%22collection%22%3A%20%22123-TEST_RMRK_2_COLLECTION%22%2C%0A%20%20%22symbol%22%3A%20%22TEST_STICKIE_MAN%22%2C%0A%20%20%22transferable%22%3A%201%2C%0A%20%20%22sn%22%3A%20%220001%22%2C%0A%20%20%22metadata%22%3A%20%22ipfs%3A%2F%2Fipfs%2FQmZahb7UAQn6a7D8yyrjYvwiz9z7dej1L6rLtT24ppJ97C%22%0A%7D
Per the MINT spec, the format for a MINT remark is:
rmrk::MINT::{version}::{html_encoded_json}::{recipient?}
We're using version 2.0.0, and aren't sending the NFT to a different recipient, so our final MINT remark will look like
rmrk::MINT::2.0.0::%7B%0A%20%20%22collection%22%3A%20%22123-TEST_RMRK_2_COLLECTION%22%2C%0A%20%20%22symbol%22%3A%20%22TEST_STICKIE_MAN%22%2C%0A%20%20%22transferable%22%3A%201%2C%0A%20%20%22sn%22%3A%20%220001%22%2C%0A%20%20%22metadata%22%3A%20%22ipfs%3A%2F%2Fipfs%2FQmZahb7UAQn6a7D8yyrjYvwiz9z7dej1L6rLtT24ppJ97C%22%0A%7D
As with collection, we'll send this remark as a system.remark in the Polkadot JS app > Developer > Extrinsics. We'll submit exactly as we did before, and we can verify the transaction similarly as well. My example can be seen in block 12,338,954.
Singular Marketplace
Verifying that the NFT was indeed created requires checking on the front-end. The blockchain explorer will accept any remark, so if we made a mistake, we won't know. Let's check if the NFT was created by heading to the Singular 2.0 marketplace.
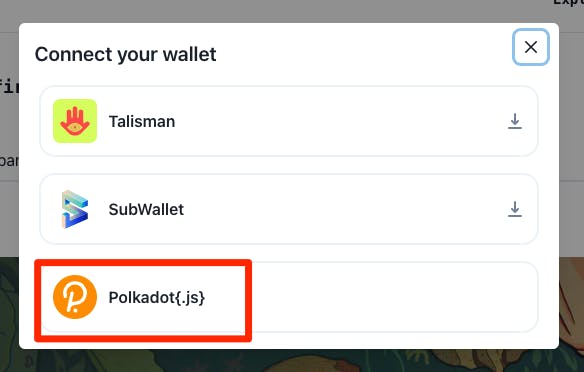
- First we need to Connect our wallet.

- Select Polkadot{.js}
- Authorize access for singular.app to your wallet

- Select your wallet
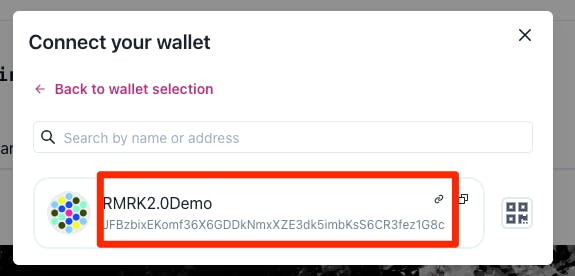
- Confirm the wallet is successfully connected by noting that Connect Wallet is replaced with your wallet name. Also an option for Your Space should appear. Click on Your Space.

Our Stickie has been created! Click on it to see the NFT details. The direct URL for my Stickie is singular.app/collectibles/12338954-123-TES…
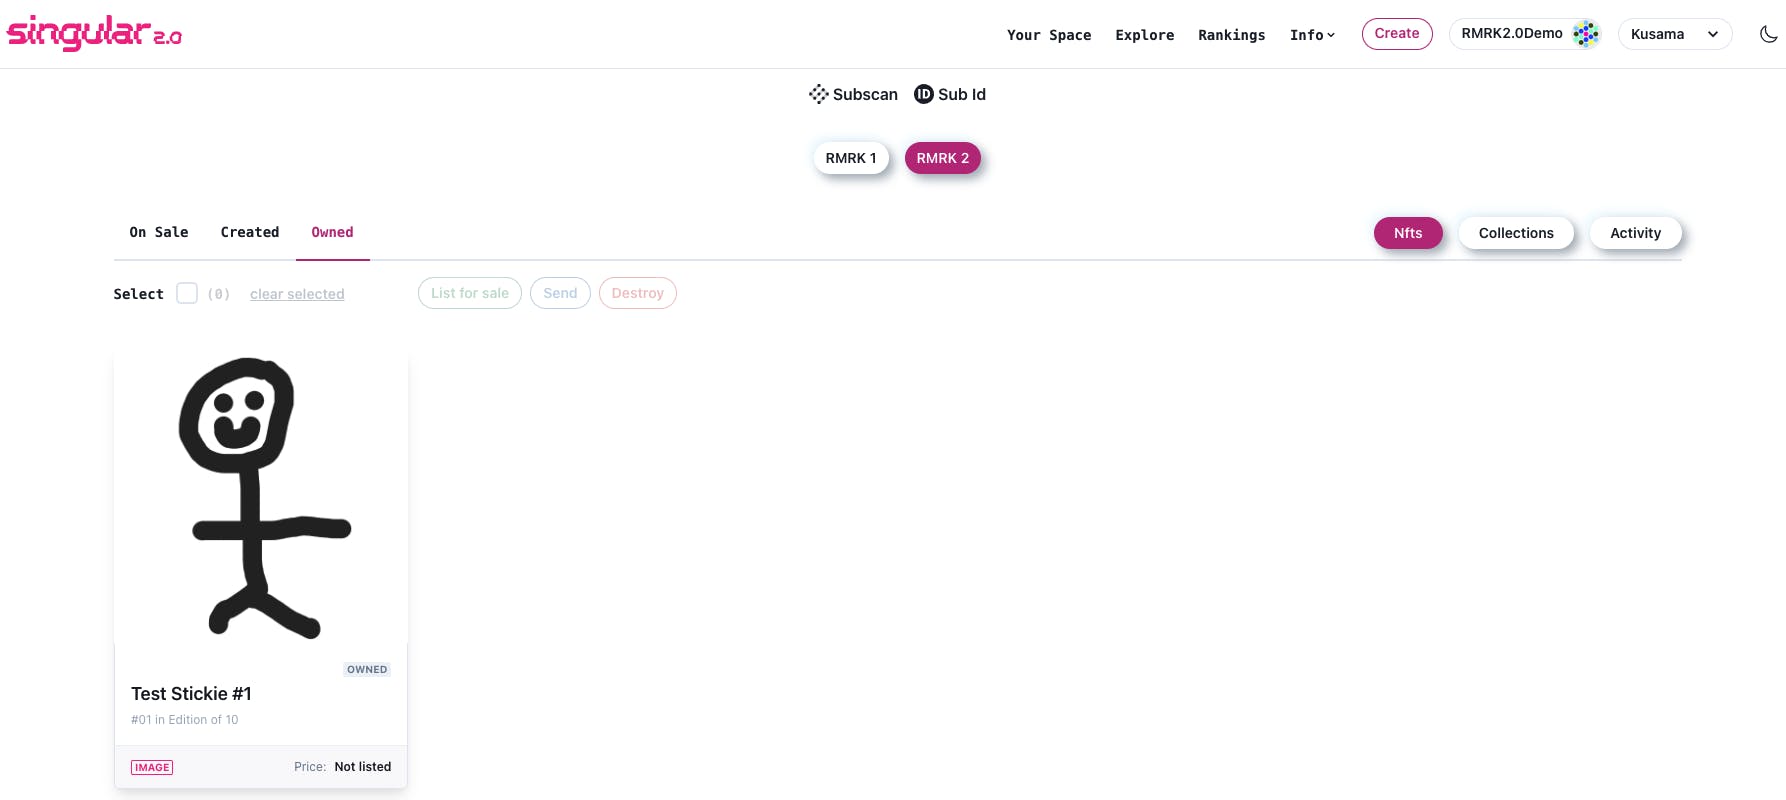
Notice that the NFT ID is a combination of the following:
- Block number that the NFT was minted at
- Collection ID
- NFT symbol
- NFT serial number
All of these are joined with a "-". Thus, my Stickie NFT ID is 12338954-123-TEST_RMRK_2_COLLECTION-TEST_STICKIE_MAN-0001. We will need this later.
Create Stick NFT
Next we'll create the NFT that will be the Stick, which we will eventually equip to either the right hand or the left hand of the Stickie. For now, we'll just create the NFT itself (again, it is the Resources that bring the real power, but that comes later).
Exactly as before with the Stickie mint, we refer to the MINT standard to see that we need the following:
- collection: 123-TEST_RMRK_2_COLLECTION
- symbol: we'll use TEST_STICK
- transferable: we'll use 1
- sn: serial number, we'll use 0001 again
- metadata: IPFS hash of metadata (completed example is hash QmZCQSEPNTV2QFocw7xA8QagnCKN3qyYjzo25PYKteC1bK:
- image: main Stick image (Image #4 from above) hash, which is QmNotsRxQ32fxH7ANFtDTcT4WzjPDAtX24Nha2QAfWxP5T and is entered in the metadata field as ipfs://ipfs/QmNotsRxQ32fxH7ANFtDTcT4WzjPDA….
- description: description (This is a test Stick)
- name: some name (Test Stick # 1)
So our JSON object looks like this:
{
  "collection": "123-TEST_RMRK_2_COLLECTION",
  "symbol": "TEST_STICK",
  "transferable": 1,
  "sn": "0001",
  "metadata": "ipfs://ipfs/QmZCQSEPNTV2QFocw7xA8QagnCKN3q…"
}
We then URL encode this:
%7B%22collection%22%3A%20%2212345abcde-TEST_RMRK_2_COLLECTION%22%2C%22symbol%22%3A%20%22TEST_STICK%22%2C%22transferable%22%3A%201%2C%22sn%22%3A%20%220001%22%2C%22metadata%22%3A%20%22ipfs%3A%2F%2Fipfs%2FQmZCQSEPNTV2QFocw7xA8QagnCKN3qyYjzo25PYKteC1bK%22%7D
And our full remark becomes:
rmrk::MINT::2.0.0::%7B%22collection%22%3A%20%2212345abcde-TEST_RMRK_2_COLLECTION%22%2C%22symbol%22%3A%20%22TEST_STICK%22%2C%22transferable%22%3A%201%2C%22sn%22%3A%20%220001%22%2C%22metadata%22%3A%20%22ipfs%3A%2F%2Fipfs%2FQmZCQSEPNTV2QFocw7xA8QagnCKN3qyYjzo25PYKteC1bK%22%7D
We submit this remark exactly as before. My example remark is on block 12,339,076. Since we now know the block number, we can deduce the NFT ID of the Stick NFT is 12339076-123-TEST_RMRK_2_COLLECTION-TEST_STICK-0001, which we can confirm on the Singular UI.
We now have two NFTs--a Stickie, and a Stick. Now comes the real fun.
Create a Base
The power of Resources are rooted in a Base. A Base can be considered a generic structure that a Resource can be built from. It is generic in that we don't ever see a Base--rather, we will only refer to it when we are dealing with Resources. Resources are very real and very important, but rely on the generic structure of a Base.
Now, a Base is composed of Parts. And there are two categories of Parts. We will use them both. One is a Fixed Part, the other is a Slot Part. A Fixed Part is strictly-defined. That is to say, the Part I'm using is always and will always be something. A Slot Part is non-strictly defined. Specifically, it refers only to a Collection (or set of Collections), so that potentially any NFT from that Collection can be equipped into that slot.
Base is admittedly complicated, and takes some poking and prodding to digest. Let's consider our very simple demo. We're going to define a Base that has only three Parts. One will be a Fixed Part. This will be the Stickie Body. It is fixed because we will define specifically what this part is (a stick figure .svg file). The second part will be a Slot Part. This will be the Right Hand. It will not specifically define what will appear in it--rather, it will say "any item that is from some Collection can take this Slot". The same will be true of the third part, which will be the Left Hand.
What is the benefit of defining Slot Parts? Well, versatility! We will see that we can equip a Stick into the Right Hand slot, but because it is a Slot, you'll be able to make anything you want to equip into that slot! A ⚔️ sword, an 🍦 ice cream cone, a 🪄magic wand--anything!
What's the purpose of Fixed Parts? These are the Fixed items that create the cohesive style of your Resources. Also, it's important to note that generally you would have many Fixed Parts in a Base. The Fixed Parts in a Base will usually be a giant collection of all possible pieces that a Resource can be built from. So if we were making Stickies more complex, we might have Head Style 1 (maybe a circle), Head Style 2 (maybe an oval), Body Style 1 (maybe the Stickie part with thickness of 5px), Body Style 2 (thickness 10px), etc. All possible items are defined in a Base. It is later that we will pull from this Base to create a Resource when we will pick which Parts (both Fixed and Slot) we want to use for a Resource. But everything fixed gets defined initially in the Base.
But enough chitter-chatter--let's create a Base!
The BASE spec refers us to the Base entity. Our super-simple base will look like this:
{
    "symbol": "test_stickie_base",
    "type": "svg",
    "issuer": "JFBzbixEKomf36X6GDDkNmxXZE3dk5imbKsS6CR3fez1G8c",
    "parts": [
      {
          "id": "body",
          "src": "ipfs://ipfs/Qmd3EwaSGsTbzTrSUm95aqwZQTXwR9…",
          "type": "fixed",
          "z": 1
      },
      {
          "id": "right",
          "type": "slot",
          "equippable": ["123-TEST_RMRK_2_COLLECTION"],
          "z": 2
      },
      {
          "id": "left",
          "type": "slot",
          "equippable": ["123-TEST_RMRK_2_COLLECTION"],
          "z": 2
      }
    ]
}
Notice that the Part with ID body has a src field, but with the Slot Parts, we can identify only the Collections that can create NFTs that may be equippable into that slot with the equippable field. Also note the z field, which defines the depth of the layer (in other words, the right and left Slots will appear in front of the body Slot.
URL encoding this, we get the following (Note: you might save a little money over time by removing spaces and tabs from your JSON files before encoding):
%7B%0A%20%20%20%20%22symbol%22%3A%20%22test_stickie_base_example%22%2C%0A%20%20%20%20%22type%22%3A%20%22svg%22%2C%0A%20%20%20%20%22issuer%22%3A%20%22JFBzbixEKomf36X6GDDkNmxXZE3dk5imbKsS6CR3fez1G8c%22%2C%0A%20%20%20%20%22parts%22%3A%20%5B%0A%20%20%20%20%20%20%7B%0A%20%20%20%20%20%20%20%20%20%20%22id%22%3A%20%22body%22%2C%0A%20%20%20%20%20%20%20%20%20%20%22src%22%3A%20%22ipfs%3A%2F%2Fipfs%2FQmd3EwaSGsTbzTrSUm95aqwZQTXwR9gSs17ZpAtCsrvhUV%22%2C%0A%20%20%20%20%20%20%20%20%20%20%22type%22%3A%20%22fixed%22%2C%0A%20%20%20%20%20%20%20%20%20%20%22z%22%3A%201%0A%20%20%20%20%20%20%7D%2C%0A%20%20%20%20%20%20%7B%0A%20%20%20%20%20%20%20%20%20%20%22id%22%3A%20%22right%22%2C%0A%20%20%20%20%20%20%20%20%20%20%22type%22%3A%20%22slot%22%2C%0A%20%20%20%20%20%20%20%20%20%20%22equippable%22%3A%20%5B%2212345abcde-TEST_RMRK_2_COLLECTION%22%5D%2C%0A%20%20%20%20%20%20%20%20%20%20%22z%22%3A%202%0A%20%20%20%20%20%20%7D%2C%0A%20%20%20%20%20%20%7B%0A%20%20%20%20%20%20%20%20%20%20%22id%22%3A%20%22left%22%2C%0A%20%20%20%20%20%20%20%20%20%20%22type%22%3A%20%22slot%22%2C%0A%20%20%20%20%20%20%20%20%20%20%22equippable%22%3A%20%5B%2212345abcde-TEST_RMRK_2_COLLECTION%22%5D%2C%0A%20%20%20%20%20%20%20%20%20%20%22z%22%3A%202%0A%20%20%20%20%20%20%7D%0A%20%20%20%20%5D%0A%7D
The BASE spec defines the Base remark as:
rmrk::BASE::{version}::{html_encoded_json}
Since our version is 2.0.0, our final remark is:
rmrk::BASE::2.0.0::%7B%0A%20%20%20%20%22symbol%22%3A%20%22test_stickie_base_example%22%2C%0A%20%20%20%20%22type%22%3A%20%22svg%22%2C%0A%20%20%20%20%22issuer%22%3A%20%22JFBzbixEKomf36X6GDDkNmxXZE3dk5imbKsS6CR3fez1G8c%22%2C%0A%20%20%20%20%22parts%22%3A%20%5B%0A%20%20%20%20%20%20%7B%0A%20%20%20%20%20%20%20%20%20%20%22id%22%3A%20%22body%22%2C%0A%20%20%20%20%20%20%20%20%20%20%22src%22%3A%20%22ipfs%3A%2F%2Fipfs%2FQmd3EwaSGsTbzTrSUm95aqwZQTXwR9gSs17ZpAtCsrvhUV%22%2C%0A%20%20%20%20%20%20%20%20%20%20%22type%22%3A%20%22fixed%22%2C%0A%20%20%20%20%20%20%20%20%20%20%22z%22%3A%201%0A%20%20%20%20%20%20%7D%2C%0A%20%20%20%20%20%20%7B%0A%20%20%20%20%20%20%20%20%20%20%22id%22%3A%20%22right%22%2C%0A%20%20%20%20%20%20%20%20%20%20%22type%22%3A%20%22slot%22%2C%0A%20%20%20%20%20%20%20%20%20%20%22equippable%22%3A%20%5B%2212345abcde-TEST_RMRK_2_COLLECTION%22%5D%2C%0A%20%20%20%20%20%20%20%20%20%20%22z%22%3A%202%0A%20%20%20%20%20%20%7D%2C%0A%20%20%20%20%20%20%7B%0A%20%20%20%20%20%20%20%20%20%20%22id%22%3A%20%22left%22%2C%0A%20%20%20%20%20%20%20%20%20%20%22type%22%3A%20%22slot%22%2C%0A%20%20%20%20%20%20%20%20%20%20%22equippable%22%3A%20%5B%2212345abcde-TEST_RMRK_2_COLLECTION%22%5D%2C%0A%20%20%20%20%20%20%20%20%20%20%22z%22%3A%202%0A%20%20%20%20%20%20%7D%0A%20%20%20%20%5D%0A%7D
Let's submit this remark, and check for the block number, using the Network Explorer, as we did when creating our Collection. My example was submitted at block 12,339,190.
Note that Base IDs are calculated on the backend. They have the format base-[block-number]-[base-id]. So our base ID is base-12339190-test_stickie_base.
⚠️ WARNING: There is unfortunately no front-end way to confirm a base was created successfully without testing the Resource section. In order to search for invalid transactions, we would need to look inside the RMRK2.0 consolidated dump linked to here. Note that this is updated every 20 minutes or so, so it may take a while for invalid transactions to appear. That said, there is a section of the consolidated dump called invalid which may help shed light on why this (or other) remark transactions might be failing. ⚠️
At this point, we will assume that our Base has been successfully created. Next, we will proceed to adding a Resource (which will fail if our Base was not successfully created).
Add Resource for Stickies
There are always two parts to Resources that can be equipped--first, there is "Where is this getting equipped to?" Second, there is "What is getting equipped there?". The first question, in our case, is the Stickie. The second question is the Stick. So we need a Composable Resource to be added to the Stickie, and a Non-Composable Resource to be added to the Stick. (In fact, we'll need two Non-Composable Resources added to the Stick, because we want it to be equippable to either the right or the left hand).
We'll start with the Composable Resource for the Stickie. This is where we pick all the Fixed and Slot Parts from the Base that we want to use. In this case, we'll be using all Parts, though in more complex examples, one would cherry-pick the Fixed Parts for each Composable Resource.
The RESADD spec and Resources section of the NFT entity show us what is needed for a Resource to be added. For our simple example, we'll need the following:
- id: some ID for the resource, we'll use aaaabbbb
- base: the Base we are composing this from (base-12339190-test_stickie_base)
- thumb: an IPFS hash for a thumbnail representation (Image #1 from above) of this Resource. Mine is QmfXMnAuooZmP9kKnc3kLyRwHL42xaJGisjH278J7qwofF, entered as ipfs://ipfs/QmfXMnAuooZmP9kKnc3kLyRwHL42xa…
- parts: array of Part IDs we will compose our Resource from (["body","left","right"])
So our RESADD JSON will look like this:
{
    "id": "aaaabbbb",
    "thumb":"ipfs://ipfs/QmfXMnAuooZmP9kKnc3kLyRwHL42xa…",
    "base": "base-12339190-test_stickie_base",
    "parts": ["body", "left", "right"]
}
URL encoding this, we get:
%7B%0A%20%20%20%20%22id%22%3A%20%22aaaabbbb%22%2C%0A%20%20%20%20%22thumb%22%3A%22ipfs%3A%2F%2Fipfs%2FQmfXMnAuooZmP9kKnc3kLyRwHL42xaJGisjH278J7qwofF%22%2C%0A%20%20%20%20%22base%22%3A%20%22base-12339190-test_stickie_base%22%2C%0A%20%20%20%20%22parts%22%3A%20%5B%22body%22%2C%20%22left%22%2C%20%22right%22%5D%0A%7D
The RESADD spec shows us the format should be:
rmrk::RESADD::{version}::{id}::{html_encoded_json}
Since our version is 2.0.0, and our NFT ID (of our Stickie) is 12338954-123-TEST_RMRK_2_COLLECTION-TEST_STICKIE_MAN-0001, our final RESADD remark is:
rmrk::RESADD::2.0.0::12338954-123-TEST_RMRK_2_COLLECTION-TEST_STICKIE_MAN-0001::%7B%0A%20%20%20%20%22id%22%3A%20%22aaaabbbb%22%2C%0A%20%20%20%20%22thumb%22%3A%22ipfs%3A%2F%2Fipfs%2FQmfXMnAuooZmP9kKnc3kLyRwHL42xaJGisjH278J7qwofF%22%2C%0A%20%20%20%20%22base%22%3A%20%22base-12339190-test_stickie_base%22%2C%0A%20%20%20%20%22parts%22%3A%20%5B%22body%22%2C%20%22left%22%2C%20%22right%22%5D%0A%7D
We submit that transaction as we have before. My example is submitted on block 12,339,546.
After a minute or two, we should be able to see the resource added to the NFT by visiting the front-end UI (the Stickie NFT). In my case that is singular.app/collectibles/12338954-123-TES…

So our Stickie now has a Composable Resource!
Add Right Hand Resource for Stick
Now that we've covered a Composable Resource, we can now address the other kind of Resource, which is Non-Composable. This is a simpler Resource, either if it is standalone (which this demo doesn't care about) or equippable into a specific Slot of some Base. In our case, we want the Equippable version. Specifically, we want to define how a Stick can be represented in the Right Hand of a Stickie.
A few things we'll need for this Non-Composable type of Resource:
- slot: the - of the Slot we want to equip to. We need both the base-id and the slot-name, separated by a hyphen. For our case, since the base is base-12339190-test_stickie_base and the slot we want to equip to is right, this value will be base-12339190-test_stickie_base.right
- id: some Resource ID. Let's pick ccccdddd
- src: The IPFS hash of the Resource as it will be represented on the Composable Resource (Image #5 from above), hash Qmbmu4hYQPztDBWigB8Fne1P8uy8qexBe4EhJCstBqxxVc
- thumb: The IPFS hash of a thumbnail image (Image #4 from above), hash QmNotsRxQ32fxH7ANFtDTcT4WzjPDAtX24Nha2QAfWxP5T
So our *RESADD JSON for our Stick (right) will look like this:
{
    "id": "ccccdddd",
    "src":"ipfs://ipfs/Qmbmu4hYQPztDBWigB8Fne1P8uy8qe…",
    "thumb":"ipfs://ipfs/QmNotsRxQ32fxH7ANFtDTcT4WzjPDA…",
    "slot": "base-12326439-test_stickie_base_example.right"
}
URL encoding this, we get:
%7B%0A%20%20%20%20%22id%22%3A%20%22ccccdddd%22%2C%0A%20%20%20%20%22src%22%3A%22ipfs%3A%2F%2Fipfs%2FQmbmu4hYQPztDBWigB8Fne1P8uy8qexBe4EhJCstBqxxVc%22%2C%0A%20%20%20%20%22thumb%22%3A%22ipfs%3A%2F%2Fipfs%2FQmNotsRxQ32fxH7ANFtDTcT4WzjPDAtX24Nha2QAfWxP5T%22%2C%0A%20%20%20%20%22slot%22%3A%20%22base-12326439-test_stickie_base_example.right%22%0A%7D
The RESADD spec shows us the format should be:
rmrk::RESADD::{version}::{id}::{html_encoded_json}
Since our version is 2.0.0, and our NFT ID (of our Stick) is 12339076-123-TEST_RMRK_2_COLLECTION-TEST_STICK-0001, our final RESADD remark is:
rmrk::RESADD::2.0.0::12339076-123-TEST_RMRK_2_COLLECTION-TEST_STICK-0001::%7B%0A%20%20%20%20%22id%22%3A%20%22ccccdddd%22%2C%0A%20%20%20%20%22src%22%3A%22ipfs%3A%2F%2Fipfs%2FQmbmu4hYQPztDBWigB8Fne1P8uy8qexBe4EhJCstBqxxVc%22%2C%0A%20%20%20%20%22thumb%22%3A%22ipfs%3A%2F%2Fipfs%2FQmNotsRxQ32fxH7ANFtDTcT4WzjPDAtX24Nha2QAfWxP5T%22%2C%0A%20%20%20%20%22slot%22%3A%20%22base-12326439-test_stickie_base_example.right%22%0A%7D
We submit this remark as we have many remarks now. My example is block 12,339,749.
Now we can check the Stick and see that we now have 1 resource associated with the Stick! You also might notice that the primary image for the Stick has been overridden by the Right Hand SVG version of the resource, where we would probably prefer to have the thumbnail/centered image as the primary main display. This is an example of the revealable mechanics of the RMRK standard. To get around this, we should have initially added a Non-Composable Resource that referred to the primary image alone first (without reference to the Base), but this is not important enough for this demo to do this. Feel free to experiment with this on your own--you can add another Resource to this NFT, you'll just have to use SETPRIORITY (or the Singular UI) to reorder the priorities of the resources as they display on the main NFT details page.
Add Left Hand Resource for Stick
Composing and submitting a resource for the left slot of the Stick will be identical to the process for the right slot. We'll again need:
- slot: the - of the Slot we want to equip to. base-12339190-test_stickie_base.left
- id: some Resource ID. Let's pick ffffeeee
- src: The IPFS hash of the Resource as it will be represented on the Composable Resource (Image #6 from above), hash QmRjewZKtenzs7dKCs3e8fJkR9zqtzwMsjjbJZDyPxR5i7
- thumb: The IPFS hash of a thumbnail image (Image #4 from above), hash QmNotsRxQ32fxH7ANFtDTcT4WzjPDAtX24Nha2QAfWxP5T
So our *RESADD JSON for our Stick (left) will look like this:
{
    "id": "ffffeeee",
    "src":"ipfs://ipfs/QmRjewZKtenzs7dKCs3e8fJkR9zqtz…",
    "thumb":"ipfs://ipfs/QmNotsRxQ32fxH7ANFtDTcT4WzjPDA…",
    "slot": "base-12326439-test_stickie_base_example.left"
}
URL encoding this, we get:
%7B%0A%20%20%20%20%22id%22%3A%20%22ffffeeee%22%2C%0A%20%20%20%20%22src%22%3A%22ipfs%3A%2F%2Fipfs%2FQmRjewZKtenzs7dKCs3e8fJkR9zqtzwMsjjbJZDyPxR5i7%22%2C%0A%20%20%20%20%22thumb%22%3A%22ipfs%3A%2F%2Fipfs%2FQmNotsRxQ32fxH7ANFtDTcT4WzjPDAtX24Nha2QAfWxP5T%22%2C%0A%20%20%20%20%22slot%22%3A%20%22base-12326439-test_stickie_base_example.left%22%0A%7D
The RESADD spec shows us the format should be:
rmrk::RESADD::{version}::{id}::{html_encoded_json}
Since our version is 2.0.0, and our NFT ID (of our Stick) is 12339076-123-TEST_RMRK_2_COLLECTION-TEST_STICK-0001, our final RESADD remark is:
rmrk::RESADD::2.0.0::12339076-123-TEST_RMRK_2_COLLECTION-TEST_STICK-0001::%7B%0A%20%20%20%20%22id%22%3A%20%22ffffeeee%22%2C%0A%20%20%20%20%22src%22%3A%22ipfs%3A%2F%2Fipfs%2FQmRjewZKtenzs7dKCs3e8fJkR9zqtzwMsjjbJZDyPxR5i7%22%2C%0A%20%20%20%20%22thumb%22%3A%22ipfs%3A%2F%2Fipfs%2FQmNotsRxQ32fxH7ANFtDTcT4WzjPDAtX24Nha2QAfWxP5T%22%2C%0A%20%20%20%20%22slot%22%3A%20%22base-12326439-test_stickie_base_example.left%22%0A%7D
We submit this remark as before. My example is block 12,339,899.
We now have two resources on our Stick, and can equip to either the right slot or the left slot!
Send Stick to Stickie
First, we need to send the Stick to the Stickie. For this we need only the two NFT IDs
- recipient: Stickie: 12338954-123-TEST_RMRK_2_COLLECTION-TEST_STICKIE_MAN-0001
- item being sent: Stick: 12339076-123-TEST_RMRK_2_COLLECTION-TEST_STICK-0001
The SEND spec tells us that the format for the SEND remark is
rmrk::SEND::{version}::{id}::{recipient}
So our remark will be
rmrk::SEND::2.0.0::12339076-123-TEST_RMRK_2_COLLECTION-TEST_STICK-0001::12338954-123-TEST_RMRK_2_COLLECTION-TEST_STICKIE_MAN-0001
We send that remark. My example is block 12,339,929.
A few moments after the SEND remark, we should now have a backpack icon in our Stickie:
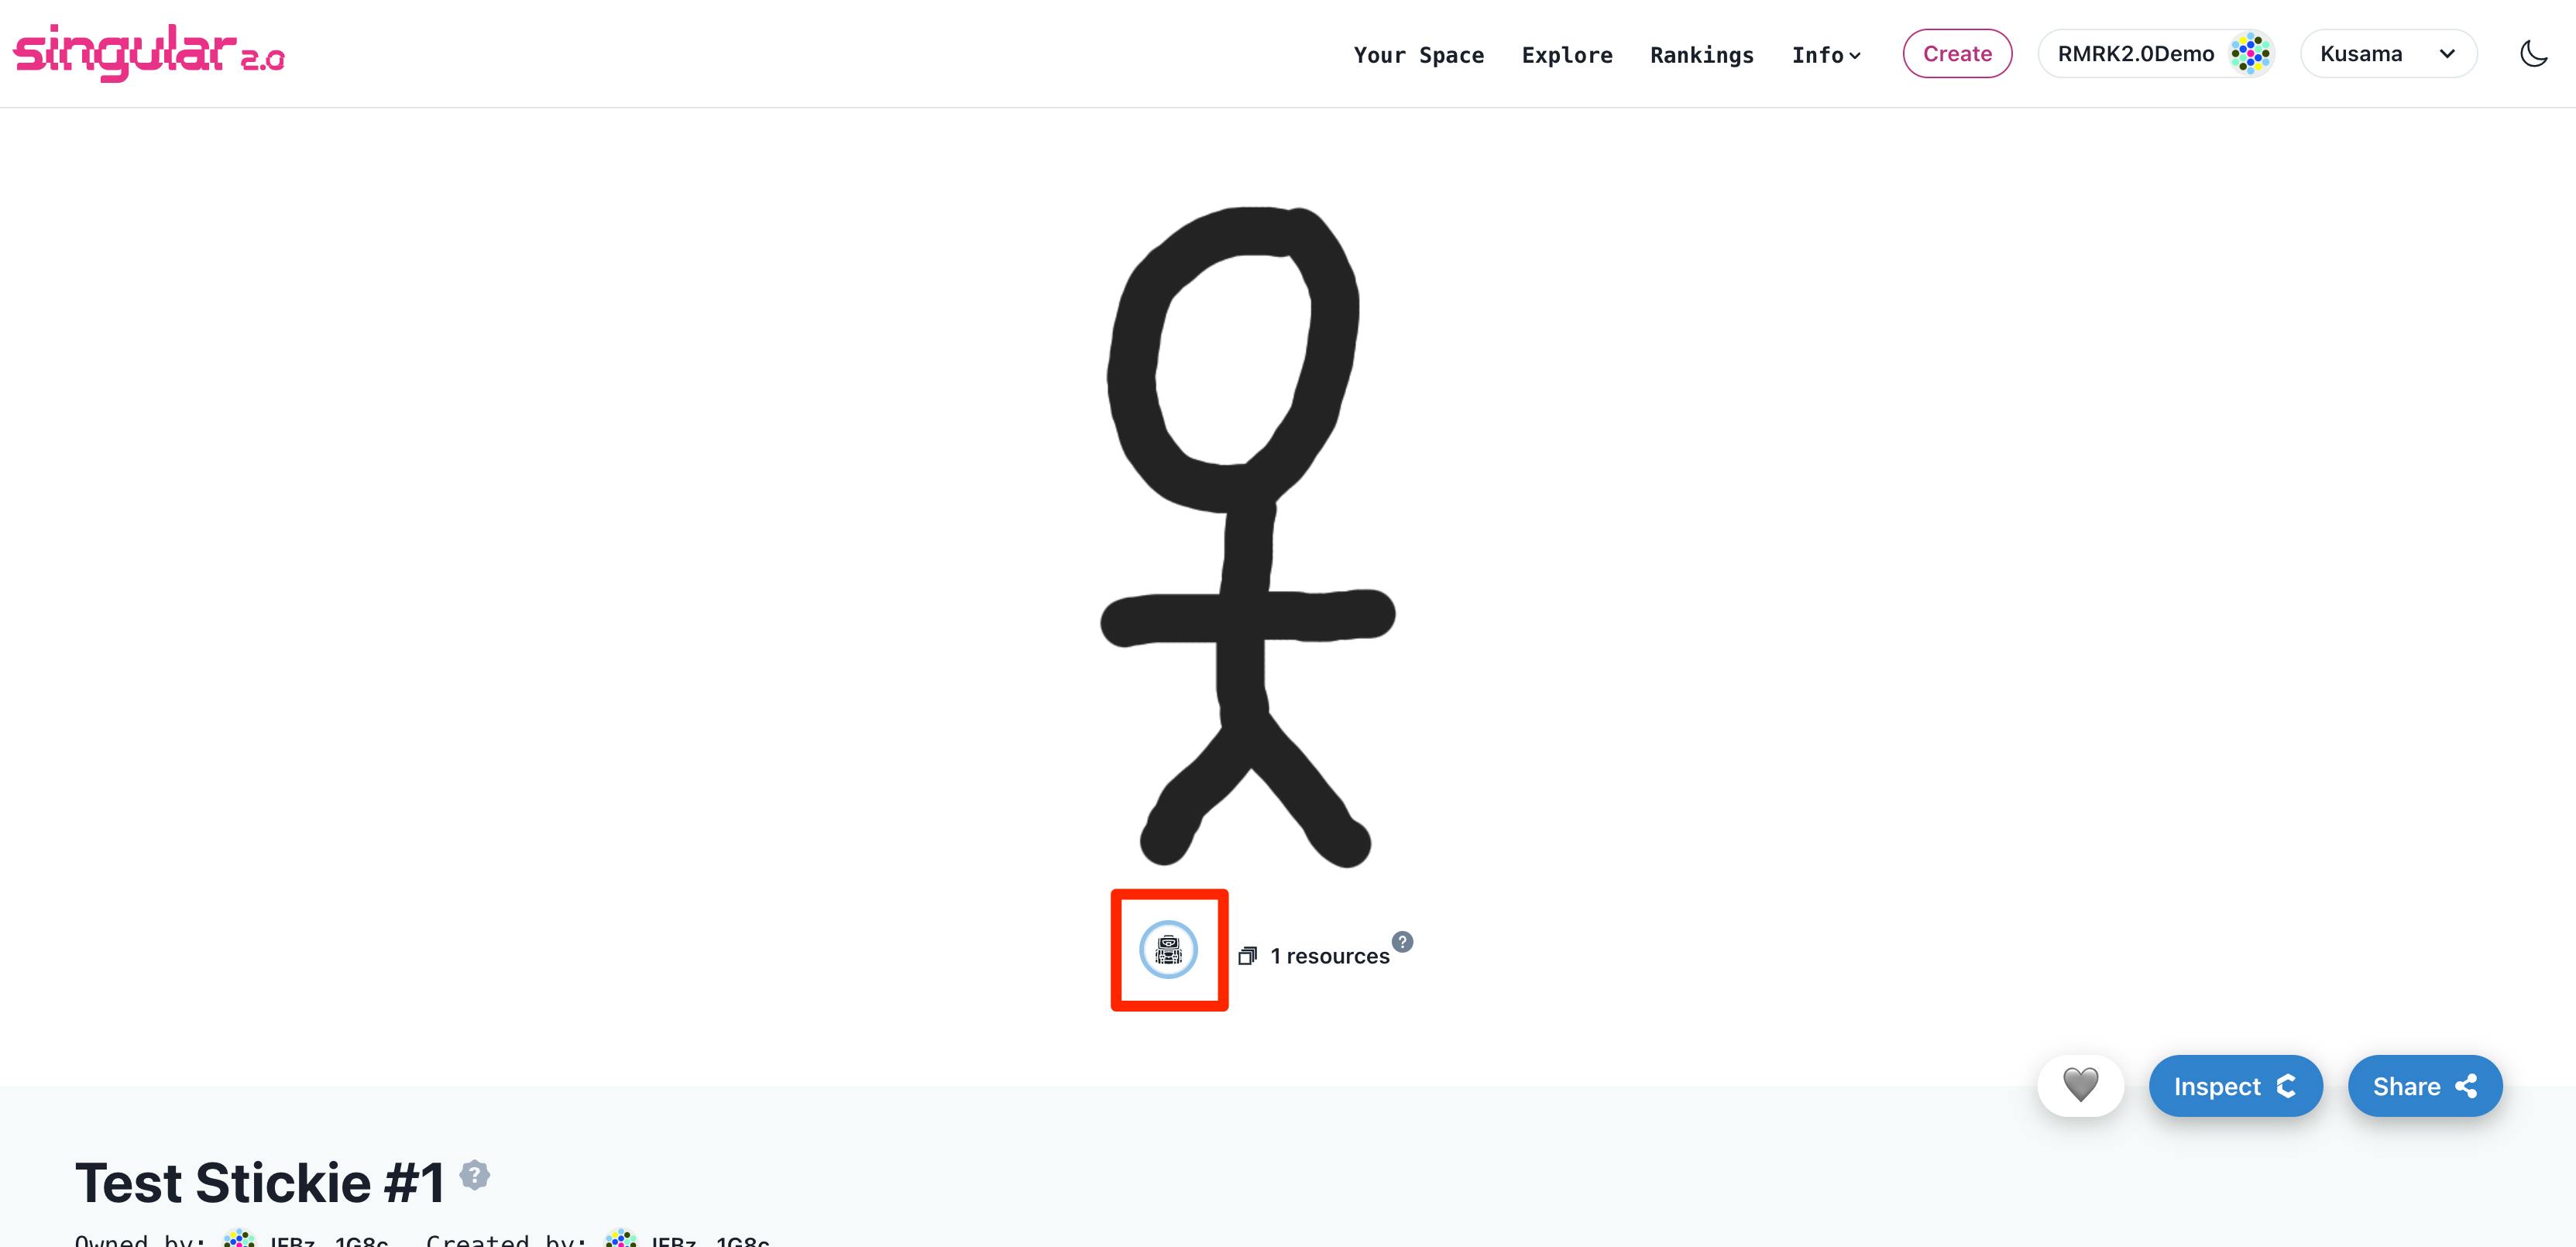
Equip Stick
If we click on this, we'll see our Stick! Click on the Stick thumbnail and we'll see Slots the Stick can be equipped to (left and right).
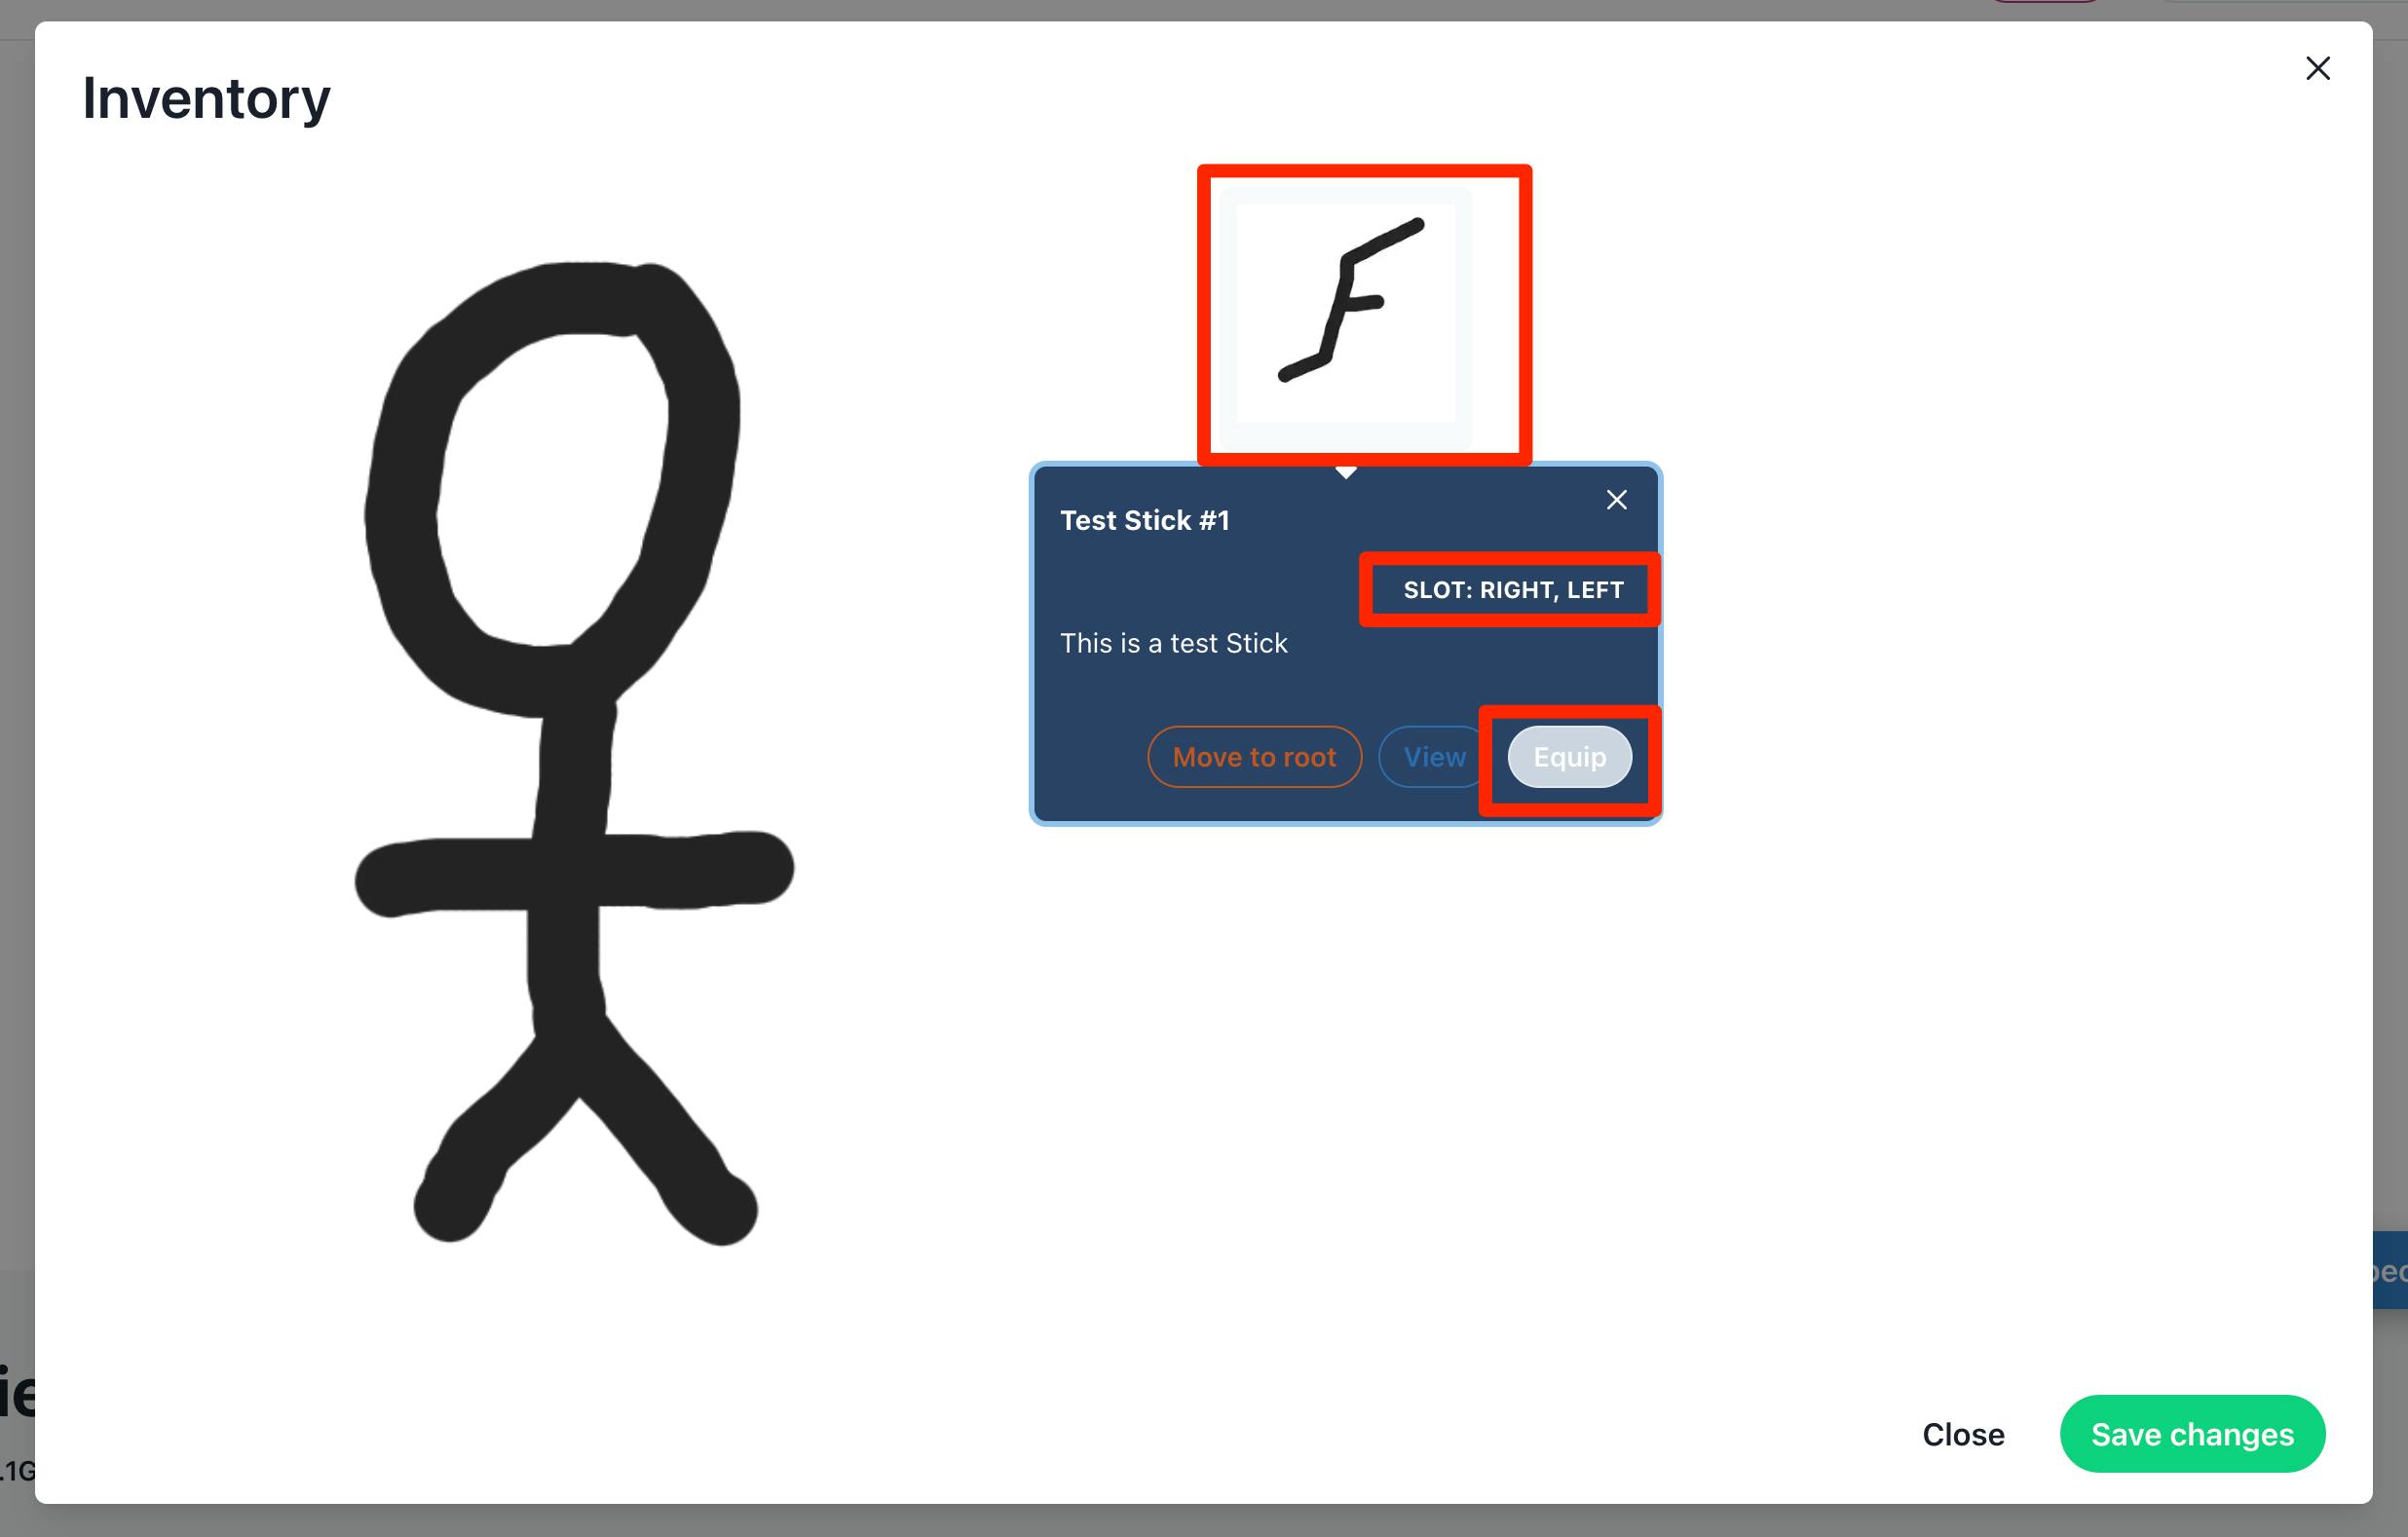
If we click Equip, we'll have an option of Slot!
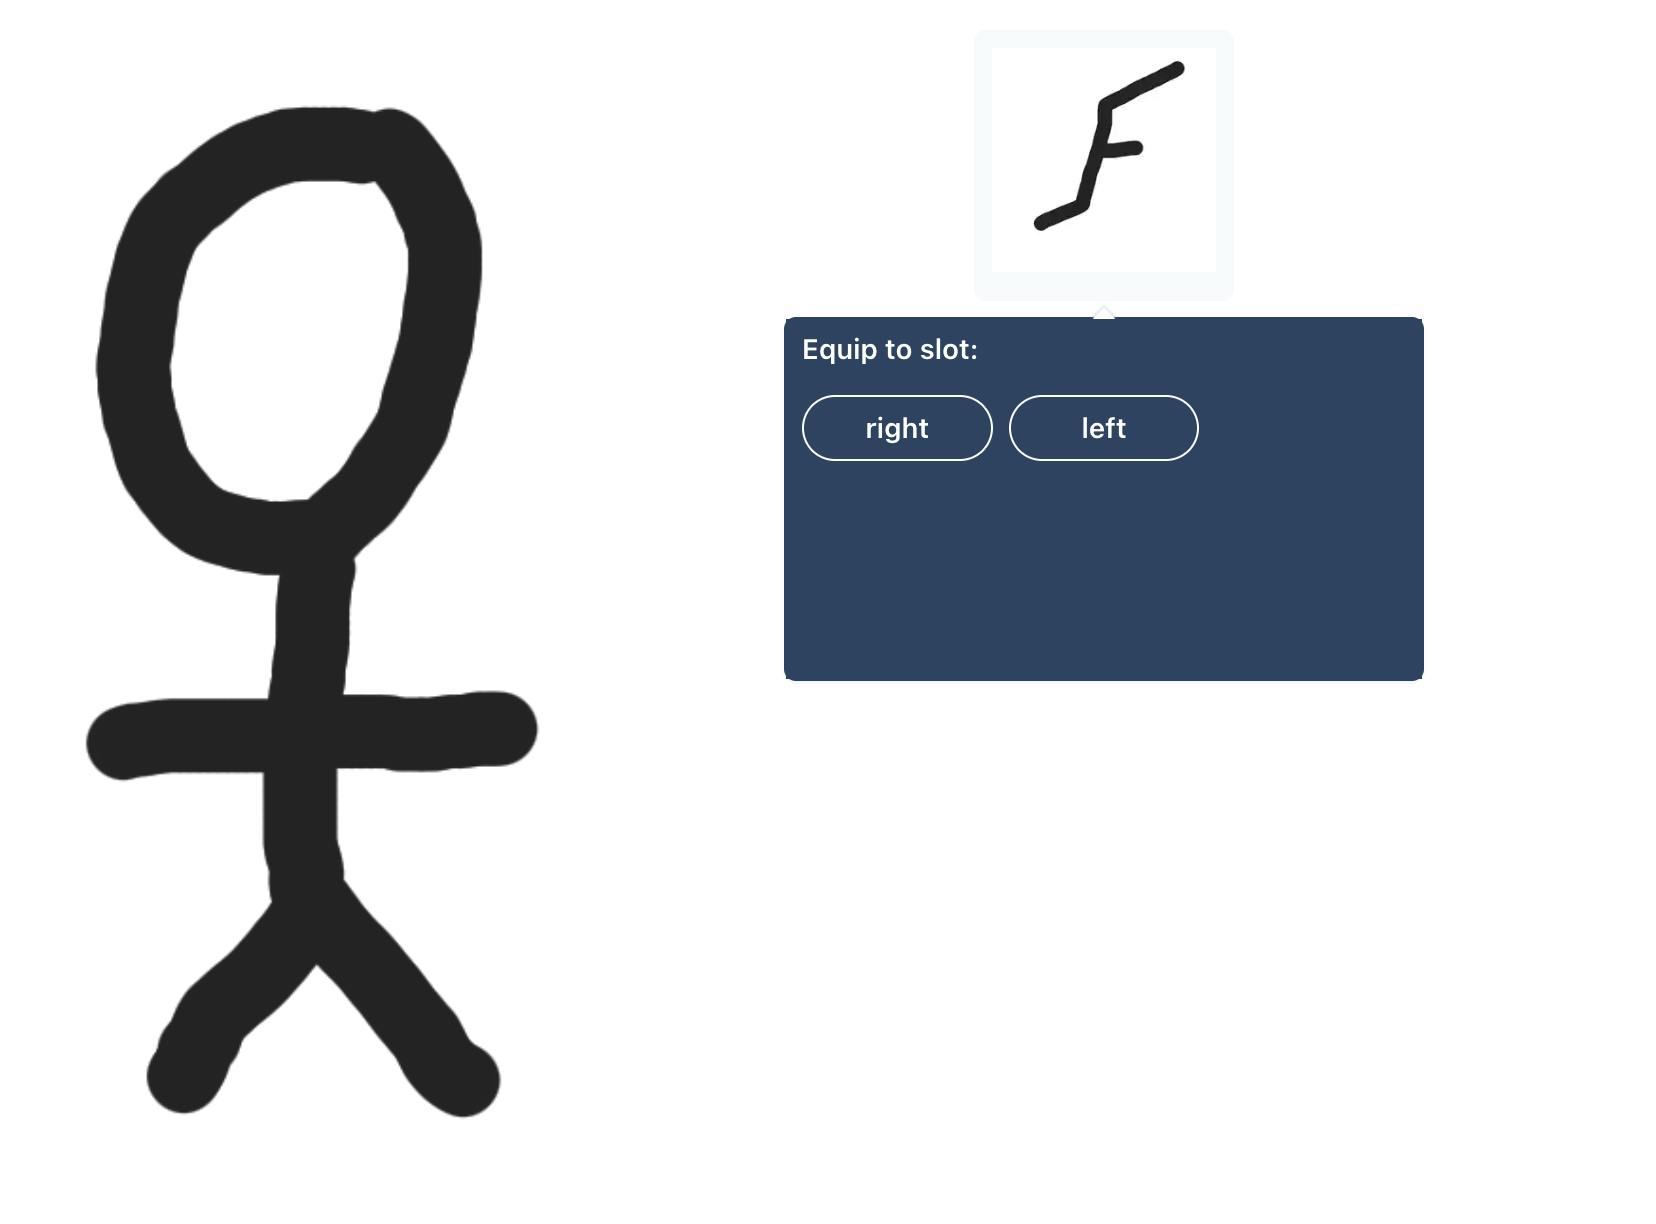
Pick a slot to equip, see the preview! However, the equipping isn't complete until we Save Changes and sign that transaction.
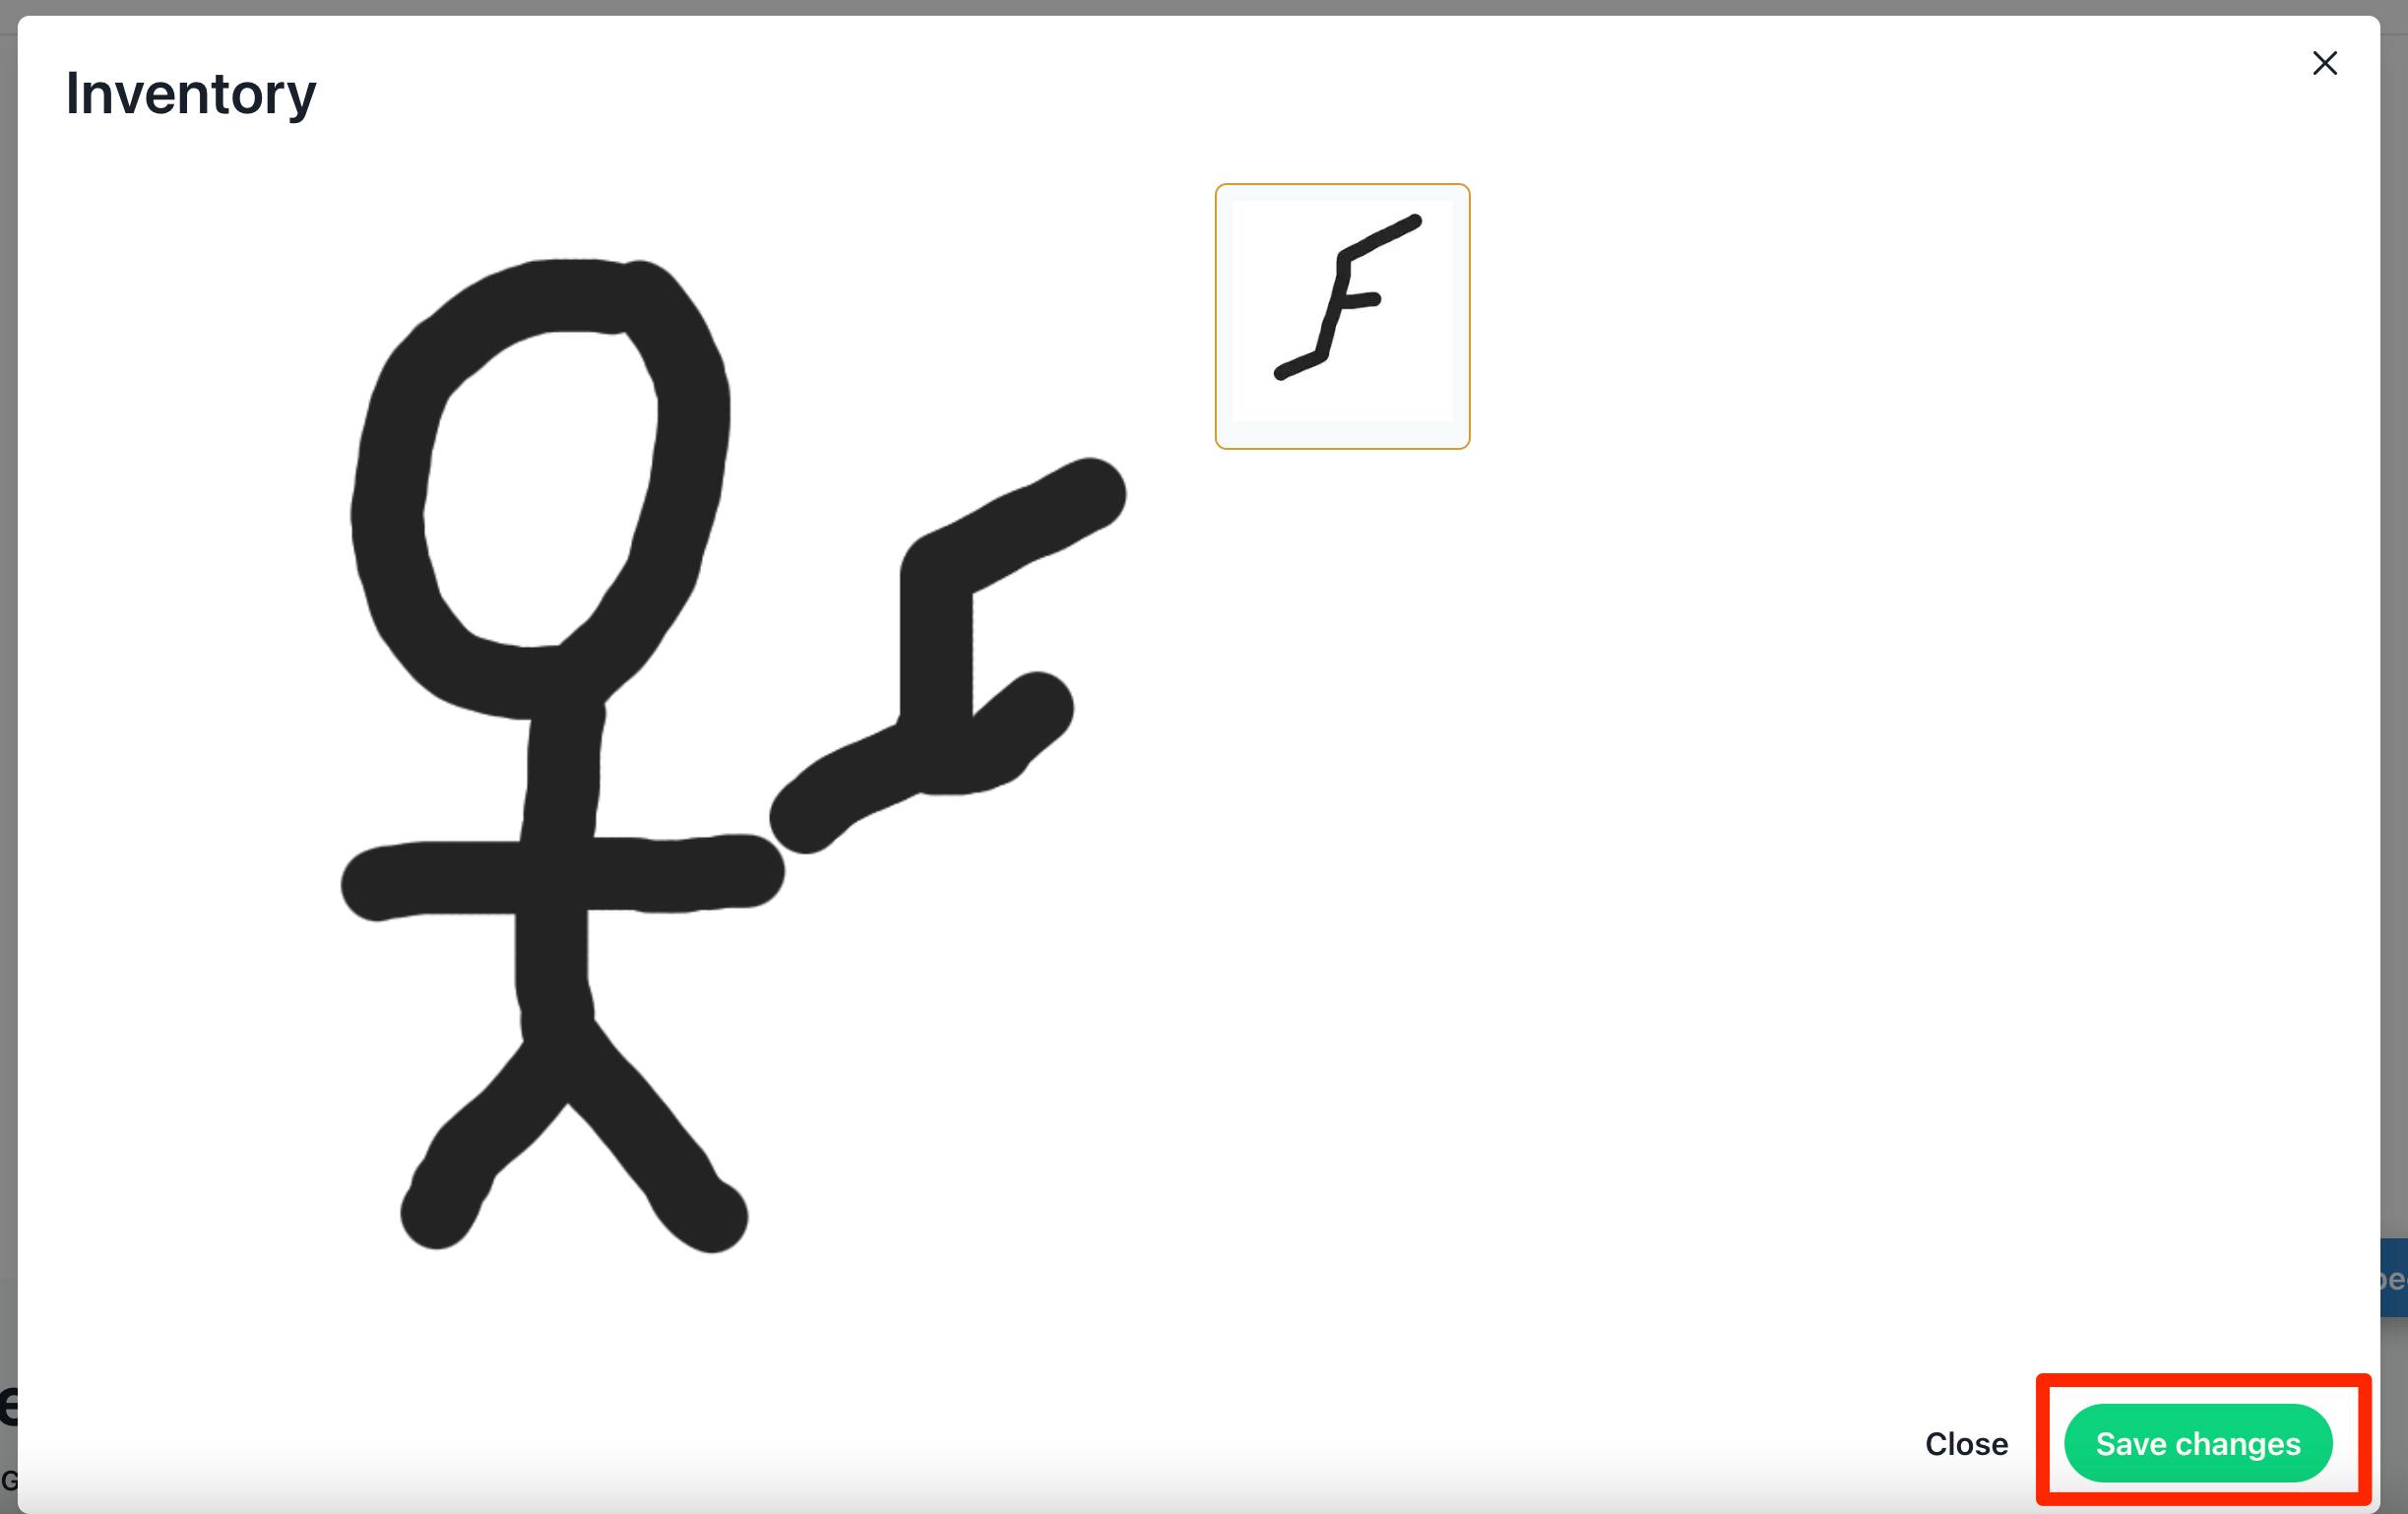
Once this is done, we have completed our demo! The Stick should appear equipped! It usually appears correctly immediately, but if not, try reloading.
There we have it--a multi-resource, composable, evolvable NFT.
Conclusion and Next Steps
Hopefully, this demonstration tickled your imagination. The RMRK 2.0 standard is a front-runner of NFT development and evolution. The concepts of nested ownership, multi-resource representation, future-proof and conditional rendering set this standard in a class of its own. Furthermore, this was the hard way of developing on RMRK. There are tools for automation, short video demos, long video demos, a vibrant technical Telegram community, and many projects on the Singular marketplace. I'm personally responsible for creating a full-fledged Stickies implementation on RMRK2.0, whose goal is to be utterly approachable.
Feel free to follow or message me on Twitter @blocksbrandon. If you have any questions, suggestions or ideas, I'm all ears.