Django Rest Framework Authentication with Dj-Rest-Auth
Authentication and authorization in Django RESTful APIs using Dj-Rest-Auth with Gmail server for sending verification emails to users
Introduction
Oftentimes, we come across websites and apps that demand that we register, that is, sign-up as users for us to have access to some service or feature on those websites and apps. Registering enables us to create accounts. We also get some personal credentials that allow us to have access every time we log in to use the apps. The credentials could consist of a password, email address, and/or username. 3rd-party services such as email accounts and social accounts could be used to create automatic sign-ups. When every we request to sign in to use such websites and apps, we are made to undergo an authentication process whereby the login credentials are checked with registered credentials.
A common concept usually discussed with authentication is authorization. The authorization merely is granting access to specific features or services before or after authentication. In the Django framework, developers might mandate authentication before users can access some services. They can also permit users to access certain services in a web application without authentication. Nonetheless, they can also allow some users to be superusers with certain administrative capabilities.
APIs are used on websites to provide responses to requests from other web services. We could ensure that users who make requests to our APIs are authenticated before they can use the features on our APIs.
In this article, you will learn how to implement authentication with dj-rest-auth in a Django REST framework API for a basic student management website. By using dj-rest-auth, you will be able to add an authentication feature to your Django REST API in few simple lines of code. You will get Sign up, Sign in and Sign out, password change and password reset features. By the end of the article, you will be able to add authentication to Django REST APIs using dj-rest-auth.
Some technologies we would use include:
- Django: Django is an open-source Python framework used for web development. It follows the model view controller (MVC) pattern.
- Django REST framework: a robust and customizable toolkit for creating RESTful APIs in Django.
- Dj-Rest-Auth: a free and open-source package used for handling authentication in Django REST APIs
Outline
- Introduction
- Prerequisites
- Step 1 — Creating Virtual Environment and Setting up Dependencies
- Step 2 -Setting up the Django Project and Django REST Framework
- Step 3 — Setting up the Student API
- Step 4 — Creating Authentication URLs
- Step 5 — Testing Authentication with the Browsable API
- Conclusion
Prerequisites
- A development machine running either Linux, Windows, or macOS
- Have Python 3.4 or a later version, and pip installed. You can follow this article, Python 3 Installation & Setup Guide to install and setup Python.
- Have a basic experience using the Django framework
Step 1 — Creating Virtual Environment and Setting up Dependencies
We shall start off by setting up a virtual environment and installing the dependencies for our application. A virtual environment will isolate the current project from other projects on our machine. So, we can have distinct versions of Python, pip, and other modules for the current project. If you use a Windows machine, you can learn how to set up virtualenv on Windows in this article, Setting up a Virtual Environment for your Django Project . You can check How to set up virtual environments for Python on a Mac if you run macOS. If you are running an Ubuntu machine, you may want to read How to Set Up a Python Virtual Environment on Ubuntu 20.04. Navigate to your home directory on the terminal. Then, create a virtual environment using the virtualenv package:
cd ~
virtualenv venv
Activate the created virtual environment using source:
source env/bin/activate
Make sure you are in your activated virtual environment while you are working on this project.
Next, you can install the dependencies using pip. These include the following:
- Django: web framework to be used for the project.
- Django REST framework: package for creating REST APIs with Django.
Install the dependencies with the following command:
pip install django djangorestframework
With the project dependencies installed, you will create the Django project.
Step 2 — Setting up the Django Project and Django REST Framework
Firstly, let us install the tree package. tree is a good tool for viewing files and directory structures from the terminal. We can use it to view the directory structure of our project files.
sudo apt-get install tree
Then, we will create a new Django project by using the django-admin utility on the command-line with the startproject command as follows.
django-admin startproject drfauthproject
Change directory to drfauthproject folder and view the folder with the tree command.
cd ~/drfauthproject/
tree
You should see the terminal output as:
├── drfauthproject
    │   ├── __init__.py
    │   ├── settings.py
    │   ├── urls.py
    │   └── wsgi.py
    └── manage.py
The root folder contains the following essential files:
manage.py: this is a utility script that allows us to create new applications, migrate databases, and other administrative duties.settings.py: the configuration file that holds the settings for our project. We can edit the settings such as adding newly installed apps to theINSTALLED_APPSsettings. You can get more information from the Django documentation on Django settings.urls.py: a file where we will define our URL patterns and their associated views. The patterns connect the URLS with their respective view functions. You can learn more about views in this tutorial, Django View
Let us add rest_framework, rest_framework.authtoken, which allows the use of token authentication, to the INSTALLED_APPS setting in the settings.py file.
...
INSTALLED_APPS = [
    'django.contrib.admin',
    'django.contrib.auth',
    'django.contrib.contenttypes',
    'django.contrib.sessions',
    'django.contrib.messages',
    'django.contrib.staticfiles',
    'rest_framework',
    'rest_framework.authtoken',
]
...
Save the file after modifying it.
We will then create a new app called students with the manage.py script and the startapp command for creating new apps inside a Django project. The students app will be a module for managing students in our project.
python manage.py startapp students
Navigate to the students directory and use the tree command.
cd students
tree
The output will be like this:
├── __init__.py
   ├── admin.py
   ├── apps.py
   ├── models.py
   ├── tests.py
   └── views.py
The models.py will contain the models which define the database fields of our apps while the views.py file will contain views for receiving and responding to web requests. Let us then add the new app to the INSTALLED_APPS setting in the settings.py file.
...
INSTALLED_APPS = [
    ...
    'rest_framework',
    'rest_framework.authtoken',
    'students'
]
...
Next, we need to perform migrations on the database. In Django, migrations are carried out to persist the changes made in models into the database. The changes include adding and removing models and fields.
python manage.py migrate
The out on the terminal should be like the following:
Operations to perform:
  Apply all migrations: admin, auth, authtoken, contenttypes, sessions
Running migrations:
  Applying contenttypes.0001_initial... OK
  Applying auth.0001_initial... OK
  Applying admin.0001_initial... OK
  Applying admin.0002_logentry_remove_auto_add... OK
  Applying admin.0003_logentry_add_action_flag_choices... OK
  Applying contenttypes.0002_remove_content_type_name... OK
  Applying auth.0002_alter_permission_name_max_length... OK
  Applying auth.0003_alter_user_email_max_length... OK
  Applying auth.0004_alter_user_username_opts... OK
  Applying auth.0005_alter_user_last_login_null... OK
  Applying auth.0006_require_contenttypes_0002... OK
  Applying auth.0007_alter_validators_add_error_messages... OK
  Applying auth.0008_alter_user_username_max_length... OK
  Applying auth.0009_alter_user_last_name_max_length... OK
  Applying auth.0010_alter_group_name_max_length... OK
  Applying auth.0011_update_proxy_permissions... OK
  Applying auth.0012_alter_user_first_name_max_length... OK
  Applying authtoken.0001_initial... OK
  Applying authtoken.0002_auto_20160226_1747... OK
  Applying authtoken.0003_tokenproxy... OK
  Applying sessions.0001_initial... OK
Django comes shipped with a local development server. Let us start the server with the following command.
python manage.py runserver
The output should look like the following
Performing system checks...

System check identified no issues (0 silenced).
October 22, 2018 - 15:14:50
Django version 2.1.2, using settings 'drfauthproject.settings'
Starting development server at http://127.0.0.1:8000/
Quit the server with CONTROL-C.
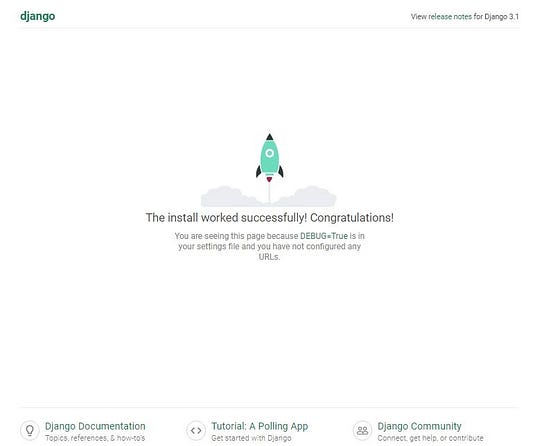
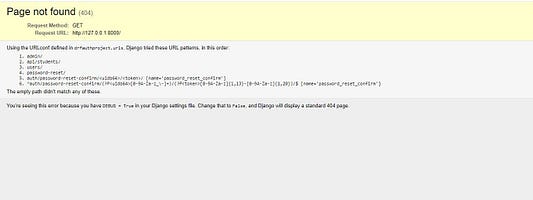
Next, on your web browser, navigate to 127.0.0.1:8000 where the web application will be running from. You will see the following page:
You can stop the development server on the terminal with the Ctrl + C keyboard shortcut or open a new terminal to continue working on the project.
Step 3 — Setting up Student API
Next, we will use the Django REST Framework to create the REST API. We will create the models for database fields. We will also create API view functions for managing the API requests. We will then add API endpoints where the website visitors can access the API. We will also create serializers to transform model instances and QuerySets into JSON format when API responses are served.
When visitors make requests through the endpoints, Django calls the corresponding view to deal with the requests and provide responses to the requests respectively.
Our API endpoints will include the following:
api/students: this endpoint is used to create students and return a list of students.api/students/<pk:id>: this endpoint is used to get, update, and delete single students byidor primary key.
Creating the Student Model
The Student model represents the database table that will contain the students’ data. The Django Object Relational Mapper (ORM) handles database management for us by providing a Python interface for SQL operations. It maps the Python classes and variables in our models to corresponding SQL tables and columns. Hence we do not need to use SQL queries ourselves.
Navigate into the directory and open the models.py file inside with the nano command. You can learn more about GNU nano text editor for Unix-like systems from this How to Use Nano, the Linux Command Line Text Editor
cd ~/drfauthproject/students/
nano models.py
You will see that it contains the following lines:
from django.db import models
# Create your models here.
from django.db import models already imports the Student model's API for us. Let us now add the Student class with the following fields:
first_name: the first name of the studentlast_name: the last name of the studentemail: the email address of the studentclassroom: the classroom the student is in
Add the code for the Student model :
from django.db import models

class Student(models.Model):
    first_name = models.CharField("First name", max_length=255)
    last_name = models.CharField("Last name", max_length=255)
    email = models.EmailField()
    classroom = models.CharField("Classroom", max_length=20)

    def __str__(self):
        return self.first_name
In the code above, the Student class extends the models. Model from django.db.models.Model. The str() function tells how the model will be displaced. Here, we specified with a return statement that the student's first name should be displayed. You can learn more about Django Models in this article, how to write Django models.
Now, we will migrate the database to create tables. We will use the makemigrations command to create migration files where the model changes are reflected. The changes will then be applied to the database with the migrate command. So, let's navigate back to the root directory of the project where we can use our manage.py utility script.
cd ~/drfauthproject
Then, let us create the migration files:
python manage.py makemigrations
The output on the terminal will look like the following:
students/migrations/0001_initial.py
    - Create model Student
Then, apply the changes to the database:
python manage.py migrate
If the migration completes, the output will show as below:
Operations to perform:
  Apply all migrations: admin, auth, contenttypes, sessions, students
Running migrations:
  Applying customers.0001_initial... OK
Create the Serializer Class
We shall add a serializer class for the Student model. The serializer class will convert student instances and QuerySets to and from JSON. Let us start off by creating a serilizers.py file inside the students application directory.
Navigate to the students folder and create make the serializers.py file using the command nano:
cd ~/drfauthproject/students/
nano serializers.py
Add the following lines of code to the file:
from rest_framework import serializers
from .models import Student


class StudentSerializer(serializers.ModelSerializer):

    class Meta:
        model = Student
        fields = ('pk', 'first_name', 'last_name', 'email', 'classroom')
From the first two lines, we imported the serializers API from the Django REST framework and the Student model from the models.py file of the student application. We then created the CustomerSerializer class which extends the serializers.ModelSerializer to specify the specific fields to be serialized.
We then used the Meta class to define the model and fields to be serialized which are: pk, first_name, last_name, email, and class.
Now that we have created the serializer class for the Student model, we shall create the API views.
Making the API Views
At this point, we want to add the API views for the Student application. Whenever an endpoint is visited, Django will fetch the corresponding view.
Open the views.py file in the students application directory and replace what is there with the following code:
from .models import Student
from rest_framework.generics import ListCreateAPIView,  RetrieveUpdateDestroyAPIView
from rest_framework.permissions import IsAuthenticated
from .serializers import StudentSerializer
With the above code, we imported the following:
- the Student model from the
models.pyfile of theStudentapplication. - the generic view from the Django REST Framework. You can read more about other generic views provided by the Django REST Framework in this article, Generic views
- the
IsAuthenticatedpermission class from the permissions module of the Django REST Framework to authorize user access to our own views. This ensures that the user is authenticated before they are able to perform a particular action or access a resource. - the
StudentSerializerclass from theserializers.pyfile of theStudentapplication
Next, let us add our API views:
...
class StudentList(ListCreateAPIView):
    permission_classes = [IsAuthenticated]
    queryset = Student.objects.all()
    serializer_class = StudentSerializer

class StudentDetail(RetrieveUpdateDestroyAPIView):
    permission_classes = [IsAuthenticated]
    queryset = Student.objects.all()
    serializer_class = StudentSerializer
In the above code, we created 2 classes — StudentList and StudentDetail.
StudentListenables us to accept GET requests to list all the students available. It also allows us to accept POST requests to create a new student.StudentDetailresponds toGETrequests to provide the details of a specific student as indicated by theidorprimary_key. It also responds toPUTrequests to update one or more of the fields of a student. It also deletes a student instance when aDELETErequest is made.
However, permission_classes = [IsAuthenticated] ensures that the responses from the views will only be available if the user making the request is logged in and authenticated. Assuming we do not need our users to be authenticated to access the APIs, we wouldn't include the permission class. You can learn more about Permissions in Django REST Framework.
The full code in the views.py file is as follows:
from .models import Student
from rest_framework.generics import ListCreateAPIView,  RetrieveUpdateDestroyAPIView
from rest_framework.permissions import IsAuthenticated
from .serializers import StudentSerializer


class StudentList(ListCreateAPIView):
    permission_classes = [IsAuthenticated]
    queryset = Student.objects.all()
    serializer_class = StudentSerializer


class StudentDetail(RetrieveUpdateDestroyAPIView):
    permission_classes = [IsAuthenticated]
    queryset = Student.objects.all()
    serializer_class = StudentSerializer
Let us add our endpoints now.
Add API Endpoints
Now, we will create the API endpoints for the student application. We shall have two endpoints: api/students to create and get the list of students and api/students/<pk:id> to get, update and delete single students by their pk.
Create a urls.py file inside the students application directory and add the following imports inside:
from django.urls import path
from .views import StudentList, StudentDetail
Then, add the URL patterns for our endpoints in the urlpatterns list:
...
urlpatterns = [
    path('', StudentList.as_view()),
    path('<int:pk>', StudentDetail.as_view()),
]
int:pk above allows us to view the details of each student by going to an endpoint appended by the pk of the particular student.
The full code of the urls.py file of the student application is as follows:
from django.urls import path
from .views import StudentList, StudentDetail

urlpatterns = [
    path('', StudentList.as_view()),
    path('<int:pk>', StudentDetail.as_view()),
]
Next, let us connect the urls.py file of the student application to the urls.py file of the Django project.
Firstly, navigate to ~/drfauthproject/drfauthproject and open the urls.py file of the project:
cd ~/drfauthproject/drfauthproject
nano urls.py
Leave the code that is there already, but add the import to the students views and include as follows:
from django.contrib import admin
from django.urls import path, include # added the include keyword
from students import views # new line

...
Now, add the URL to the students app to the urlpatterns list:
urlpatterns = [
    path('admin/', admin.site.urls),
    path('api/students/', include('students.urls')), # new line
]
The full code of the urls.py of the project is:
from django.contrib import admin
from django.urls import path, include
from students import views

urlpatterns = [
    path('admin/', admin.site.urls),
    path('api/students/', include('students.urls')),
]
Now, we have the students application up. Next, let us move into creating authentication endpoints where users can make authentication requests.
Step 4 — Creating Authentication Endpoints
In this section, we shall create URLS patterns for our authentication endpoints. The authentication endpoints in our project will be mapped to the authentication views of the dj-rest-auth package. The views contain code that handles the various authentication functions such as registering users and logging in. You can see more endpoints and views provided by the dj-rest-auth package here, Dj-rest-auth API endpoints.
The views we shall be using are the following:
LoginView: the view that accepts sign-in requestsRegisterView: the view that will allow users to sign-upVerifyEmailView: works with the endpoints for email verification during sign upPasswordResetViewandPasswordResetConfirmView: used for resetting passwords
Firstly, we will create a Django application called users to manage user accounts. This is where our register and login endpoints for users will be housed.
Navigate to the root directory of the project so you can use the manage.py script with the startapp command.
cd ~/drfauthproject/
python manage.py startapp users
Since we are going to put our register and login endpoints in the users app, we need to create a urls.py file inside there to add URL patterns for authentication. Navigate to the users app and create a urls.py file with the following commands:
cd ~/drfauthproject/users/
nano urls.py
Let us then add the new users application to the INSTALLED_APPS setting in the settings.py file.
...
INSTALLED_APPS = [
    ...
    'rest_framework',
    'rest_framework.authtoken',
    'students',
    'users'
]
...
Next, add a URL pattern to link the urls.py file of the project to the urls.py file of the users app.
Change directory to the project’s directory to access the urls.py file of the project:
cd ~/drfauthproject/drfauthproject/
The full code of the urls.py of the project is:
from django.contrib import admin
from django.urls import path, include
from students import views

urlpatterns = [
    path('admin/', admin.site.urls),
    path('api/students/', include('students.urls')),
    path(('users/'), include('users.urls')),
]
Now, we will add the authentication endpoints inside the Users app.
Dj-rest-auth Settings and Configuration
Next, let us install dj-rest-auth to handle authentication. We shall also install the django-allauth package to enable us to use the standard registration process of dj-rest-auth which is powered by django-allauth.
Install the packages with the following command on the command-line
pip install dj-rest-auth django-allauth
Next, add django.contrib.sites, allauth, and dj-rest-auth, to the list of INSTALLED_APPS in our settings.py file. We will also specifically add the registration module of the dj-rest-auth package, that is dj_rest_auth.registration to the list of INSTALLED_APPS to be able to use it in our project.
So, navigate to the root project folder and open the settings.py file.
cd ~/drfauthproject/drfauthproject/
nano settings.py
Then, add django.contrib.sites, allauth, dj-rest-auth and dj_rest_auth.registraion
...
INSTALLED_APPS = [
    ...
    'django.contrib.sites',
    'allauth',
    'allauth.account',
    'dj_rest_auth',
    'dj_rest_auth.registration',
    ...
Next, perform migrations for the newly added django.contrib.sites :
python manage.py makemigrations
python manage.py migrate
Next, we need to indicate the kind of authentication that we want for our REST API. We want token authentication so that API requests will be made with unique tokens. The Basic authentication type is also available where just the username and password are used to authenticate users. The session authentication type works by authenticating users by session contexts. You can learn more about the different types of authentication from the Django REST Framework documentation on Authentication.
Dj-rest-auth uses the JSON Web Token (JWT) for tokenization. Therefore, we shall install and use the djangorestframework-simplejwt library.
Let us use the pip package manage to install djangorestframework-simplejwt on the command-line:
pip install djangorestframework-simplejwt
Then, navigate to the settings.py file and add it dj_rest_auth.jwt_auth.JWTCookieAuthentication' to the list of the default authentication classes:
cd ~/drfauthproject/drfauthproject/
nano settings.py
Then add the following to the settings.py file
REST_FRAMEWORK = {
    'DEFAULT_AUTHENTICATION_CLASSES': [
        'dj_rest_auth.jwt_auth.JWTCookieAuthentication',
    ],
}
Now, add SITE_ID = 1 in the settings.py file:
SITE_ID = 1
Next, set REST_USE_JWT to be True so that JWT authentication will be used by dj-rest-auth:
REST_USE_JWT = True
For every authenticated session, dj-rest-auth would return a Set-Cookie header that looks like the following:
Set-Cookie: my-app-auth=xxxxxxxxxxxxx; expires=Sun, 17 Feb 2021 14:21:00 GMT; HttpOnly; Max-Age=300; Path=/
Hence, you need to define what the cookie key will be called in your settings.py file. We can call it my-app-auth. So, put the following code inside the settings.py file of the project:
JWT_AUTH_COOKIE = 'my-app-auth'
Next, let us add the AUTHENTICATION_BACKENDS that will allow our users to be authenticated upon login and also to allow us to log in to the Django admin irrespective of the django-allauth authentication backend.
...
AUTHENTICATION_BACKENDS = [
    'allauth.account.auth_backends.AuthenticationBackend',
    'django.contrib.auth.backends.ModelBackend',
]
...
Next, let us specify that we want email verification for our project:
...
ACCOUNT_AUTHENTICATION_METHOD = 'email'
ACCOUNT_EMAIL_REQUIRED = True
ACCOUNT_EMAIL_VERIFICATION = 'mandatory'
We have just specified above that the email should be used for authentication instead of the username. We also specified that the e-mail address must be provided by the user in order to register. Lastly, we added the setting to ensure mandatory verification by email for the user to complete the registration process.
Next, we shall add the following code to the settings.py file:
ACCOUNT_CONFIRM_EMAIL_ON_GET = True
LOGIN_URL = 'localhost:8000/users/login'
The ACCOUNT_CONFIRM_EMAIL_ON_GET is to allow the website to verify the user when the user opens the link received in the email. Then, we want the user to be redirected to the LOGIN_URL after verification, so we specified our LOGIN_URL
Sign up and Sign in Endpoints
We will add the registration, login, and log-out endpoints first. Navigate to the users app folder and open the urls.py file inside the folder.
cd ~/drfauthproject/users/
nano urls.py
Add the following imports inside:
from django.urls import path, re-path
from dj_rest_auth.registration.views import RegisterView, VerifyEmailView
from dj_rest_auth.views import LoginView, LogoutView
As shown in the code above, RegisterView and LoginView are in the registration module of dj-rest-auth. Add the endpoints to the views in the urlpatterns list as below:
from django.urls import path, re_path
from dj_rest_auth.registration.views import RegisterView, VerifyEmailView
from dj_rest_auth.views import LoginView, LogoutView

urlpatterns = [
    path('register/', RegisterView.as_view()),
    path('login/', LoginView.as_view()),
    path('logout/', LogoutView.as_view()),

    path('verify-email/',
         VerifyEmailView.as_view(), name='rest_verify_email'),
    path('account-confirm-email/',
         VerifyEmailView.as_view(), name='account_email_verification_sent'),
    re_path(r'^account-confirm-email/(?P<key>[-:\w]+)/$',
         VerifyEmailView.as_view(), name='account_confirm_email'),
]
In the code above, we have added endpoints for registering users, logging in, and logging out. We have also added 3 endpoints to handle the email verification process of the user registration.
After a successful signup request, dj-rest-auth reaches out to the verify-email/ endpoint which processes the email verification and ensures that an email is sent via the account-confirm-email/ endpoint to the email address supplied by the user. A URL is sent along with the email message. The URL sent consists of the re_path to account-confirm-email/ and a unique key. The user can then verify the email address with the URL. re_path allows us to use regular expressions in our URL.
However, we want the verification process to be automatic once the user opens the URL received in the email. So, we will specify an endpoint to receive the unique key of account-confirm-email then verify the user.
Navigate to the users application and open the urls.py file.
cd ~/drfauthproject/users/
nano urls.py
Then, add the following path to the beginning of the urlpatterns list before the register endpoint:
urlpatterns = [
    path('account-confirm-email/<str:key>/', ConfirmEmailView.as_view()),
    ...
    ]
After verification, the user will be directed to the LOGIN_URL which we had earlier specified in the settings.py file.
You might want to check in Django admin to see if your domain is localhost or the default example.com. Navigate to the root directory of the project to use the manage.py script. Then create a superuser on the command-line with the following commands and follow the prompt to supply a username, e-mail address, and password for a superuser account:
cd ~/drfauthproject
python manage.py createsuperuser
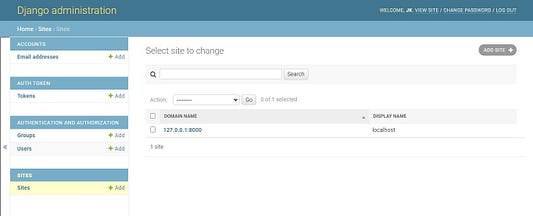
Go to 127.0.0.1:8000/admin and login with the credentials of the new superuser that you just created. Navigate to the Sites menu:
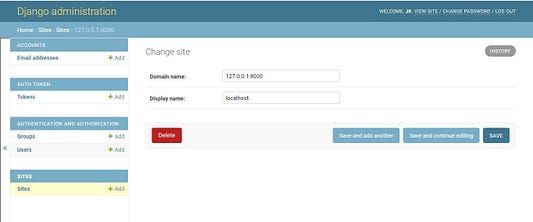
Select the site there to edit it. You may change the domain name to 127.0.0.1:8000 and the display name to localhost if they are not:
Changing the domain above to localhost will ensure that the e-mails that users will receive from us bear the localhost name and not the default example.com or any other. When you deploy to production, ensure that the display name is the name of the site and not the default example.com.
Adding Password Reset Feature
Now, we will allow our users to perform password reset when they forget their passwords. We will be adding the password-reset, and the password-reset-confirm' endpoints in the global urls.py file of the project for them to be active.
Navigate to the project’s directory and open the urls.py file of the project:
cd ~/drfauthproject/drfauthproject/
nano urls.py
Import PaswordResetView and PasswordResetConfirmView from dj-rest-auth views to the file
...
from dj_rest_auth.views import PasswordResetView, PasswordResetConfirmView
Next, add the following endpoints to the list of urlpatterns as shown below:
urlpatterns = [
    ...
    path('password-reset/', PasswordResetView.as_view()),
        path(‘password-reset-confirm/<uidb64>/<token>/',
         PasswordResetConfirmView.as_view(), name='password_reset_confirm'),
]
The password-reset endpoint is where the user makes the request to reset their password. dj-rest-auth calls unto password-reset-confirm endpoint to which sends an email to the email address of the user. The email message body contains the password-reset-confirm that has a unique key to verify only that email address. When the user opens the password-reset-confirm URL in the email message, they will be redirected to a new page to supply a new password for their account.
The full code of the main urls.py file of the project now becomes:
from django.contrib import admin
from django.urls import path, include, re_path
from students import views
from dj_rest_auth.views import PasswordResetView, PasswordResetConfirmView

urlpatterns = [
    path('admin/', admin.site.urls),
    path('api/students/', include('students.urls')),
    path(('users/'), include('users.urls')),

    path('password-reset/', PasswordResetView.as_view()),
    path(‘password-reset-confirm/<uidb64>/<token>/',
         PasswordResetConfirmView.as_view(), name='password_reset_confirm'),
]
Email Backend Configuration
We need to set up the configuration for our email backend server so we can send verification emails to the users.
Navigate to the settings.py file and open it:
cd ~/drfauthproject/drfauthproject/
nano settings.py
Add the following code to the settings.py file:
...
EMAIL_BACKEND = 'django.core.mail.backends.smtp.EmailBackend'
EMAIL_USE_TLS = True
EMAIL_HOST = 'smtp.gmail.com'
EMAIL_HOST_USER = 'email@gmail.com'
EMAIL_HOST_PASSWORD = ********
EMAIL_PORT = 587
In the above code, we specified the Django service to be used for doing email in our app. We also defined the EMAIL_HOST as the Gmail email server. We added our email address and password as EMAIL_HOST_USER and EMAIL_HOST_PASSWORD respectively. Replace the value of the EMAIL_HOST_USER and EMAIL_HOST_PASSWORD with your Gmail email address and password.
Please note that we have put the values for the configuration settings in our settings.py file because we are still in the development stage and we test on our localhost. During production, make sure you put the above configuration inside your .env environment variables so that they would be secret and would not be available to the public.
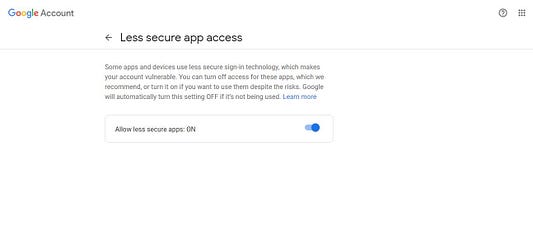
Next, sign in to your Gmail account and allow less secure apps in your Gmail account here, Less secure apps access. This will prevent Google from blocking access to your Gmail account when you want to use it to send confirmation emails to users.
Now that we have set up our authentication endpoints and email backend server configuration, we will test the endpoints.
Now, navigate to 127.0.0.1:8000 and you will see the endpoints listed out as shown in the picture below:
Step 5 — Testing Authentication with the Browsable API
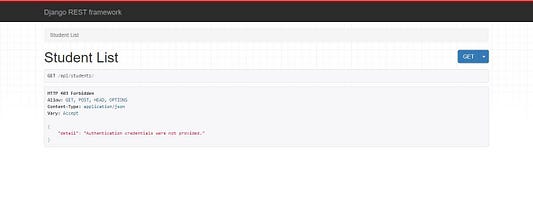
Django REST Framework ships with the Browsable API which has a good and simple interface for interacting with APIs. We shall make use of the browsable API to test our newly created REST API. If you navigate to any of the endpoints that we created, you will see the browsable API. For example, navigate to 127.0.0.1:8000/api/students to see how the browsable API looks like. it should look like the following:
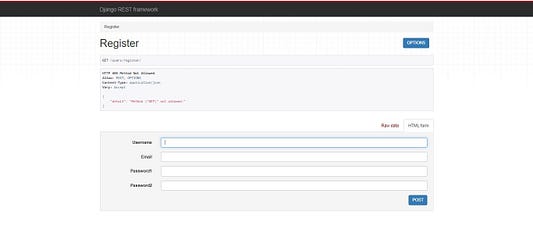
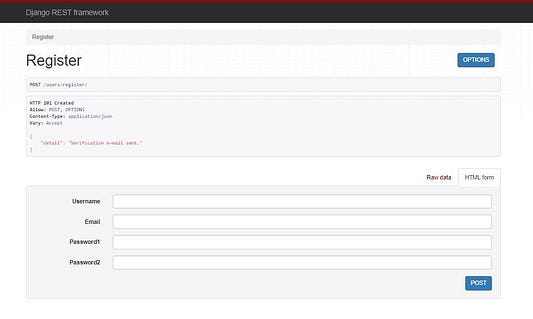
However, we cannot access the HTTP actions and resources provided by the student list endpoint because we haven’t been authenticated. We need to provide login details in order to be able to use the students app endpoints. But before login, we need to register a student. Now, let us register to create a new student instance. We shall do this through the register endpoint. Navigate to 127.0.0.1:8000/users/register to see the page looking like the following:
Then, you should get a response, Verification e-mail sent. with the HTTP response code 201 Created as thus:
The user would receive an e-mail like the following:
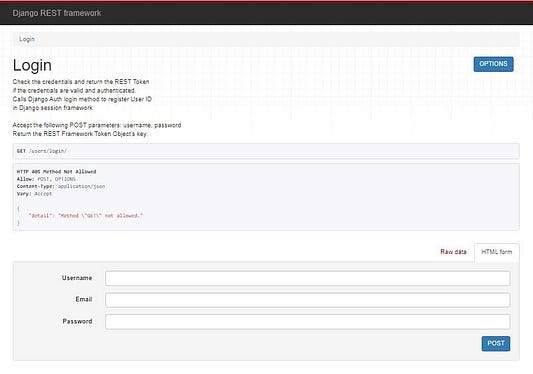
When the user opens the URL they received via email, they will be redirected to the login endpoint which looks like the following on the browsable API:
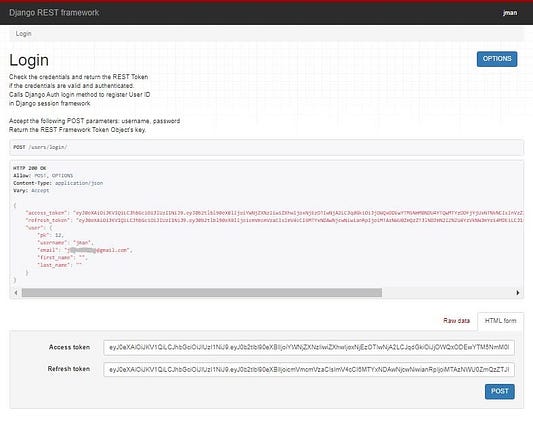
Now, login with the login credentials that you registered with. Upon successful authentication, you should get a 200 OK response, two tokens, and the user details and as shown below:
Along with the details of the user returned upon login, we have 2 tokens returned. These are the access and refresh tokens:
- Access token: this is the token that allows you to have access to the API. It has a short life span before it expires.
- Refresh token: consists of the information that will enable you to get a new access token when the previous one has expired.
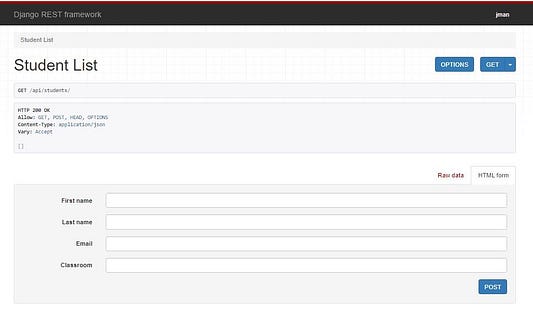
If you navigate to the student list endpoint now at 127.0.0.1:8000/api/students, you should be able to access the endpoint since you have been authenticated. The browsable API endpoint should look like the following:
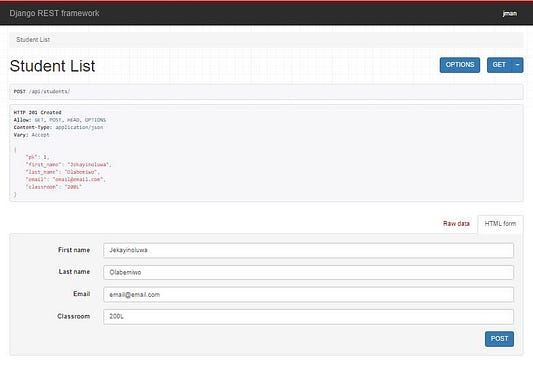
Input the first name, last name, email, and classroom of a sample student, you should get a HTTP 201 Created response and the new student added shown in the list. It will like the following:
Here, because we used the ListCreateAPIView generic view, we get a list of students on this endpoint, we also have options to create a new student.
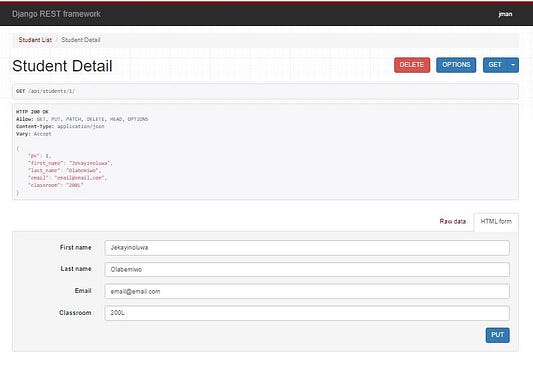
Now, let us check the details of the particular student added, go to the endpoint 127.0.0.1:8000/api/students/1. 1 is the primary key of the student that goes into the StudentDetail path in the urlpatterns list of the students app. It should look like this:
Because we used the RetrieveUpdateDestroyAPIView generic view, we can view the details of a particular student (retrieve), we can edit the details of that student (update) and we can delete that student (destroy).
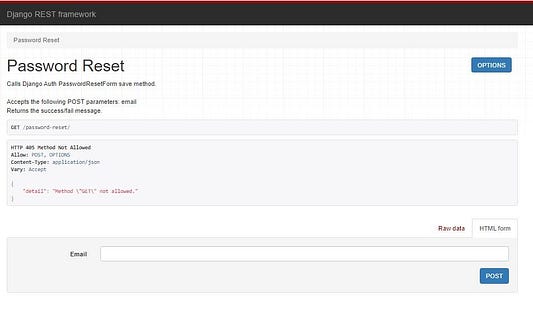
Next, let us test the Password reset endpoint Navigate to 127.0.0.1:8000/password-reset/ on your browser. It should look like the following:
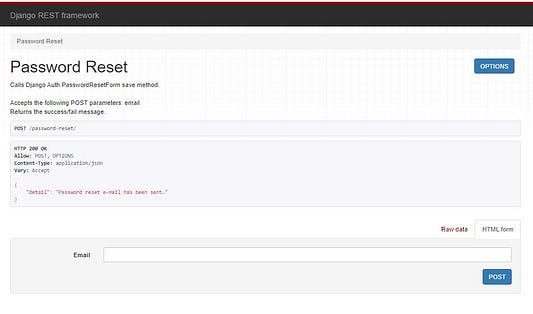
Input the e-mail address. You should get a detail message as shown below:
The user will receive an email with a URL in their inbox. The e-mail message will look like the following:
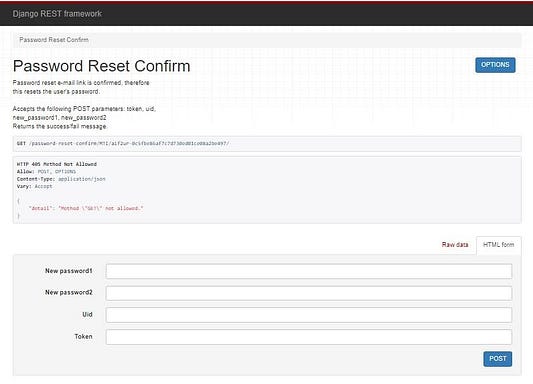
When the user opens the URL in the email body, they would be required to supply a new password with the uid and token values in the URL as shown in the browsable endpoint below:
When the user opens the URL they received in the e-mail, they will be redirected to password-reset-confirm page to supply a new password and the uid and token values. To handle this part, you will need to configure your client-side app to get the uid and token parameters from the link in the email body when the user opens it. You can check how to do this with React, a JavaScript framework for frontend apps in this Stackoverflow discussion
You can get the full code of this project on Github.
Conclusion
We have been able to learn how to setup authentication for Django REST APIs. We also implemented smptp with Gmail for the verification of e-mail addresses used to register. We implemented endpoints for users to register, login, logout, verify emails, and reset passwords in cases where they forget their passwords.
Hopefully, you should be able to implement authentication and authorization in your Django projects with RESTful APIs. You may go and integrate client-side apps with React.js, Vue.js, Angular.js, and other frontend frameworks and libraries. You would however need to implement the cross-origin resource sharing (CORS) headers in your Django backend to effectively serve responses to requests from the client-side apps. You may use the django-cors-headers tool for this. Follow the good straightforward documentation of the django-cors-headers on how to install and use the module.
Thanks for patiently reading through this article. Please do not hesitate to share your opinions and ask questions. You may connect with me on Twitter @jkaylight.
