


Docker is a tool used to create and run containers, self-sufficient units that can have their own operating system, tools, and libraries, and run your code in an isolated environment. That means you don't have to worry about the libraries and the operating system architecture which can be different than your own development environment. Docker solves one of the most common excuses developers use when the production code fails: "But, it works on my machine".

In this Docker tutorial, I'll cover all the basics and will demonstrate how all Docker beginners can containerize Node.js and Go applications. Even if you aren't familiar with these languages it should be easy for you to follow this tutorial and use any other language.
What is Docker?
Docker is an engine for creating containers. You can think of it as an operating system that can be mounted inside another operating system, and managed by the Docker engine.
Before we start working with Docker we need to understand 3 concepts:
Container - A standardized unit of software, a container will typically run an operating system, any libraries that we may need, and our application.
Image - An image holds the layers that when mounted on the Docker engine, can operate as a container.
Dockerfile - A Dockerfile is a blueprint for creating a Docker image, it can inherit from another container, define what software to install, what files to transfer from our computer to the image, and what commands to run.
Prerequisites
1. Installing Docker
OSX and Windows Pro users: The easiest way is to use Docker desktop which you can download here. All you need to do is download the version for your operating system and follow the installer instructions.
Windows Home users: Please follow this video guide:
- Ubuntu users: Please follow this video guide:
- For any other operating system: Please follow the official installation guide.
For Linux users, you will probably need to set a user group so you won't have to use sudo every time:
# add a group named docker if none exists
sudo groupadd docker

# add the current user to the docker group we just created
sudo gpasswd -a $USER docker

# reset the docker group in the current session, or just exit and reopen the terminal
newgrp docker
If you installed Docker correctly, you should be able to check the version like so:
docker -v

# output: Docker version 18.09.1, build 4c52b90
2. Registering on Docker Hub
We will cover publishing containers to Docker Hub, and for that we will have to register as a user here.
Once registered, we need to set the credentials in our local Docker, and here are three different ways to do so.
# the verbose way
docker login --password super-secret-password --username my-username

# the shorter way
docker login -p super-secret-password -u my-username

# or with stdin, by reading a file (the "safer" way for production)
cat ~/my_password.txt | docker login --username my-username --password-stdin
Getting started
Once installed, you should have the docker command available. Open your terminal/cmd and write the following command to check if Docker is installed: docker -v, and the output should look like this: Docker version 18.09.1, build 4c52b90.
Once you have Docker installed, we can start by running our very first image! We can use the "Hello world" image for this. You just need to run:
docker run -it hello-world
And you should see a message that starts with "Hello from Docker!". Now, let's analyze what happened here:
- We called
docker run <image-id>to tell docker what image to run. - We saw a message telling us
Unable to find image 'hello-world:latest' locally. This is because we run it for the first time. The ":latest" part here is the image tag. We can tag an image with whatever we want (dev, v0.1.1, my-tag, etc...), but the default tag is latest. - Since the image was not found locally, docker had to get it from somewhere, and we got it from Docker Hub. Docker Hub in concept is similar to GitHub, but instead of hosting repositories, it hosts images, and often those images are open sourced. But there are also private images.
The -it flag tells Docker to attach the container to the terminal, so CTRL+C should kill the container. If you want the container to keep running, drop this flag.
Let's build our own container!
For this Docker tutorial, we can choose between using Node.js or Go (just pick one). In reality you should be able to use pretty much any server technology you want (.net, Python, PHP, etc...).
You don't even need to install Go or Node.js to run the examples, since Docker will handle the dependencies for us.
First, let's create a directory for our little project and call it docker-example.
For Node.js
Create a file and call it server.js. In this file simply write this:
const http = require('http');
const port = 8000;

// we create a simple http server
http.createServer((request, response) => {
   // Send the HTTP header
   // HTTP Status: 200 : OK
   // Content Type: text/plain
   response.writeHead(200, {'Content-Type': 'text/plain'});
   response.end('Docker is awesome!!!');
}).listen(port);

// Console will print the message
console.log(`Server running at 127.0.0.1:${port}`);
For Go
Create a file and call it server.go, and in this file simply write this:
package main

import (
    "fmt"
    "net/http"
)

func main() {
       var port = 8000

       // this handler will recieve any incoming request
    http.HandleFunc("/", func(w http.ResponseWriter, r *http.Request) {
          // send a response text
          w.Write([]byte("Docker is awesome!!!"))
    })

        // print a message to the console
    fmt.Printf("Server running at 127.0.0.1:%d", port)
        // start accepting new requests
        http.ListenAndServe(fmt.Sprintf(":%d", port), nil)
}
When running any of these applications (node server.js, or go run server) you should be able to go to http://localhost:8000/ in the browser and see our message. You should also see a message in the terminal.
Let's write our first Dockerfile
The next step in this Docker tutorial is to write our first Dockerfile. The file name should be Dockerfile, with no extensions.
As you can see, a Dockerfile is just a series of commands to the docker engine that tells it what to do:
- FROM: Start from a base image. This could be an os like Alpine or Ubuntu, or a known image that contains dependencies for us like databases, or language tools.
- WORKDIR: set a working directory inside the container.
- COPY: copy the files you need. For simplicity, I copy it all and build inside the container.
- RUN: you can add multiple RUN commands, each of them is a simple command to be executed in the terminal, those will run when building the image.
- EXPOSE: you can set ports to expose. I chose 8000 since I also use that port in the servers.
- CMD: a command to run when starting the container. Sometimes you would see it as an array
CMD ['npm', 'start'], and sometimes as a commandCMD npm start- both are accepted.
There are a few more commands for Dockerfiles, but these are the most used ones.
Here are examples for a Dockerfile for Go and Node.js, pick the one you built the server with.
Dockerfile for Node.js
npm install is commented out, since we don't use any npm packages, but this is where you would call it.
# inherit from the Go official Image
FROM node:11.8

# set a workdir inside docker
WORKDIR /usr/src/app

# copy . (all in the current directory) to . (WORKDIR)
COPY . .

# run a command - this will run when building the image
# RUN npm install

# the port we wish to expose
EXPOSE 8000

# run a command when running the container
CMD node server.js
Dockerfile for Go
Here's what the Dockerfile for our Go application should look like:
# inherit from the Go official Image
FROM golang:1.8

# set a workdir inside docker
WORKDIR /go/src/server

# copy . (all in the current directory) to . (WORKDIR)
COPY . .

# run a command - this will run when building the image
RUN go build -o server

# the port we wish to expose
EXPOSE 8000

# run a command when running the container
CMD ./server
Let's build an image and run our container!
To build the image you simply need to go into the directory with the Dockerfile and run docker build .. You can replace the . with the path to the directory.
You will see an output that looks something like this:
Sending build context to Docker daemon  3.072kB
Step 1/6 : FROM golang:1.8
 ---> 0d283eb41a92
Step 2/6 : WORKDIR /go/src/server
 ---> Using cache
 ---> c18d9f48a8ee
Step 3/6 : COPY . .
 ---> Using cache
 ---> 41c3635ba598
Step 4/6 : RUN go build -o server
 ---> Using cache
 ---> 6ee0d2bafb00
Step 5/6 : EXPOSE 8000
 ---> Using cache
 ---> 5c16cd7ff831
Step 6/6 : CMD ./server
 ---> Using cache
 ---> 8675fc90ccdd
Successfully built 8675fc90ccdd
As you can see, Docker will specify the commands that it's running and ends up giving us an image id on the last line: 8675fc90ccdd. Just note it down somewhere since we will use it later.
We can now use this image to run the container:
docker run -it -p 8000:8000 8675fc90ccdd
The -p 8000:8000 part of the commands tells docker to redirect from localhost:8000 to the container-ip:8000.
Now you should be able to check out the browser and see the message from our server.
Pushing the image to Docker Hub
We first need to tag our image to give it a proper name. The name must be in this format <USER-NAME>/<IMAGE-NAME>. Here is an example with my username on Docker Hub (lironavon), and my image name (my-server)
# with tag latest
docker tag 294ebde018fe lironavon/my-server

# or with a custom tag
docker tag 8675fc90ccdd lironavon/my-server:v0.1
Now let's create an image on Docker Hub. You can click here to do so, and name it the same as we did when tagging. Here is an image:
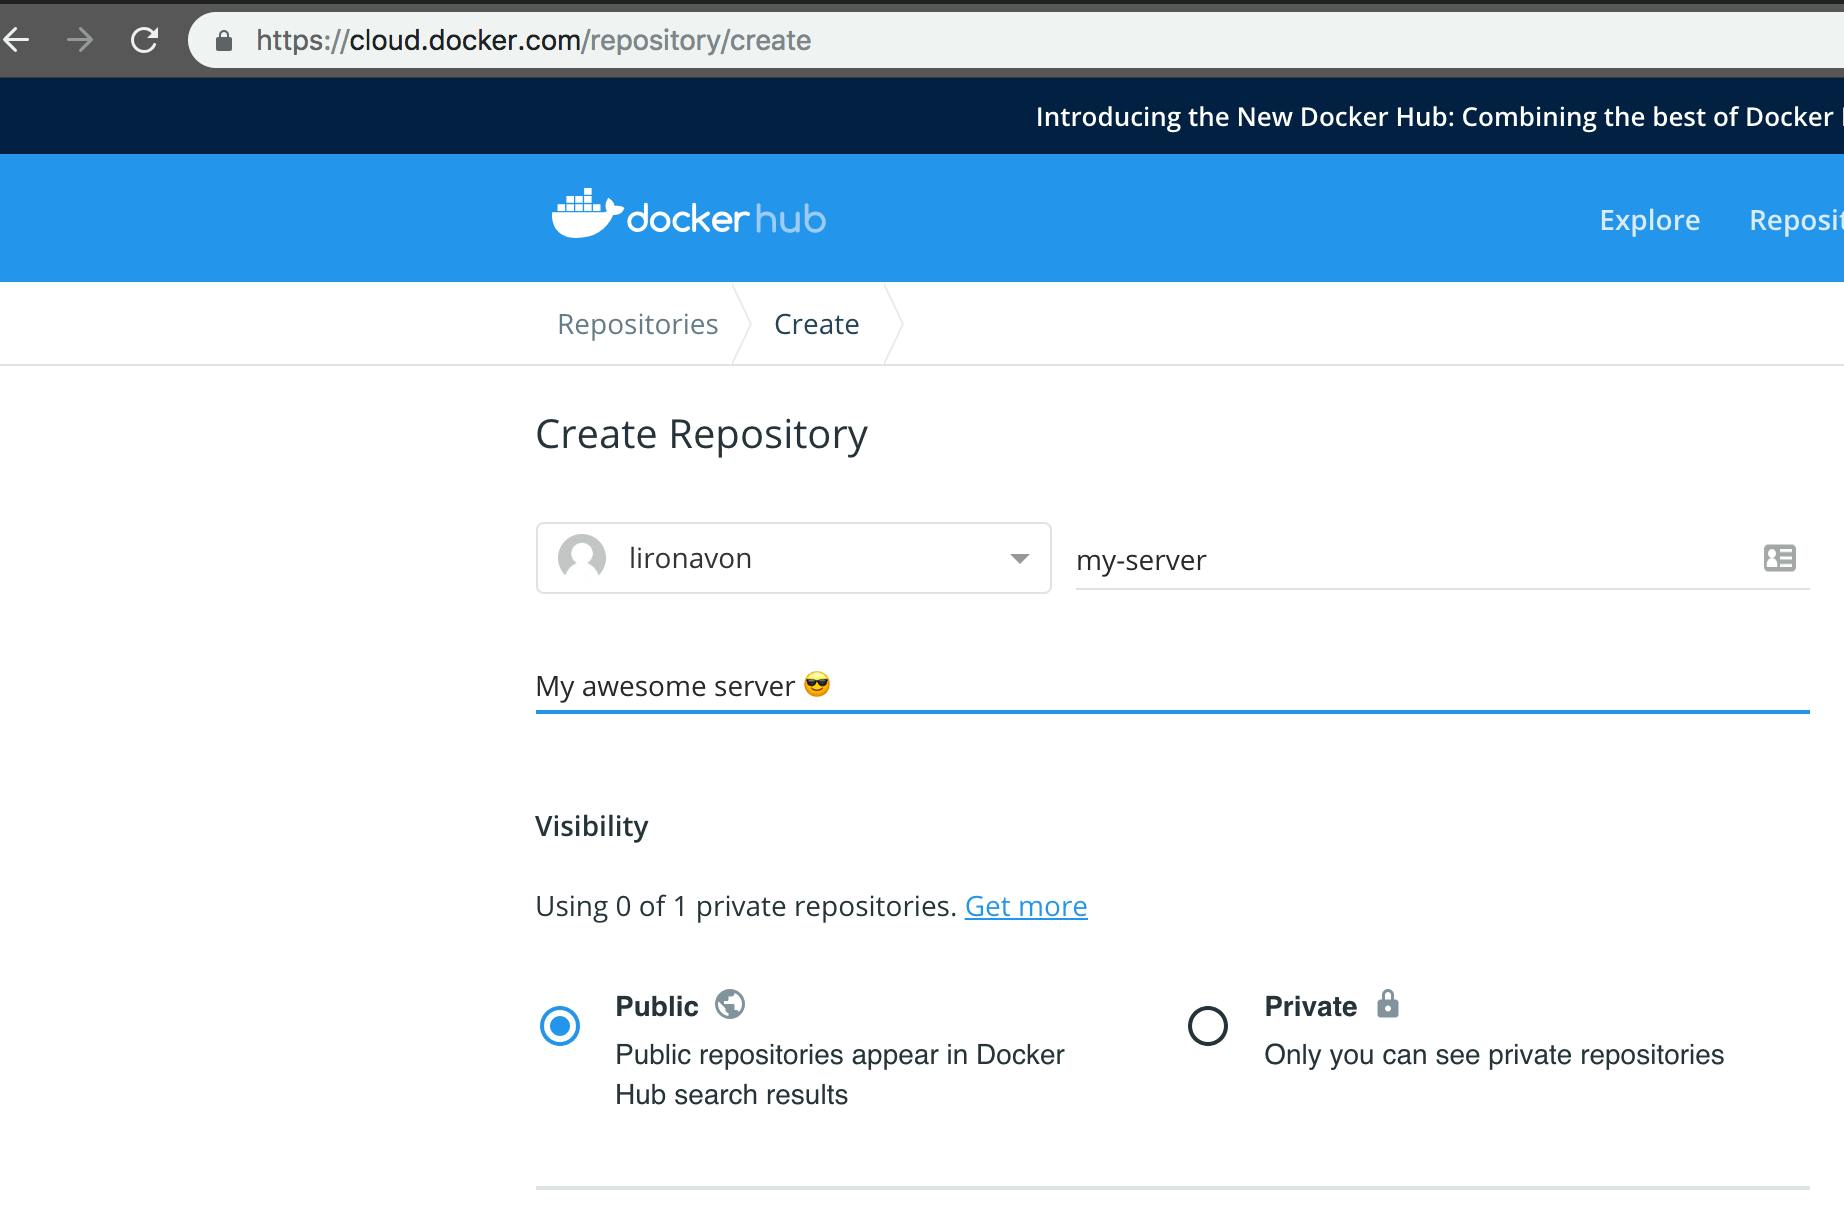
After you name the image, scroll down and click create.
Now we can push it to Docker Hub.
# with tag latest
docker push lironavon/my-server

# or with a custom tag
docker push lironavon/my-server:v0.1
More Docker commands
This wouldn't be a comprehensive Docker tutorial unless we take a deeper dive into other basic Docker CLI commands. So, let's check out some of the most useful ones:
# show a table of all the running containers
docker ps

# show a table of all the local images
docker images

# see more information about a container, you can use its ID or its name.
docker inspect 8675fc90ccdd

# similar to git pull, it pulls image updates
docker pull 8675fc90ccdd

# see logs from a container, useful for debugging
docker logs 8675fc90ccdd

# removes a running container
docker rm 8675fc90ccdd

# removes an image
docker rmi 8675fc90ccdd

# stop a running container
docker stop 8675fc90ccdd
Docker 'ps' command is very strong, it has two nice flags that allows it to mix with other commands easily:
docker ps -q: lists the running containersdocker ps -a -q: lists all the containers
Here are some common use cases for them:
# kill all running containers
docker kill $(docker ps -q)

# remove all running containers
docker rm $(docker ps -a -q)

# remove all images
docker rmi $(docker images -q)
Debugging a running application inside a container
One of the hardest things for me when I started to work with containers, was debugging, but after a while, I learned you could actually debug applications inside the container! It might take a while for the initial setup, but it's worth it. I will show how to do it in Node.js since it's the most straight forward, but I will link to a few other tutorials, and you should find one for your language of choice easily.
How to debug Node.js inside Docker container with Chrome
First, create a separate Dockerfile, and copy this:
FROM node:11.8
WORKDIR /usr/src/app
COPY . .

# expose two ports
# 9229 is the default node debugger port
EXPOSE 8000 9229

# run node in inspect mode
CMD node --inspect-brk=0.0.0.0 server.js
The --inspect-brk=0.0.0.0 flag tells node to run in debug mode, and the -brk part tells it to stop at the first line, the 0.0.0.0 part tells it to accept connections from any IP, since we are going to access it from the host IP and not from the container localhost.
We can now build the debug image, and then run it like this:
docker build -f debug.Dockerfile .

# make sure to use the image id we just built instead of "7b4bec4dc9b4"
docker run -it -p 8000:8000 -p 9229:9229 7b4bec4dc9b4
You should see a message like this in the terminal:
Debugger listening on ws://0.0.0.0:9229/88c7468f-...
Now you can open chrome, go to chrome://inspect and you should see a remote target named server.js. Clicking it will open a chrome debugger for us.
Debug other languages inside Docker
Most debuggers are capable of exposing a web API for debugging. Here is a list of some of the languages and how to debug them. You should be able to find documentation for other languages easily.
Debugging Go inside a container
Debugging Python inside a container
Debugging Elixir inside a container
What's next
Docker is a great tool, and it is massive. You should also take a look at other tools like Docker Swarm, Docker Compose or Kubernetes that increase the productivity and the ease of deployment of containers.
Summary
In this Docker tutorial for beginners, we went through the process of installing Docker, running our first container and dockerizing our first application. We've also demonstrated how to push your Docker images to Docker Hub. Let me know in the comments below how you liked this tutorial and please share it with whoever might find it useful.