


OVERVIEW
Errors and exceptions are a part of development process. While errors are problems that are critical and should not be caught and managed, whereas, an exception is a condition that can be caught and acted upon by the program. Debugging errors, catching exceptions and testing the code is a critical task and can be performed easily if one is aware of different exception handling techniques.
TRY – CATCH BLOCK
A try – catch block is used to handle exceptions. A try-catch block ensures that the program doesn’t stops executing because of an exceptional scenario in the test code and raises flags that makes it easier for us to debug the code.
A ‘try’ statement is used to define a block of code for testing. If this block of code has an exception, the control shifts to the ‘catch’ statement and the code inside this block executes which enables efficient exception handling.
try{
//test-code block goes here.
}
catch(e){
// error handling code goes here.
}
Try and Catch come in pair. The parameter ‘e’ to Catch is the exception that was encountered in the test code. The identifier ‘e’ lasts only for the duration of the catch block. Once the catch block finishes executing, the identifier no longer exists. Also, please note that the parameter ‘ (e) ‘ to the catch block has been made optional in the ES2019 update. I, however, still prefer using it.
THROW STATEMENT
Throw statement is used to ‘throw’ an exception. This exception is then ‘caught’ by our Catch statement. The syntax to use throw statement is pretty straight forward:
throw expression
Let’s see a simple example to understand how we can use throw inside a try and catch block.
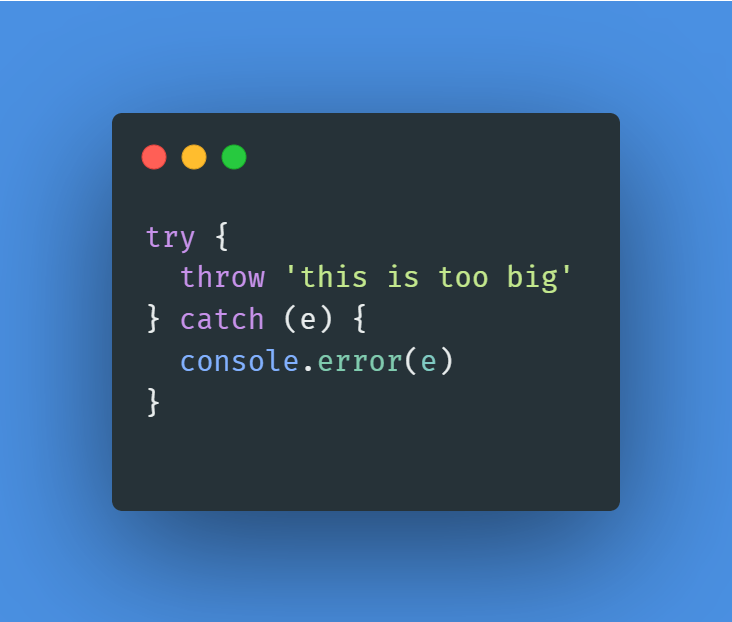
Here I am using console.error( ) to log the error but you can use console.log( ) although it is not recommended. console.error( ) logs the message as an error generated on a particular page and maintains a list of all such errors generated on a particular page.
PROCEED WITH ‘FINALLY’
Simply put, ‘Finally’ allows one to write a code to be run after try and catch blocks, regardless of their result. This means that code in the ‘ Finally ‘ block will execute even when the try block throws an exception. It will execute even if there is no catch statement to handle the exception that was thrown by the try block. If finally returns a value, it will be the return type of the entire try, catch and finally block regardless of whether or not try and catch blocks also have a return statement. I am going to take a small example to highlight this point.
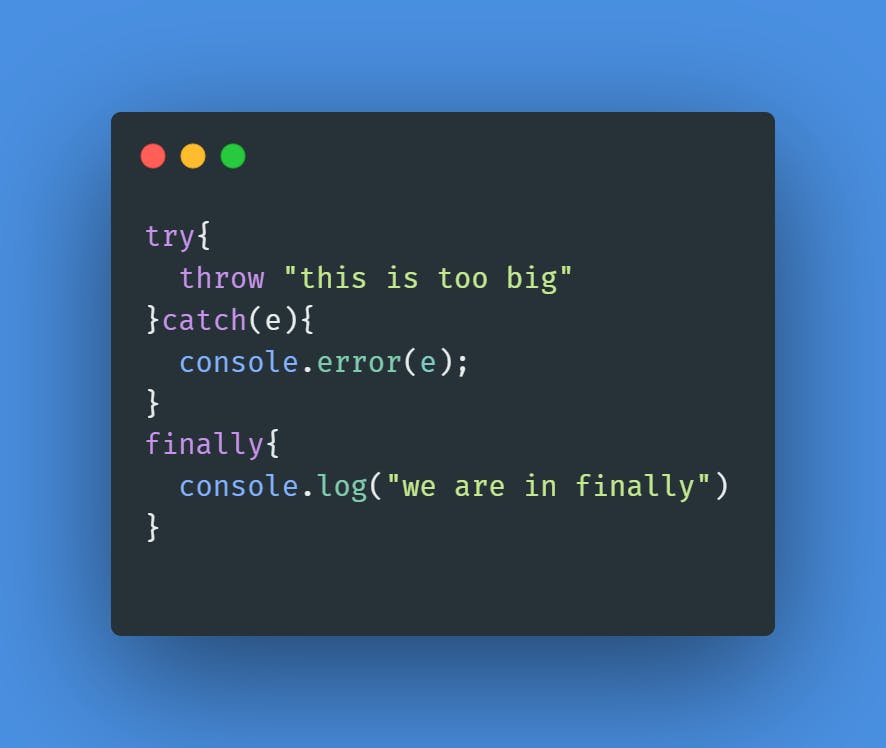
The code above will return these in the console :
this is too big
we are in finally!
I am borrowing this code from wonderful folks at MDN to highlight how return statements works with try, catch and finally block.

REFERENCE AND FURTHER READING
I think that along with these exception handling techniques, one must be familiar with different types of errors that you can encounter while writing your code. MDN has done a solid job of making a list of all such errors and you can check it for yourself HERE .
Since these are very self-explanatory , I think there is no need to re-invent the wheel here although it was important to mention it.
DOMExceptions must also be discussed here. MDN describes DOMException interface as an abnormal event (called an exception) that occurs as a result of calling a method or accessing a property of a web API.
DOMExceptions have 3 properties :
- DOMException.code : Earlier, errors were described using a numeric code. Although they are not used anymore, this property is still used sometimes for legacy reasons.
- DOMException.message : This property represents the description of the error that was caused.
- DOMException.name : It returns the name of the error that was caused.
You can read more about DOMExceptions HERE .
I have used MDN Documentations and W3schools as reference for this post and I’d definitely recommend you to read them. It will help you understand the concepts in greater clarity if you went through them after reading this post.
In case you have any doubts in any of the topics or examples we have discussed here, feel free to comment down below and I’ll be glad to help you out. If you would like to give any feedback on the quality of content shared here, you can reach out to me here or on any of your preferred social media.
Found this post helpful?
