


Live chat is a faster, personalized and economical way for your customers to talk to you. Live chat provides a far better experience than your age-old contact forms.
Nowadays, every website is being powered by live chat plugins. In this post, we are going to talk about how you can add live chat plugin to websites and site builder platforms such as WordPress, Squarespace, Wix etc.
What is Live Chat Plugin?
Live chat software provides plugins which can be added within your website in a matter of a few minutes. These plugins place a chat widget in your website, which your website visitors can use to communicate with you. There are many products available in the market, following are some of the advanced customer support software providers:
Kommunicate
Zendesk Chat
Tawk to
Intercom
Drift
Crisp
Firstly, choose a live chat plugin which you want to install on your website. I will take an example of Kommunicate , a live chat powered customer support platform.
Add Chat to Website
Installing support chat widget is only a matter of copy-pasting JavaScript code snippet into your website page. You can get your code snippet from Kommunicate.
Copy the code snippet by signing up for free account in kommunicate .
Navigate to Kommunicate Dashboard, select Settings. Click on Install under the Configuration section.
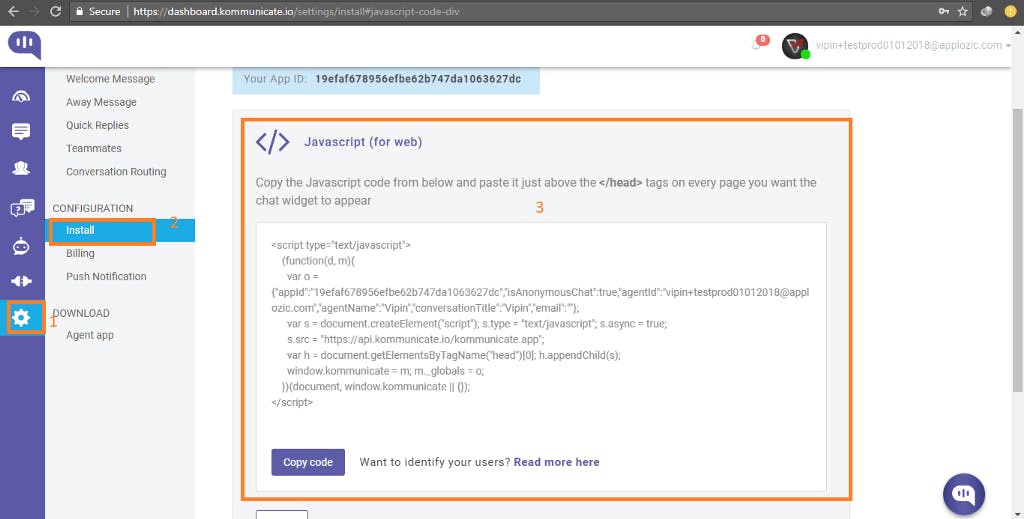
Copy the JavaScript code from Install section and paste it in just above the </head> tag in every page where you want the chat widget to appear.
That’s it! Your customers can now start chatting with you right from your website.
Support Agent Panel
Go to Kommunicate dashboard -> Conversations to reply to the incoming customer conversations.
Integrations
Kommunicate can be installed into website builders and other platforms. See the list of supported platforms for adding live chat software:
Squarespace Chat Integration WordPress Chat Integration Wix Chat Integration Shopify Chat Integration Didn't find your favourite site builder integration? Let us know in the comments below.
Customizations
Launcher Icon
Passing ‘chatLauncherHtml’ in kommunicateSettings’ allows you to change the chat launcher icon which is displayed on the page bottom right corner.
var kommunicateSettings = {
"appId": appId,
  "isAnonymousChat": true,

  "chatLauncherHtml": "<img src='https:api.kommunicate.io/img/logo02.svg' width='70px' height='70px'/>",

   "agentId": agentId,

  "groupName": groupName,

  "email": email
};
Theme Color
Add the below code to change the color of the top header color in your CSS file:
.mck-box-top {
background-color: green;
}
Start New Conversation Button Color
Add the below code to change the color of the ‘Start new conversation’ button in your CSS file:
#mck-msg-new.mck-btn{
background-color: green!important;
}
Received Messages Color
Add the below code to change the color of the received messages in your CSS file:
.mck-msg-right .mck-msg-box{
 background-color: green;

 color:white;
}
Sent Messages Color
Add the below code to change the color of the sent messages in your CSS file:
mck-msg-left .mck-msg-box{
background-color: white;
color:black;
}
Refer to the Kommunicate docs for more details.
Kommunicate also supports integrations with Helpdocs and DialogFlow and things like an FAQ bot can be easily integrated without writing any code.
This article is originally published here .