

How to develop and distribute Flutter apps and deploy them to iOS (without Mac)
Learn from this post how to build iOS apps on Linux


Learn from this post how to build and publish iOS apps if you're working on Linux or Windows. We are going to show how this is possible with Flutter and Codemagic.
NB! there is a difference between developing iOS apps and building and publishing them with Codemagic.
It's hard to imagine developing apps for iOS without a Mac computer. There is no sign of this changing any time soon, but there are still ways to build the app for iOS and release it to the App Store even if you don't have a Mac. With Flutter and Codemagic, you can build and distribute iOS apps without buying a Mac computer yourself.
In this post, we will walk you through how you can create a Flutter app on Linux or Windows and use Codemagic CI/CD to set up code signing for your iOS project and release the application to the App Store. We will be using the Flutter iOS app from Codemagic sample projects in this example.
REQUIREMENTS
- You need to buy the Apple Developer Program licence to code sign and publish the app
- You should also have an iOS device to smoke test the application
Build and distribute iOS apps without Mac with Flutter & Codemagic Get started
Before getting started, it's important to articulate which problem are we going to solve. You cannot develop iOS apps without a Mac computer. This article is about how to build an iOS app and release it to your users. But what's the difference?
Let's take a closer look at the problem statement and example use cases before going into the possible solution. Consider this a user story to understand the context before starting feature development.
When can you not use Linux or Windows machine to develop iOS applications?
As you probably may have guessed, having an iOS simulator or debugging iOS specific issues on macOS is invaluable. Moreover, when a user logs a bug, you need to be able to reproduce the issue and it is likely that the problems that are reported are platform-specific.
I would say one of the most notorious features that is ubiquitious across all apps that you will have to deal with is push notifications. While iOS simulator will be enough in most cases, there are some scenarios where you should also test your application on a real device and push notifications are one of them.
When can you build and publish iOS applications without a Mac computer?
One big advantage of Flutter is not having to build a whole new application for just iOS or any other OS for that matter, but using the existing project to ship for all platforms.
You can buy a second-hand Mac and set up your development environment or you can use a free service like Codemagic to build the iOS binary that you can smoke test on an iOS device or share with your first users. This is a great way to move quickly and get your app out.
Try to turn the tables if you are a macOS user and considering releasing a desktop version of your app to Microsoft Partner Center. You could go out and buy a Windows machine to build the application or you can use your existing CI/CD tool and switch the instance type to Windows.
The second most common case I have seen is when you are working in a team and some team members have Mac computers and others have Linux or Windows machines. It would be great once you are ready to merge a PR that the CI will build for all platforms and automatically share the binaries with the QA team rather than asking others to build the binaries or having QA do it.
Developing Flutter apps on Linux or Windows
Flutter is a multi-platform application development framework that enables you, among other platforms, to develop iOS and Android apps from the same source code. However, you need to use Xcode to build an iOS app and Xcode will only work on macOS. You cannot get away with Linux or Windows. We can, however, build and distribute the apps to Google Play Store or Apple App Store using a CI/CD product like Codemagic.
Flutter together with Codemagic makes it possible to release iOS apps for developers using Linux or Windows.
Setting up development environment for Flutter
Let's get started by installing Android SDK and Flutter. After that you can clone the Codemagic sample projects repository from GitHub and we can start working on it right away. We will be using the Flutter Android and iOS demo project. Getting started with Flutter guides are also available on the official website of Flutter docs.
Keep in mind that we can use Linux or Windows to only develop for Android not iOS. We will still get an iOS app by the end of this article that can be deployed to the App Store, but we will use Codemagic CI/CD with a macOS environment to achieve this.
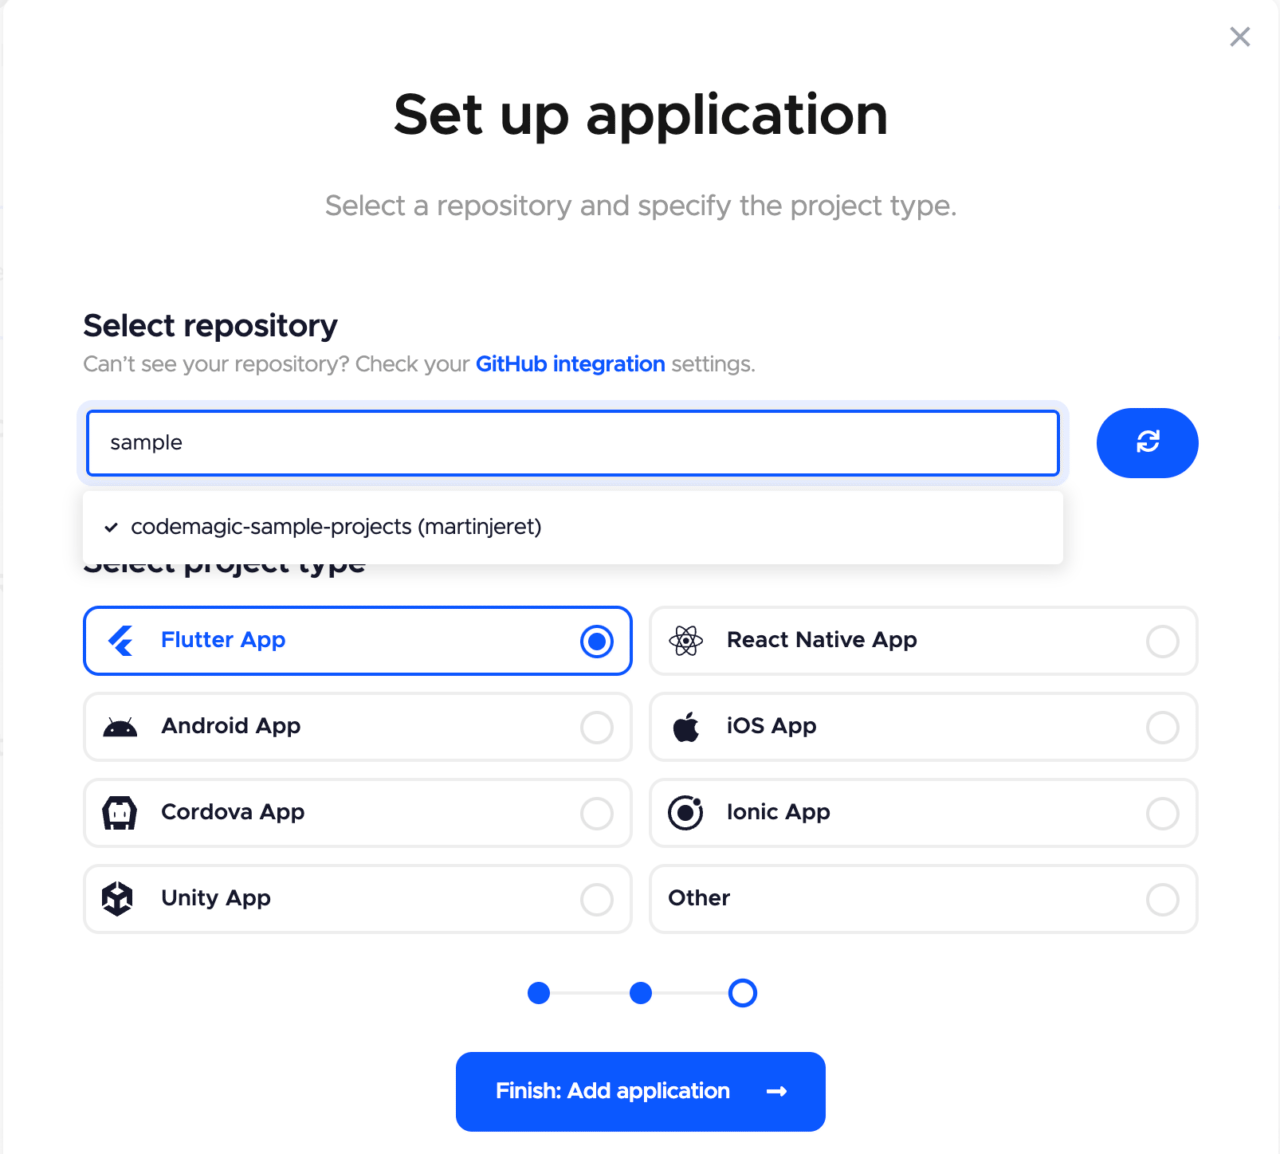
Adding application to Codemagic
After signup, you can connect your repository by clicking Add application button.
Documentation link. If the repositroy is self-hosted or behind a firewall see the documentation here.
Run your first build
Let's try to run a build and print "My first green build!"
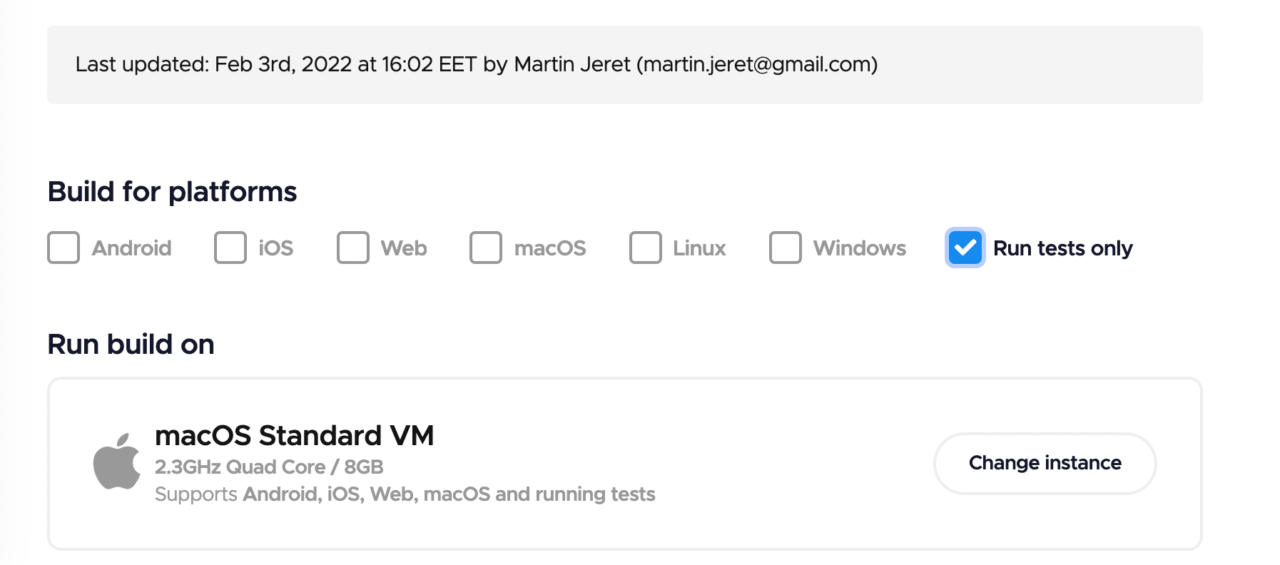
- Open the Flutter workflow editor and select Run tests only.
- Make sure tests are disabled in the Tests section.
- Open the + button after the Distribution section and write
#!/bin/sh

echo "My first green build!"
- Save changes.
- Start the build.

Alas... the build has failed. The error message is saying that there is no pubspec.yaml file in the root of the cloned repository. This is true, because it is a monorepo. How do we tell Codemagic which path to use for the working directory?
- Open the workflow editor.
- Go to the Build section and select the Flutter demo project in the Project path field.

- Save changes.
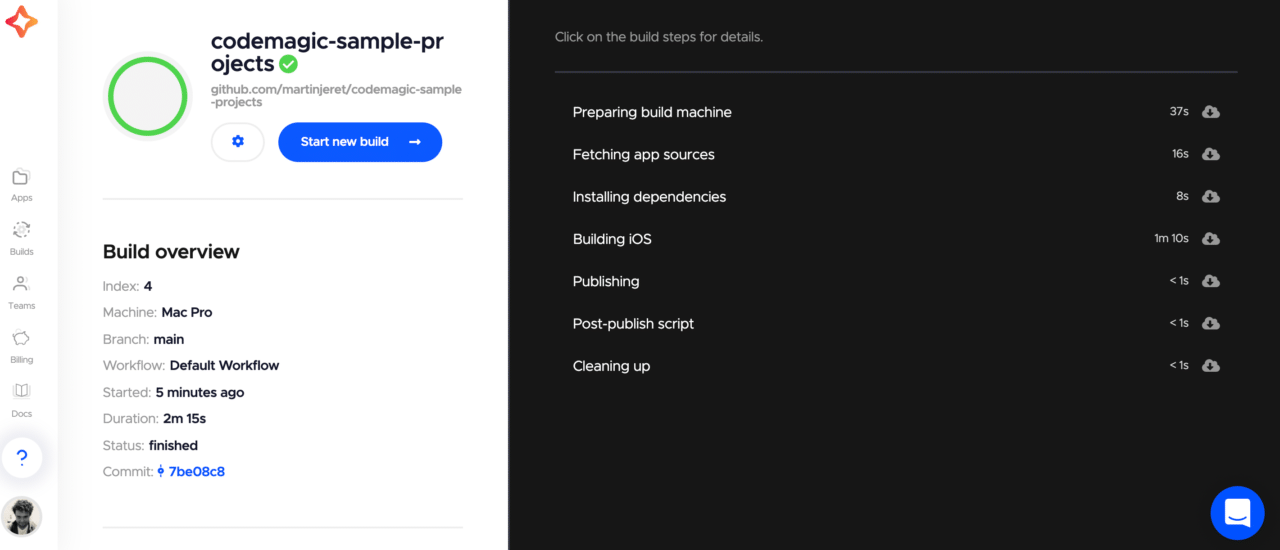
- Start the build.

Success!
Building the iOS project
Now that you have made your first green build, let's try to build the iOS project.
- Open the workflow editor.
- Choose iOS as the build platform.
- In the Build section, choose the Xcode version, CocoaPods and Flutter version you would like to use.
- Save settings.
- Start the build.
- Cross your fingers.
At the time of writing this article (Feb 3 2022), we used Xcode 13.2.1 and Flutter 2.8.1
If you are following this guide on your own application, then you may experience another failed build.
One common issue that we have seen is if you have never built the iOS project before is generating the Podfile or making a small change in Xcode graphical user interface (GUI). You can remote access the Codemagic macOS virtual machine and initialize a new file and push the changes to your repository. Once you are connected, run these commands from the terminal. This is how you could initialize pods for example.
cd iOS
pod init
gh auth login --with-token YOUR_GITHUB_PAT_TOKEN
git add .
git commit -m "Added Podfile"
git push
Please refer to the docs to see how to use remote access here
In order to push the changes to your repo, you need to authenticate yourself in your git provider. This is necessary because Codemagic VM only has read access to the GitHub repo. In order to authenticate with GitHub, you need to use your GitHub personal access token. See how to generate the token from https://github.com/settings/tokens.
You are now one step closer to getting the .ipa file!
.ipa file
The .ipa is a binary that you can run on a physical device similar to an .apk for Android. We cannot produce an .ipa binary on anything other than macOS. The way to overcome the obstacle will be to use a continuous integration and delivery service with macOS environment. We will need to set up our Codemagic CI/CD to be able to do code signing with Xcode and build the .ipa binary and later publish it to App Store Connect.
Preparing your iOS project for code signing on your local machine
Much like how you need to configure Gradle to use relative paths instead of absolute paths in order to function in a CI/CD environment, we need to make some changes to our iOS project as well.
Register your bundle id in Apple Developer Portal by going to https://developer.apple.com/account/resources/identifiers/list.
Create an app record in https://appstoreconnect.apple.com/apps and use the bundle id you had just created.
Open your iOS project in an editor and open the
project.pbxprojfile and set the applicationPRODUCT_BUNDLE_IDENTIFIERto the bundle id you had just created. This is mentioned in multiple places in the project, so make sure to change it everywhere. You can edit the file without a Mac.Bonus points: set up webhooks for automatic build triggering in Codemagic. by opening the workflow editor and setting the build trigger to build on push to master.
From your local machine terminal, save changes you had made to the
project.pbxprojfile and push changes to master in your repository. If you had already configured webhooks, you should also see a Codemagic build fire off from this push.
If you are using flavors, we have covered this case in a separate post here and a sample project is available on GitHub here
If you are using some Google services like Firebase, then you will need to access the virtual machine remotely via VNC and add the GoogleService-info.plist file to the iOS project via Xcode. There is an article about adding Firebase to your iOS project available on our blog here.
Getting started with iOS code signing
Judging by the number of questions related to iOS code signing on Stackoverflow, many developers struggle with iOS code signing. We understand that setting up code signing can be a headache, especially when you're trying to get it to work in a CI/CD environment without a Mac.
In order to code sign iOS apps, you need an Apple developer account (one of the requirements mentioned in the beginning), a development and a distribution certificate, your app ID and the matching provisioning profiles.
After WWDC 2019, it became possible to use the App Store Connect API in order to generate these signing files. We have built our own CLI tools on top of the API and Codemagic uses these under the hood to make code signing and publishing easier. The CLI tools are open source on GitHub.
Setting up App Store Connect integration on Codemagic
Now that you have successfully built the iOS project and set up your iOS project for code signing, let's enable iOS code signing on Codemagic as well.
We are going to be using the App Store Connect integration in order to do this. This means you need to create an API key on Apple Developer Portal.
- Open the workflow editor and go to Distribution > iOS code signing.
- Follow the prompt to set up App Store Connect integration.
- Go to Apple Developer portal > Users and Access.
- Go to the Keys section and create an App Store Connect API key, then upload it to Codemagic to authenticate with the Apple Developer portal.
- Complete Codemagic App Store Connect integration.
We recommend creating a dedicated key for use in Codemagic. For automatic code signing, create the key with Developer role. To use the integration also for publishing to App Store Connect, the App Manager role is required. In this example we will be publishing to App Store Connect and will create the key with App Manager role.
- App Store Connect API key name is a name that helps you to distinguish the key in Codemagic.
- Issuer ID is an alphanumeric value above the table of API keys and identifies who created the authentication token.
- You can find the Key ID from the table of API keys.
- API key is the .p8 key file that can be downloaded from App Store Connect. Note that the key can be downloaded only once.
Link to documentation
Building the .ipa file and publishing to App Store Connect
Now that you have enabled the App Store Connect integration, you can use Codemagic to generate your code signing files (certificate and provisioning profile) and produce an .ipa.
- Open the workflow editor.
- Navigate to Distribution > iOS code signing.
- Select automatic code signing.
- Select your API key.
- Select the provisioning profile type as App Store.
- Select your bundle identifier.
- Save changes.
- Open the App Store Connect section and enable App Store Connect publishing; make sure to select the API key that we just created.
Kick off your new build.
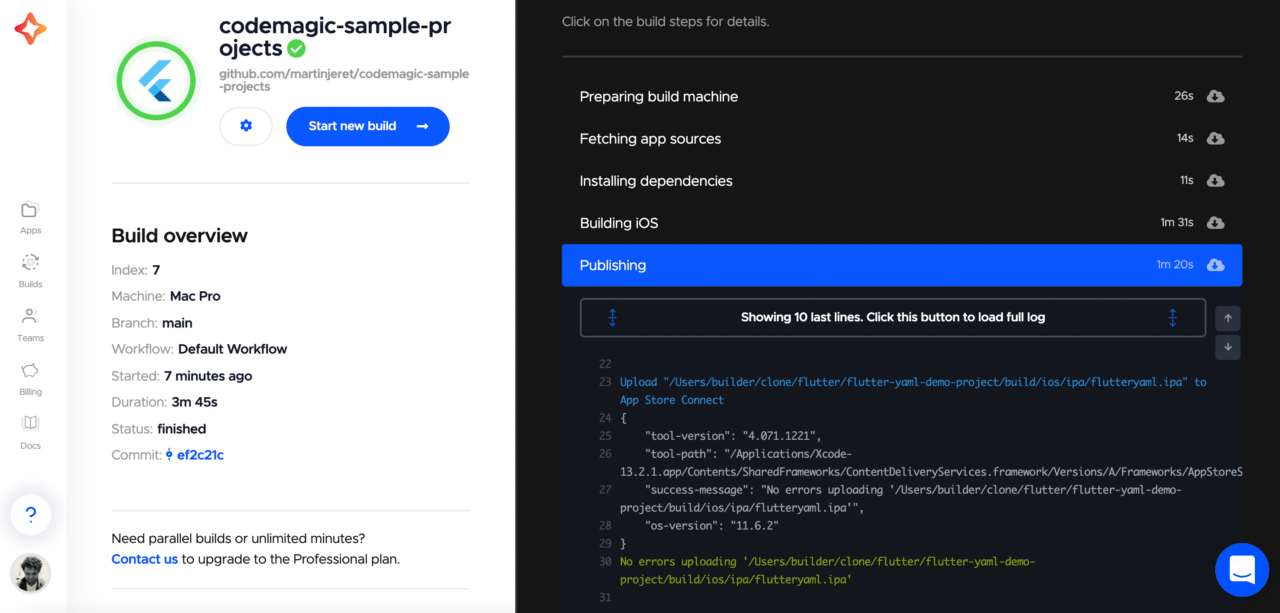
You may face additional errors as well.
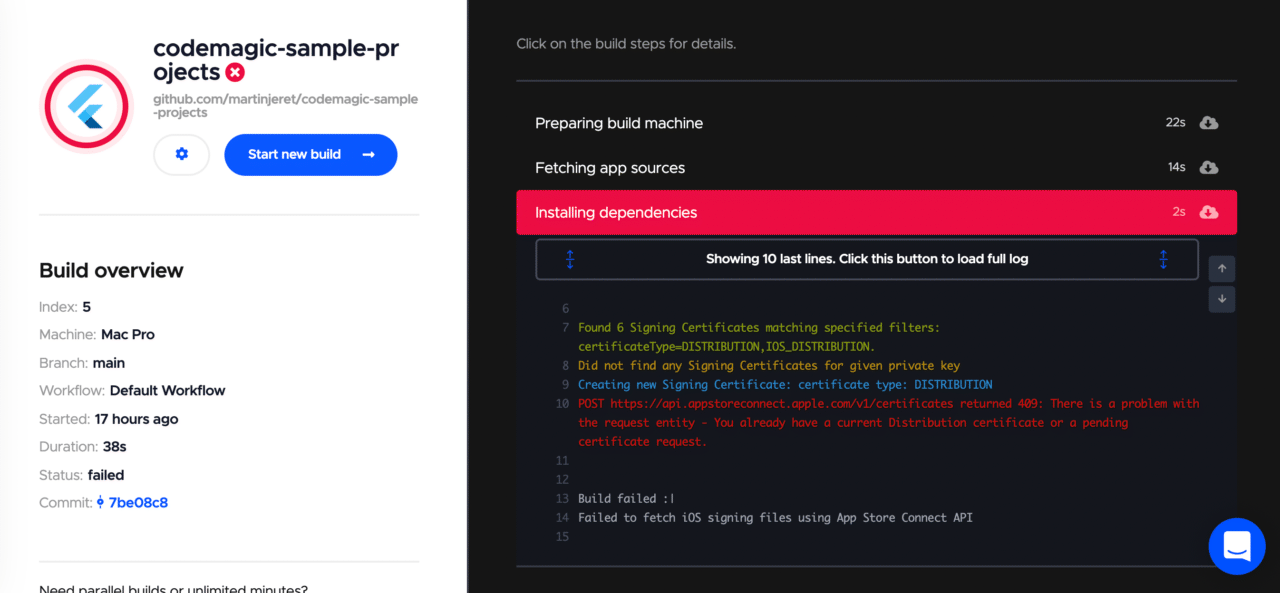
If the build fails because of an error message like this, it means you have too many existing distribution certificates on your account. You can remove the ones that are not used or choose manual code signing and upload your existing profiles and distribution certificates following the docs here
If you opt to use .yaml file configuration as opposed to the GUI workflow editor you can also specify the private key of the distribution certificate you are using. Link to documentation
Conclusion
You can use an SDK like Flutter to develop applications on many platforms. Codemagic CI/CD allows you to collaborate with your team and move quickly by building and releasing the applications automatically for all target platforms - either to the stores or for sharing in your team.
Make sure that you test the apps before release and that you have access to the native operating systems you are building for.