


There are lots of tutorials on how to make a slider in javascript and in numerous frameworks but, sometimes, we don't have to spend so much time going about adding a simple slider feature in our web page.
Hence, this tutorial will give you the quick and simple way to go about making a slider. Yeah...and we are going to be using a plugin for this.
We are going to be using the siema javascript plugin in making this slider and it is super easy and light weight
Lets start....
Open your code editor, you will create a html file, home.html
Next, a typical homepage html code should look like this. We'll write our css inside the head tag and some javascript
<!DOCTYPE html>
<html lang="en">
<head>
    <meta charset="UTF-8">
    <meta http-equiv="X-UA-Compatible" content="IE=edge">
    <meta name="viewport" content="width=device-width, initial-scale=1.0">
    <title>SLider Demo</title>
</head>
    <style>
       /*all css styles goes here*/
   </style>
<body>

    <div class="siema">
        <div>
        <img src="mypath/folder/image1.png" alt="slider
                 1">
        <img src="mypath/folder/image2.png" alt="slider
                 3">
        <img src="mypath/folder/image3.png" alt="slider
                 3">
        </div>
    </div>

</body>
</html>
Let me explain: we have a parent div with the class, siema, which we used as a wrapper/container for the images we'll be using for our slider. Very Important!!!
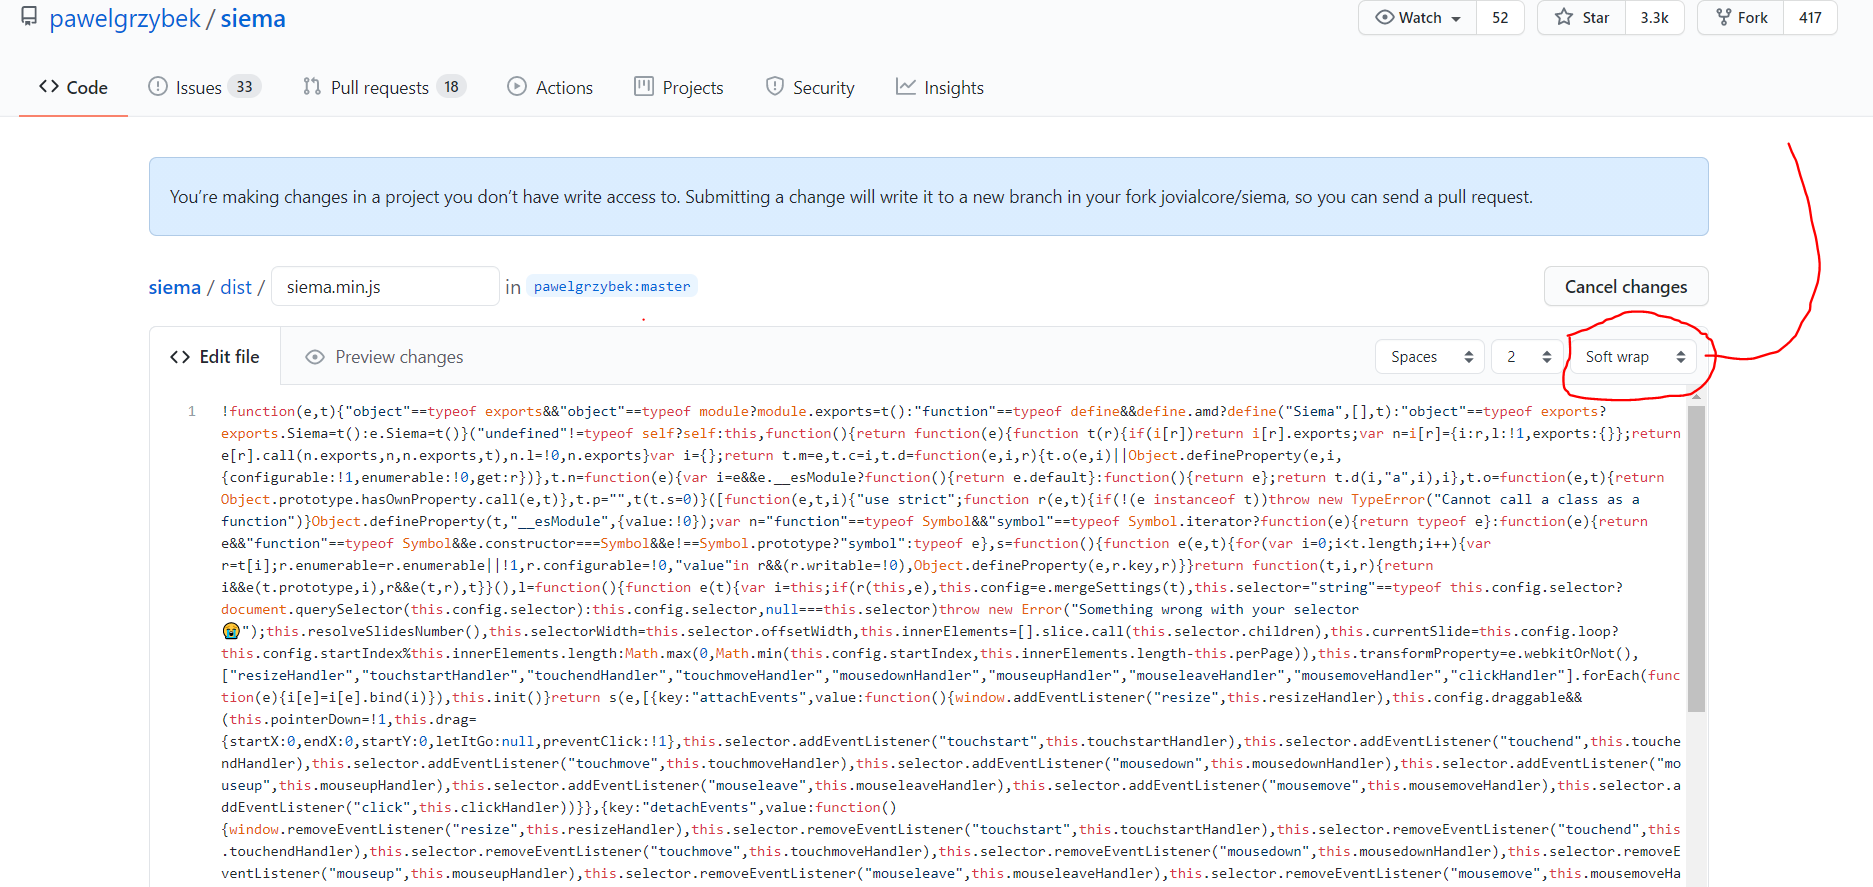
Next, we have to import the minified version of siema javascript plugin.
The minified version is hosted on github, so we navigate to the source code Link click on the area circled red from the picture below, select soft wrap. Next, highlight the entire code then copy...
Next, create a javascript file with the name, siema.minified.js
Paste the entire code you copied in this new js file, siema.minified.js
Next, link the siema.minified.js file path in your code editor via the source attribute for your script tag like so
<script src="siema.minified.js"> </script>
Note: make sure your add the file path depending on the location where you have siema.minifed.js
Lets write the main code:
<script src="siema.min.js"></script>
<script>
  new Siema();
</script>
This is how our full code will look like
<!DOCTYPE html>
<html lang="en">
<head>
    <meta charset="UTF-8">
    <meta http-equiv="X-UA-Compatible" content="IE=edge">
    <meta name="viewport" content="width=device-width, initial-scale=1.0">
    <title>SLider Demo</title>
</head>
<body>
         <div class="siema">
        <div>
        <img src="mypath/folder/image1.png" alt="slider
                 1">
        <img src="mypath/folder/image2.png" alt="slider
                 3">
        <img src="mypath/folder/image3.png" alt="slider
                 3">
        </div>
    </div>
</body>
<script src="siema.min.js"></script>
<script>
  new Siema();
</script>
</html>
At this point, our code will work but we want to be able navigate from one slide to another. So to do that, we will have to add two navigation buttons, NEXT and PREV, in our home.html file
                    <button class="prev"> Previous </button>

                    <button class="next"> Next </button>
next, we add event listeners to the buttons, so that when the button is clicked, the sliders shift either left (prev) or (right) respectively
document.querySelector('.prev').addEventListener('click', ()=> mySiema.prev())

document.querySelector('.next').addEventListener('click', ()=> mySiema.next())
Let me clear up: we are simply selecting the element with class prev and next respectively then add an event listener to them so that when any of the buttons is clicked, we return the siema functions mySiema.next() and mySiema.prev() respectively.
Typical result:

Say we want to have more than one image per slide display, we can specify the number of images we wish to have like so:
const mySiema = new Siema({

//we want3 images to be displayed instead of the default which is one
    perPage : 3
});
Responsiveness !!!
Finally, there will definitely be a situation where you want only 2 images to be displayed on mobile screens, to do this, you set a view port for different screen sizes : 445px, 600px, 1024px, etc
Here is an example:
const mySiema = new Siema({

    perPage : {
        400: 2, //2 images for 400px screen sizes
        1024:5  // 5 images for 1024px screen sizes
    }
});
Here is a full code
<!DOCTYPE html>
<html lang="en">
<head>
    <meta charset="UTF-8">
    <meta http-equiv="X-UA-Compatible" content="IE=edge">
    <meta name="viewport" content="width=device-width, initial-scale=1.0">
    <title>SLider Demo</title>
</head>
<body>
         <div class="siema">
         <div>
            <img src="mypath/folder/image1.png" alt="slider
                 1">
        <img src="mypath/folder/image2.png" alt="slider
                 3">
        <img src="mypath/folder/image3.png" alt="slider
                 3">
         </div>
    </div>
</body>
<script src="siema.min.js"></script>
<script>
const mySiema = new Siema({

perPage : {
    400: 2,
    1024:5
}
});
</script>
</html>
You can refer to the plugin documentation or other features like duration, animation (ease out), etc
Yoo...I hope this helped you get a slider done in 10mins though... (smiles) I tried to make this tutorial as short as possible and straight to the point.
I'm on twitter too.