


We are now hosting everything on render.com as it has pretty much the same feature set as what we are building for just a tad bit more $$$. The best advice we can give is to spend as much time as you can on the product itself even if it costs a bit more.
Welcome to the next part of the "Indie DevOps" series. This post will show you how to set up a database, scale-up storage as you need it, and back up your databases to DigitalOcean Spaces (or S3).
We will be using Dokku which supports the following databases via plugins:
- Postgres
- Redis
- MySQL
- MongoDB
- RabbitMQ
- MariaDB
- CouchDB
- Elasticsearch and more...
Provisioning The Server
We are going to use DigitalOcean for all of our server needs. You can go with another VPS provider, however, keep in mind that DigitalOcean has the "Volumes" feature which allows you to dynamically change the size of your volume (to expand as the database grows), and also comes with a One-Click Dokku installer.
First, create a new Dokku instance on DigitalOcean. Here is a supplementary guide on how to set that up. For this guide, we will call the droplet "DB".
Attach a Volume
Once your droplet has been created and set up, the first thing we need to do is set up an external volume. Our goal is to completely move the Dokku install to this volume so that we can scale the amount of storage we have without needing to pay extra for more vCPUs or RAM.
To do this, first go to the volumes section (from the sidebar) and create a new volume. Make sure to choose a reasonable size (in this case 10gb), and link it to the droplet you just created. Set the name to something memorable (in this case we'll just leave it default).
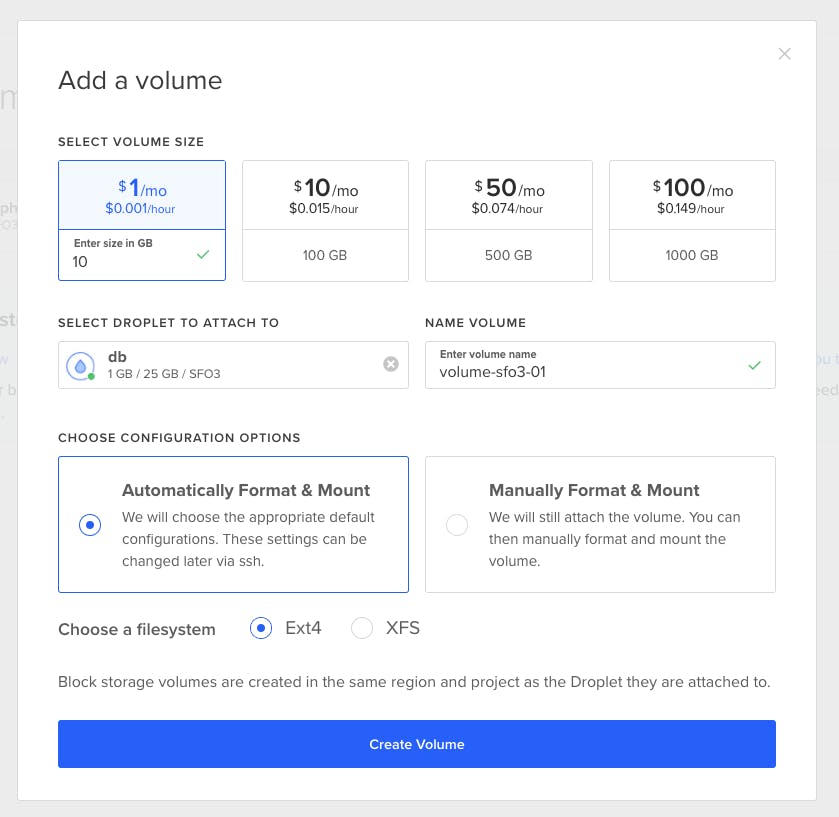
Once created, this volume should automatically mount anytime your server is restarted.
Moving to the External Volume
First things first, let's ssh into the server.
ssh root@$INSERT_IP_HERE
Now let's find our volume.
cd /mnt
ls
Here we should get an output like this:
root@db:/mnt# ls
volume_sfo3_01
This means that our volume is at /mnt/volume_sfo3_01. Now to move the Dokku install, follow this (up to date) guide. Wherever it mentions /mnt/volume, you should replace it with your volume directory. Skip the "Prepare the filesystem" step!
Setting up your Database
For the rest of the guide, we will be using postgres, however, the directions will be very similar for most of the other databases.
First, we need install the dokku-postgres plugin. If you need another DB, you can search for dokku-$INSERT_DB_HERE and you should be able to find the plugin.
Once you find your plugin, install it.
sudo dokku plugin:install github.com/dokku/dokku-postgres.git postgres
Then we need to create the database we want. In this case, we'll call it my-ludicrous-app.
dokku postgres:create my-ludicrous-app
Once created, we need to expose the DB so we can use it outside of this machine.
dokku postgres:expose my-ludicrous-app
Finally, let's figure out the external database URL and try to connect to it. First lets get the database information.
dokku postgres:info my-ludicrous-app
This should return something that looks like this:
root@db:~# dokku postgres:info my-ludicrous-app
=====> my-ludicrous-app postgres service information
       Config dir:          /var/lib/dokku/services/postgres/my-ludicrous-app/data
       Data dir:            /var/lib/dokku/services/postgres/my-ludicrous-app/data
       Dsn:                 postgres://postgres:3504054bc52b86e00688a28e9b4cd509@dokku-postgres-my-ludicrous-app:5432/my_ludicrous_app
       Exposed ports:       5432->20850
       Id:                  4ff7d5a259d8e412430d0e05d9135bfefc20813717d6384479b294e5155a79b5
       Internal ip:         172.17.0.2
       Links:               -
       Service root:        /var/lib/dokku/services/postgres/my-ludicrous-app
       Status:              running
       Version:             postgres:11.6
We need to construct the URL because the Dsn by itself is incorrect. First, we need to replace our internal hostname with either our external IP or domain name. So in this case we need to replace the dokku-postgres-my-ludicrous-app with either the droplet IP or db.example.com. Then we need to replace the port 5432 with the exposed port (in our case 20850). So with our example, the final database string should be:
postgres://postgres:3504054bc52b86e00688a28e9b4cd509@db.example.com:20850/my_ludicrous_app
So let try to connect with psql:
psql postgres://postgres:3504054bc52b86e00688a28e9b4cd509@161.35.239.164:20850/my_ludicrous_app
If you are able to connect then you've successfully set up your external DB server! You can repeat these steps as many times as you like with whichever DB software you want.
Backing Up
Backing up your data is super important, especially with production data. Thankfully, Dokku makes it super easy to back up your servers. In this case, we will back up once a day to DigitalOcean Spaces. You can easily tweak the frequency and also swap out DigitalOcean Spaces with any S3 compatible bucket.
Head over to DigitalOcean spaces and enable it. It should cost $5 for 250GB of storage. Inside your space, create a folder called my-ludicrous_app. This folder is where all of the backups will go.
Now to configure dokku, we will need to get access keys to the bucket. To do that, go to the "API" page under the "Account" section in the left sidebar. On the page, scroll down until you get to the "Spaces access keys" section which should look like this:

Generate a key pair and save this somewhere safe. Now in Dokku, configure the database to authenticate with S3 with the following command:
dokku postgres:backup-auth $DB_NAME $KEY $SECRET $REGION s3v4 $URL
$DB_NAME- In our casemy-ludicrous-app$KEY- The value on top when you generated the access key$SECRET- The value on the bottom when you generated the access key$REGION- The region of your bucket, e.gsfo2s3v4- Leave this unchanged$URL- The URL that is displayed when you're looking at your space, e.g.example.sfo2.digitaloceanspaces.com
Once you configure the backup, you can verify it works by creating a manual backup with the following command:
dokku postgres:backup my-ludicrous-app $BUCKET
where $BUCKET is the name of the folder/bucket you created in your space. If everything succeeds, you should see a .tgz file in your folder after a few minutes. Additionally, for extra security, you can set a encrpytion key for the backups. Just be sure not to lose the key.
postgres:backup-set-encryption my-ludicrous-app $PASSWORD
Finally, set we can tell Dokku to perform a backup every day (or more often) by passing it a crontab value like so:
dokku postgres:backup-schedule my-ludicrous-app "0 3 * * *" $BUCKET
Conclusion
That's it! You should have a fully working database server which has expandable storage and makes daily (or more often) backups for ~$10 a month!