


Last year at Flutter Live, the team announced to the world that they were working on bringing Flutter to the web. Earlier this week at Google IO, the Technical Preview of Flutter Web (formerly called Humming Bird) was made publicly available to developers for testing.
Today we are going to cover four things:
- A quick recap of Flutter
- What is Flutter Web
- Installation
- Web in practice (aka let’s build something using Flutter Web)
— Building a UI
— Custom Fonts
— Working with assets
— Responsiveness
Recap
First, the basics, if you are new to Flutter or you’re casually browsing the interwebs and just happen to read this article, you might be wondering what all the hype is about.
Flutter is UI toolkit developed by Google aimed at building high quality, native mobile applications in as little time as possible. Unlike similar frameworks like React Native or Ionic, a compiled Flutter app contains no interpreted code or WebView, all code is compiled to native binary for the platform you are building on. This is all possible thanks to Dart, the language used by Flutter.
Unlike Javascript, Dart is a statically typed, class-based language which is able to compile Just in Time (JIT) or Ahead of Time (AOT). This behavior allows for one of Flutter signature features, Hot Reload…also known as sub-second stateful reload of your running app. If you are coming from a language like C#, Java or even Javascript, the syntax of Dart should feel very similar to you.
 Smooth scrolling from Reflectly, see the full article here
Flutter Web
As you might’ve guessed from the title, Flutter has expanded from being able to only run on Android and iOS. Today, Flutter is being developed to run on Windows, MacOS, Linux, Chrome OS, Smart displays and yes, even Web.
To understand how this is even possible, we need to take a look at Flutter architecture:
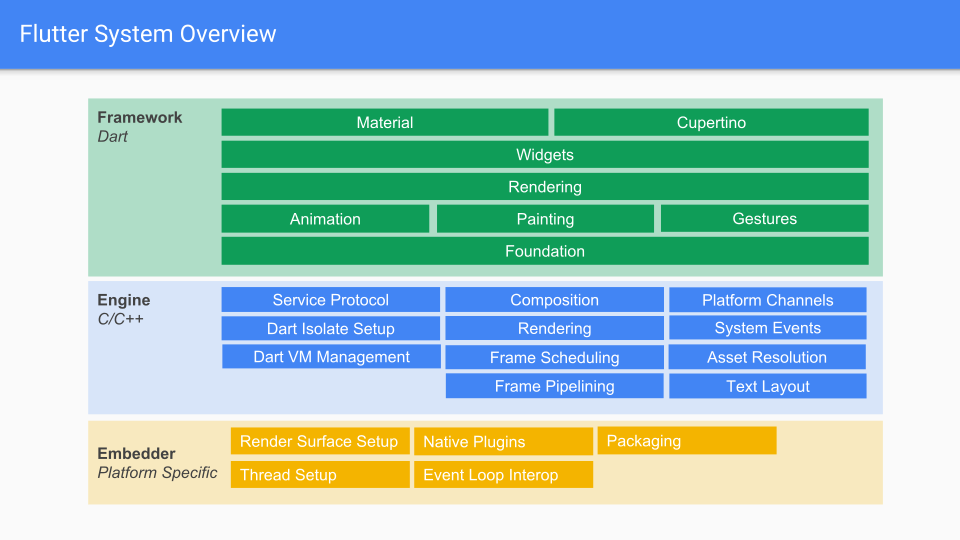 Flutter’s architecture
The top layer consists of the framework. This layer is purely written in Dart and contains libraries for Animation, Painting, Rendering, and Widgets, the core building blocks of every Flutter UI. The Material and Cupertino libraries are also contained in this layer. The Flutter code you write sits atop this layer and typically uses widgets from Material or Cupertino. If there is something you want that is not included in these libraries, you can simply move to a layer below to either widgets or rendering and built it yourself…it’s all open and Dart after all.
Below the Framework sits the engine, written in primarily C/C++ the engine contains three core libraries:
- Skia — An open source graphics engine used by Google Chrome, Android, Chrome Os and may more.
- Dart runtime
- Text — Engine used to render and layout text
The final layer we care about is the embedder. This layer is platform specific and is where the surface for rendering Flutter is configured. If you’re really adventurous, you can check out this article on building a custom Flutter embedder for a Raspberry Pi.
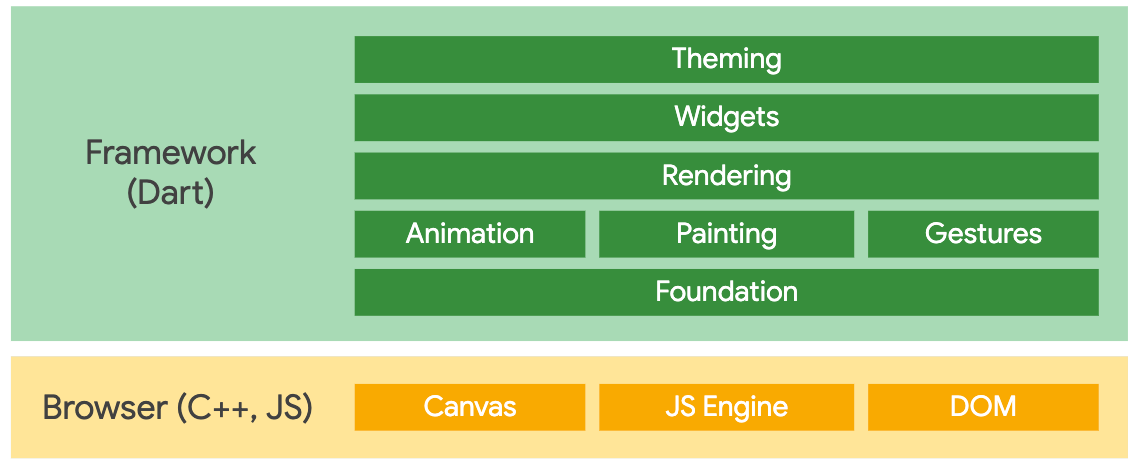
Flutter Web Architecture
Before we go any further, it is worth mentioning that the project is in the very early stages of development, plugins are not yet supported on web, performance might feel slow at times, not all of the Flutter APIs are supported (the team plans to support all of the Flutter API eventually) and full desktop interaction is not complete. As the project matures and these issues are resolved, I may write a follow-up article.
Bringing Flutter to the Web posed the interesting challenge of replacing the existing Flutter engine since it wasn’t compatible with compiling to the web. Hence a tweaked version of the Flutter engine called “flutter_web” was born. As the project becomes more stable, it will eventually be merged back into the main Flutter repo.
Since only the engine and layers under the Framework needs to be changed and be re-implemented, the core Flutter API remains mostly unchanged so it is entirely possible to port the UI from your Android/IOS Flutter app to the Web.
The current implantation re-implements the Dart UI layer with bindings to the DOM and HTML5 Canvas instead of directly using Skia (Since most browsers use Skia, the end result is identical to what you would see on mobile Flutter see here for Skia usages). This layer is then compiled to JavaScript, something Dart is more than capable of doing with its Dart2Js (production) compiler. Elements which can’t be represented using DOM elements are drawn using the Canvas.
Installation
To use Flutter web there are a few prerequisites:
- Your Flutter version needs to be
1.5.4and higher - Version 3.0 of the Flutter plugin
Let’s start with the Flutter upgrade, for this example, I am going to be on channel master. Run the following line in your terminal:
flutter channel master && flutter upgrade
Now run flutter doctor and make sure you're on a version higher than 1.5.4:
Doctor summary (to see all details, run flutter doctor -v):
[√] Flutter (Channel master, v1.5.9-pre.174, on Microsoft Windows [Version 10.0.17763.475], locale en-US)

[√] Android toolchain - develop for Android devices (Android SDK version 28.0.3)
[!] Android Studio (version 3.3)
    X Flutter plugin not installed; this adds Flutter specific functionality.
    X Dart plugin not installed; this adds Dart specific functionality.
[√] IntelliJ IDEA Ultimate Edition (version 2018.3)
[√] VS Code, 64-bit edition (version 1.33.1)
[!] Connected device
    ! No devices available

! Doctor found issues in 2 categories.
Next, we need to add .pub-cache/bin to our PATH since we will be installing a global pub package:
If you are on Windows add the following line to your PATH:
C:\Users\<your-username>\AppData\Roaming\Pub\Cache\bin
MacOS/Linux add:
$HOME/.pub-cache/bin
With our cache directory successfully added to our PATH, we can now move on to installing webdev, a package which provides the build tools for Flutter on Web:
flutter packages pub global activate webdev
Once it is installed, try running webdev --help from the command line to make sure everything is okay:
C:\Users\nash>webdev --help
A tool to develop Dart web projects.

Usage: webdev <command> [arguments]

Global options:
-h, --help       Print this usage information.
    --version    Prints the version of webdev.

Available commands:
  build   Run builders to build a package.
  help    Display help information for webdev.
  serve   Run a local web development server and a file system watcher that rebuilds on changes.
Finally, update your IDE’s extensions then create a new Flutter project, this time selecting “New Flutter Web” from the options. This will generate the necessary files to build and run your project.
If we look at the dependencies, we can see we have two dependencies, flutter_web and flutter_web_ui. Both of these references the repos found on GitHub. The list of dev dependencies is also very small, only containing compilers, runners and pedantic, a package for static analysis.
name: <project_name>
description: An app built using Flutter for web

environment:
  # You must be using Flutter >=1.5.0 or Dart >=2.3.0
  sdk: '>=2.3.0-dev.0.1 <3.0.0'

dependencies:
  flutter_web: any
  flutter_web_ui: any

dev_dependencies:
  build_runner: ^1.4.0
  build_web_compilers: ^2.0.0
  pedantic: ^1.0.0

dependency_overrides:
  flutter_web:
    git:
      url: github.com/flutter/flutter_web
      path: packages/flutter_web
  flutter_web_ui:
    git:
      url: github.com/flutter/flutter_web
      path: packages/flutter_web_ui
With the theory out of the way, let’s actually build something and see Flutter Web in action.
Web in practice
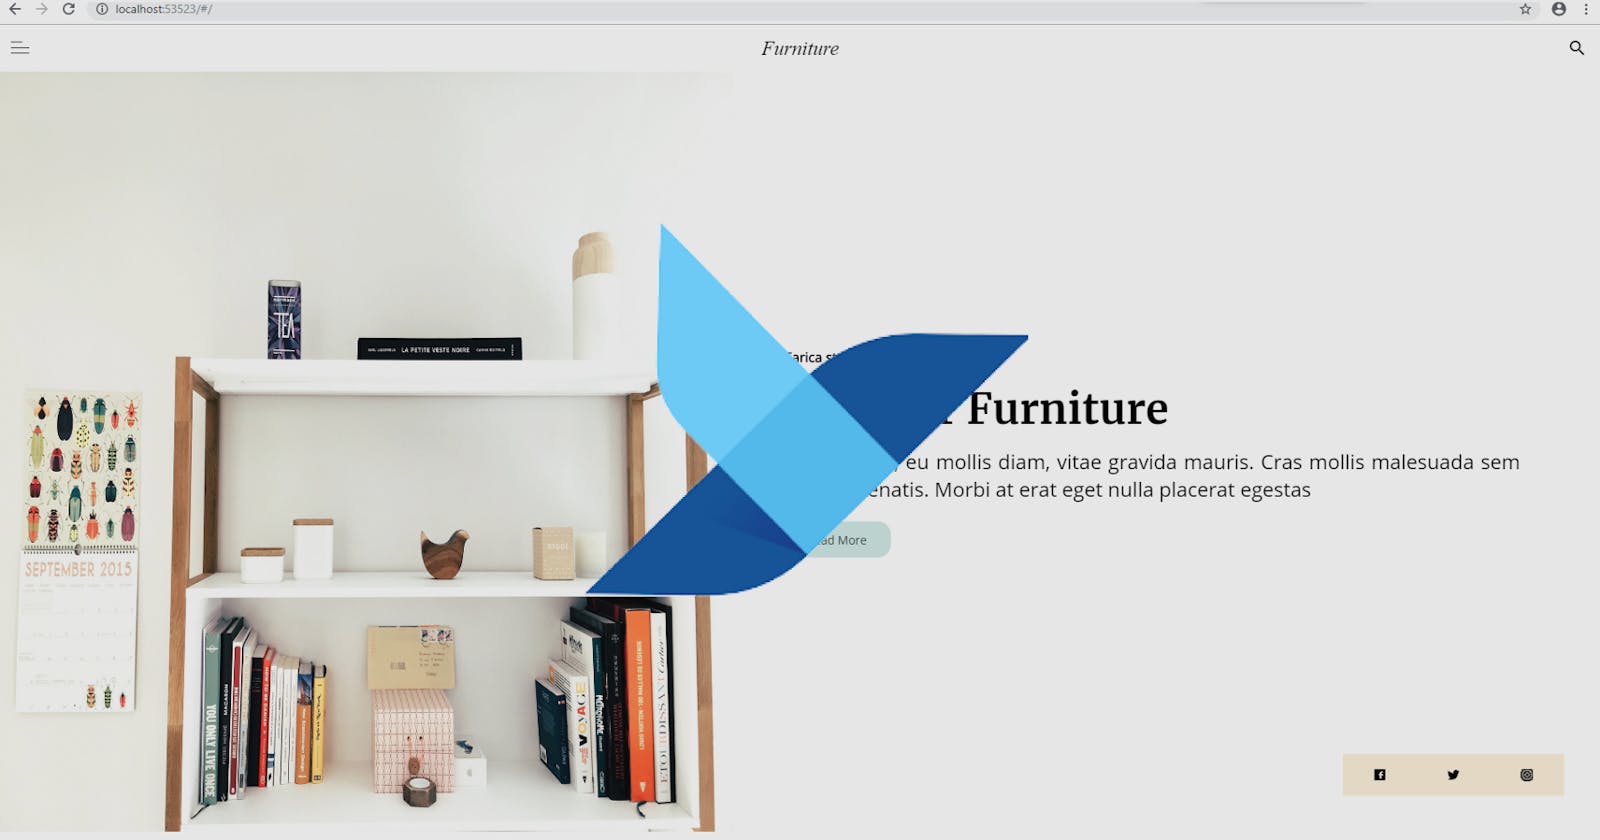
The website we are going to be building is going to be similar to this concept from Hulk Code
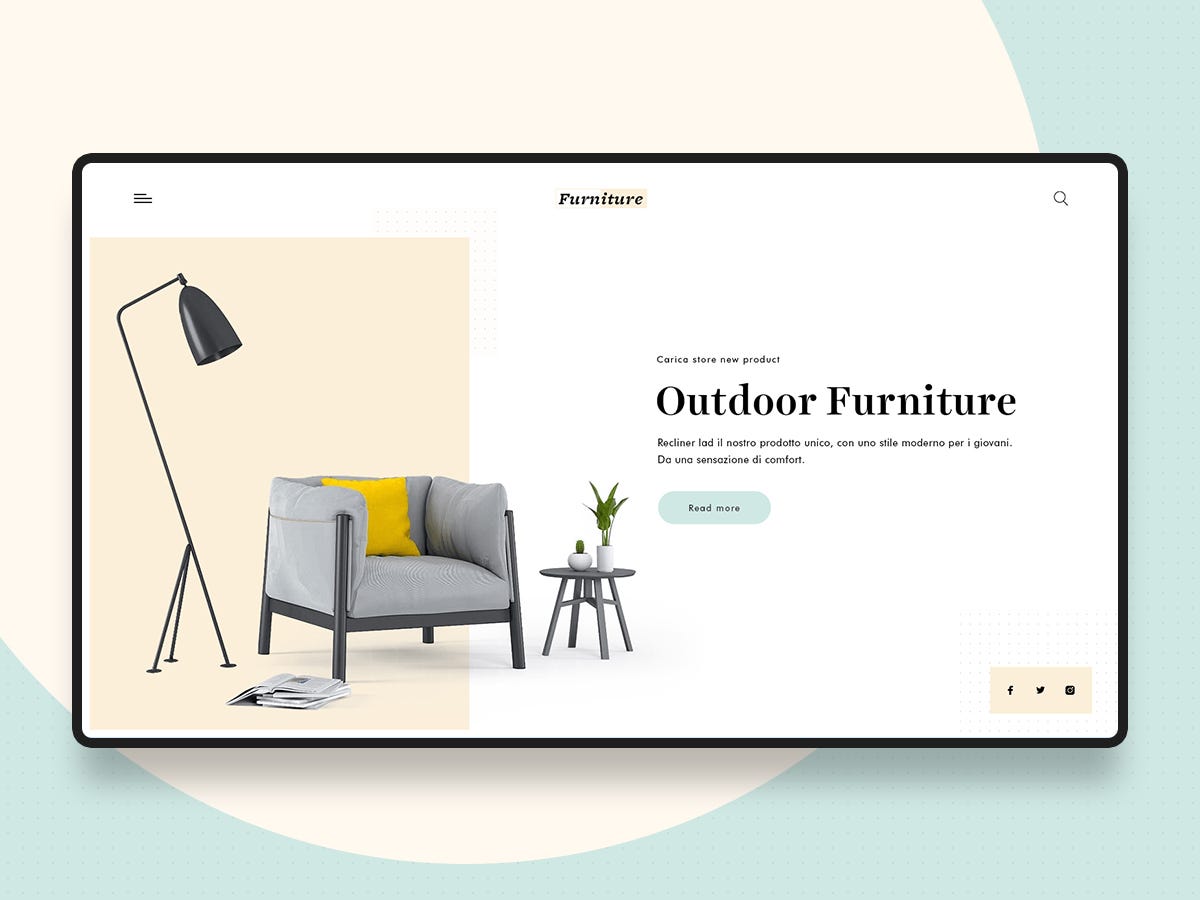
It is a simple yet beautiful design allows us to explore everything from layout to working with custom fonts and assets.
Create the project
First, create a new Flutter web project. If you’re using IntelliJ, create a new project using the Dart wizard (the option is not available using the Flutter menu). For VsCode users, create the project using the “Flutter: New Web Project” from the command palette ( Ctrl+Shift+P).
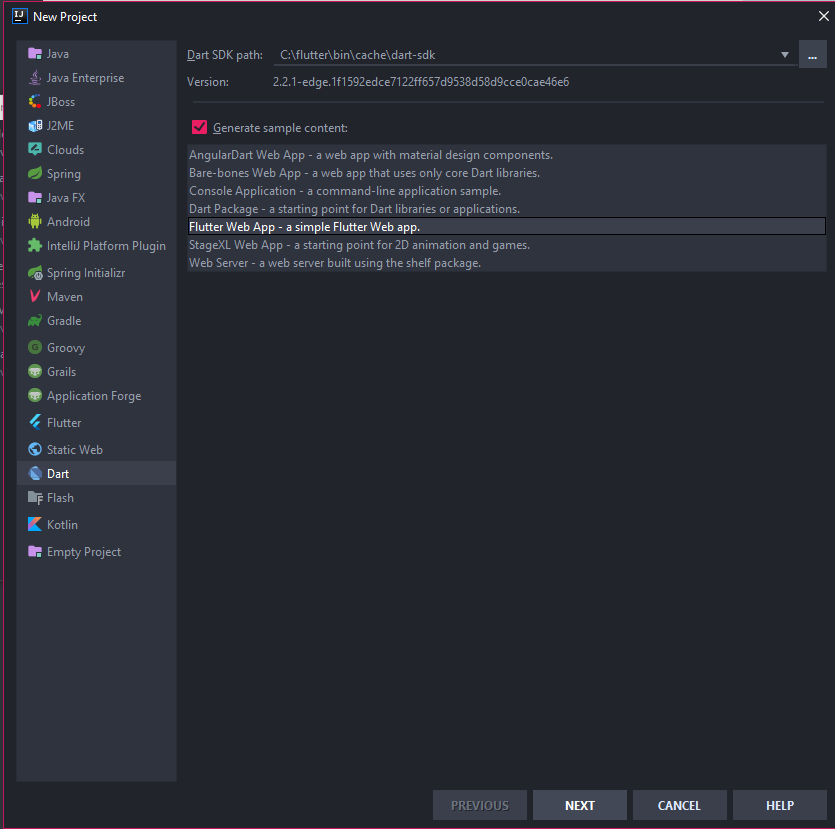 Project creation using IntelliJ
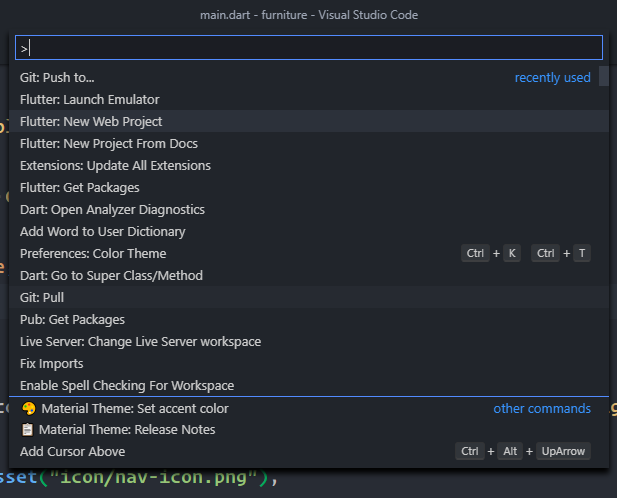 Project creation using Vscode
When our project is generated, you will notice it creates two folders and two files:
web — Contains index.html, the entry point of the project and main.dart (used for initializing Flutter Web then running your app). Assets are placed in this folder.
lib — Contains main.dart and is where most of your code will go
pubspec.yaml — Every pub package even regular Flutter projects contains a pubspec.yaml. It contains metadata and dependencies associated with your project.
analysis_options.yaml — Configures the lint rules for the project. If you would like to set your own lint options, see: https://dart.dev/guides/language/analysis-options
Open lib/main.dart to see the default code generated by the project. You can run the project by hitting F5 or "Debug -> Start Debugging" on Vscode or hitting run on the main toolbar of IntelliJ.
Step: 0: Adding our assets
If you are coming from Flutter on mobile, your first thought might be to create an assets folder in the root of the project directory, copy your files then add them to your pubspec.yaml. At the time of writing this, assets are handled a bit differently. First, we need to navigate to the web folder then create a new folder, assets.
You can download the assets need for this project from here: https://github.com/Nash0x7E2/furniture-flutter-web/releases/download/1.0/assets.zip
Unzip the folder and copy it to the web folder.
Looking inside the folder, you will notice everything is broken up into folders which is pretty normal. The black sheep in the herd “FontManifest.json” might be unfamiliar to most so let’s open this file and have a look at its contents.
[
    {
        "family": "MaterialIcons",
        "fonts": [
            {
                "asset": "fonts.gstatic.com/s/materialicons/v42/flUh…"
            }
        ]
    },
    {
        "family": "Merriweather",
        "fonts": [
            {
                "asset": "fonts/Merriweather-Bold.ttf"
            }
        ]
    },
    {
        "family": "Open Sans",
        "fonts": [
            {
                "asset": "fonts/OpenSans-Regular.ttf"
            }
        ]
    }
]
As you can see, the file is essentially an array of objects with each element being a different font family. The first font registered is the MaterialIcons font. This is necessary to use material icons in your project since unlike a regular Flutter project, you don't have the option to set use-material-icon: true. The other two entries in the file are for two fonts we are going to use in the project. If you would like to add more fonts to your project, simply follow the format or copy and edit one of the objects.
Step 1: Setup
Let’s start by opening lib/main.dart, removing all of the generated code and importing the material library from Flutter web:
import 'package:flutter_web/material.dart';
Note: We import from flutter_web instead of flutter. This is due to the fact that some API's are still not available. Like I mentioned at the start of this post, as development continues, it will eventually be merged back into the main Flutter repo.
Next, we need our main function for running our app in lib/main.dart.
void main() {
  runApp(
    MaterialApp(
      debugShowCheckedModeBanner: false,
      home: Furniture(),
    ),
  );
}
This function will be called by the file
web/main.dartafter the platform is initialized by the framework.
In the above code, we are setting up our app using runApp and MaterialApp. I am not going to explain too much about what's going on here since it is regular Flutter code. We are disabling the debug banner and setting the home screen to Furniture().
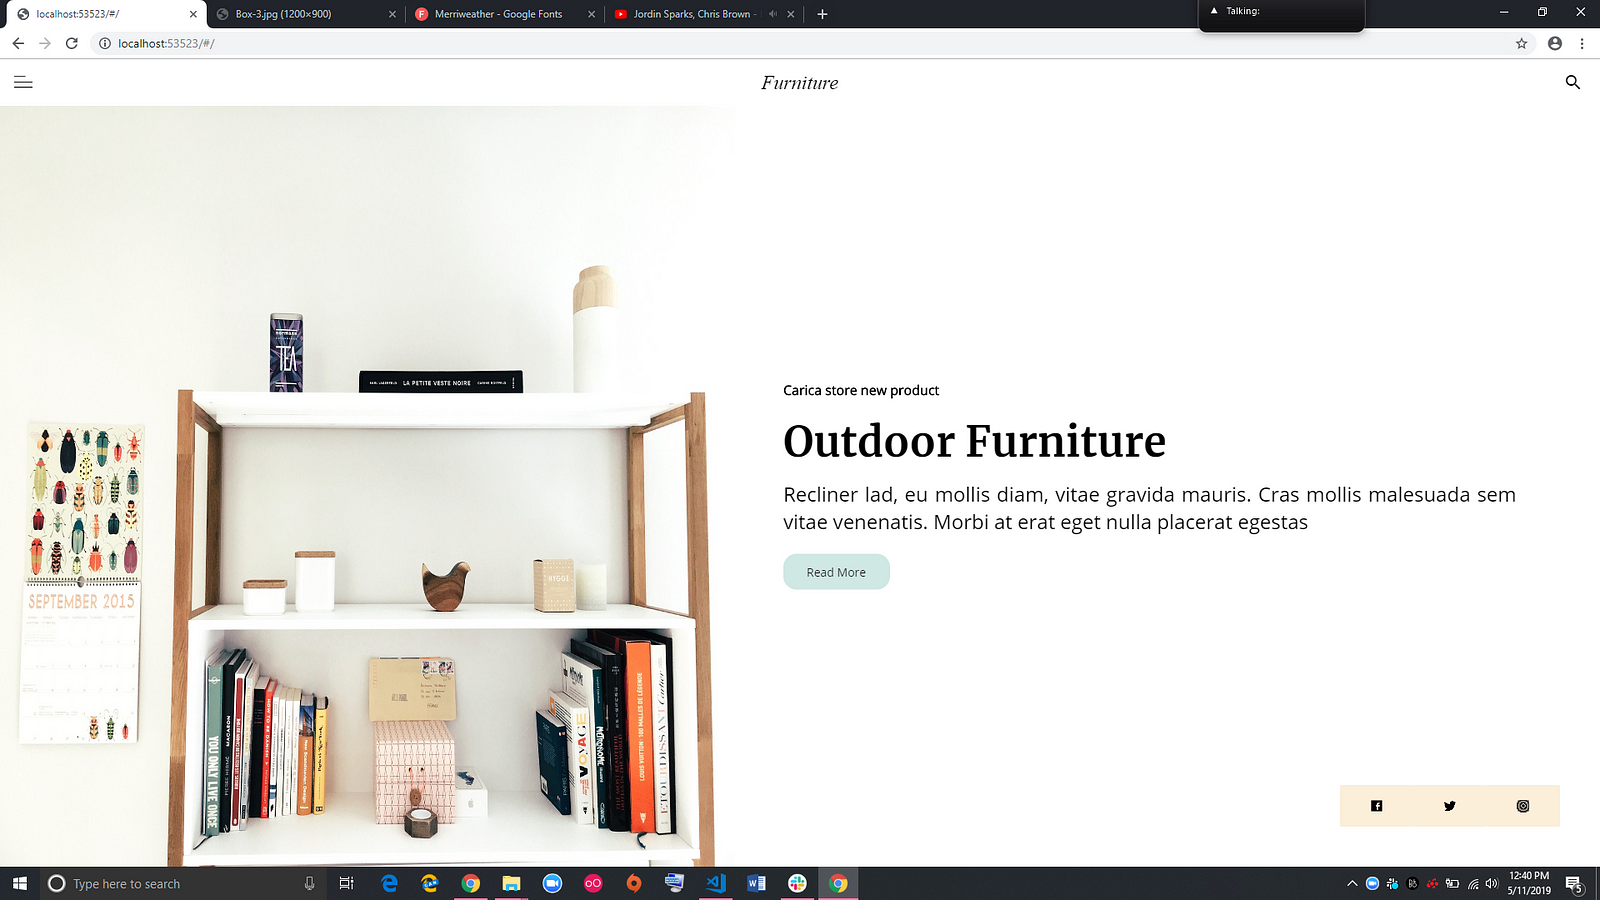
Step 2: Home Screen: App Bar
With our setup out of the way, let’s create the home screen.
If we look at the reference image, we notice a few things:
- The top bar is similar in structure to an
AppBar(it is a leading icon, center text, and a trailing search icon) - The actual body of the page has content stacked on top of each other. The social buttons in the bottom right “floats” about the image and text.
class Furniture extends StatelessWidget {
  @override
  Widget build(BuildContext context) {
    return Scaffold(
      backgroundColor: Colors.white,
      appBar: AppBar(
        backgroundColor: Colors.white,
        elevation: 0.0,
        centerTitle: true,
        title: Text(
          "Furniture",
          style:
              TextStyle(color: Colors.black, fontSize: 24.0, fontWeight: FontWeight.w500, fontStyle: FontStyle.italic),
        ),
        leading: Icon(Icons.account_circle),
        actions: <Widget>[
          Padding(
            padding: const EdgeInsets.symmetric(horizontal: 20.0),
            child: Icon(
              Icons.search,
              color: Colors.black,
            ),
          )
        ],
      ),
      body: Stack(
        children: [
            // Social Buttons
            // Body
        ],
      ),
    );
  }
The first can easily be translated to code. The snippet above creates a StatelessWidget with a Scaffold with the background color set to white. An AppBar is then added to the Scaffold. The elevation, background color and icons of the AppBar are all set. For the text, we center it by setting centerTitle: true on the AppBar then create a text widget and pass it the String "Furniture". Some basic styling is applied using TextStyle.
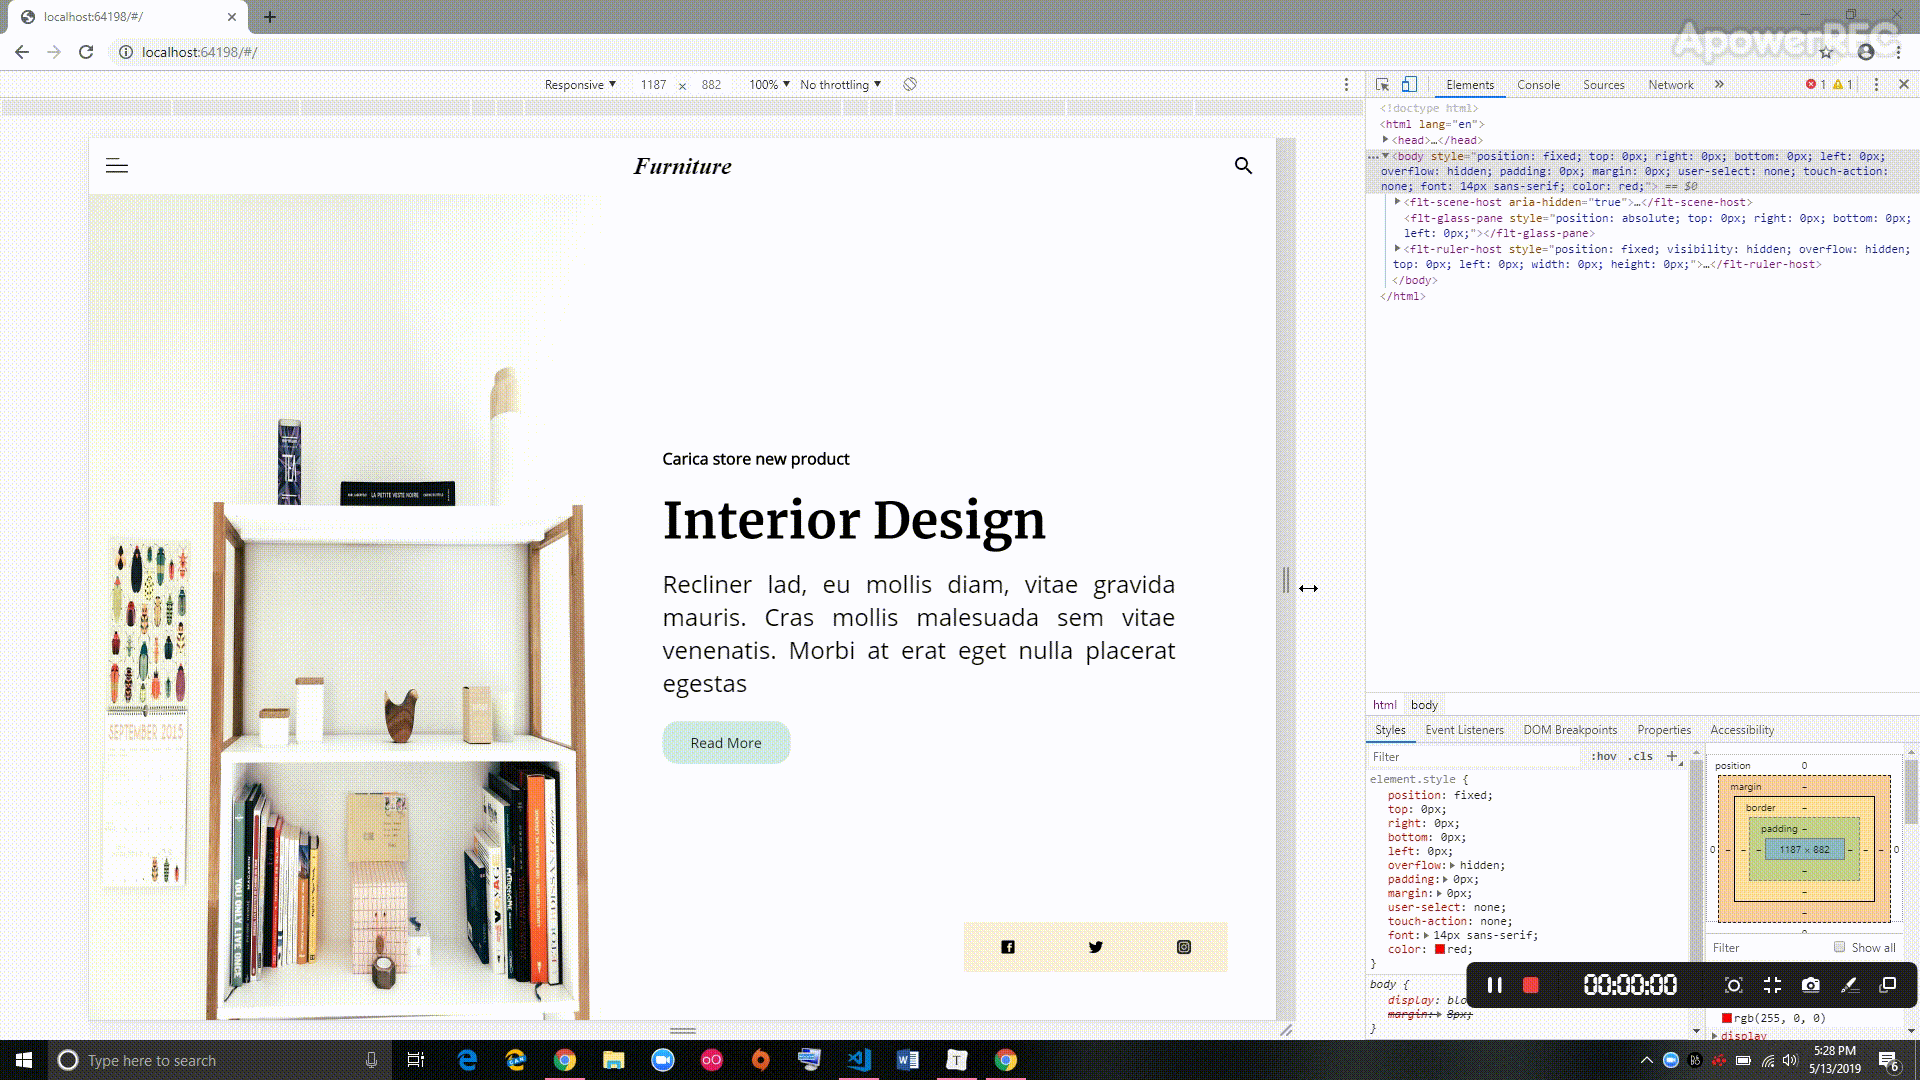
Running the above code looks fine except for the drawer icon. In its place, there is an account circle…wtf?!
Don’t be mad, you typed the code, after all, 😂 I intentionally added an Icon there as a placeholder since this is where we run into one of the behaviors that are unique to Flutter Web.
If you are thinking why not add the icon directly with an Image asset like:
Image.asset("../web/assets/icon/nav-icon.png"),
you would not be too far off from the solution but running the above code with a direct path will cause the app to crash.
To use assets in Flutter web, all paths are relative to the assets/ folder. So to add an image to our leading we would replace our icon with:
Image.asset("icon/nav-icon.png"),
Notice the icons path is icons/<file>, not assets/icon/<file>
Step 3: Body
You might look at the design and think the building the body of this site will take forever and it’s super complicated. But fear not, we’re going to build it in just a few lines of code.
Remove the comment // Body from our code and replace it with a new StatelessWidget named “Body”. This widget is going to contain our background image and column of text. Breaking up large build methods into smaller more manageable widgets is a great way to maintain code readability.
class Body extends StatelessWidget {
  const Body({Key key}) : super(key: key);

  @override
  Widget build(BuildContext context) {
    return Row(
      crossAxisAlignment: CrossAxisAlignment.stretch,
      mainAxisAlignment: MainAxisAlignment.spaceBetween,
      children: <Widget>[
        Expanded(
          flex: 1,
          child: Image.asset(
            "background-image.jpg",
            fit: BoxFit.fill,
          ),
        ),
        const SizedBox(width: 60.0),
        Expanded(
          child: Column(
            mainAxisAlignment: MainAxisAlignment.center,
            crossAxisAlignment: CrossAxisAlignment.start,
            children: <Widget>[
              Text(
                "Carica store new product",
                style: TextStyle(
                    color: Colors.black, fontWeight: FontWeight.w600, fontSize: 16.0, fontFamily: "Open Sans"),
              ),
              const SizedBox(height: 20.0),
              Text(
                "Interior Design",
                style: TextStyle(
                    color: Colors.black, fontWeight: FontWeight.w600, fontSize: 50.0, fontFamily: 'Merriweather'),
              ),
              const SizedBox(height: 14.0),
              Text(
                "Recliner lad, eu mollis diam, vitae gravida mauris. Cras mollis malesuada sem vitae venenatis. Morbi at erat eget nulla placerat egestas ",
                style: TextStyle(
                    color: Colors.black, fontWeight: FontWeight.w400, fontSize: 24.0, fontFamily: "Open Sans"),
                textAlign: TextAlign.justify,
              ),
              const SizedBox(height: 20.0),
              FlatButton(
                onPressed: () {},
                color: Color(0xFFCFE8E4),
                shape: RoundedRectangleBorder(
                  borderRadius: BorderRadius.circular(16.0),
                ),
                child: Padding(
                  padding: const EdgeInsets.all(12.0),
                  child: Text("Read More", style: TextStyle(fontFamily: "Open Sans")),
                ),
              ),
            ],
          ),
        ),
        const SizedBox(width: 100.0),
      ],
    );
  }
}
Since the image is aligned to the left of the text and button, it makes sense that both should be placed in a row. Expanded widgets are used to give the image and column which contains the text a flex value. This value is used to tell the widgets how they are to divide the available space. Since both have a Flex value of 1, space will be shared evenly between both widgets.
Notice we simply use the name of the image as the path. This is because our image is located in the root of the assets folder and not in a sub-directory. Remember all assets are relative to assets/.
To center align the text and button in the Column, MainAxisAlignment.center, is set as the alignment. The font family for the text uses the name we gave it in FontManifest.json.
Reloading our app now you’ll see that we’re almost finished, we have a background image with some text and a button to the right of it. You can even try resizing your browser windows and to observe how the image and text shirking as it is made smaller. Even though we did not write any code to handle this, it works as expected. In a later section, we’ll customize things even further so as the window width gets to the size of a mobile device, the layout changes.
The final piece of the puzzle is the social buttons. To create this, we need a Row of FlatButtons. Their child is going to be wrapped in a Center containing an Image.asset with the path to the appropriate asset image. We are also going to set the mainAxisSize to min since we do not want to Row to extend to the end of the screen. Notice we are creating a variable to set this size then exposing it via the constructor. We will use this in the responsive section of the tutorial.
To keep our main.dart file tidy, let’s move this widget into a separate file in widget/button_row.dart then import it.
class ButtonRow extends StatelessWidget {
  const ButtonRow({Key key, this.size = MainAxisSize.min}) : super(key: key);
  final MainAxisSize size;
  @override
  Widget build(BuildContext context) {
    return Row(
      mainAxisSize: size,
      mainAxisAlignment: MainAxisAlignment.spaceEvenly,
      children: <Widget>[
        FlatButton(
          onPressed: () {},
          color: Color(0XFFFBEFD9),
          child: Center(
            child: Image.asset(
              "social/facebook.png",
              height: 15.0,
            ),
          ),
        ),
        FlatButton(
          onPressed: () {},
          color: Color(0XFFFBEFD9),
          child: Center(
            child: Image.asset(
              "social/twitter.png",
              height: 15.0,
            ),
          ),
        ),
        FlatButton(
          onPressed: () {},
          color: Color(0XFFFBEFD9),
          child: Center(
            child: Image.asset(
              "social/instagram.png",
              height: 15.0,
            ),
          ),
        ),
      ],
    );
  }
}
Now, all we need to do is add our buttons to the Stack and wrap them in an Align with the alignment set to bottom right.
Align(
    alignment: Alignment.bottomRight,
    child: Padding(
        padding: const EdgeInsets.all(48.0),
        child: SizedBox(
            height: 50.0,
            child: ButtonRow(),
        ),
    ),
),
I added 48.0 of padding around our buttons so they don't align to the very edge of the screen. Reload the app and you should now have a complete landing page made entirely using Flutter Web!
Responsive Layout
Okay, we’ve made it pretty far and we have a working website but let’s take things one step further and make it so when the user resized their window past a certain point, the layout changes.
If you are a web developer, the first thing that comes to mind is MediaQuery. In the land of Flutter, there is a MediaQuery class which gives us access to properties such as the width and height of the screen. For our example, we are going to utilize the shortestSide property.
As a quick refresher, in Flutter, constraints are passed down the tree to widgets. We can use a layout builder to access the constraints being passed then check to see whether there are larger/smaller than a size we care about. If you are unfamiliar with Flutter’s rendering pipeline, I would highly recommend you check out these two talks:
To help with our quest to make our page responsive, I created this helper widget in utils/responsive_layout.dart. We use a MediaQuery to get the size of the shortest size. The size is then compared to our breakpoints and the appropriate widget is displayed.
Note: The previous implementation of
**ResponsiveLayout**used a LayoutBuilder. While this worked for our specific use case, it was not scalable since the constraints are passed from the parent. Meaning it would only work for root widgets.
Back in main.dart, let's wrap our Stack with the newly created ResponsiveLayout:
import 'package:flutter_web/material.dart';

class ResponsiveLayout extends StatelessWidget {
  const ResponsiveLayout({
    Key key,
    @required this.largeChild,
    this.mediumChild,
    this.smallChild,
    this.largeBreakPoint = 1200.0,
    this.mediumBreakPoint = 800.0,
  })  : assert(largeChild != null),
        super(key: key);


  final Widget largeChild;

  final Widget mediumChild;

  final Widget smallChild;

  final double largeBreakPoint;

  final double mediumBreakPoint;

  @override
  Widget build(BuildContext context) {
    final smallestWidth = MediaQuery.of(context).size.shortestSide;
    if (smallestWidth >= largeBreakPoint) {
      return largeChild;
    } else if (smallestWidth >= mediumBreakPoint) {
      return mediumChild ?? largeChild;
    } else {
      return smallChild ?? mediumChild ?? largeChild;
    }
  }
}
Next, duplicate Body and rename the copy to SmallBody. We are going to keep things relatively simple and change our current layout from a Row to a Column.
In SmallBody, change the Row to a Column and remove the mainAxisAlignment and crossAxisAlignment since they are no longer needed:
   body: ResponsiveLayout(
        largeChild: Stack(
          children: [
            Align(
              alignment: Alignment.bottomRight,
              child: Padding(
                padding: const EdgeInsets.all(48.0),
                child: SizedBox(
                  height: 50.0,
                  child: ButtonRow(),
                ),
              ),
            ),
            Body(),
          ],
        ),
        smallChild: SmallBody(),
      ),
Now add some padding to the Column containing the text and change its Flex value to two:
 Column(
   children: <Widget>[
      Expanded(
      flex: 3,
      child: Image.asset(
         "background-image.jpg",
Great! Let’s add our social buttons to the page. Under the Expanded containing the text and button, add another leaving the Flex to one. Set the child to Align with the alignment bottom center. Also add a container with the color of Color(0XFFFBEFD9), to match the color of the FlatButttons.
  const SizedBox(height: 60.0),
  Expanded(
    flex: 2,
    child: Padding(
      padding: const EdgeInsets.symmetric(horizontal: 12.0),
      child: Column(
        crossAxisAlignment: CrossAxisAlignment.start,
        children: <Widget>[
          const SizedBox(height: 40.0),
          Text(
            "Carica store new product",
            style: TextStyle(
                color: Colors.black,
                fontWeight: FontWeight.w600,
                fontSize: 16.0,
                fontFamily: "Open Sans"),
          ),
                          ...
Okay, reload your page and try resizing your browser window, if all went as planned, as the screen gets smaller than 800, the layout should change to the one we just built.
To add some final polish, I am going to wrap our SmallBody in a SingleChildScrollView and change some of the font sizes to better suit a smaller screen. Feel free to play around at this point and find something that works best for you.
 final product
Conclusion
Like I mentioned at the start of this article, flutter_web is still under development so there are still a lot of things missing. That said, it is surprisingly easy to get up and running with Flutter web. If you have an existing project with little dependencies, try porting it to the web. Besides the caveats of having to change our assets directory and register your fonts, the process is relatively simple.
For those who managed to make it to the end, thank you for sticking around, I know this is a very long read. I hope you learned something new about Flutter web and how it differs from Flutter. If you have any questions or spot any bugs please feel free to leave a comment or reach out to me on Twitter (https://twitter.com/Nash0x7E2).
The full source code for the project can be found on my GitHub here and a deployed version of the site can be found here.
--Nash