
Installing Jenkins On Linux Server (using Aws Ec2 Ubuntu 18.04) Second Month Into The Shecodeafrica Cloud School
Installing Jenkins on AWS EC2 (Ubuntu 18.04)


This is the second month of the SheCodeAfrica Cloud School Program and one of our tasks was installing Jenkins on Ubuntu 18 and CI/CD with Jenkins.
Jenkins is a very popular CI/CD tool and being a beginner in Jenkins and CI/CD in general, setting it up for the first time was a bit frustrating. Follow along for an easy way to set up a fresh installation of Jenkins on a new EC2 instance.
For this learning, we shall be using EC2 (t2.micro) for the deployment of the Jenkins server on a custom port.
Prerequisites
Since we are going to install Jenkins on an AWS EC2 instance, you should have an AWS account set up before following along.
We need to install Java on the EC2 instance since Jenkins needs java to run.
Getting Started
Log in to the Amazon AWS console and launch a new EC2 instance. We will be using the Ubuntu 18.04 LTS for our EC2 instance.
 Click on Launch Instance to start a new EC2 instance
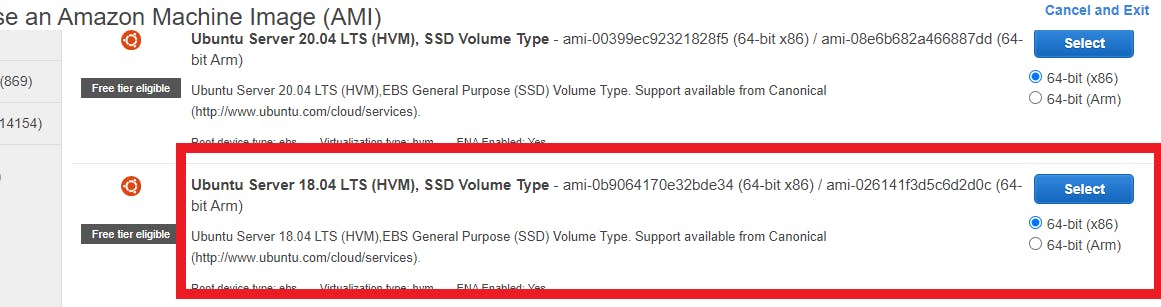 Select Ubuntu Server 18.04 LTS
 Choose your instance type
Choose your instance type as shown in the image above and then you can either Review and Launch for a quick start or for a greater control you can choose to Configure Instance Details.
Once the instance is set up and running (as shown in the image below), you need to connect to the server. On a Windows PC you use PUTTY (PuTTY is a free implementation of SSH (and telnet) for PCs running Microsoft Windows it also includes an xterm terminal emulator) or if you are on a Linux or a Mac then head on over to the terminal to ssh into your latest EC2 instance.

Installing JAVA 8 (I read online that the current Jenkins does not support JAVA 10 and 11)
Remember we said we need to install JAVA before we can install Jenkins to the server, follow the steps below to install JAVA :
Step 1 – Run the commands below one by one to install Java 8
$ sudo apt update

$ sudo apt install openjdk-8-jdk openjdk-8-jre
Step 2 – Verify Java Installation, you have successfully installed Java 8 on your system. Let’s verify the installed and current active version using the following command.
$ java -version

openjdk version "1.8.0_252"
OpenJDK Runtime Environment (build 1.8.0_252-8u252-b09-1ubuntu1-b09)
OpenJDK 64-Bit Server VM (build 25.252-b09, mixed mode)
Step 3 – Setup JAVA_HOME and JRE_HOME Variable, you can set these variables in /etc/environment file using the following command.
$ cat >> /etc/environment <<EOL
JAVA_HOME=/usr/lib/jvm/java-8-openjdk-amd64
JRE_HOME=/usr/lib/jvm/java-8-openjdk-amd64/jre
EOL
All done, you have successfully installed Java 8 on your Ubuntu Server and you can now proceed to installing Jenkins on your server.
Installing JENKINS
Step 1 - We need to add the repository key to the system
$ wget -q -O — https://pkg.jenkins.io/debian/jenkins-ci.org.key | sudo apt-key add -
Step 2 - After the key is added to the system, the system should return an OK response. We need to add the Debian repository address to the server’s sources.list .
$ echo deb https:pkg.jenkins.io/debian-stable binary/ | sudo tee /etc/apt/sources.list.d/jenkins.list
Step 3 - Next we need to run an update and install Jenkins from the newly added Debian repository.
$ sudo apt-get update
$ sudo apt-get install jenkins
The install command will
- Setup Jenkins as a daemon launched on start. See /etc/init.d/jenkins for more details.
- Create a user called Jenkins to run this service.
- Direct console log output to the file /var/log/jenkins/jenkins.log
- Populate /etc/default/Jenkins with configuration parameters for Jenkins server, e.g JENKINS_HOME
- Set Jenkins to listen on port 8080. Access this port with your browser to start the configuration.
After the installation has been done, you may want to confirm that Jenkins can run :
Set Jenkins to start
sudo systemctl start jenkins
Check Jenkins status
sudo systemctl status jenkins
If everything went well, the beginning of the output should show that the service is active
After the Jenkins’ service start, visit Jenkins default port (8080), using the server domain name or IP address: jenkins-server-ip-or-domain:8080 You will see the Unlock Jenkins page, which displays the location of the initial password.
After all the necessary configuration has been set up, we can use Jenkins for CI/CD Pipeline for our works.
References :
- CI/CD with Jenkins Provided by SheCodeAfrica Cloud School