Kubernetes Manifests with Monokle
Introduction to Monokle and creating first template


Why Monokle?
Usually, when working with Kubernetes, we deal with very long YAML files. Changing and updating these files is required when needed and since they are way lengthy, managing them becomes a tough job. That's when I came to know about a very cool tool (wordplay) that makes debugging these manifests a piece of cake. I would like to share my experience while I was exploring this tool.
Monokle is a tool through which one can debug, manage and make changes very easily before deploying them into the cluster. It provides templates that we can easily pick and enter the required inputs. Moreover, we can also create our own template on our localhost and connect it to monokle via GitHub by making a plugin of our own!
Installation
Before installing this app, make sure that helm is already installed in your system. We can install the helm through cmd. I installed it from Chocolatey using the following command:
choco install Kubernetes-helm
From the Monokle's (Github Repo), we can install the latest version with just one click.
If you are a Windows user, you may face installation errors due to windows defender blocking the installation process. Simply disable it before installing the app. You can enable it once again after the installation is complete.<
Making inbuild template
After opening the app you will find options like creating a new file or starting from a template. Go through the default templates option. Enter the name and other details and choose a basic pod and use this template. After submitting, you will find your YAML file template generated by monokle on the right side. You can now just deploy it from top in minikube and DONE that's all! The pod with the details that you entered has been deployed.
Creating your own customized template
Now to create your own template of YAML file, you should first create a repository on your Github because, in Monokle, there are plugins from which we get the template hence in your project there will be a file called package.json. Connect your git bash and clone the project on your local system. Create a file named package.json and write the code in the following format. I wrote the code for my requirements, you can edit any query according to you.
{
    "name": "Templates plugins",
    "description": "Custom templates plugin",
    "version": "1.0.0",
    "author": "Abhinav Kumar",
    "repository": "github.com/abhinav2712/monokle-templates-p…",
    "monoklePlugin": {
      "id":"com.github.abhinav2712.plugin.templates",
      "helpUrl":"github.com/abhinav2712/monokle-templates-p…",
      "modules": [
        {
          "type": "template",
          "path": "basic-pod-template"
        }
      ]
    }
  }
One mistake which I did was to forget to paste the links of my Github repo. These links are important since this file will be used for the installation process by monokle through our repository where the source code (our customized template) is.>
Any type of template contains the following things:
- Monokle template configuration
- Form configuration
- Kubernetes YAML manifest with placeholders
Following the documentation and a few tutorials, I created all these files. The monokle template defines what type of template you are creating and hence should contain details like author, description, id, etc. It also has a field named "Forms" :
"forms": [
    {
      "name": "Pod Settings",
      "description": "Specify the settings for your Pod",
      "schema": "form-schema.json",
      "uiSchema": "form-ui-schema.json"
    }
  ],
The form-schema file will contain the form fields that monokle will request the user to input and the form-ui-schema.json file fines how the form is going to appear, like how its interface will look just like previously we saw the template on the right side when choosing the default template.
Now we will create both files. In the form-schema file you can enter properties like a default name which will be displayed when nothing is entered, namespace, and image. Monokle uses react UI format for the form-ui-schema file. We can enter the title, message in this. The monokle provides a feature called namespaceselection in the widget option which is like a dropdown container for the pod.
We have made all the files where we gave the inputs to monokle. Now all these details will be filed with the template in YAML file. So hence whatever we put into the forms file, it will automatically get filled into the YAML file. Only the placeholders will be there. Now we create the template for the manifest. This will contain a pod template where all our inputs will be shown.
Create a new file with 'yaml' extension.
apiVersion: v1
kind: Pod
metadata:
  name: [[forms[0].name]]
[[ forms[0].namespace ? "  namespace: " + forms[0].namespace + "\n" : ""]]
spec:
  containers:
    - image: [[forms[0].image]]
      name: [[forms[0].name]]
      resources: {}
In Monokle template file, there are various forms inside which there is our template data. This form is a list (array) hence we select the first index since we have only one entry and the names property will be shown. Similarly, the name and image is also linked and selected with the YAML file.
We have now successfully created our own template hence now we push the file into the GitHub repository we created. Make sure to enter your GitHub repo's link in the files wherever required.
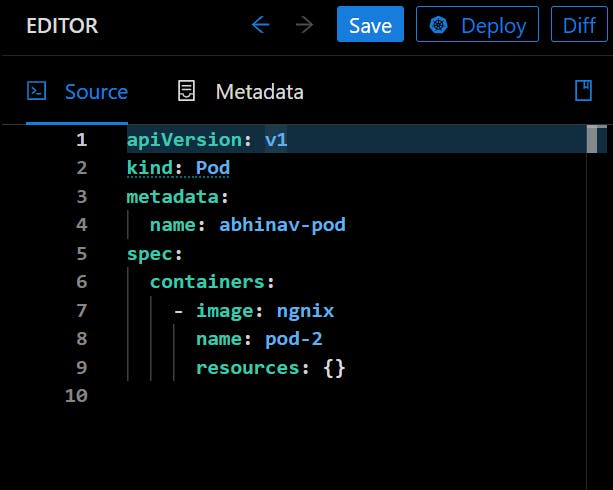
After pushing it to GitHub, connect the repo with the monokle desktop app by going to Plugins manager and pasting you Github's repository link which acts as a plugin for monokle. Install it and then select your template from the templates section on the left side of the window. The Pod template would be shown just like I entered in my form-schema file. After submitting the pod on the editor, your own customized template with all the relevant YAML inputs will be shown. Deploy the pod afterwards. For my case, this was the template that I created:
Conclusion:
I learned about templates, pods, and how the Monokle tool allows us to create our templates. The YAML file is automatically created, we just need to enter our inputs. It was a lot of fun to explore this tool and I would like to thank Kunal for providing with such information about these types of tools. Looking forward to learning more about such tools!
Thank you Monokle!