LinearLayout In Android Basic Concepts


LinearLayout in Android is used to create Layout Design of every Page.
Android LinearLayout is a view group that aligns all children in either vertically or horizontally.
Linear layout is a simple layout used in android for layout designing. In the Linear layout all the elements are displayed in linear fashion means all the childs/elements of a linear layout are displayed according to its orientation. The value for orientation property can be either horizontal or vertical.
LinearLayout is used to design various elements like Button, EditText, TextView etc. in separate blockwise method.
Blobkwise method means these elements can not cover each other as they can cover each other in Relative Layout.
Note: I will write about two properties here. Full article present at
Click here for more deeper details
Orientation of LinearLayout In Android
LinearLayout has attribute named Orientation which is used to set children of LinearLayout in vertical or horizontal manner.
Let us take Two Buttons and set them with Linear Layout in Android Layout.
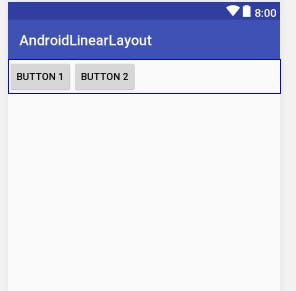
1.) Set Horizontally Look below source code
<?xml version="1.0" encoding="utf-8"?>
<LinearLayout xmlns:android="schemas.android.com/apk/res/android"

    android:layout_width="match_parent"
    android:layout_height="wrap_content"
    android:orientation="horizontal">

    <Button
        android:layout_width="wrap_content"
        android:layout_height="wrap_content"
        android:layout_weight="1"
        android:text="Button" />

    <Button
        android:id="@+id/button"
        android:layout_width="wrap_content"
        android:layout_height="wrap_content"
        android:layout_weight="1"
        android:text="Button" />
</LinearLayout>
Output of Above code will generate layout like below image.
2.) Set Vertically
Look below source code
<?xml version="1.0" encoding="utf-8"?>
<LinearLayout xmlns:android="schemas.android.com/apk/res/android"

    android:layout_width="match_parent"
    android:layout_height="wrap_content"
    android:orientation="vertical">

    <Button
        android:layout_width="wrap_content"
        android:layout_height="wrap_content"
        android:text="Button 1" />

    <Button
        android:id="@+id/button"
        android:layout_width="wrap_content"
        android:layout_height="wrap_content"
        android:text="Button 2" />
</LinearLayout>
Output of Above code will generate layout like below image.
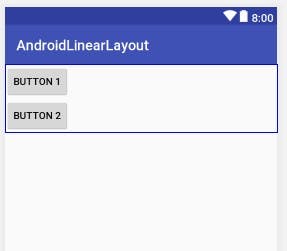
As you can see that two button are set vertically. In LinearLayout orientation is set as vertical and two buttons are it’s children.
You can set all layouts like Linearlayout, Relativelayout, Framelayout, TableLayout, GridLayout etc. as child of each other.