


#AmplifyHashnode
Overview
Machine Learning (ML) has been gradually expanding these few years. One just needs to look at the number of available ML libraries out there to see the staggering growth of ML applications. However, given the ecosystem of ML is so huge, where do we start exactly? How do individuals who do not have exposure to ML techniques or even writing an application begin exactly?
Fret not, this is where AWS Amplify comes in. I was able to develop an ML application that does textual analysis from photos and parse into a sentimental analysis function. Thereafter, my application then saves this data into a database where we can do a tagging of the data for sentimental analysis. All this was developed on AWS and the involved technology stack is as below
- AWS rekognition (Predictions - Identify)
- AWS rekognition (Predictions - Interpret)
- AWS AppSync GraphQL API
- AWS Cognito Auth
- ReactJS
I have detailed my steps below so depending on which level you are, do skip to the section which you deem relevant
Pre-requisites
Now before you start coding our application, we first have to install the below items
- Node JS: Now depending on whether you are on Mac or Windows, please follow the guide to install Node JS and NPM. nodejs.org/en/download
- Visual Studio Code. You can download it here: code.visualstudio.com
- AWS Amplify. To install and configure AWS Amplify, please follow the points below. If not you can refer to the official document from Amplify. Please note to choose West Virgnia
## Installing AWS Amplify
adrianlee@ladrian-a02> npm install -g @aws-amplify/cli

## Configure AWS Amplify
adrianlee@ladrian-a02> Amplify Configure
Specify the AWS Region
region:  us-east-1
Specify the username of the new IAM user:
user name:  Amplify-Admin

##
Complete the user creation using the AWS console as per the guide option 2: docs.amplify.aws/cli/start/install#option-2-follow-the-instructions

##
Enter the access key of the newly created user:
accessKeyId:  XXXXXXX
secretAccessKey:  YYYYY
Profile Name:  Amplify-Admin
Setting up our AWS Amplify
Open up your Visual Studio Code and navigate to the directory where you want to create your application.
We will now create a new React Application and test it by running a npm start. If all is well you should see our standard React App page.
# this will download a bunch of stuff and set up your base React JS application
npx create-react-app my-app
cd my-app
npm start
- Quite the npm start by doing a ctrl-c and then we will do a
amplify Init. This will help to provision the Amplify backend environment. If all is well, you should see a final output where it statesInitialized your environment successfully. Your project has been successfully initialized and connected to the cloud
adrianlee@ladrian-a02 my-app % amplify init
Note: It is recommended to run this command from the root of your app directory
? Enter a name for the project **myapp**
? Enter a name for the environment dev
? Choose your default editor: **Visual Studio Code**
? Choose the type of app that you're building **javascript**
Please tell us about your project
? What javascript framework are you using **react**
? Source Directory Path:  **src**
? Distribution Directory Path: **build**
? Build Command:  **npm run-script build**
? Start Command: **npm run-script start**
Using default provider  awscloudformation
? Select the authentication method you want to use:**AWS profile **
- We will now start adding our relevant Predictions (Identify and Interpret) and the auth to the project. I will add in the GraphQL API on later when we start writing our application
Adding Identify Prediction
adrianlee@ladrian-a02 my-app % amplify add predictions
? Please select from one of the categories below **Identify**
? What would you like to identify? **Interpret Text**
? Provide a friendly name for your resource **identifyTextxxxxx**
? Would you like to identify documents? **Y**
? Who should have access? **Auth and Guest users**
Adding Interpret Prediction
adrianlee@ladrian-a02 my-app % amplify add predictions
? Please select from one of the categories below **Interpret**
? What would you like to interpret? **Interpret Text**
? Provide a friendly name for your resource **interpretTextxxxxx**
? Would you like to identify documents? **Y**
? Who should have access? **Auth and Guest users**
Adding Authentication
adrianlee@ladrian-a02 my-app % amplify add auth
Using service: Cognito, provided by : aws cloudformation
- All right we are done with the AWS resources. We can now do an
amplify pushand these resources stated in part 4 will be deployed into the cloud
Developing our application - Identification and Sentimental Analysis of text
Right! We are now ready to start writing our ML application.
- First, we need to add the necessary dependencies by using yarn or npm. Im using npm
npm install aws-amplify - We will now open
index.jsand import and load the configuration file. We will also load our predictions API as shown below.
import React from 'react';
import ReactDOM from 'react-dom';
import './index.css';
import App from './App';

import Amplify from 'aws-amplify'
import config from './aws-exports'
import { AmazonAIPredictionsProvider } from '@aws-amplify/predictions';

Amplify.configure(config)
Amplify.addPluggable(new AmazonAIPredictionsProvider())
- Next, we will open our
App.jsand import predictions and API from AWS-Amplify as shown below
import React , { useState, useEffect } from 'react';
import { Predictions } from 'aws-amplify';
import { API } from 'aws-amplify'
Great, we can start coding our application. We are going to have a simple upload button. First we will declare
const [response, setResponse,] = useState()after our function App()We will now create a asynchronous function to take in the uploaded file, call our AWS AWS rekognition (Predictions - Identify) and return the output.
  // function to analyse data
  async function identify(event){
    setResponse("...Analysing...")
    setTextToInterpret("...Analysing...")
    const { target :{files} } = event
    const file = files[0]

    # This will await the predictions API to look through our image and return the file data
    const data = await Predictions.identify({
      text : {source : { file }, format: "PLAIN"}
    })

    setResponse(data.text.fullText)

  }
- Finally, we will return the response into our ptag
  return (
    <div className="App">
      <div class="container">
        <h1>Text Analysis Application</h1>
        <div >
          <input type="file" onChange={identify}></input>
          <p className={pStyle}> Analysed Text: {response}</p>
        </div>
       </div>
    </div>
- We will do a
npm startand our application should start up

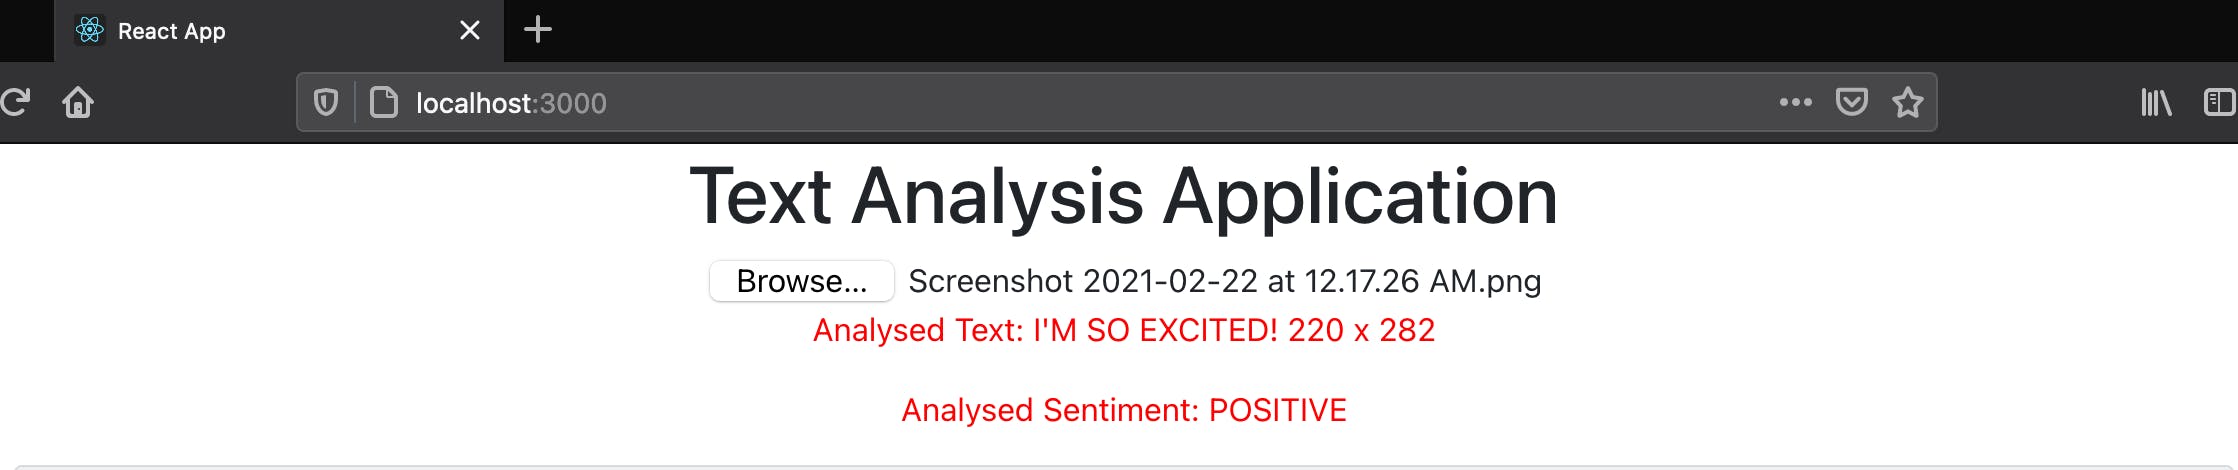
- We have our trusty image of Anna being really excited and with our written text and we are going to upload our image into our portal

- And Voila! It managed to return back a text analysis of our image! Awesome!

- We will now do the sentimental analysis of the text. In this function, we will be passing our text earlier retrieved and do a
await Predictions.interpret. Similarly like above, we will declareconst [textToInterpret, setTextToInterpret,] = useState()From here we will then iterate through the array returned to get back the predominant analysis.
  async function interpret(textToInterpret){
    const const_data_save = []
    const analysis = await Predictions.interpret({
      text : {source: { text : textToInterpret}}
    })

    const sentiment_analysis = analysis.textInterpretation.sentiment.predominant
    console.log (sentiment_analysis)
    const_data_save.push({
      description: textToInterpret,
      analysis: sentiment_analysis
    })

    setTextToInterpret(sentiment_analysis)

  }
And End Product of our identification and Interpretation using AWS rekognition
That was a good introduction. Now stay tuned for part 2 as we will be looking at implementing our APIs to save our data alongside the styling of our application.