


This post assumes that you at least have some working knowledge of Angular, Rx and Redux.
In this article, we will learn how to create the traditional todo app with ngrx/store and ngrx/effects. The same concept will apply to @angular-redux/store with redux-observable.
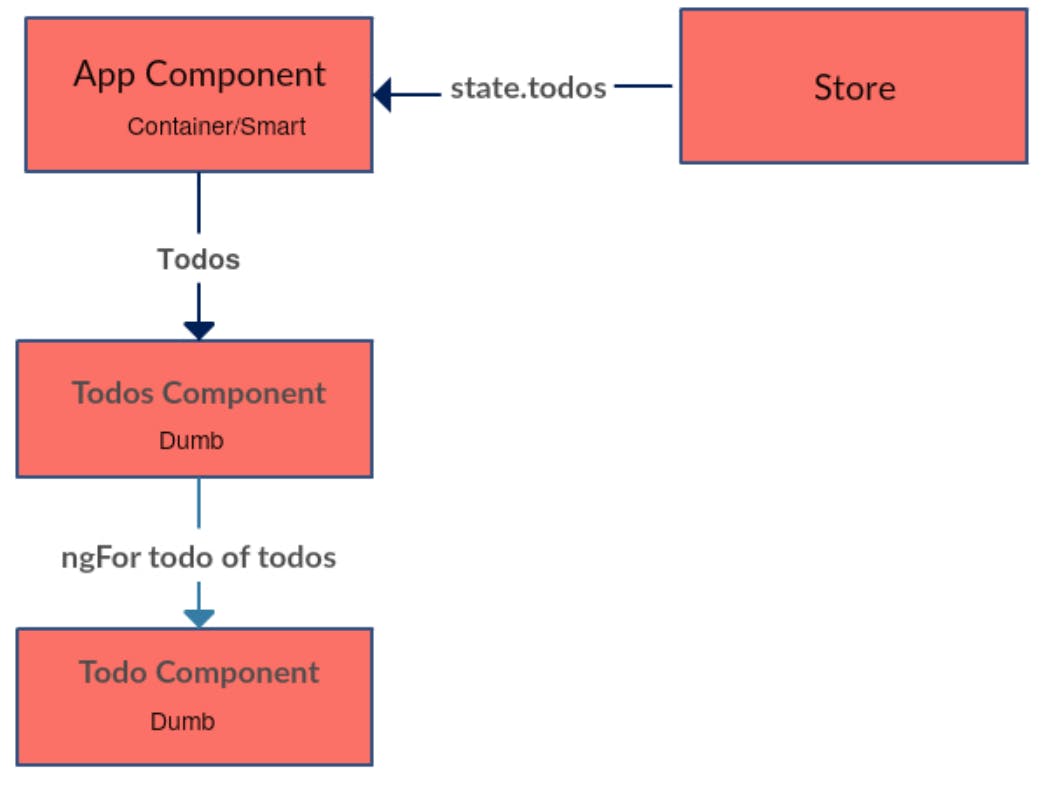
In this part, we are going to focus on the todo’s implementation. Let’s see our component tree.
Build the Todo Component
@Component({
  selector: 'todo',
  template: `
    <p>{{todo.title}}</p>
  `,
  changeDetection: ChangeDetectionStrategy.OnPush
})
export class TodoComponent {
  @Input() todo;
}
The todo component is just a dumb component that takes a todo as Inputand renders its title.
Build the Todos Component
@Component({
  selector: 'todos',
  template: `
    <p *ngIf="todos.pending">Loading...</p>

    <todo [todo]="todo"
          *ngFor="let todo of todos.data">
    </todo>

    <p *ngIf="todos.error">{{todos.error}}</p>
  `,
  changeDetection: ChangeDetectionStrategy.OnPush
})
export class TodosComponent {
  @Input() todos;
}
The todos component is also a dumb component that takes an array of todos and ngFor over them to render the todo component. There is also a loading indicator and error handling based on the state from our store.
Build the Todos Reducer
We are going to create all the actions in the same file; I don’t want to focus on how to structure your app.
export const GET_TODOS = "GET_TODOS";
export const GET_TODOS_SUCCESS = "GET_TODOS_SUCCESS";
export const GET_TODOS_ERROR = "GET_TODOS_ERROR";

export function getTodos() {
  return {
    type: GET_TODOS
  }
}

const initialState = {
  data: [],
  pending: false,
  error: null
}

export function todos( state = initialState, { type, payload } ) {
  switch( type ) {
    case GET_TODOS:
      return Object.assign({}, state, {pending: true, error: null})
    case GET_TODOS_SUCCESS:
      return Object.assign({}, state, {data: payload, pending: false})
    case GET_TODOS_ERROR:
      return Object.assign({}, state, {pending: false, error: "Error"})
    default:
      return state;
  }
}
I will not explain the reducer because it should be straightforward to you if you know Redux. (and if you’re reading this article, I hope you do).
Let’s register the reducer in our store:
@NgModule({
  declarations: [
    AppComponent,
    TodoComponent,
    TodosComponent,
  ],
  imports: [
    StoreModule.provideStore({todos}),
  ],
  providers: [TodosService],
  bootstrap: [AppComponent]
})
export class AppModule {
}
Now we need to fetch the todos from the server, so let’s create a service that will manage this.
Build the Todos Service
@Injectable()
export class TodosService {

  getTodos() {
    const todos = [{id: 1, title: "Learn ngrx/store", completed: false}, {id: 2, title: "Learn ngrx/effects", completed: false}]
    return Observable.timer(1000).mapTo(todos)
  }

}
We are just faking an HTTP request with the timer operator from Rx and returning dummy data.
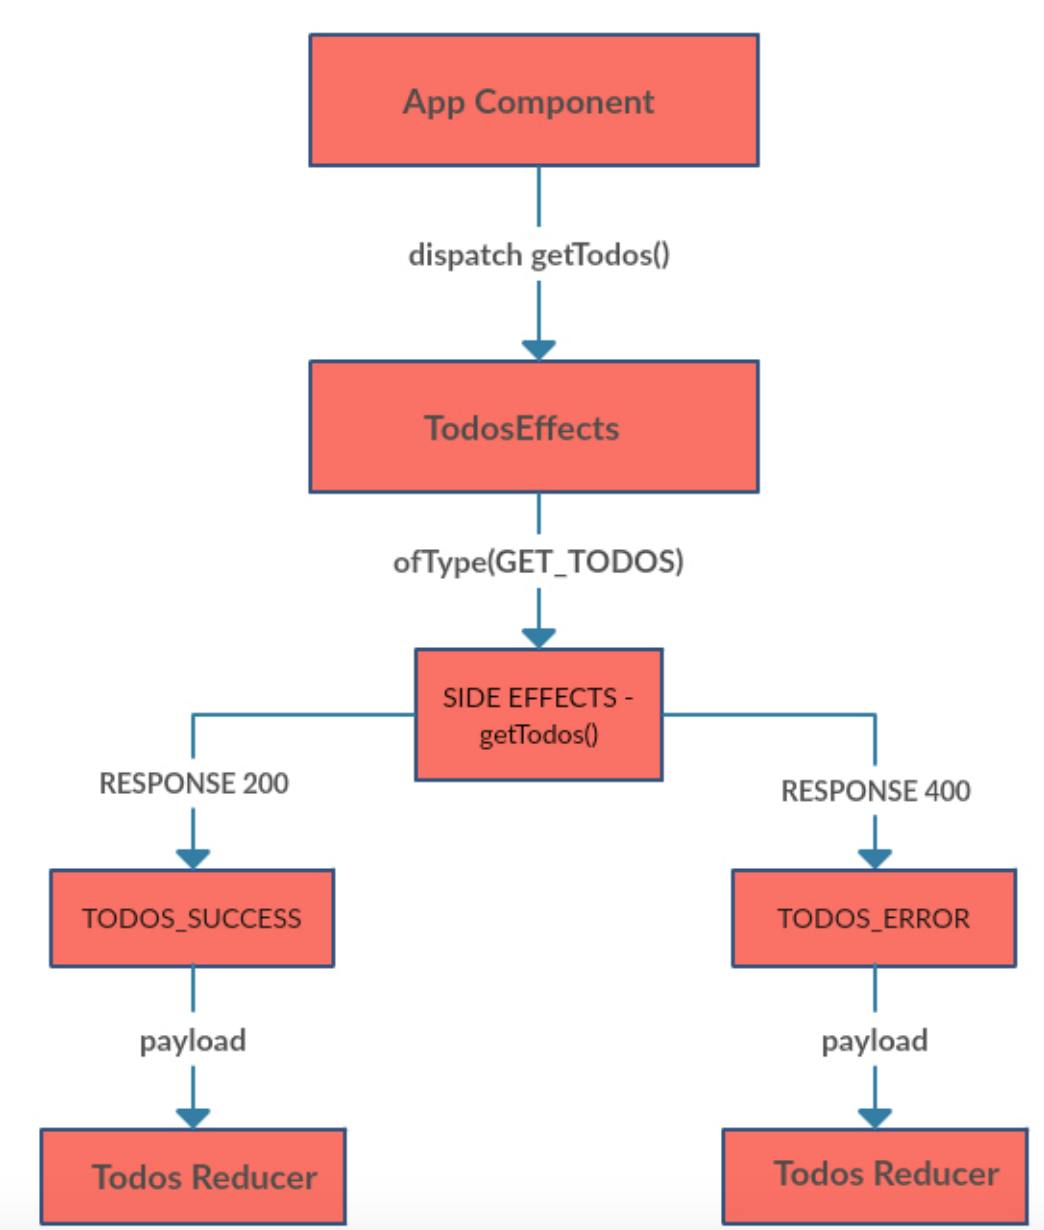
In Redux, reducers need to be pure so we need a middleware to handle our side effects. This will be the responsibility of ngrx/effects.
Build the Todos Effects
import { Injectable } from "@angular/core";
import { Actions, Effect } from "@ngrx/effects";
import { Observable } from "rxjs";
import { GET_TODOS, GET_TODOS_SUCCESS, GET_TODOS_ERROR } from "./app.module";
import { TodosService } from "./todos.service";

@Injectable()
export class TodosEffects {
  constructor( private actions$ : Actions,
               private todosService : TodosService ) {
  }

  @Effect() getTodos$ = this.actions$
    .ofType(GET_TODOS)
    .switchMap(action =>
      this.todosService.getTodos()
           .map(todos => ({type: GET_TODOS_SUCCESS, payload: todos}))
           .catch(() => Observable.of({type: GET_TODOS_ERROR})));
}
It looks difficult, but let's break it down.
@Effect() getTodos
We’re using the Effects decorator to label our property getTodos$ as an effect that will be triggered when we dispatch actions with the store.
@Effect() getTodos$ = this.actions$
@ngrx/effects exports an Actions observable service that emits every action dispatched in your application.
ofType(GET_TODOS)
The ofType operator is for filtering actions by action type. In our case, we want to continue our effect process only if the action type is GET\_TODOS. Every effect need to return a new action, for example:
@Effect() login$ = this.actions$
      .ofType("ACTION")
      .map(action => ({ type: "NEXT_ACTION" }))
In our case the getTodos() method returns an observable, so we need to merge the new action to our effect stream with the help of the switchMapoperator.
   switchMap(action =>
      this.todosService.getTodos()
           // If successful, dispatch success action with result
           .map(todos => ({type: GET_TODOS_SUCCESS, payload: todos}))
           // If request fails, dispatch failed action
           .catch(() => Observable.of({type: GET_TODOS_ERROR})));
When we dispatch the GET\_TODOS action the effect will call the getTodos()method to fetch the todos from the server and based on the response will return a new action.
Let’s register the TodoEffects.
// app.module.ts
imports: [
  StoreModule.provideStore({todos}),
  EffectsModule.run(TodosEffects),
]
Now the final piece is to inject our store to the app component, dispatch GET\_TODOS action and get the todos from the store.
import { Component } from '@angular/core';
import { Store } from "@ngrx/store";
import { Observable } from "rxjs";
import { getTodos } from "./app.module";

@Component({
  selector: 'app-root',
  templateUrl: `
    <todos [todos]="todos | async"></todos>
  `
})
export class AppComponent {
  todos : Observable<any>;

  constructor( private store : Store<any> ) {
    this.store.dispatch(getTodos());
    this.todos = store.select("todos");
  }
}
I will stop here because I don’t want the article to be long. In the next article, we will add the ability to add/toggle todo and after this the visibility filters.
Originally published on Medium.