
MQTT and MAM: Sending temperature and humidity data to the IOTA Tangle


Introduction
The project is an attempt to combine the two technologies, MAM and MQTT, to retrieve and store information in the blockchain. In this case the IOTA tangle.
MQTT is a Client Server publish/subscribe messaging transport protocol. It is light weight, open, simple, and designed so as to be easy to implement. These characteristics make it ideal for use in many situations, including constrained environments such as for communication in Machine to Machine (M2M) and Internet of Things (IoT) contexts where a small code footprint is required and/or network bandwidth is at a premium.
Some of the advantages MQTT has are:
It’s efficient: The small message size makes it perfect for instances where bandwidth is constrained, an important consideration for IoT systems.
It’s easy to implement: MQTT is an open protocol which means multiple devices from different manufacturers can talk to one another providing huge flexibility.
It’s fast: MQTT is capable of providing data in a fast and real time manner.
Masked Authenticated Messaging (MAM) is a second layer data communication protocol which adds functionality to emit and access an encrypted data stream, like RSS, over the Tangle (IOTA’s distributed ledger or blockchain) regardless of the size or cost of device.
An example where both of this technologies are applicable is in:
Supply and Global trade: Creating immutable audit trails that keeps a hash of logistical updates. Providing data integrity in an attempt to improve transparency and access. Providing real time information such as location, temperature and humidity.
A live example in the logistics sector can be found here:
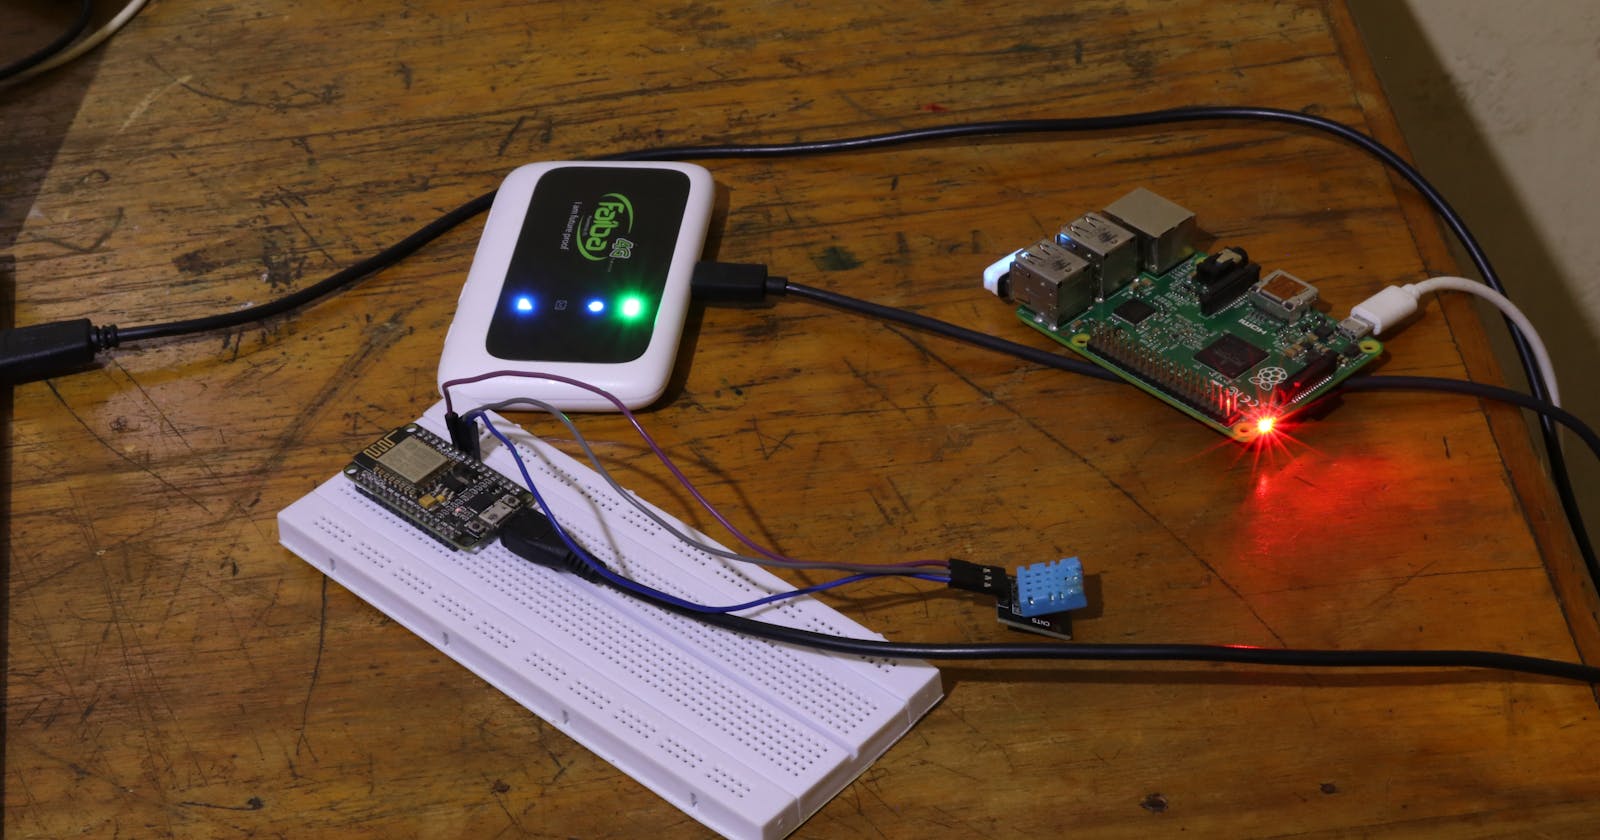
In this tutorial we will be retrieving IoT sensor data from an IoT device (a nodemcu) sending the data to a Raspberry Pi which is acting as a broker, and then storing this information on the blockchain. The blockchain we will be using in this case is the IOTA blockchain.
The code for the full project can be found here.
Prerequisite
The following background knowledge will come in handy
- Node js.
- Javascript.
- Python or Micropython.
- Some knowledge on IOTA Blockchain or blockchains in general.
Components
A list of the hardware components that I used are
PS: You can probably get all these components, half the price at Aliexpress.
Raspberry Pi
In this case my Raspberry Pi 2 Model B was acting as a broker. Yes, it does not come with on board WiFi so I had to add a WiFi dongle to it. Any Raspberry Pi which has WiFi capability can do the same work.
The broker is responsible for receiving all messages, filtering the messages, determining who is subscribed to each message, and sending the message to these subscribed clients.
Setting up the broker
The broker I used is an open source one known as Eclipse mosquitto. It is an open source messenger broker that implements MQTT. It is lightweight and suitable for use on all devices for low power devices (the raspberry pi) to a full blown server.
Having the raspberry pi already up and running Raspbian OS, I ran the following commands to install and run mosquitto on the Raspberry Pi.
sudo apt-get update
sudo apt-get upgrade
sudo apt-get dist-upgrade
sudo apt-get install mosquitto mosquitto-clients python-mosquitto
To start the mosquitto service, I ran the command.
sudo systemctl enable mosquitto.service
To test and ensure that it is running, I opened up two terminal windows from the rapsberry pi.
On the first terminal I typed:
mosquitto_sub -d -t hello/world
On the second terminal, I typed:
mosquitto_pub -d -t hello/world -m "Greetings from Terminal window 2!"
Then upon checking the response from terminal 2, the message was published.
Client mosqsub/3014-LightSwarm sending CONNECT
Client mosqsub/3014-LightSwarm received CONNACK
Client mosqsub/3014-LightSwarm sending SUBSCRIBE (Mid: 1, Topic: hello/world, QoS: 0)
Client mosqsub/3014-LightSwarm received SUBACK
Subscribed (mid: 1): 0
Client mosqsub/3014-LightSwarm received PUBLISH (d0, q0, r0, m0, 'hello/world', ... (32 bytes))
Greetings from Terminal window 2
Nodemcu
The Nodemcu was used to gather the temperature and humidity data from the DHT11 humidity and temperature sensor, and to publish it via MQTT.
Setting up the circuit
The breadboard circuit was set up as shown below.
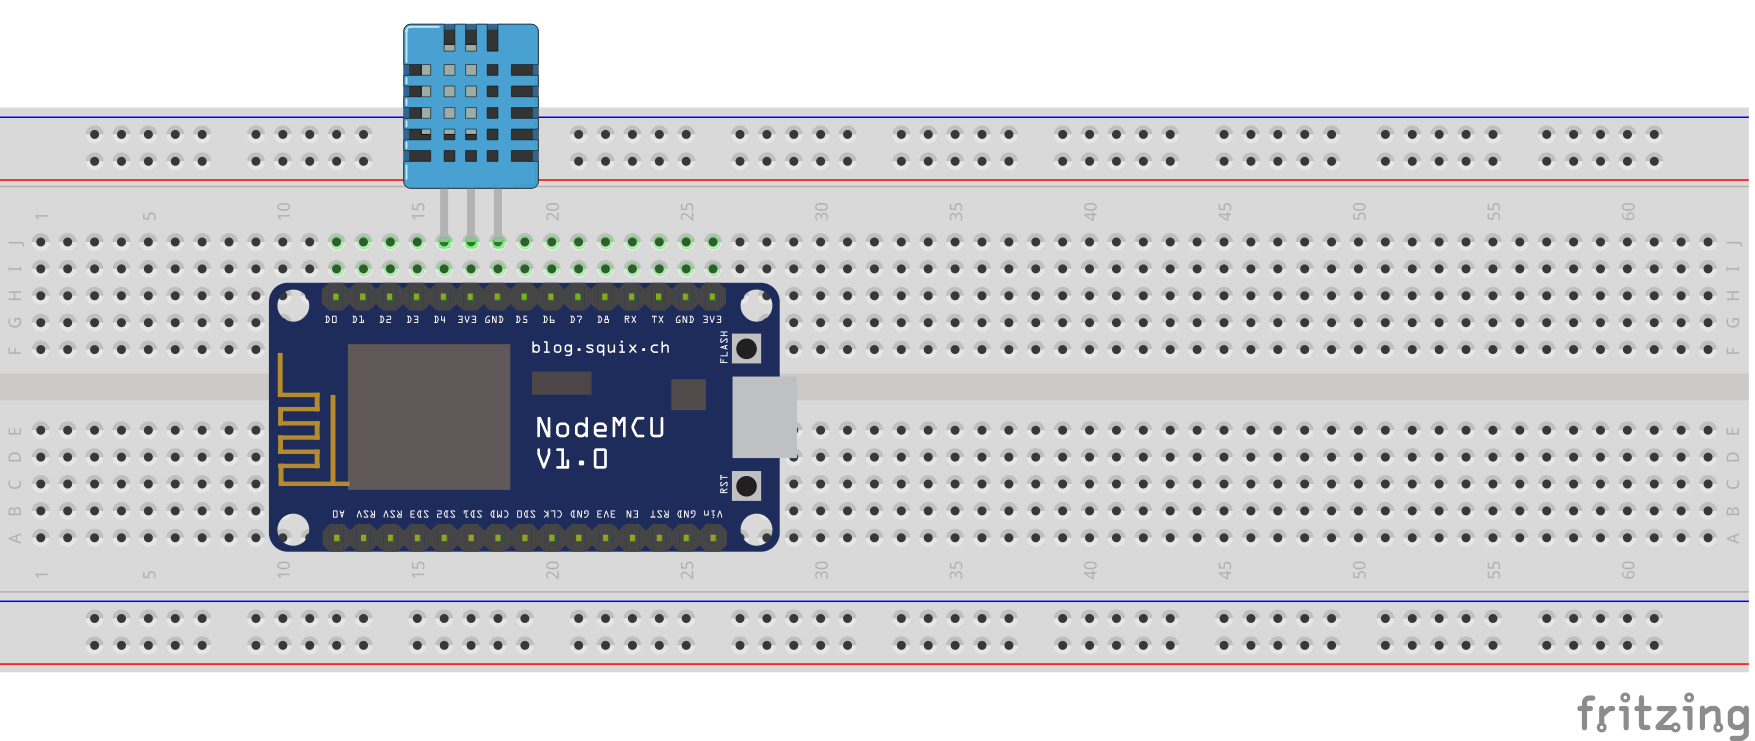
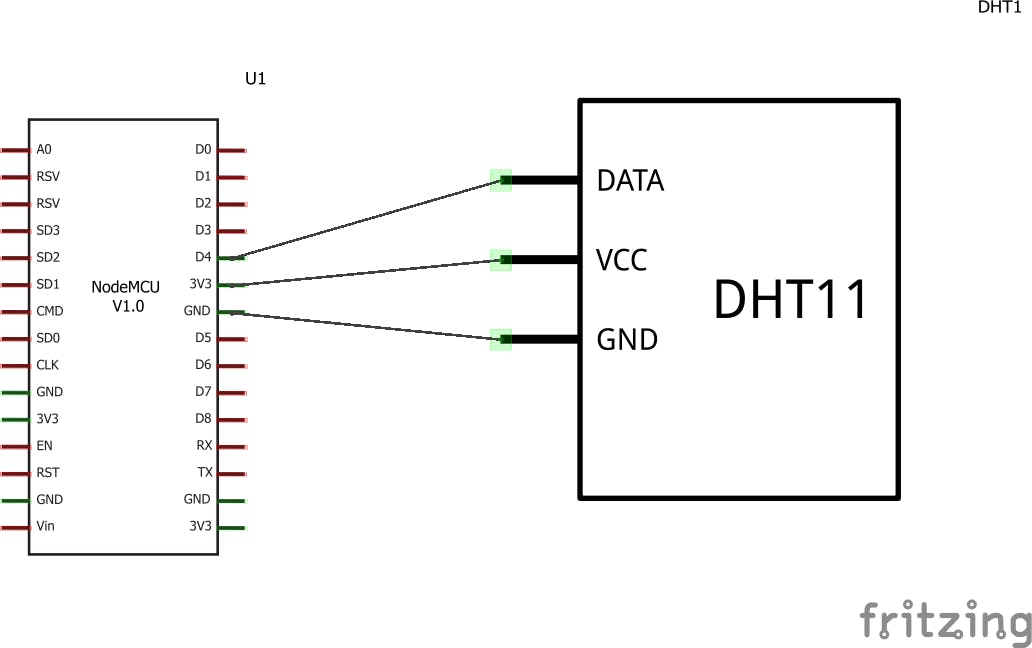
The DHT11 sensor is connected to the Nodemcu. The digital out/data pin of the sensor is connected to pin D4 to accept the digital signals from the sensor. The sensor operates at 3.3v. The rest of the pins are connected to power and ground. A circuit representation is shown below.
The Nodemcu is then connected to power via a normal USB cable.
Setting up the configuration
The configuration file for the nodemcu can be found here. Ensure you save it as setup.py for it to work with the nodemcu.
MQTT_CONFIG = {
    'SENSOR_ID': '',
    'MQTT_HOST': '',
    'PORT': '',
    'PUB_TOPIC': ''
}

WIFI_CONFIG = {
    'WIFI_ESSID': '',
    'WIFI_PASSWORD': ''
}
The meaning of the parameters are
- SENSOR_ID: The sensor identifier identifies each MQTT client that connects to an MQTT broker. (e.g temp-sensor)
- MQTT_HOST: This defines the IP address of the broker in the MQTT setup. (e.g 192.168.0.22 but exact one for the broker )
- PORT: The default port number that is used for MQTT. (normally this is 1883)
- PUB_TOPIC: This refers to an UTF-8 string that the broker uses to filter messages for each connected client. (e.g sensors/temperature)
- WIFI_ESSID: Name of the WiFi network you want the Nodemcu to connect to.
- WIFI_PASSWORD: Password of the WiFi network your Nodemcu is connecting to.
Setting up the WiFi connection
To set up the wifi, I used the following code. The same code is shown below. What it does is that it takes the WIFI_ESSID and WIFI_PASSWORD and tries to connect to your WiFi network. If it successfully connects, it prints out "Connection successful".
# Set up connection to wifi access point
def connect():
    import network
    import config

    ssid = config.WIFI_CONFIG['WIFI_ESSID']

    password = config.WIFI_CONFIG['WIFI_PASSWORD']

    station = network.WLAN(network.STA_IF)

    if station.isconnected() == True:
        print("Already connected")

    station.active(True)
    station.connect(ssid, password)

    while station.isconnected() == False:
        pass

    print("Connection successful")
    print(station.ifconfig())
Collecting and publishing the sensor data
The next step was to collect and publish the sensor data. The full code can be found here.
The first process was to import the necessary files and libraries. Some of the files and libraries to note are:
- connectWifi - for connecting to a given WiFi connection.
- config - contains all the configuration settings for WiFi and for MQTT.
- dht - library for the DHT11 sensor.
- umqtt.simple - assist in publishing the sensor via MQTT.
- time, json, pin - time is used for timing functions within the Nodemcu, json is used to send the information in JSON format, pin is used to read information from the pin connected to the sensor.
import connectWifi
import time
import config
import json
from dht import DHT11
from machine import Pin
from umqtt.simple import MQTTClient
We then want the Nodemcu to first of all connect to WiFi. This runs the function from the file we created for handling connections to WiFi.
# connect to wifi first
connectWifi.connect()
Since our DHT11 is connected physically to pin number D4 on the board, this equates to GPIO 2. The setup in the code as shown below.
# set the pin for reading the humidity ant temperature values
d = DHT11(Pin(2))
Next I imported all the MQTT settings from the config file that I earlier created. This is as shown below.
SERVER = config.MQTT_CONFIG['MQTT_HOST']
PORT = config.MQTT_CONFIG['PORT']
SENSOR_ID = config.MQTT_CONFIG['SENSOR_ID']
PUB_TOPIC = config.MQTT_CONFIG['PUB_TOPIC']
Setting up the main method, I put the whole code in an infinite loop. I called the read_sensor() function to fetch the temperature and humidity values. To transmit the data via MQTT, I called upon the send() function with the sensor data. I then set up a delay for 8 seconds.
def main():
    while True:
        # get the values for temperature and humidity
        data = read_sensor()
        print("Sending data", data)
        # transmit the values for temperature and humidity
        send(data)
        # delay for 8 seconds before reading the values again
        time.sleep(8)
The read_sensor() function simply fetches the temperature and humidity values from the GPIO 2 pin (physical pin is pin D4). It then returns the values in a JSON format with temperature value and humidity value.
# function for reading the temperature and humidity values
def read_sensor():
    d.measure()
    return {
        "temperature": d.temperature(),
        "humidity": d.humidity()
    }
The send() function simply handles the sending of the sensor data to the broker. The first thing it does it sets up the MQTTClient, connects to the broker, publishes the information via the topic in json format and then disconnects itself from the broker.
# function for sending the temperature and humidity values
def send(data):
    c = MQTTClient(SENSOR_ID, SERVER, 1883)
    c.connect()
    c.publish(PUB_TOPIC, json.dumps(data))
    c.disconnect()
We then ensure the main function runs.
if __name__ == "__main__":
    main()
Pushing the files to the nodemcu
You need to have micropython running on the nodemcu for it to work, I normally use esptool to upload the firmware on to the nodemcu.
The command I normally run is
sudo esptool.py --port /dev/ttyUSB0 --baud 115200 write_flash --flash_size=detect 0 ~/Downloads/esp8266-20171101-v1.9.3.bin
To store the python files on the nodemcu, I normally use ampy.
Installation can be done using pip3 using the following command.
pip install adafruit-ampy
To push the files on to the nodemcu, I used the following commands. One needs to be keen on the --port that one uses. It should match your system configuration. I also found it interesting that ampy also works with WSL.
sudo ampy --port /dev/ttyUSB0 --baud 115200 put main.py
sudo ampy --port /dev/ttyUSB0 --baud 115200 put config.py
sudo ampy --port /dev/ttyUSB0 --baud 115200 put connectWifi.py
Verifying the data is being sent
A quick way to verify that the data is being sent is to ssh into the Raspberry Pi and running the command.
mosquitto_sub -d -t [topic name]
You need to specifying the topic name you used. You then check the output of the command to see if there is any temperature and humidity data showing up.
Raspberry Pi
I needed to run a server to fetch the MQTT information and store it in the MAM channel (IOTA tangle blockchain). There are two options for this. We can set up a node js server on raspberry pi itself or set it up on another machine or in the cloud. In this process I decide to use the same raspberry pi we used earlier to run the node js server.
Installing the necessary libraries
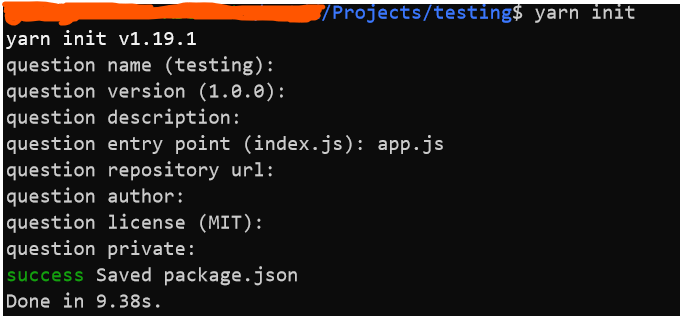
Ensuring that I have yarn for linux installed, I created a new folder and then ran the command.
yarn init
This initializes a new node js project. I ensured that the entry point for the project is app.js.
After this I proceeded to install the iota/mam module and the MQTT module by running
yarn add @iota/mam mqtt
This will help us retrieve the sensor data and publish the information to the blockchain.
Setting up the configuration file
The configuration for the raspberry pi can be found here.
module.exports = {
    brokerUrl: "",
    port: "",
    topic: "",
    provider, ""
};
The meaning of the parameters are
- brokerUrl: This defines the IP address of the broker in the MQTT setup. (eg 192.168.0.22 but has to be exact IP address of the broker)
- port: The default port number that is used for MQTT.( default is 1883).
- topic: This refers to an UTF-8 string that the broker uses to filter messages for each connected client. (e.g sensors/temperature)
- provider: The iota node we want to connect to so that we can send the temperature and humidity data to. In this case we will use nodes.devnet.iota.org:443
Receiving sensor data and publishing it to the tangle
We then create a new file as shown here. In this case I went with the filename app.js
I then went ahead and imported the configuration files we set up earlier and the libraries we installed using node js.
const mqtt = require("mqtt");
const Mam = require("@iota/mam");
const Converter = require("@iota/converter");
const provider = require("./config/config").provider;
const brokerUrl = require("./config/config").brokerUrl;
const port = require("./config/config").port;
const topic = require("./config/config").topic;
I connected to the broker using the following line of code
const client = mqtt.connect(`${brokerUrl}:${port}`);
I then connected to an IOTA node and initializing the state using the following line of code.
let state = Mam.init(provider);
console.log(state);
We want once we connect to the MQTT broker, we subscribe to a given topic, so that we can start receiving the temperature and humidity information. I set it up as shown below.
client.on("connect", function () {
    client.subscribe(topic);
    console.log(`Client has connected successfully to ${topic}`);
});
Once we receive a message from the broker, we want to see if the topic it comes with actually matches the one we set up in our configuration file. If it matches, we can then send the message (the temperature and humidity data) to the publish() function, so that the information can now be posted on the MAM channel.
client.on("message", (topic, message) => {
    if (topic.toString() == topic) {
        console.log(`Values are ${message}`);
        publish(JSON.parse(message));
    }
});
I then proceeded to write the function to publish the information on the MAM channel. The data is stored on a packet variable. A new message is created with Mam.create() and then the message is sent to the MAM channel using the Mam.attach() function.
const publish = async function (packet) {
    const trytes = Converter.asciiToTrytes(JSON.stringify(packet));

    const message = Mam.create(state, trytes);
    state = message.state;
    console.log(state);

    await Mam.attach(message.payload, message.address);
    console.log(message);
    return message.root;
};
The node js server is then run using the command
node app.js
To ensure that the Raspberry Pi runs the code whenever it boots, edit the rc.local file
sudo nano /etc/rc.local
and add
node app.js &
Output
After running the node js server, the following console messages were shown.
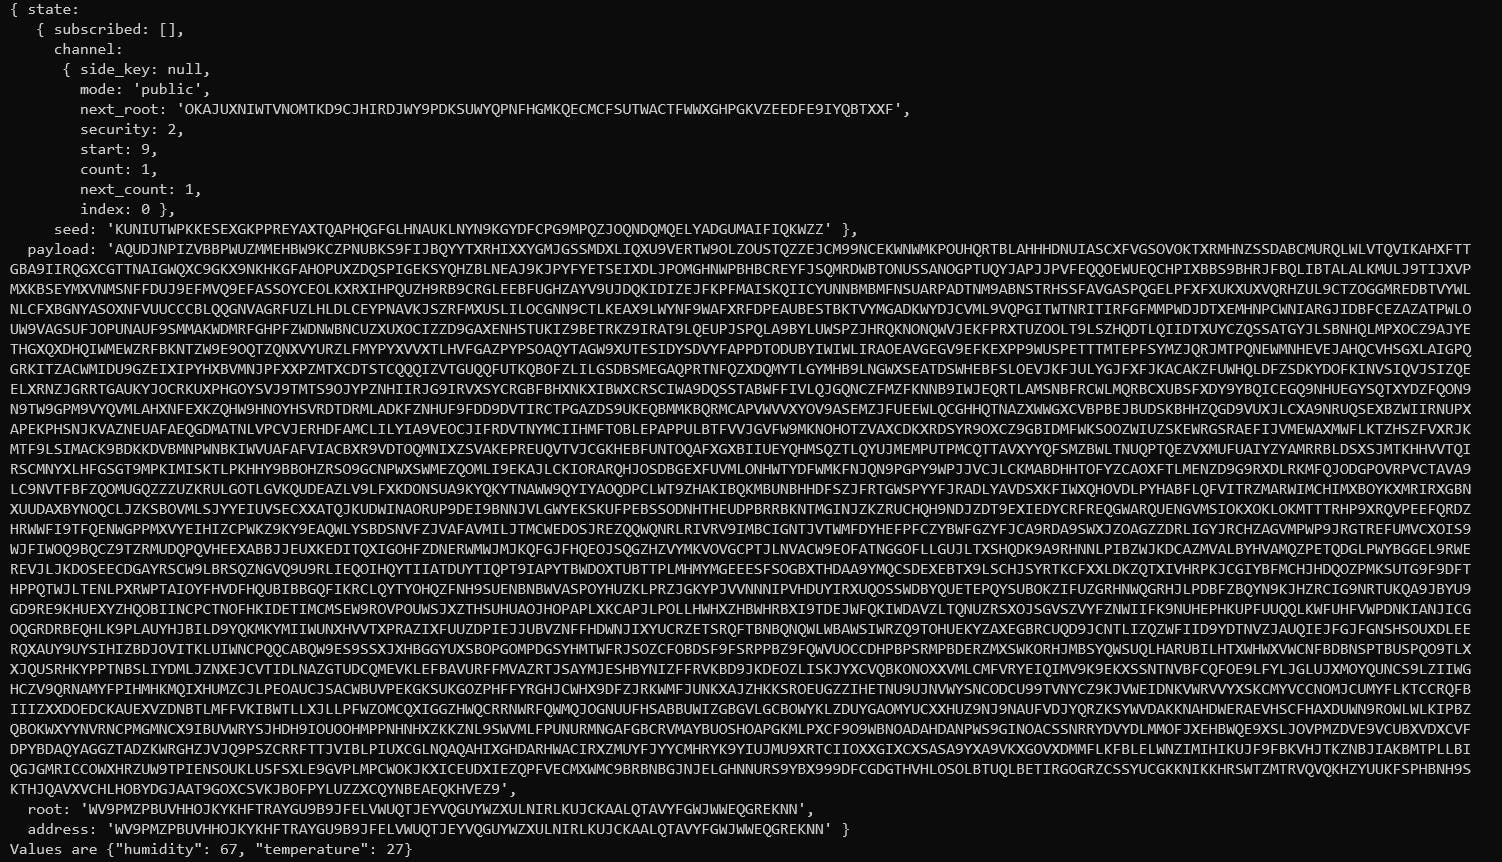
Looking into the console messages, I was able to see the temperature and humidity values
Values are {"humidity": 68, "temperature": 27}
Also zooming in I was able to see root values

Which when I entered it into the mam explorer and setting the mode to public as shown below
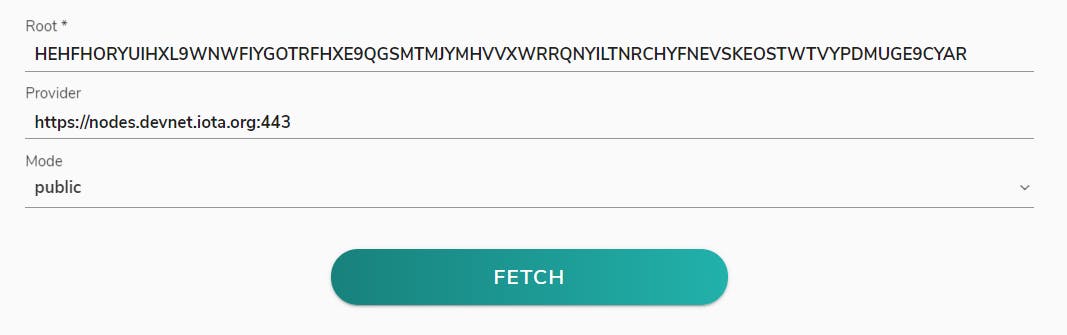
I can be able to see the temperature and humidity values on the IOTA tangle.
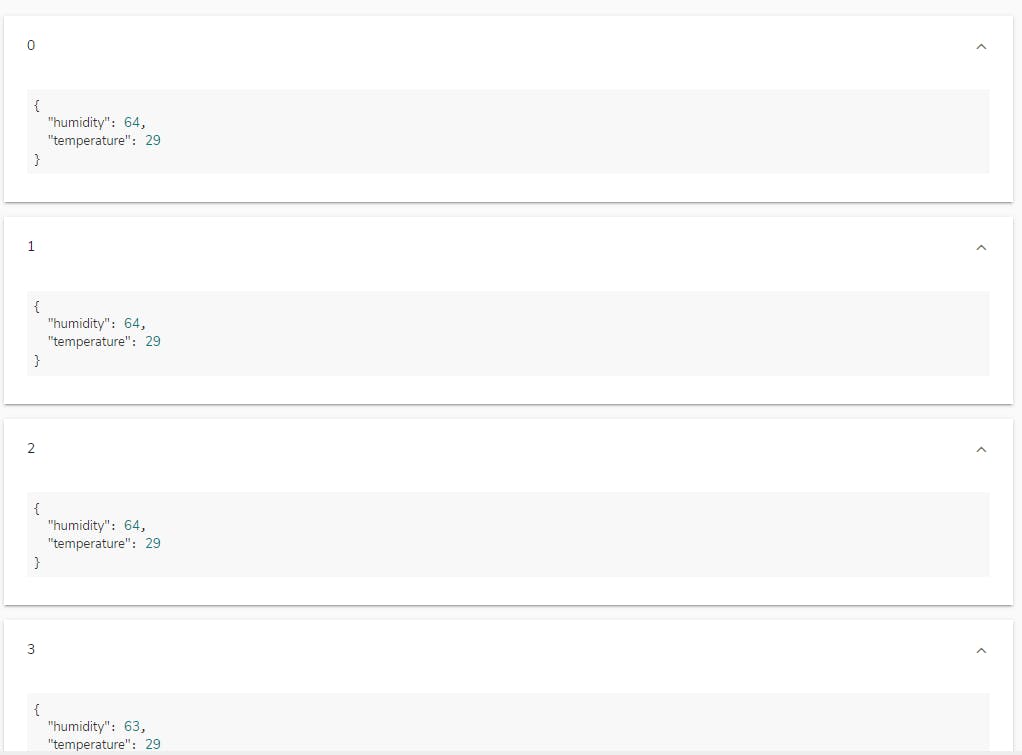
The beauty of this is that, from any root, if any new temperature data or humidity data come in, one is able to see them.
Limitations
Some of the limitations of the setup are
- Security has not been set up on the MQTT side. This means that one can easily hack the MQTT data being sent and modify the data that is being transmitted.
- The MAM channel is operating in public mode. Meaning that anyone having the root can access the data. This may not be suitable if one wants the data to be private.