


NX Workspace Introduction
In this blog post series, I am going to explore the features that NX workspace that provides. The original post can be found on NextJS Tutorial with Nx Framework .
In this blog post series, I am going to explore the features that NX workspace provides. I'm going to build a simple Next JS web app with Tailwind CSS styling within the Nx workspace.
NX is an advanced set of extensible dev tools for mono repositories, with a strong emphasis on modern full-stack web technologies.
1) Setup NextJS App on Nx Workspace
npm install -g nx
# Install and create workspace
npx create-nx-workspace nx-tutorial
# Choose project types
✔ Workspace name (e.g., org name)     · nx-tutorial
? What to create in the new workspace …
❯ empty             [an empty workspace with a layout that works best for building apps]
  react             [a workspace with a single React application]
  angular           [a workspace with a single Angular application]
  next.js           [a workspace with a single Next.js application]
  gatsby            [a workspace with a single Gatsby application]
  nest              [a workspace with a single Nest application]
  express           [a workspace with a single Express application]
  web components    [a workspace with a single app built using web components]
  react-express     [a workspace with a full stack application (React + Express)]
  angular-nest      [a workspace with a full stack application (Angular + Nest)]
  oss               [an empty workspace with a layout that works best for open-source projects]

# Choose whether you'll use Nx Cloud or not
✔ Use Nx Cloud? (It's free and doesn't require registration.) · Yes
>  NX  Nx is creating your workspace.

# get into the workspace
cd nx-tutorial
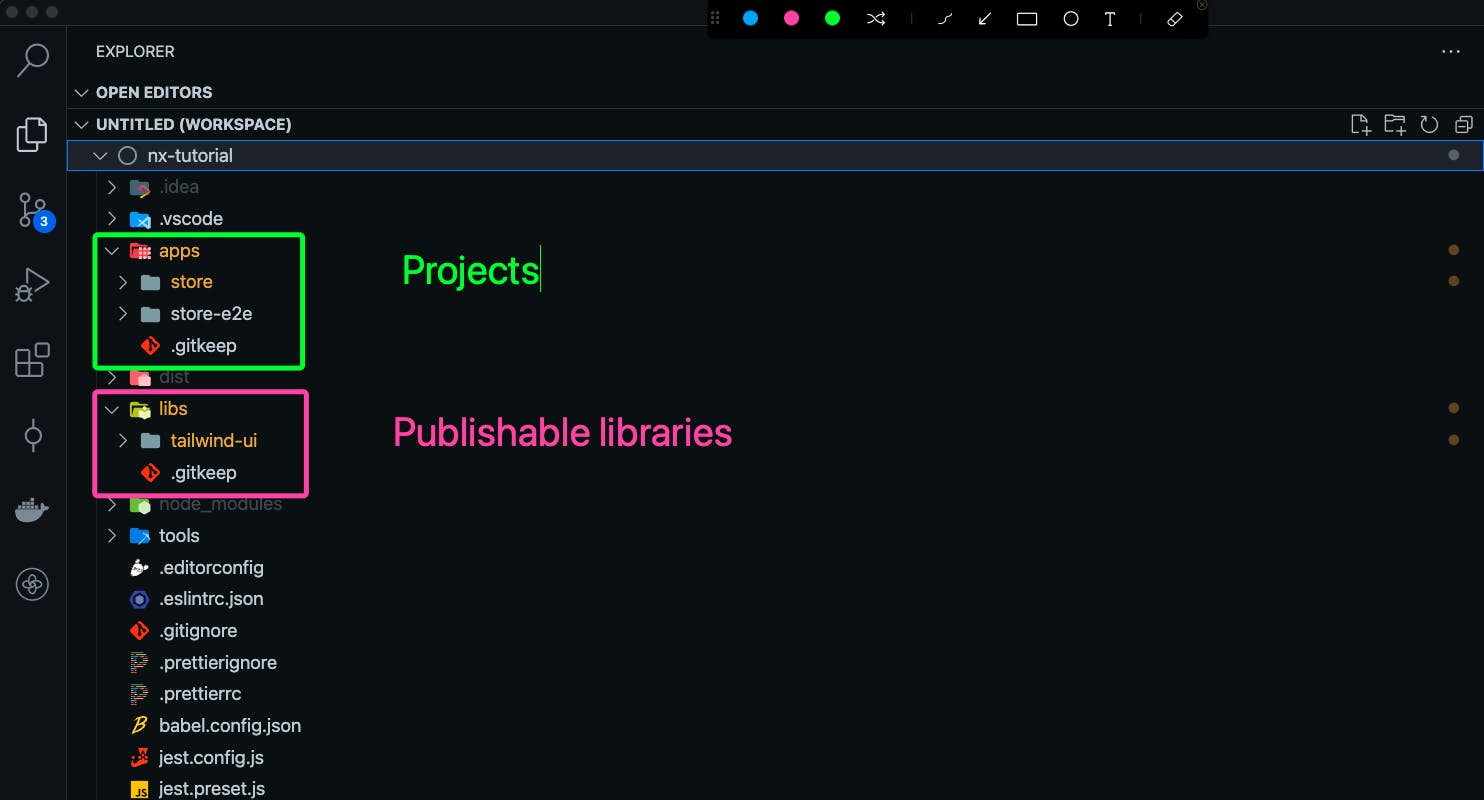
Nx Workspace directory structure
1.1) See the available plugins
You can see all of the available plugins with nx list command
# See the available plugins
nx list
>  NX  Installed plugins:

  @nrwl/jest (builders,generators)
  @nrwl/linter (builders)
  @nrwl/workspace (builders,generators)

>  NX  Also available:

  @nrwl/angular (generators)
  @nrwl/cypress (executors,generators)
  @nrwl/express (executors,generators)
  @nrwl/nest (executors,generators)
  @nrwl/next (executors,generators)
  @nrwl/node (executors,generators)
  @nrwl/nx-plugin (executors,generators)
  @nrwl/react (executors,generators)
  @nrwl/storybook (executors,generators)
  @nrwl/web (executors,generators)

>  NX  Community plugins:
1.2) Installation of the Next plugin
Now, install the Next plugin and see the options of it.
# Install the plugin
yarn add @nrwl/next
1.3) See the plugin options
Let's see what we can do with the plugin. You'll see the available options for the plugin you choose. I am going to generate an application but first I need to see all options. We have options four options to generate and 3 to execute.
# See the options for the plugin
# nx list [plugin]
nx list @nrwl/next
>  NX  Capabilities in @nrwl/next:

  GENERATORS

  init : Initialize the @nrwl/next plugin
  application : Create a Next.js application
  page : Create a Next.js page component
  component : Create a React component

  EXECUTORS/BUILDERS

  build : Build a Next.js app
  server : Serve a Next.js app
  export : Export a Next.js app. The exported application is located at dist/$outputPath/exported.
1.4) See the options for generating a Next application
Before generating the Next application, It will be better to see initial configuration options for generating an app. To do this, I must append help flag to the end of the command.
# See the options for generating a Next application
nx generate @nrwl/next:application --help
nx generate @nrwl/next:application [name] [options,...]

Options:
  --name                  The name of the application.
  --directory             The directory of the new application.
  --style                 The file extension to be used for style files. (default: css)
  --server                The server script path to be used with next.
  --linter                The tool to use for running lint checks. (default: eslint)
  --skipFormat            Skip formatting files
  --skipWorkspaceJson     Skip updating workspace.json with default options based on values provided to this app (e.g. babel, style)
  --unitTestRunner        Test runner to use for unit tests (default: jest)
  --e2eTestRunner         Test runner to use for end to end (e2e) tests (default: cypress)
  --tags                  Add tags to the application (used for linting)
  --js                    Generate JavaScript files rather than TypeScript files.
  --setParserOptionsProjecWhether or not to configure the ESLint "parserOptions.project" option. We do not do this by default for lint performance reasons.
  --standaloneConfig      Split the project configuration into <projectRoot>/project.json rather than including it inside workspace.json
  --dryRun                Runs through and reports activity without writing to disk.
  --skip-nx-cache         Skip the use of Nx cache.
  --help                  Show available options for project target.
1.5) Generating a Next JS application
It is better to use —dryRun flag on generating an application. Also, I need to give a name to my app. When I execute the command, some configuration options will be available to me. I'll stick with CSS styling option
# I'll also choose the name of the app as "store"
nx generate @nrwl/next:application store
? Which stylesheet format would you like to use? …
❯ CSS
  SASS(.scss)       [ sass-lang.com          ]
  Stylus(.styl)     [ stylus-lang.com        ]
  LESS              [ lesscss.org            ]
  styled-components [ styled-components.com ]
  emotion           [ emotion.sh            ]
  styled-jsx        [ npmjs.com/package/styled-jsx ]
1.6) Start Next JS Application
After setting up the Next application, let's open workspace.json file. In the file, you will see the target list under the store application. Those are the actions that I can do with the Next JS application.
{
  "version": 2,
  "projects": {
    "store": {
      "root": "apps/store",
            --- --- --- --- --- ---
      "targets": {
        "build": {
                    --- --- --- --- --- ---
        },
        "serve": {
                    --- --- --- --- --- ---
        },
        "export": {
                    --- --- --- --- --- ---
        },
        "lint": {
                    --- --- --- --- --- ---
        }
      }
    },
    --- --- --- --- --- ---
    --- --- --- --- --- ---
Now, I can start serving the app by the run command.
# Serving the app
# nx run [project]:[target]
nx run store:serve
Now, open your browser and navigate to localhost:4200
 Installing Dependencies
2.1) TailwindCSS Setup
I am going to style the web app with Tailwind CSS. Let's add the dependencies of it.
# Tailwind CSS dependencies
yarn add -D tailwindcss@latest postcss@latest autoprefixer@latest

# Other styling libs
yarn add @heroicons/react @headlessui/react
# Put tailwind config file in the app dir
cd apps/store
npx tailwindcss init -p
// apps/store/postcss.config.js
module.exports = {
  plugins: {
    tailwindcss: { config: './apps/store/tailwind.config.js' },
    autoprefixer: {},
  },
};
According to the docs, Nx utility function should be used for purge property. This eliminates additional manual maintenance as your workspace progresses. Also, it should be noted that Nx only purges on production build.
// apps/site/tailwind.config.js
const { join } = require('path');

// available since Nx v 12.5
const { createGlobPatternsForDependencies } = require('@nrwl/next/tailwind');

module.exports = {
  mode: 'jit',
  purge: [
    join(__dirname, 'pages/**/*.{js,ts,jsx,tsx}'),
    ...createGlobPatternsForDependencies(__dirname),
  ],
  darkMode: false, // or 'media' or 'class'
  theme: {
    extend: {},
  },
  variants: {
    extend: {},
  },
  plugins: [],
};
2.2) Import TailwindCSS Styles
When I'm in the root folder, I'll create separate style file for tailwind.
# create tailwind.css file on pages dir
touch apps/store/pages/tailwind.css
/* apps/store/pages/tailwind.css */
@tailwind components;
@tailwind base;
@tailwind utilities;
/* apps/store/pages/styles.css */
@import "./tailwind.css";

/* The rest of styles.css file */
/* ----------------------------*/
3) Create a library
Nx framework allows you to structure your project with apps and libs. In other words, we don't need to create app libraries specifically in the app directory. We can also create separate and publishable libraries.
There are different types of libraries you can create:
You can easily move the libraries using the @nrwl/workspace:move generator command
We have two options for building libraries either —buildable or —publishable. Those are valid for Angular, React, NestJS and Node. Therefore, I am going to use React libraries as a separate standalone publishable library.
You will also find useful options flag that you can pass to the CLI command. You can find the full list of the react:library options.
# Create a library wiht @nrwl/react package
# See which files will be written to the disk
# (output is not produced)
nx g @nrwl/react:lib tailwind-ui --dry-run

# Now create the library as publishable
# publishable flag requires importPath=npmusername/libraryname
nx g @nrwl/react:lib tailwind-ui  --publishable --importPath=@canburaks/tailwind-ui --globalCss=true --component=false

# Also you can remove the library as like this
# nx g remove tailwind-ui
# You'll see the ouput like that
✔ Which stylesheet format would you like to use? · css
UPDATE workspace.json
UPDATE nx.json
CREATE libs/tailwind-ui/.eslintrc.json
CREATE libs/tailwind-ui/.babelrc
CREATE libs/tailwind-ui/README.md
CREATE libs/tailwind-ui/package.json
CREATE libs/tailwind-ui/src/index.ts
CREATE libs/tailwind-ui/tsconfig.json
CREATE libs/tailwind-ui/tsconfig.lib.json
UPDATE tsconfig.base.json
CREATE libs/tailwind-ui/jest.config.js
CREATE libs/tailwind-ui/tsconfig.spec.json
4) Create a components
Now, I generated a publishable user interface component library. I'm planning to populate this library with tailwind components.
Additionally, style=none flag is added because components styling will be done by tailwind classes and there is no need to create extra style file.
Also, the library will not include tailwindcss library, meaning that the library has a peer dependency of tailwindcss.
4.1) Generate components for the library
# Navbar component
nx g @nrwl/next:component Navbar --project=tailwind-ui --style=none --export=true

# Footer component
nx g @nrwl/next:component Footer --project=tailwind-ui --style=none --export=true
4.2) Generate components for the app
I generated the required files for the library components. It is a good practice to create Layou component for the NextJS apps. Let's create it.
nx g @nrwl/next:component Layout --project=store --style=none
Now, fill those files likes these:
// apps/store/components/layout/layout.tsx

import Navbar from './navbar'
import Footer from './footer'

export default function Layout({ children }) {
  return (
    <>
      <Navbar />
      <main>{children}</main>
      <Footer />
    </>
  )
}
// libs/tailwind-ui/src/lib/navbar/navbar.tsx
export function Navbar() {
  return (
    <section className="w-full px-8 text-gray-700 bg-white ">
      <div className="container flex flex-col flex-wrap items-center justify-between py-5 mx-auto md:flex-row max-w-7xl">
        <div className="relative flex flex-col md:flex-row">
          <a
            href="/"
            className="flex items-center mb-5 font-medium text-gray-900 lg:w-auto lg:items-center lg:justify-center md:mb-0"
          >
            <span className="mx-auto text-xl font-black leading-none text-gray-900 select-none">
              cbsofyalioglu<span className="text-indigo-600">.</span>
            </span>
          </a>
          <nav className="flex flex-wrap items-center mb-5 text-base md:mb-0 md:pl-8 md:ml-8 md:border-l md:border-gray-200">
            <a
              className="mr-5 font-medium leading-6 text-gray-600 hover:text-gray-900"
              href="/contact"
            >
              Contact
            </a>
          </nav>
        </div>

        <div className="inline-flex items-center ml-5 space-x-6 lg:justify-end">
          <a
            href="/login"
            className="text-teal-600 px-8 py-2 border-teal-600  font-medium leading-6 border-2 rounded-lg transition ease-out duration-300 hover:text-blueGray-100 hover:bg-teal-600"
          >
            Login
          </a>
        </div>
      </div>
    </section>
  );
}
// libs/tailwind-ui/src/lib/footer/footer.tsx
export function Footer() {
  return (
    <section className="text-gray-700 bg-white body-font border-t-4 border-teal-800">
      <div className="container flex flex-col items-center px-8 py-8 mx-auto max-w-7xl sm:flex-row">
        <a
          href="filizguvenlik.com.tr"
          className="text-xl font-black leading-none text-gray-900 select-none logo"
        >
          cbsofyalioglu<span className="text-indigo-600">.</span>
        </a>
        <p className="mt-4 text-sm text-gray-500 sm:ml-4 sm:pl-4 sm:border-l sm:border-gray-200 sm:mt-0">
          © 2021 -{' '}
          <a href="webmeister.org" target="_blank" className="text-xs" rel="noreferrer">
            Webmeister
          </a>
        </p>
      </div>
    </section>
  );
}
// libs/tailwind-ui/src/index.tsx
export * from "./lib/navbar/navbar"
export * from './lib/footer/footer';
Now, I must build the library. By doing this, I'll be able to import the components to the app.
# build library
nx run tailwind-ui:build
// apps/store/pages/_app.tsx
import { AppProps } from 'next/app';
import Head from 'next/head';
import './styles.css';
import Layout from '../components/layout/layout';

function MyApp({ Component, pageProps }) {
  return (
    <Layout>
      <Component {...pageProps} />
    </Layout>
  );
}

export default MyApp;
// // apps/store/pages/index.ts
export default function Index() {
  return (
    <div className="min-h-screen">

    </div>
  );
}
Now, restart the server.
4) Generate pages
// Generate a contact page
nx generate page Contact
// apps/store/pages/contact.tsx
/* eslint-disable react/no-unescaped-entities */
/* eslint-disable @next/next/no-img-element */

export default function Contact(props) {
  return (
    <div className="container mx-auto mt-8 md:mt-0 md:space-x-10 md:grid grid-cols-3 justify-center md:py-40">
      <div className="grid justify-center items-center order-1 col-span-1">
        <img
          className="lg:h-80 md:h-64 h-40 rounded-full"
          src="cbsofyalioglu.fra1.cdn.digitaloceanspaces.…"
          alt=""
        />
      </div>
      <div className="mt-8 md:mt-0 lg:justify-end col-span-2">
        <h1 className="text-4xl text-gray-800 text-center md:text-left font-bold mb-6">
          Hi, I am Can Burak Sofyalioglu.
        </h1>
        <p className="text-xl text-gray-800 text-center md:text-left">
          I'm an engineer.
        </p>
      </div>
    </div>
  );
}
# Create component within a lib
npx nx g @nrwl/react:component todos --project=ui --export