Next.js Router and React Router: Difference


Background
Before we dive into the topic, it helps to have some background.
What is React
React was originally created by Facebook and has become one of the most popular libraries in the frontend world today. React is easily extendable and can include features like routing as well as state management patterns with libraries like Redux. React is minimal in its footprint but can be customized for almost any project.
What is Next.js
Next.js was created on top of React in an effort to build an easy-to-use development framework. It was developed by Vercel and makes use of many of the popular features of React. Right out of the box, Next.js provides things like pre rendering, routing, code splitting and webpack support.
Major Difference
React is a JavaScript library that helps you to build user interfaces using components as building blocks. Next.js is a framework with a set of libraries that work together to build a web app, and one of those libraries is React.
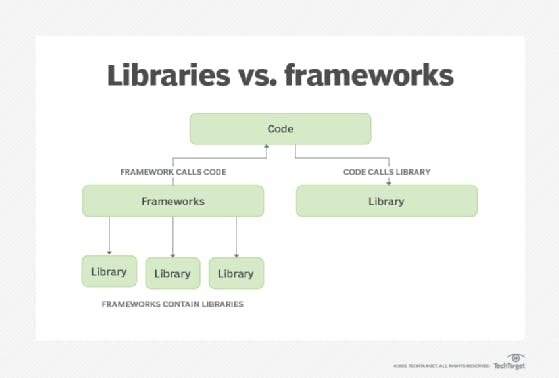
Library vs. framework
Libraries and frameworks are code that someone else wrote to help you solve common problems while writing your application.
Libraries
Libraries are to solve a specific problem in your app. For example:
- Routing
- Dates management
- Transform data
Frameworks
It can be everything you use to develop your web app. Typically is a collection of libraries that work together in some opinionated way to help you build a fully functioning app.
What do React vs. Next.js projects look like?
with React, you can get up and running by installing Node.js on your machine and running npx create-react-app my-app. This will create a basic structure with src/App.js file as the entry point for the application.
you'll also have a public folder where you can store assets, and the initial scaffold includes a service worker and a method to pull in Jest for testing. The initial scaffold looks like this:
├── public

    ├── favicon.ico

    ├── index.html

    ├── logo192.png

    ├── logo512.png

    ├── manifest.json

    └── robots.txt

├── src

   ├── App.css

   ├── App.js

   ├── App.test.js

   ├── index.css

   ├── index.js

   ├── logo.svg
With Next.js, you can get started by running npx create-next-app. This will scaffold out a project that already has a pages folder for the pages or routes and a public directory that hosts your assests. The intitial scaffold looks like this:
├── node_modules

├── pages

   ├── _app.js

   ├── api

   └── index.js

├── public

   ├── favicon.ico

   └── vercel.svg

├── styles

   ├── Home.module.css

   └── globals.css
The files in the pages directory correlate to the routes in your application. The public directory holds your static files or images you want to serve, and it can be directly accessed - no need to use require or other traditional React methods to import pictures into components.
Within the pages directory, you'll see an index.js file, which is the entry point of your application. If you want to navigate to other pages, you can use router with Link, check out in next/link below
The initial scaffolding process is pretty straightforward for both Next.js and React. React, however, does require you to add libraries like React Router for routing,
whereas Next.js that functionality out of the box with the Link component.
Additionally, the overall structure of your application is already guided by Next.js by having the pages directory to hold your containers etc.
ReactJS | Router - Building Pages
React Router is a standard library for routing in React. It enables the navigation among views of various components in a React Application, allows changing the browser URL, and keeps the UI in sync with the URL.
React Router can be installed via npm in your React application npm install react-router-dom --save and wait till all dependencies get downloaded.
The main Components of React Router are:
BrowserRouter: BrowserRouter is a router implementation that uses the HTML5 history API(pushState, replaceState and the popstate event) to keep your UI in sync with the URL. It is the parent component that is used to store all of the other components.
Route: Route is the conditionally shown component that renders some UI when its path matches the current URL.
Link: Link component is used to create links to different routes and implement navigation around the application. It works like HTML anchor tag.
Switch: Switch component is used to render only the first route that matches the location rather than rendering all matching routes. Although there is no defying functionality of SWITCH tag in our application because none of the LINK paths are ever going to coincide. But let’s say we have a route (Note that there is no EXACT in here), then all the Route tags are going to be processed which start with ‘/’ (all Routes start with /). This is where we need SWITCH statement to process only one of the statements.
To add React Router components in your application, open app.js and import BrowserRouter.
Code
import { BrowserRouter as Router, Route, Switch} from 'react-router-dom';
BrowserRouter: Add BrowserRouter aliased as Router to your app.js file in order to wrap all the other components. BrowserRouter is a parent component and can have only single child.
 return (
      <Router>
           <div className="App">
                Text
           </div>
      </Router>
   );
Route: Route component will now help us to establish the link between component’s UI and the URL. To include routes to the application, add the code give below to your app.js.
    <Route exact path='/' component={Home}></Route>
    <Route path='/about' component={About}></Route>
    <Route path='/contact' component={Contact}></Route>
Note: Here Home, About and Contact are all components that React Router is routing the URL path to render.
1. exact: it is used to match the exact value with the URL. For Eg., exact path=’/about’ will only render the component if it exactly matches the path
2. path: Path specifies a pathname we assign to our component.
3. component: It refers to the component which will render on matching the path.
Switch: To render a single component, wrap all the routes inside the Switch Component.
    <Switch>

         <Route exact path='/' component={Home}></Route>
         <Route path='/about' component={About}></Route>
         <Route path='/contact' component={Contact}></Route>

    </Switch>
Switch groups together several routes, iterates over them and finds the first one that matches the path. Thereby, the corresponding component to the path is rendered.
Live Project Example
 The above image is from the project which I had developed, you can see the
 <Router> in which all the other components are wrapped. The other two components header footer which are not wrapped in <switch> are fixed components in our application. They are rendered throughout the application and only <switch> components are switched with respect to routing. The path and components reference is given to Route.
Note: The home path "/" must be written at the end of <switch> , otherwise it will give an error.
Next.js | Router
Other libraries used by Nextjs are:
- next/router for routing and navigation
- next/link a component that allows our web app to link pages and lazy load data
1. next/link
If you look at the Next.js folder of the project, you'll notice that the project is much leaner because the routes are all built into the pages folder. The Header component uses Link to route to the different pages, as you see here:
Snippet:
 <Link href ="/" >
      <a className ="header_anchor"> Home </a>
 </Link>
 The above image is from the project which I had developed, where you can see the Link tag with the value as { url }. The url will be received as a prop from other component and it looks like
 / /home /profile .
Client-side transitions between routes can be enabled via the Link component exported by next/link
  import Link from "next/link";

  const sample = ( ) = > {
        return(
            <div className = "sample" >
                    <span>
                         <Link href="/">Home</Link>
                    </span>
                    <span>
                         <Link href="/episodes">Episodes</Link>
                    </span>
                    <span>
                         <Link href="/season2">Season 2</Link>
                    </span>
            </div>
         );
     };
href - The path or URL to navigate to. This is the only required prop.
2. next/router
If you want to access the router object inside any function component in your app, you can use the useRouter hook. import { useRouter } from 'next/router';
Take a look at the example,
 import { useRouter } from 'next/router';

 function Sample({ children, href }) {
   const router = useRouter()

 const handleClick = (e) => {
     e.preventDefault()
     router.push(href)
   }

 return (
     <a href={href} onClick={handleClick} style={style}>
       {children}
     </a>
   )
 }

 export default Sample;
router.push handles client-side transitions, this method is useful for cases where next/link is not enough.
router.push(url, as, options);
url - The URL to navigate to.
options
scroll - Optional boolean, controls scrolling to the top of the page after navigation. Defaults to true.
Usage
  import { useRouter } from 'next/router'

  export default function Page() {
    const router = useRouter()

     return (
       <button type="button" onClick={( ) => router.push('/about')}>
         Click me
       </button>
     )
   }
The button is rendered to the output and when we click on the button then the router will push to about page.
Difference between < a > tag and next/link or next/router
The main difference between a normal < a > tag and next/link or next/router is that the latter two are used for client-side transitions. So a normal < a > tag will load/navigate to the page with an http request, while router and link with load the page client-side.
When to use next/router or next/link
You can use next/router (inside a function in your component) when next/link is not enough, for example if you need to do some operations before render the new component.
So both router and link has similar behaviours, you can choose, based on what your app needs to do, which one to use. Both, will run data fetching methods (getServerSideProps, getStaticProps, and getInitialProps).
Tip 1: Buttons are for actions (use next/router) and links are to go somewhere.
Tip 2: Use Link tag over < a > because, Link avoids reloading the page whereas, < a > reloads the page.
Conclusion
React and Next.js both provide great developer experience in their own way.React lets you build things the way you want and is supported by a strong community. Next.js makes your life easier through several tools and conventions available out of the box, and it is backed by a very active open source community as well.
When it comes to the tooling itself, both React and Next.js were easy to get started. Going beyond the simple “hello world” project, it was fairly easy to find help, whether it be in the documentation or community resources.
At the end of the day, both React and Next.js provide solid developer experiences. I hope the comparisons and discussions I’ve included here give some insight to how you could use them with your projects. I encourage you to check them out, and check out my sample projects as well.