Build a complete React app, step-by-step with the MERN stack
Intro
What?
This is a step-by-step tutorial that will help you get up to speed with React quickly, and also build a complete app with the MERN (Mongo-Express-React-Node) stack. You'll also learn other tools that you typically use to build an app: Gulp, Browserify, Material-UI and React-Bootstrap.
Why?
Why another React tutorial when there are so many out there? Well, most of them focused on React alone. When I set out to write my React app, I couldn't find any advice on whether or not to use jQuery and how to fit in Bootstrap. And, how about bower vs. browserify? What about grunt? Or gulp? How do I put it all together? Which UI framework is appropriate?
Well, I found out, the hard way. Now that it's done, here it is.
How?
There is nothing that I invented here, it's all a string-together of links to existing resources. You're supposed to read the links (Read), then accomplish some tasks that I assign (Write), and just think about what and why we did stuff (Ruminate). Some folks like @keenavasan suggest taking a peek at the tasks (Write part) before starting to read, or mixing the two. Whatever works for you.
At the end of the exercise, you'd have built a simple CRUD app. I chose a Bug Tracking app for this purpose.
I encourage you type out the code yourself (not copy-paste). This is something I found very useful in the learn something the hard way series of tutorials. Use the github repo of the source code only for comparison, and when you are really, really stuck.
Edit (Apr/06/2016): We now have the source for other variants of this tutorial:
- ES6/Webpack/Mongoose - thanks to @deviantony
- ES6/Webpack/No jQuery - mine.
Who?
You're expected to know Javascript and have a fair bit of web app development in any language / stack. MEAN stack is ideal. I am assuming that you have access to a Linux VM or desktop to write and test code, this is the easiest way.
Which?
This was written during my Christmas break of 2015. It's highly likely that when you are reading this in, say, summer of 2016, things will be quite different.
Here are the versions of various stuff used when writing this tutorial:
- OS: ubuntu 14.04 LTS
- nvm: 0.29.0
- node: 4.2
- mongodb: 2.4.9
- Rest of the stuff: take a look at package.json
1. Hello World

We'll start with a Hello World app, served from a very rudimentary server using Node and Express.
1.1 index.html as a file
We'll take a few shortcuts to get going really quickly. We'll create an html file that we can just open in a browser to get a really simple Hello World running.
Read
- React Getting Started - Quick start without npm, stop before the Separate File section. Don't start copying this part yet ... if you're impatient, take a peek at the Write section below.
- cdjns - react (or google for react cdn)
- React Tutorial - Getting Started, stop before Your First Component.
Write
- Create an index.html file on your filesystem with (almost) the same contents as the quick start.
- Replace the scripts
build/react.jsandbuild/react-dom.jswith the ones from the CDN, so that it looks like the one in the Tutorial. - Open index.html in a browser
Ruminate
- Doesn't the HTML string need quotes? No, it's JSX!
- Does the browser understand JSX? No, Babel (the third script in index.html) compiles it to Javascript on the fly.
- What about React itself? Where's the real React library?
Compare your work with index.html in my Step 1.1
1.2 Serve it up
Instead of opening a html file in the browser, let's create an express/node web-server that serves the index.html instead.
Read
- nvm - installation
- nvm - Node installation
- Express - installation
- Express - Hello World
- Express - Static files
Write
- Install nvm and the latest version of Node.
- Run
npm initand install express as per the Express Installation instructions.. Remember to use--save. We'll be using--savein pretty much all our npm installs. - Use
webapp.jsas the entry point for the node server when you donpm init. - Create a simple static file server to serve the index.html, which shall be placed under the directory
static. - Run the server using
node webapp.jsand point your browser to http://localhost:3000. - You may want to make the installed version of node the default. For example
$ nvm alias default 4.2) or the next time you enter the shell node will not be in your PATH, or you may get the wrong version.
Ruminate
- Use the Network tab under your browser's developer console and checkout the time it takes to retrieve each resource.
- Compare: Here are my full set of files and the changes for step 1.2.
2. Organize

2.1 Split HTML and JS
Read
Write
- Create a new file App.js along side index.html.
- Move the script contents from index.html and use
src=to refer to the new file.
Ruminate
- Compare Here are my full set of files and the changes for step 2.1.
2.2 Transform
Read
- React Tutorial - Using react from npm (Ignore the parts about webpack / browserify / bower. We'll be manually transforming the JSX files for now.)
- Babel - CLI
Write
- Move App.js to an
srcfolder. - Install babel-preset-react (locally) and babel-cli (globally).
- Manually transform
src/App.jstostatic/App.js. Write a shell script to do this. - Remove the run-time transform.
- Add
--watchso that changing the source file automatically generates the destination. - There are innumerable ways of getting this done. reactify was the de-facto till recently. I recommend the manual transform at this stage, since that shows clearly what's happening.
Ruminate
- Look at the output generated by the babel/react transform.
- What else does Babel do? Consider switching to ES2015, now that we are using Babel.
- Compare with my step 2.2 and diff with 2.1. A global install of babel-cli is not visible here, though.
3. Compose Components
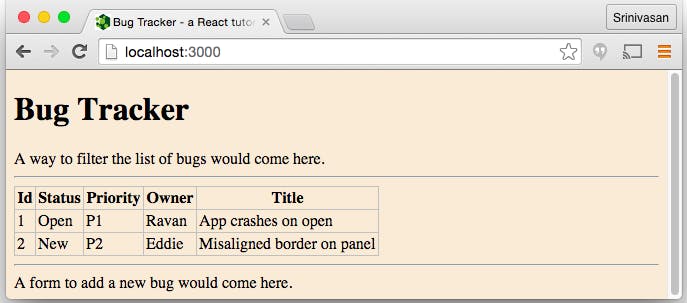
The key thing about React is creating and re-using components.
3.1 Use React.createClass
Read
Write
- Change the Title of our page to something more meaningful
- Change the id of the container where everything is rendered to
main - Create a component called
BugListwhich renders just a div with placeholder text. Render this component in theReactDOM.render()method. - Using minified React scripts hides errors. Use the non-minified version.
Ruminate
- React classes must return a single DOM element in their
render()function. Why is this so? - Compare with my diffs for Step 3.1 and complete 3.1 source.
3.2 Compose Components
Read
- React Tutorial - Composing Components (stop just before Using Props)
Write
- Create three classes -
BugFilter,BugTableandBugAdd, with place holder text indicating that each section is meant for a filter, a table to list all the bugs, and a form to add a new bug. - Replace the placeholder in
BugListwith these three classes.
Ruminate
- Compare with my diffs for Step 3.2 and complete 3.2 source.
3.3 Communicate between components
Read
- React Tutorial - Using props
- React Tutorial - Component properties (skip all the Markdown stuff)
Write
- Create a new class
BugRowfor a single table row for a bug, which displays one column each for id, status, priority, owner, title of the bug. - Create a bordered table with a header
- Add two
BugRowinstances from within<tbody>of the Bug Table. - Pass the bug attributes as parameters as props from
BugList
Ruminate
- Why doesn't
border=1attribute for the table work? - Think about the use of curly braces
{ }to step into Javascript world while inside the HTML representation. Is this like<?phpor{{}}in Angular.js? - When does one pass parameters to children as props using
this.propsvis-a-vis as children usingthis.props.children? Why not always usethis.props? - Here is my diffs for Step 3.3 and complete 3.3 source.
3.4 Dynamic Composition
Let's now create the rows of bugs from an array, dynamically.
Read
Write
- Similar to the React tutorial, create a global array of bugs.
- Pass this as the
propsvariablebugsfrom theBugListclass down to theBugTableclass. - Create an array of
<BugRow>classes in therender()function ofBugTablebased on the passed-inprops.bugs, and replace the hard-coded<BugRow>s with this.
Ruminate
- Why is the special
keyproperty required? - You could pass the entire bug object instead of each attribute from
BugTabletoBugRow. Which style would you use and why? Are there situations where you would use the other style? - I chose to pass the global data right from
BugList, though we could have done it fromBugTableitself. Why? - Here is my diffs for Step 3.4 and complete 3.4 source.
4. Dynamic updates
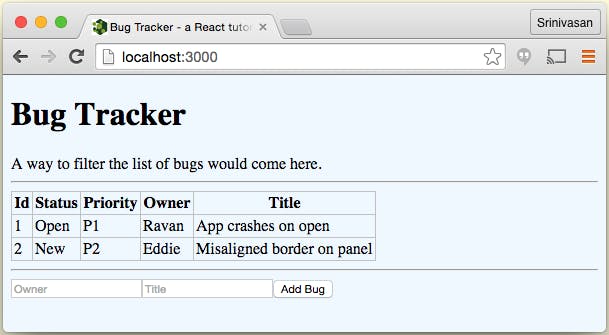
Props are immutable. We need to store our data in the State and update it dynamically.
4.1 Create initial state
Read
- React Tutorial - Reactive state (ignore updating state for the moment)
Write
- Add a
getInitialState()function toBugList, which just returns the global bugs data. - Look at the props passed in from
BugListtoBugTable. Replace this with state.
Ruminate
- There is no apparent change, why did we have to do this?
- Here is my diffs for Step 4.1 and complete 4.1 source.
4.2 Update the state
Read
- React Guide - Interactivity and Dynamic UIs
- React Tutorial - Updating state, but don't focus on the ajax part. Focus on
this.setState()and its effect. We'll come back to Ajax later.
Write
- Add a test button in
BugListwhich will trigger a test method in the same class on anonClickevent. - Let that test method call another method
addBug()which adds a bug, taking a bug object as parameter. - Let
addBug()modify the state. Get a copy of the current state's bug list, modify it by pushing the new bug, and set the new state. - Add a console log message in
render().
Ruminate
- Why is a
render()onBugListautomatically called when we change the state? - Would
render()also be called for the other classes? - Does
render()really change the DOM? Always? - Here is my diffs for Step 4.2 and complete 4.2 source.
4.3 Communicate child to parent
Read
- React Tips - Communicate between components
- React Tutorial - Callback as props, notice how you can pass a function as a props variable.
- React Tutorial - Submitting the form, but ignore all the information on form inputs' values and handing changes for the moment.
Write
- Replace the placeholder text in
BugAddwith a real form, including the Add button. Don't attempt to show an initial value in the inputs, use the form in the old plain-HTML way. - Pass the
addBugfunction as a props variable to theBugAddclass. - Remove the test button and its handler. Add a handler (
onClickoronSubmit) to theBugAddclass. - In the handler, call the passed-in-props: the
addBugfunction. Create abugobject by looking at the form values the traditional way, i.e., using form input values.
Ruminate
- If the state had been maintained in
BugTableinstead ofBugList, would this have been possible? - Why does the bug list reset to the original when you hit Refresh on the browser? How do you make it stay?
- Here is my diffs for Step 4.3 and complete 4.3 source.
5. Data on server

We'll now move the data store to the server, but not use a database yet. We'll store it in memory.
5.1 GET API
Read
Write
- Create an initial array of bugs in the web server.
- In the web server, create an endpoint
/api/bugs. - Stringify and return the array of bugs in this endpoint.
- Test by typing the URL directly in the browser.
Ruminate
- Inspect the request response on a browser refresh.
- We get a 304 Not Modified response sometimes. What if we use curl on the command line?
- Read this stackoverflow question and see if we need to disable caching.
- Here is my diffs for Step 5.1 and complete 5.1 source.
5.2 POST API
Read
- Express - req.body
- body-parser - Installation and body-parser - bodyParser.json. Pay special attention to the type option.
Write
- Install body-parser. We'll need to use this to parse JSON in the request body.
- Create a POST handler for
/api/bugsin the web server that takes in a new bug as JSON and adds it to the bug array. Generate the bug ID based on current array length. - Return the new bug created (so that the generated id is known to the caller) as the response. Use
res.json()instead ofres.send(). - Test using curl -- send a JSON as the request body.
- Note: If you don't use
typewhen creating thebodyParser, you will have to explicitly send a header for content type asapplication/json.
Ruminate
- Here is my diffs for Step 5.2 and complete 5.2 source.
5.3 Use the GET API
Read
- React Tips - Load initial data via AJAX
- React Tutorial - Updating state
- stackoverflow - why getInitialState can't do async requests
- React Tutorial - Getting Started, for jQuery CDN inclusion.
- jQuery -
$.ajax()
Write
- Include jQuery, we'll need this for making Ajax calls.
- In our client app code, return an empty array in getInitialState. Get rid of the global bug data, we'll be getting this from the server now.
- Make an ajax call to fetch the data in
componentDidMount, usesetState()to set the state to the returned data.
Ruminate
- Look at the number of times
render()is called. Can this be avoided? Does it need to be avoided? - What's that
bind(this)all about? What happens if we did not bind? - Here is my diffs for Step 5.3 and complete 5.3 source.
5.4 Use the POST API
Read
- React Tutorial - Adding new comments (We've already read and used the form related parts, now read the ajax call parts.)
- React Tutorial - Optimistic updates
Write
- Modify
addBugto POST the bug to the server's api. - Do the
setStateon successful return of the POST API, using the response data as the new bug to push.
Ruminate
- Could we have done optimistic updates? Why or why not?
- Do we need a
bind()for the error handler? - Here is my diffs for Step 5.4 and complete 5.4 source.
6. Save to database

We'll now use a database to act as the store for the list of bugs instead of the in-memory store.
6.1 Initialize
Read
- MongoDB - Installation
- MongoDB - Inserting Data
- MongoDB - Querying Data
- MongoDB - Removing Data
- MongoDB - Using Mongo Shell
Write
- Play around with the Mongo shell, insert and fetch some documents in a collection.
- Create a Mongo shell script that we can use to initialize a collection with set of initial values.
- Remove existing records before inserting the initial default ones.
- Run the shell script to initialize the DB.
Ruminate
- MongoDB generates its own primary key called
_id. Is it OK to use the same, or should we generate our own? - If we need to generate our own sequence like 1,2,3 ... how complicated is it?
- Here is my diffs for Step 6.1 and complete 6.1 source.
6.2 Connect and Read
Read
Write
- Install mongoldb driver using nom (don't forget
--save). - Connect to the db, and in its success function, (a) save the connection to a global variable, (b) start the web server.
- Modify the GET API to query the data from the DB using
find(), and convert it to an array. - Send the array as a JSON in the response.
- In the client code, replace
idwith_idwhich is generated by MongoDB.
Ruminate
- Should we have used
cursor.each()? - We're saving the connection in a global variable. Is this safe? What happens if the DB connection is lost? Restart the MongoDB server while the web server is still running to see what happens.
- Here is my diffs for Step 6.2 and complete 6.2 source.
6.3 Write to DB
Read
- MongoDB - Insert Data with Node.js
- Mongo Driver - Collection.insertOne()
- Mongo Driver - insertOneWriteOpResult
- Mongo Driver - Collection.findOne()
Write
- Modify the POST API to insert a record.
- For the return value, you will have to
find()the inserted record, whose_idis part of the result of the insert. - Now's the time to get rid of the in-memory database array of bugs.
- Test, and also check via the mongo shell whether new records are being inserted.
Ruminate
- Could we have just added the
_idto the passed in but to be added and returned that instead of doing afindOne()again? findOne()is deprecated. Did you use the suggested alternative?- Here is my diffs for Step 6.3 and complete 6.3 source.
7. Build and Bundle

Now, we'll take a break to get a little more organized. As we go along, we'll be writing more React components, so it's a good time to modularize. We'll use browserify to modularize, and gulp to automate.
This step is entirely optional, you may skip this if you are OK with a single App.js file and not too particular about the loading time of the React library from the CDN.
7.1 browserify
Read
- browserify, how to use a node-style
requireto organize client-side code.
Write
- Install browserify globally, to start with. We won't save this in package.json, as we'll use a local install finally.
- Install
jquery,reactandreact-domvia npm. - Use require statements to include react, react-dom and jQuery in the app.
- Manually browserify the transformed JS file, write out a
bundle.jsin the static directory. - Replace all scripts in the
index.htmlwith onebundle.js.
Ruminate
- Should we install the client-side libraries using
--saveor--save-dev? Why? - Inspect the Network traffic to ensure only a single javascript is loaded.
- Look at the contents of
bundle.js. What is browserify doing? - Here is my diffs for Step 7.1 and complete 7.1 source. Note that there is a global install of browserify that's not visible in the source.
7.2 Automate with gulp
Read
- gulp - Getting started, to understand task runners.
- babelify, a browserify plugin for Babel transforms on the fly. Don't confuse this with
gulp-babel, which is a gulp plugin. All browserify plugins end with 'ify'. - babelify - Node, how to use browserify purely in Node.
- Gulp + Browserify: The Everything Post, look for USING THEM TOGETHER: GULP + BROWSERIFY right at the end of the post.
Write
- Install
gulpglobally. - Install
vinyl-source-stream,gulp,babelifyandbrowserifylocally. - Write a
gulpfile.js, with one task calledbundle, which takes insrc/App.jsas its source, transforms it usingpresets-react, bundles it, and writes outbundle.jsin thestaticdirectory. - Cleanup: Uninstall the global
browserifyandbabel-cli - Cleanup: remove
static/App.js, and any scripts used for manual transform and bundle. - Generate
bundle.jsby typinggulp bundleon the command line.
Ruminate
- Look at
gulpfile.jsclosely and understand what each of the pipe steps mean. - Here is my diffs for Step 7.2 and complete 7.2 source. Note that there is a global uninstall of browserify, babel-cli that's not visible in the source, as also a global install of gulp.
7.3 watchify
Read
- watchify (skip all the command-line stuff, we'll be using it from within gulp only).
Write
- Install watchify
- Write a new gulp task called
watchas per instructions in the watchify readme, except, usevinyl-source-stream(we've already done this in the previous mini-step) instead ofcreateWriteStream. - Don't bother about code reuse between this and the
bundletask, let's just get it to work. - Remember to return the browserify object within the task definition.
Ruminate
- How can we re-use code between the two tasks? Some ideas in this post by Mitchel Kuijpers.
- There is no output (success or errors) from watchify. Why is that? Check if
bundle.jsis being updated on changes to the app source. - Here is my diffs for Step 7.3 and complete 7.3 source.
7.4 Error Handling
Read
Write
- Add an error handler that prints the error object -- find out what are the attributes of the error object.
- Change the printing so that only the message and stack trace are printed.
- Add another print for successful update.
- Optionally, make watch the default gulp task.
Ruminate
- Why is it that
gulp buildprints the errors, whereasgulp watchdid not till we added the special error handling? - Here is my diffs for Step 7.4 and complete 7.4 source.
7.5 Modularize
Read
Write
- Split the single source file into multiple: one for each of the components
BugFilter,BugAddandBugList. Let the file forBugListcontainBugTableandBugRowas well. - Ensure that the bundle is rebuilt when any of the files change.
Ruminate
- Do we have to add all the source files to the watch task?
- Take a look at
bundle.js, especially towards the end. What's happening? - Here is my diffs for Step 7.5 and complete 7.5 source.
8. Filtering
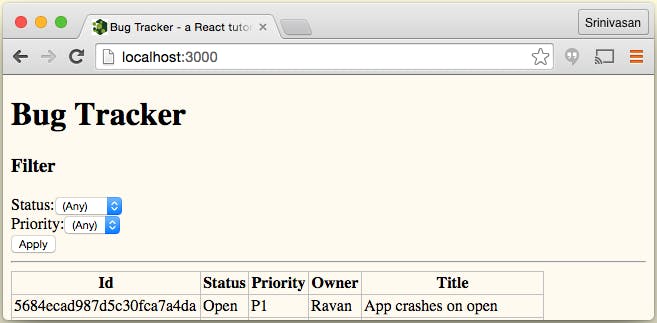
Rather than fetch all the records from the server, we'll add a convenience filter that fetches us a set of records based on an input query filter.
8.1 Add Filter to GET API
Read
Write
- Modify the GET API to add a filter to the
find()call. - Let the filter consist of two parameters: priority and status.
- The parameters must be fetched from the query string of the request, e.g.,
/api/bugs?priority=P1&status=Open. - If either parameter is blank or not specified, the query should not be filtered on that field.
- Test by typing the API call in the browser.
Ruminate
- Here is my diffs for Step 8.1 and complete 8.1 source.
8.2 Hardcoded Filter
Read
- React Tips - Communicate between components
- React Tutorial - Callback as props
- ctheu - How to communicate between child and parent
Write
- Refactor the initial data loading in
BugList. Separate out the ajax call into a function of its own,loadData(). CallloadData()fromcomponentDidMounthandler. - Let
loadData()take in a parameter,filter, which is an object containing the filter parameters as attributes,priorityandstatus. - Use the filter as the query string in the ajax call.
- Replace the
BugFilterplaceholder with a button, add a handler in the same class to handle the click. - Pass a submit handler to
BugFilterfromBugList, and call the submit handler in the button's click handler, with a hardcoded filter, e.g.,{priority: "P1"}. - Test the hardcoded filter by clicking on the button.
Ruminate
- What if we had stored the bug list data in
BugTableinstead ofBugList? Would it have been possible to implement the filter's Submit action? - Here is my diffs for Step 8.2 and complete 8.2 source.
8.3 Filter Form
Read
- React Tutorial - Adding new comments, focus on form inputs and controlled components.
- React Guides - Forms
Write
- In
BugFilter, create a form with controlled components - two dropdowns, one each for priority and status. - Save the values of these dropdowns in the component's state.
- Use the state to create the filter for
loadData().
Ruminate
- On a browser refresh, the filter is reset. How can we prevent this?
- Here is my diffs for Step 8.3 and complete 8.3 source.
9. Routing

Routing will help us use the Browser's URL bar to remember the filter and also help when we add other views ('pages') in the app.
9.1 React Router
Read
- React Router
- James K Nelson - Raw React Routing - this is to understand what happens under the hood of React Router.
- React Router Guides - Route Configuration, Preserving URLs
Write
- Install React Router.
- Create a route for
/bugsto show the Bug List. Let's use the default way of using history, that is, Hash History. Let's not use Browser History. - Create a 404 not found component, use that for any other route.
- Redirect
/to/bugs - Test:
/,/bugsand any other URL for triggering a 404.
Ruminate
- What is that _k=junk query string? rackt - Caveats of Using Hash History can explain this for you.
- Here is my diffs for Step 9.1 and complete 9.1 source.
9.2 URL parameters
Read
- React Router Introduction - Getting URL Parameters, read about query strings in particular.
Write
- Use the URL's query string to set the initial state of the filter in
BugFilter. - Type in a filter manually as a query string (e.g.,
#/bugs?priority=P1) to test that we can pass in a filter via the URL. - Note:
this.props.locationis available only for routed component, i.e.,BugFilter. You'll have to pass this down toBugFiltervia props.
Ruminate
- The initial state of the filter is nicely set, but what about changes to the inputs? The URL and the UI are out of sync on changes in the UI.
- Here is my diffs for Step 9.2 and complete 9.2 source.
9.3 Change filter
We'll change the flow such that hitting Apply in the filter changes the URL's query string as well as loads up a new bug list.
Read
- history - Basic Usage
- jQuery -
$.param() - stackoverflow - Programmatically navigate using react router
- React Router upgrade guide - Programmatic Navigation
Write
- Pass a new function,
changeFiltertoBugFilterinstead ofloadData, for calling to apply a new filter. - Let
changeFiltersync up the URL as well as load the data with the new filter. - As I write this, the right way to access history and programmatically navigate is by using
this.props.historywithin the component. As the upgrade to 2.0 instructions indicate, we may need to change this tothis.props.routermethods instead when 2.0 is released and we adopt that.
Ruminate
- A browser refresh sets the initial state of the filter UI, but the bug list is not filtered. Why?
- Here is my diffs for Step 9.3 and complete 9.3 source.
9.4 Component Lifecycle
What we really need is a single source of truth: the query string. Whenever the query string changes or is initialized, we need to re-load the bug list based on the new filter. The Apply button click should only change the query string.
Read
- React Reference - Component Spec and Lifecycle, Lifecycle Methods
- React Router guides - Component Lifecycle, Lifecycle hooks when routing
- React Router guides - Component Lifecycle, Fetching Data
Write
- In
BugList, Remove the call toloadDatawithinchangeFilter. LetloadData()get the filter from the location's query string. - Hook up to one of the lifecycle methods to get notified on props change (location is part of props). Reload the data in
BugListwhen this happens, and update the state inBugFilteron props change, to trigger a re-render. - Note: If you use
componentWillReceiveProps, you will have to skip fetching new data if previous and current query strings are the same, else, there will be an infinite loop on an initial load. - Note: If you use
componentDidUpdatetoo, you'll have to do that check. Also, you'll notice thatrender()will be called twice when the filter changes: once when the props are received, and again when you do thesetState(). - Try both and take your pick. Better still, choose one method for
BugListto reload the data, and another forBugFilterto re-render when the filter changes, e.g., when you manually change the URL's query string to a new filter.
Ruminate
- Even when there's no change in
BugFilterandBugAdd, they're being re-rendered when a new filter is applied. Is that OK? - Since
render()only affects the virtual DOM, it should be OK to let it be called multiple times? - Are there any other Lifecycle methods that we can use to optimize this further?
- Here is my diffs for Step 9.4 and complete 9.4 source. Note that some changes to the logging have been done to make debugging and understanding the Component Lifecycle easier.
10. Edit page
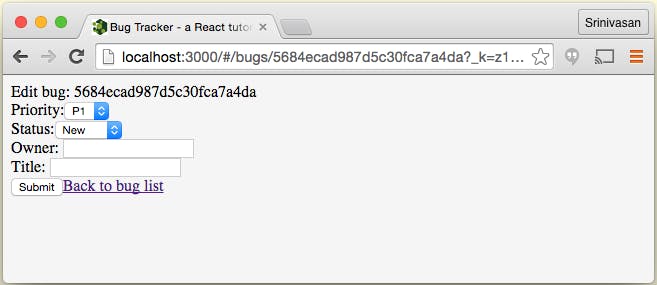
Now that we have routing all set up, let's build a new view / page that lets us display and update a single bug.
10.1 Single object GET API
Read
Write
- Add a
GETAPI of the form/api/bugs/<id>that retrieves a single record. - Be careful about the case of ObjectId, the method and the export from the mongo driver.
- Test by typing the API URL in the browser.
Ruminate
- Do we have to convert a string to ObjectId? If you are used to MySQL, you'll probably expect the database to coalesce the string type to an ObjectId.
- Here is my diffs for Step 10.1 and complete 10.1 source.
10.2 PUT API: update a record
Read
Write
- Add a
PUTAPI that modifies an existing record, the request body will contain the new bug record in JSON format. - The response will contain the new bug record that was modified.
- Test using curl or equivalent. Note: don't forget to add
Content-Typeasapplication/jsonin the curl request, in case you are using the default bodyParser.
Ruminate
- Are we better off using findOneAndReplace instead of the two-step modify and find?
- Here is my diffs for Step 10.2 and complete 10.2 source.
10.3 New route and page
Read
- React Router Introduction - Getting URL Parameters
- React Guides - Forms, we've already read this, a re-read will help.
Write
- Create a new route for a single record like
/bugs/<id>which will mount a new componentBugEdit. - Create a new component
BugEditin a new source file that renders a form with all form elements as controlled components. - Load the initial data using an Ajax call to the GET API.
- Submit the form using the PUT API.
- Handle changes to the route's parameters: reload the bug when just the id is changed.
- Test by manually typing the route, and also by just modifying the bug ID in the URL.
Ruminate
- We had a choice of hooking up to either
componentWillReceivePropsorcomponentDidUpdateLifecycle methods. Which one did you choose, and why? - Here is my diffs for Step 10.3 and complete 10.3 source.
10.4 Links
React Router Introduction - With React Router React Router API - Link
Write
- Create links from the bug list so that clicking on the bug's Id takes you to the edit page.
- Create a link to go back to the bug list from the edit page.
Ruminate
- The React Router API for
Linkhas an example with back-ticks to concatenate a string and a variable. Could we have used that method? Why or why not? - Here is my diffs for Step 10.4 and complete 10.4 source.
11. Polish the UI
After looking at various UI frameworks and widget libraries, I narrowed down on these two that had good support for React.
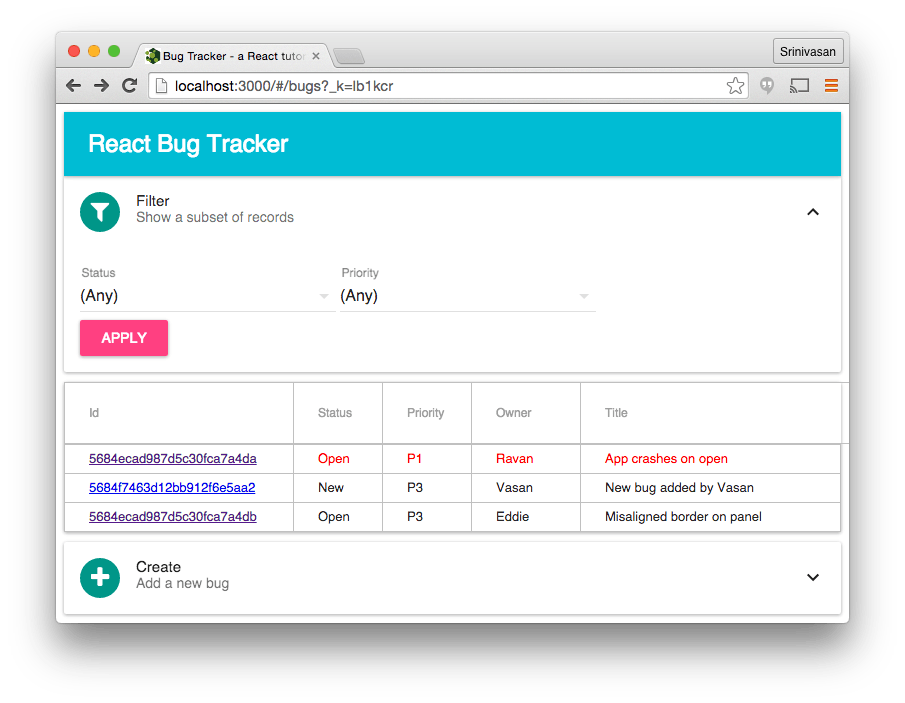
- Material UI: this seems the most seamlessly integrated with React. I liked the CSS using JS style of this library, which is truly the future of React based UI widget libraries. But there are some bugs with this library. The documentation has some issues too, but I hope soon we'll see the 1.0 version which addresses all this.
- React-Bootstrap: Bootstrap has been quite popular, and this re-build for React gives us all the familiarity of Bootstrap. The library seems quite solid.
At this point, let us branch and try Material UI. We'll come back and re-do the UI polish with React-Bootstrap as well. If you like you can skip 11.b entirely, or if you think you fancy Material UI more than React-Bootstrap, you can skip that step instead.
11.b Material UI
11.b.1 Get started
Read
Write
- Create a branch, if you are using a revision control tool. If not, save the current state of the project. We'll need this as the base for future, when we use React-Bootstrap as an alternative.
- Install
material-ui. - Convert the Apply button in
BugFilterto a Material UIRaisedButton - Use the touch / tap event to submit the form.
Ruminate
- Here is my diffs for Step 11.b.1 and complete 11.b.1 source.
11.b.2 Filter
Read
- Material UI Components -
Card - Material UI Components -
SelectField - Material UI Components -
Avatar - Material UI Components -
FontIcon - Font Awesome, for an icon inside the
FontIcon. - Material UI Customization - Inline styles
- Material UI source - Colors
Also, as I write this, it appears that SelectField documentation is not up-to-date . If you are havin, read the following.
- Material UI Components -
DropdownMenu,SelectFielduses this. - Material UI Docs source -
SelectField
Write
- Enclose the filter in a Card. Remove the default top padding of 16px in Card text, by overriding the style.
- Pick the
fa-filtericon for the Avatar in the header. - Convert the dropdowns to Select fields.
- Note: Using an empty string as the value for the dropdown causes issues. Use '*' or any other indicator as the value for
(Any)option.
Ruminate
- Why do we need double-braces for inline styles?
- Here is my diffs for Step 11.b.2 and complete 11.b.2 source.
11.b.3 Add Form
Read
Write
- Convert the Bug Add form to Material UI.
- Note: that we cannot use a
<form>and named inputs any longer, we have to do it the React way, by saving the form input values in state. - Use a Card to display enclose form in a collapsible manner.
- Use
fa-plusicon in the Avatar.
Ruminate
- Here is my diffs for Step 11.b.3 and complete 11.b.3 source.
11.b.4 Table
Read
Write
- Wrap the table in a
Paper. - Convert the regular table to a
Tablecomponent and its corresponding children. - Add an App Bar without any icons.
- To make the table look nicer:
- Use a fixed with for all columns except the Title column, let this occupy all remaining space.
- Let the size of the table rows be 24px tall, using the
styleproperty ofTableRowColumn. - Make the font color red whenever a bug's priority is P1.
Ruminate
- Is there a better way to set the row styles so as to not repeat the code for column widths between header and body columns?
- Resize the window to check the responsive behavior. How different is this from Bootstrap's Grid system?
- Here is my diffs for Step 11.b.4 and complete 11.b.4 source.
11.b.5 Edit Form
Read
Write
- Convert the Bug Edit form to Material UI.
- Use a Card to wrap the entire form, but not a collapsible Card.
- Show success of the submit using a
SnackBar. - Make the link back to the bug list a real link (so that one can right-click and open in new window/tab if they desire).
Ruminate
- Could we have avoided hardcoding of the route back to the bug list, and used some other React-Router component to achieve this?
- Here is my diffs for Step 11.b.5 and complete 11.b.5 source.
11. React-Bootstrap
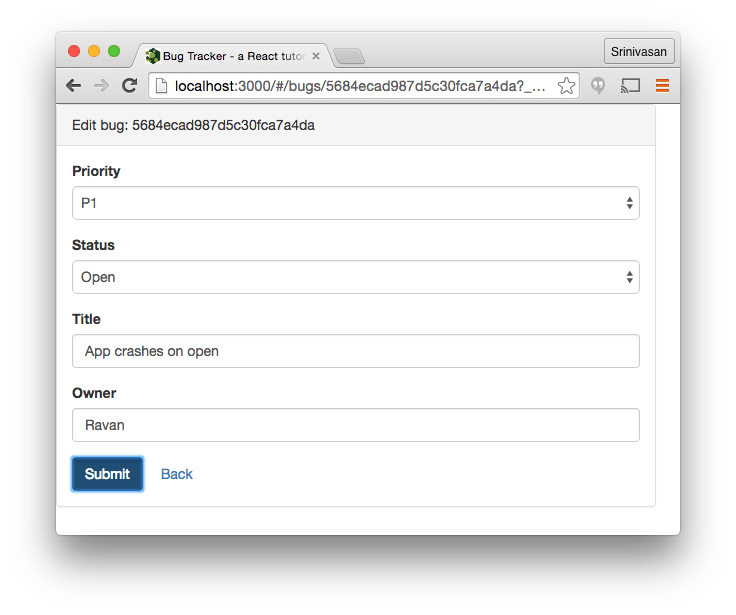
After playing around with Material UI, I found that though it seems very nice to do stuff the JS - CSS way, the library itself seems a little buggy and not mature enough. Perhaps when the version 1.0 is released, we can come back to it. In the meantime, let's take React-Bootstrap, which seems the most popular UI framework, for a spin.
11.1 Get Started
###Read
Write
- Go back to the branch point, i.e., end of step 10.
- Use the CommonJS way of installation.
- Convert the filter's button into a primary button.
Ruminate
- Here is my diffs for Step 11.1 and complete 11.1 source.
11.2 Filter
Read
- React-Bootstrap Components - Panel With Heading
- React-Bootstrap Components - Collapsible Panel
- React-Bootstrap Components - Grid System
- React-Bootstrap Components - Forms
- React-Bootstrap Components - Use as Wrapper
Write
- Create a collapsible panel with "Filter" as the heading, and the form components as the contents.
- Use a Grid inside the panel and lay the 3 inputs in 3 equal columns in a single row. Note: A
fluidGrid looks and works better. - If the button looks misaligned, use a wrapper
Input.
Ruminate
- Is the form responsive? Why?
- Here is my diffs for Step 11.2 and complete 11.2 source.
11.3 Add Form
Read
Write
- Convert the plain Add Bug form to a Bootstrap styled form. Use a vertical form this time, without using a Grid.
- Add a non-collapsible panel around this form.
Ruminate
- Here is my diffs for Step 11.3 and complete 11.3 source.
11.4 Table
Write
Write
- Add a header-less Panel around the table to give it some margins
- Convert the plain table to a striped, condensed, bordered table.
Ruminate
- There are two ways of applying table styles - the original Bootstrap CSS way of doing things by applying the Bootstrap classes, or, the React-Bootstrap way of doing things using the
Tableclass. Which one did you pick? Why? - Here is my diffs for Step 11.4 and complete 11.4 source.
11.5 Edit Form
Read
- React-Bootstrap Components - ButtonToolbar
- React Tips - Inline Styles
- stackoverflow - show or hide elements in react
- React-Bootstrap - Alert messages
Write
- Convert the input elements in the Edit form to a bootstrap-style form, without grids.
- Use a
ButtonToolbarto show a Submit button and a Back link, with the link preferably an<a>element so that we can right-click and open in new tab if we want. - Wrap the form in a panel with a header. Restrict the width of the page to 600 pixels.
- Show a success alert on successful save of edits.
Ruminate
- react-router doesn't seem to have an obvious way to get the href string that we can pass to the
Button. Fortunately, using Bootstrap styles on<Link>works. - Could the success alert be a separate component? Where would the visibility state be maintained in this case?
- Here is my diffs for Step 11.5 and complete 11.5 source.
12. Onward
At this point, you should be well equipped to go forth and write your own app using the MERN stack. Going forward, you may want to consider a reading a few more things, which I have left out.
12.1 Flux
You may want to add flux pattern to your app, especially if it gets big. The following resources are great ones to get you started on that:
12.2 Packaging
You may also want to consider packing Bootstrap CSS and minifying it as part of your build process, maybe even customize bootstrap as part of that. You may also want to minify the Javascript bundle that's being created. In which case, you should read up on:
12.3 Server side rendering
Server side rendering is really useful if you'd like your pages to be search-engine indexable. A page has to be rendered completely on the server side when a search engine makes a request. Here are some starting points:
12.4 Add-Ons
If you thought we're writing too much code to handle changes to form elements, or not being able to use a hierarchical state you may find these React Add-ons useful.
- React Add-Ons - Two Way Binding Helpers
- React Add-Ons - Immutability Helpers
- React Add-Ons - Shallow Compare
12.5 ES6
Looking at the libraries we used, significantly, their example documentation, it appears that ES6 is the way to go. Unfortunately, I haven't yet learnt ES6, so I wrote the entire tutorial in plain Javascript. I encourage you to at least get started on ES6.
