Simple data-driven way for building React forms


A brief introduction how easy can be building React forms using data-driven approach!
 Image by xresch
This article was originally published at medium.com/javascript-in-plain-english/dat… Origin author: Richard Všianský
Forms are undoubtedly the most basic interaction pattern between a user and a web server. From the first login to the last order confirmation, all these actions are still handled by a few HTML elements as inputs or buttons. With this high importance and the emerging power of JavaScript, forms are becoming more and more complex. Asynchronous validation and submit, dynamic elements, touch-based controls, complex multi-searchable dropdowns supporting different localization configurations and many more advanced features are slowly but surely replacing simple static HTML pages.
But how to handle these endless changes in large projects? One of them, ManageIQ, an open-source tool to manage clouds, which has been in development since 2006 to the present, includes over one hundred forms. And all are different: a majority of the forms were written in the old fashioned way of providing dynamic features by Ruby on Rails and a few are using AngularJS. However, since the technology is still moving forward and ManageIQ decided to switch to ReactJS, the team had to come up with a solution to make future development easier, more maintainable and testable.
First, the team looked at React libraries, which can handle forms. And there are plenty of them: Formik, ReduxForm, Final Form and many others. The issue was solved and provided all the needed features. These libraries are advanced and they provide everything that a developer needs. However, the developer still has to write HTML markups (despite it being in the form of JSX) and needs to use a lot of JavaScript/React code to bring all of these features to life. So, nothing is actually solved, as the troubles will emerge in the future, when the team decides to switch to another technology (maybe Svelte? wink**)
There were many discussions about how to deal with it, but ultimately, a data driven approach was chosen as the solution. What does it actually mean? Because you have read the title, you probably have some idea, but essentially it means that instead of writing HTML markup and JavaScript code, simple data is written with no dependency on the technology used. We can also call it a declarative way to write forms. Same as in the declarative paradigm, a programmer does not need to specify how to build the form, but only what the user should see and how it should behave. Everything else is done by magic. (Not truly by magic, but by a lot of code... don't worry, we will get there.)
Sounds simple? It really is. Let me give you an example. Let's imagine we need to build a simple login page with a login name and a password. (Right now, it doesn't matter which library we choose.) First we are going to write it in a standard way:
<form onSubmit={onSubmit}>
  <input type="text" name="login">Your login name</input>
  <input type="password" name="password">Password</input>
  <button type="submit">Your login</button>
</form>
Still simple, right? And it still is. However, when a user clicks on a button without entering any information, they want to see which inputs are required.
<form onSubmit={onSubmit}>
  <input type="text" name="login">Your login name</input>
  {!login.meta.valid && 'This field is required'}
  <input type="password" name="password">Password</input>
  {!password.meta.valid && 'This field is required'}
  <button type="submit">Your login</button>
</form>
Great. All developers are happy and users too... but no, instead of showing simple text, the UX team decided to show a modal component with a warning triangle icon. Let's change the markup again... kidding, I hope you have already gotten the picture. Under normal circumstances, each change, even if it is just a small one, can be painful with a lot of code changing. It's manageable --- in a small project it's perfectly okay, but how about in a project with hundreds of forms? No, no way. Even if you end up in a situation where you are using a small number of reusable components, this approach will not enable you to use different technologies and all forms will have to be built from scratch when you decide to change it.
Let's look at how we would deal with this form in a format we are using in our React library, Data Driven Forms:
const schema = {
    fields: [{
        component: 'text-field',
        name: 'login',
        label: 'Your login name'
    }, {
        component: 'text-field',
        type: 'password',
        name: 'password',
        label: 'Password'
    }]
}
When we are converting the HTML data into JSON, we just copy its attributes to the right keys. And most of these keys are the same. The name attribute becomes name, the type is type and the label is label. The component is the name of a component from a mapper (more about it later.) Keys are simple and self-explanatory. You don't have to know anything about HTML or React and you are still able to write your own complex forms...
... oh no, we have forgotten to add the required warnings! Let's fix it.
const schema = {
    fields: [{
        component: 'text-field',
        name: 'login',
        label: 'Your login name',
 validate: [{
            type: 'required-validator'
        }]
    }, {
        component: 'text-field',
        type: 'password',
        name: 'password',
        label: 'Password',
 validate: [{
            type: 'required-validator'
        }]
    }]
}
And what about the triangle-modal stuff? Well, we don't need to change anything in the form at all. But let's wait until we get to the implementation for that. It's still time to talk about the advantages of this approach and what it brings to us.
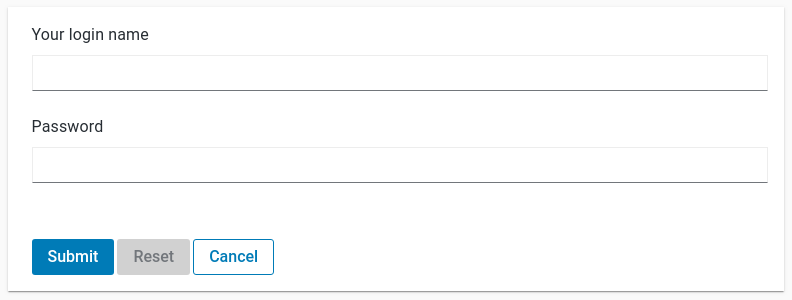
PatternFly 4 visualization of the form using the schema. You can test it yourself here.
You have already seen that it is simple to code, is easily readable and changes can happen by the help of CTRL-F, CTRL-V with no hesitation. Also, as the name suggests, you can keep this data in a database, so a web development team and those cool dudes who work on the newest iOS application can share it and use it across different programming languages and technologies. And we don't need to talk about upgradeability anymore. Data is just data, no matter which version of React you use and no matter what format or where you decide to keep it.
Awesome, isn't it? Of course, there are some flaws that are difficult to handle by only storing information in JSON. (But not impossible!) For example, for each submit action we are still using a separate coded function, as each submit action is different. But if your team has designed its API well, you can store the API endpoint in the schema too and use it in a generic way. Using complex text components can cause another issue, because it is not possible to store React components in JSON in a database. However, even here you can still use some text format (such as markdown) and then convert the text into components you need.
Data Driven Forms is a React library used to change your data into React forms.
Data Driven Forms
Now, it is time to move into a more specific example of using the data driven approach. In the text above I mentioned our custom open source library, Data Driven Forms. It is a React module that basically handles all features you could want from a standard web form. This is possible with the help of another mentioned library, Final Form. Final Form completely handles the form state, validation and all essential stuff. If you are more interested, keep its documentation page open in another tab and continue reading!
Data Driven Forms consists of two separate components: a form renderer and a mapper. The form renderer is all provided by the Data Driven Forms and its responsibility is to parse the data into the form using Final Form and provide all the functionality, so all forms behave the same. The mapper is a different story, you can easily create your own or you can use one of three mappers provided by the Data Driven Forms teams: PatternFly 3, PatternFly 4 and Material-UI. The mapper is what the name suggests. It is a set of components which maps the provided functionality (through passed props) to React components. Nothing more, nothing less. And each mapper includes components by design libraries you see in their names.
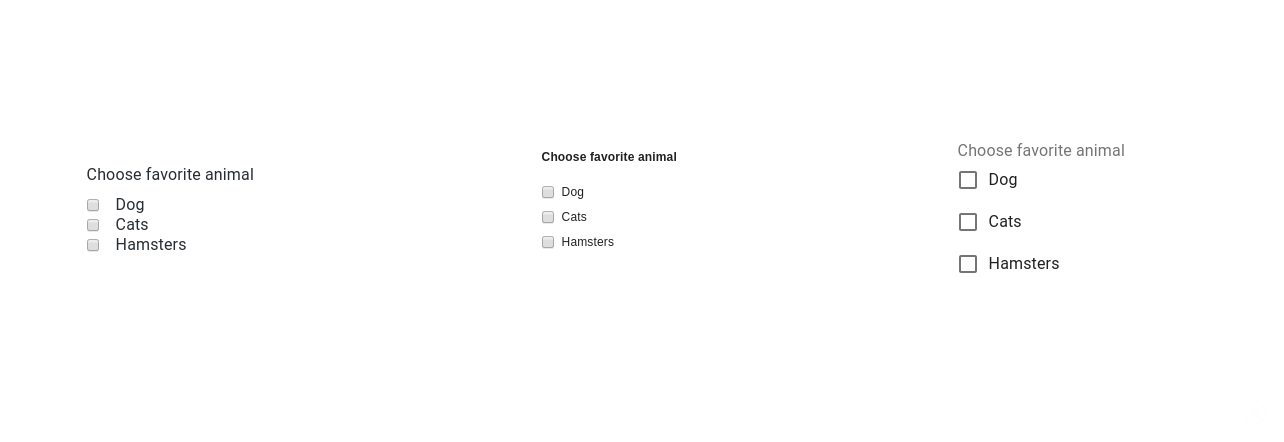
Same data, different mapper (from the left: PatternFly 4, PatternFly 3, Material-UI)
Let's return to our previous example to remind us of how the data looks:
const schema = {
    fields: [{
        component: 'text-field',
        name: 'login',
        label: 'Your login name',
        validate: [{
            type: 'required-validator'
        }]
    }, {
        component: 'text-field',
        type: 'password',
        name: 'password',
        label: 'Password',
        validate: [{
            type: 'required-validator'
        }]
    }]
}
Now, let's take a look at how to use this schema in Data Driven Forms:
import React from 'react';
import FormRenderer from '[@data](twitter.com/data)-driven-forms/react-form-…;
import { formFieldsMapper, layoutMapper } from '@data-driven-forms/mui-component-mapper';const Form = () => (
  <FormRenderer
    schema={schema}
    formFieldsMapper={formFieldsMapper}
    layoutMapper={layoutMapper}
    onSubmit={console.log}
  />
)
So, what is happening here? FormRenderer is the component, which converts your data into the form. There are only four required props: schema is the JSON data with specific format, formFieldsMapper is a set of components which creates the form elements and has access to the form state with an ability to change it, layoutMapper is a set of a few specific components like a form wrapper or a button, which cannot be rendered in the form from the data and cannot change the form. Both of these mappers are bundled together. The last prop is an onSubmit, which is just a function, that is called after pressing Enter in the form or pressing the Submit button. There are many more props you can use, which allow more customization (onReset, onCancel, ...)
It cannot be simpler. You wrote a form you can immediately use. That's all. End of story.
Wait. Have you already written a lot of forms with a lot of custom components? Well, that's a perfect time to write your custom mapper. Below, you can see a basic example with only one component:
const TextField = ({ name, type = 'text', meta, input, label }) => {
  const { error, touched } = meta;return (<div>
    <label htmlFor={ name }>{ label }</label>
    <input type={ type } onChange={ input.onChange } value={ input.value }/>
    { touched && error }
  </div>);
};

formFieldsMapper = {
  'text-field': TextField,
};
Let's untangle it together. The component is just the basic React component you know and you love. You can notice it gets all attributes from the schema, such as name, type or label. However, there are two new props: input and meta. These props are provided by the form renderer and they are the most important props obtained by the mapper: meta is an object, which includes various metadata about the field: dirty, pristine, modified, etc. and input is an object providing value and methods to change the form state. If you are wondering where the validate attribute goes, the answer is simple --- the validation is completely handled by the form renderer and components do not need to know about it.
A wizard form created using the PatternFly 4 mapper. Different steps for each source type are defined in the JSON schema. It's easy to add new steps, remove old ones or add a completely new wizard branch. All wizard features (jumping back, switching steps, ...) are controlled by the mapper, so there is no need to implement anything in the form itself.
Done. End of another story. But in reality, it is more complex; there are more components to cover and more features to implement. This article serves as an introduction to the world of the data driven approach. I have shown you its main advantages and how simple it can be to build a form using data. Meanwhile, I kept features such as Wizard forms, asynchronous validation, nested names and many more in secret. If you want to discover these, please check out our community on GitHub or visit our documentation page, where you can get all the information you need to start.