


In todays tutorial we are going to learn how to integrate redux with reactjs.
Before we start the tutorial you need to understand the concept of immutable data and why we need to use immutable data in the first place.
You can watch the following video to get the gist of it:-
Immutable data and functional programming
If you are completely new to redux you can get idea about its basic components in this article: Redux basics
Now let's get to creating a basic react app:-
1)You need to setup basic react,webpack,babel setup or you can get basic react redux starting code from this repo:
redux-starter
The starter repo's package.json contains all the npm packages that are required for this tutorial
"dependencies": {
    "axios": "^0.15.2",
    "babel-core": "^6.18.2",
    "babel-loader": "^6.2.7",
    "babel-plugin-add-module-exports": "^0.2.1",
    "babel-plugin-react-html-attrs": "^2.0.0",
    "babel-plugin-transform-class-properties": "^6.18.0",
    "babel-plugin-transform-decorators-legacy": "^1.3.4",
    "babel-polyfill": "^6.9.1",
    "babel-preset-es2015": "^6.14.0",
    "babel-preset-react": "^6.16.0",
    "babel-preset-stage-0": "^6.16.0",
    "jquery": "^3.1.0",
    "react": "^15.3.2",
    "react-dom": "^15.3.2",
    "react-redux": "^4.4.5",
    "redux": "^3.6.0",
    "redux-logger": "^2.7.4",
    "redux-promise-middleware": "^4.1.0",
    "redux-thunk": "^2.1.0",
    "webpack": "^1.13.1",
    "webpack-dev-server": "^1.16.2"
},
- Axios in a npm module for making ajax(GET/POST) requests to server
- React-redux is npm module for implementing redux in react
- Redux-logger gives us transition in states caused by various actions in console
- Redux promise middleware enables robust handling of async code in Redux
- Redux Thunk middleware allows you to write action creators that return a function instead of an action
If this seems a little confusing then don't get overwhelmed as we are going to cover there detailed uses shortly. Run npm install once you clone the repo to install all npm modules. Open App.js in src folder
import React from "react";
import ReactDOM from "react-dom";

//components
import MainComponent from "./components/App.js";
ReactDOM.render(<MainComponent />
                ,document.getElementById("main"));
Here we have rendered basic react component inside main div.
2)Create a new components folder and create Main.js with the following code:
import React from "react";
import ReactDOM from "react-dom"

import UserList from './UserList.js'
export default class Main extends React.Component{
  render(){
    return (
      <div>
      <UserList />
      </div>
    )
  }
}
Here we are rendering Userlist component which will display a list of all users fetched from api. Create userlist.js in same folder and create basic react component using following code:
import React from "react";
import ReactDOM from "react-dom"

export default class App extends React.Component{
  render(){
    return (
      <div>
      UserList Component
      </div>
    )
  }
}
Now that we have basic react components ready we can test our code using command:
npm run server
You can head over to localhost:8080 in your browser to see the basic web page.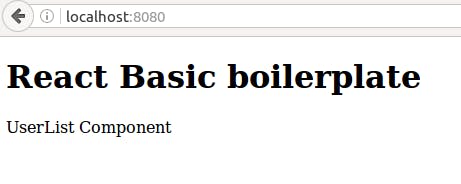
In all the steps from this point we need to make all the changes within src folder including creating folders and files Let us start integrating redux components step by step:
First we import Provider(line 3) from react-redux and inject a store(line 8) in main app.js provider:
import React from "react";
import ReactDOM from "react-dom";
import {Provider} from "react-redux";
//components
import AppComponent from "./components/App.js";
import store from "./store";

ReactDOM.render(<Provider store={store}>
                <AppComponent />
                </Provider>,document.getElementById("main"));
3)Next we create a store.js and write the following code:
import {applyMiddleware, createStore}  from "redux";

//middlewares
import logger from "redux-logger";
import promise from "redux-promise-middleware";
import thunk from "redux-thunk";

import reducers from "./reducers";

const middleware = applyMiddleware(promise(), thunk, logger());

export default createStore(reducer, middleware);
A store is central data storage hub where we store all our state values.
First we import applyMiddleware used to insert middlewares into the redux to handle processing of data,requests and log various activities.
Note:Logger must be the last middleware in chain, otherwise it will log thunk and promise, not actual actions
Here reducers are links which are used to pass data from actions to store as well as get data from store into various components.
We pass reducer as well as middleware to createStore on line 12.
4)Now create reducers folder and create index.js within it:
import {combineReducers} from "redux";

import user from "./usersReducer";

export default combineReducers({
  user
})
By default when we specify a folder to be imported it picks up index.js as default from the folder.
A redux app can have single as well as multiple reducers.Here we are using a single reducer but we have made provision multiple reducer by simply importing them after line 3 adding them on line 6.
Here combineReducers does the job of setting multiple reducers to single store which can be used for various purposes.
Now create userReducer.js in the same reducers folder with the following code:
export default function reducer(state={
  users:[],
  fetching: false,
  fetched: false,
  error: null
}, action){
  switch (action.type) {
    case "FETCH_USERS":{
      return {...state, fetching: true}
    }
    case "FETCH_USERS_FULFILLED":{
      return {
              ...state,
              fetching: false,
              fetched: true,
              users:action.payload
              }
    }
     case "FETCH_USERS_REJECTED":{
       return {
                ...state,
                fetching: false,
                error: action.payload
              }
     }

  }
  return state;
}
A reducer takes two arguments viz the initial state of all variables/properties attached to it and action.
Depending the type of action the reducer passes modified properties back to store.
Here we are going to fetch a list of users from a rest api.
If ajax request to server succeeds then we will pass FETCH_USERS_FULFILLED action which will populate users array and if it fails then we pass FETCH_USERS_REJECTED action which will pass response to error property.
5)Now create actions folder in src folder and create a new userActions.js file in actions folder with the following code:
import axios from "axios";

export function fetchUsers(){

  return function(dispatch){
    axios.get('reqres.in/api/users?page=1')
        .then((response) =>{
          dispatch({type:'FETCH_USERS_FULFILLED', payload:response.data.data});
        })
        .catch((err) => {
          dispatch({type:'FETCH_USERS_REJECTED',payload:err})
        })
  }
}
We are using fake json api generator link to simulate json data from server.
Here axios is used to execute GET request to server and pass data as response.Since we are using promise middleware we use then to execute actions after we get data from server and catch if request fails.
We dispatch FETCH_USERS_FULFILLED action if ajax request succeeds in which response data is passed as payload to reducer.
6) Now make changes to Main.js in components folder with the following code:
import React from "react";
import ReactDOM from "react-dom";

import {connect} from "react-redux";
import UserList from './UserList.js'

import {fetchUsers} from "../actions/userActions.js"
@connect((store) => {
  // console.log("ins store",store.userReducer.users);
  return {
    users: store.userReducer.users
  }
})


export default class Main extends React.Component{
  componentWillMount(){
      this.props.dispatch(fetchUsers());
  }

  render(){
    console.log(this.props.users);
    return (
      <div>
      <UserList users ={this.props.users}/>
      </div>
    )
  }
}
We first import connect module from react-redux(line 4) and then make a connection to store to retrieve variables/properties(line 8).In order to execute action we make use of react lifecycle method "componentWillMount" which triggers the rerender of the page.
We are logging the props.user to see changes in the values of the user props which will be as follows: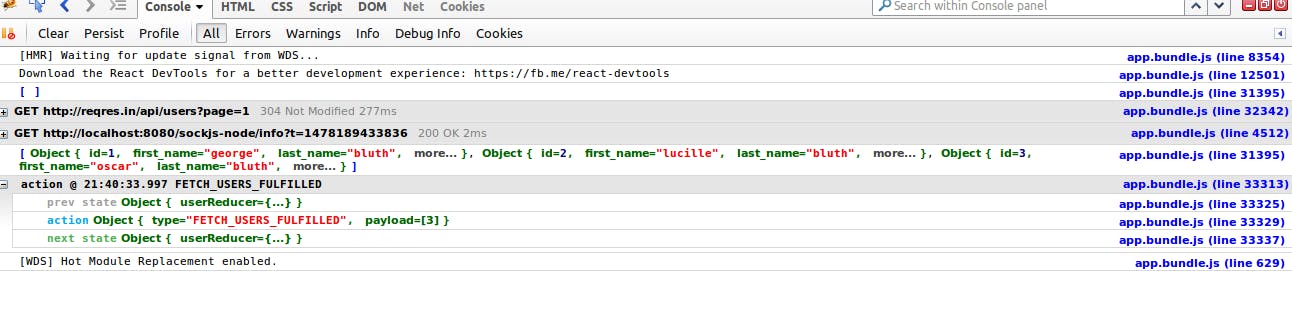
As we can see from the console the userprops is initially an empty array which is populated with the result after ajax request.
We are passing userprops from store to userList component on line 25
7)Now make the following changes to userList.js with the following code:
import React from "react";
import ReactDOM from "react-dom";

import User from './User.js';
export default class UserList extends React.Component{
  render(){
    if(Object.getOwnPropertyNames(this.props.users).length === 0){
      return (<div></div>)
    }
    var userNodes = this.props.users.map(function(user){
      return (
        <User firstname={user.first_name} lastname={user.last_name}
        key={user.id} avatar={user.avatar}>
        {user.first_name}
        </User>
      )
    })

    return (
      <div>
        <center>
        <h1 className="user-profile">User Profiles</h1>
        {userNodes}
      </center>
      </div>
    )
  }
}
On line 7 we check if userprops is populated with data and pass empty div initially.
On line 10, we create multiple User components using map function
8) Next create User.js in components folder and paste the following code:
import React from "react";
import ReactDOM from "react-dom"

export default class User extends React.Component{
  render(){
    // console.log("userprops",this.props);
    return (
      <div>

        <img src={this.props.avatar} className="avatar"/>
        <div className="username">
          {this.props.firstname} {this.props.lastname}
        </div>
      </div>
    )
  }
}
Finally a little css to page to make the ui a little better .username { margin: auto; color: #658585; font-size: 1.53em; font-family: "Coda", sans-serif; font-weight: bold; }
.avatar { padding: .7em; height: 6.23em; width: 6.23em; border-radius: 18em; }
.user-profile { margin: auto; background: #fff; border-radius: .3em; } Add this to a file in css folder in main repo and link in index file:
<link rel="stylesheet" href="css/master.css" media="screen" title="no title" charset="utf-8">
It might not be a proper way to add styles in react but it works for applying basic styles.
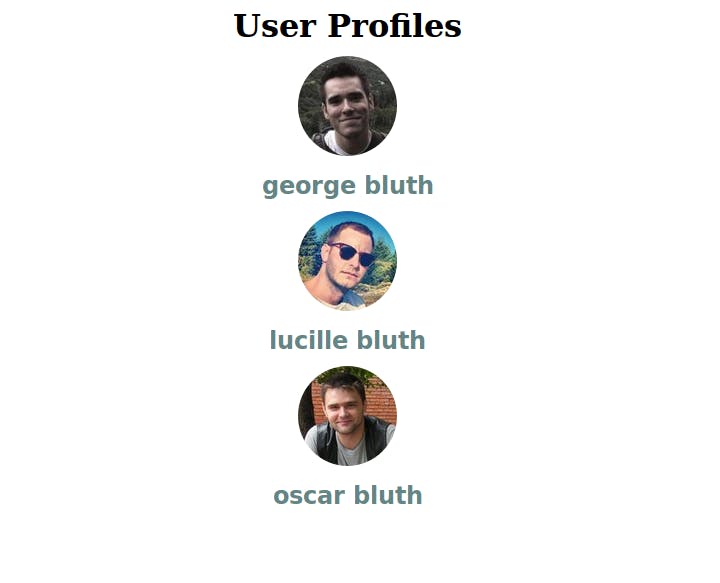
The final page will look like this:
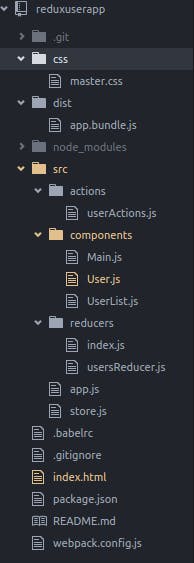
The file tree of the entire project is:
If you want to create minified bundle.js file stop npm server and run npm run build Next go to index file and change change script src path:
<script src="./dist/app.bundle.js"></script>
You can get entire source code for this app at the following link: Reduxuserapp You might have seen user list example in many redux tutorials and it was my first learning tutorial in redux. I have just modified it slightly and tried to post it in simplest terms possible. Secondly the code does not have almost any comments and I will add them if I get time. Please upvote the article if you like it and post suggestions/improvements/doubts in the comments section