Use Otomi to provide developer self-service on Kubernetes
An open-source project to provide self-service for Kubernetes with a web-based UI


Otomi, an open-source project from Red Kubes, offers developer self-service on top of any Kubernetes cluster. With Otomi, developers can deploy and manage applications, create Kubernetes and cron jobs, create and manage secrets, and publicly expose services with only a couple of clicks. And all of this without writing any Kubernetes YAML manifests.
Why developer self-service for Kubernetes
The ultimate goal of developer self-service is to have less friction in the development process and ensure that developers can deliver customer value faster. This can be achieved by enabling the separation of concerns for both dev and ops teams. The ops team manages the stack and enforces governance and compliance to security policies and best practices. Dev teams can create new environments on-demand, create and expose services using best practices, use ready-made templatized options, and get direct access to all the tools they need for visibility. Think of it as paving the road towards fast delivery and minimizing risks by providing safeguards and standards. Developers can do what they need to do and do it when they like to. And yes, sometimes not always how they would like to do it. The only challenge here is, building a platform like this takes a lot of time and not all organizations have the resources to do so.
The goal behind the Otomi open-source project was to offer a single deployable package that offers all of this out-of-the-box. Let’s take a closer look at the concepts behind Otomi, and then I'll shortly explain how you can install Otomi to explore it yourself.
Otomi architecture
Otomi consists out of multiple parts:
Core
Otomi core is the heart of Otomi and contains a set of about (currently) 47 Helm Charts. Most of these charts are optimized charts from open source projects, others are developed by Red Kubes. The core is made available (per release) as a container image. For more information, see the public repository here.
CLI
The CLI is a custom-developed Command Line Interface for Otomi. The CLI is part of the core repository and can be used for (advanced) initial configuration (bootstrapping), deployment, sync, push, template validation, and more.
Tasks
Otomi Tasks is a set of Kubernetes jobs created for Otomi. The jobs ensure that the configuration of applications integrated into Otomi is always equal to the desired-state configuration (the values). An example: When you create a team using the console or CLI, the tasks ensure that a project is created for the new team in Harbor, access to the project in Harbor is configured, a robot account (that can be used to pull images from the project registry) is created and that a pull secret is created in the namespace of the team. Otomi Tasks is currently used to configure the following applications: KeyCloak, Harbor, Gitea, and Drone.
Values
The charts integrated into the core, contain the default configuration values. These values are managed in a Git repository (Gitea) running on the cluster. You can also use GitHub or GitLab. The values can be changed directly (by pulling the repository and making validated changes using the CLI in combination with autocompletion in Visual Studio Code) or can be changed by the API. A commit in the repository automatically triggers a synchronization (using a pre-configured Drone pipeline). During synchronization, the values are 'injected' into the core charts and applied to the cluster, resulting in a new state.
API
Otomi API allows for a controlled change of all Otomi Values, based on a configuration schema, and is the brain of Otomi.
Console
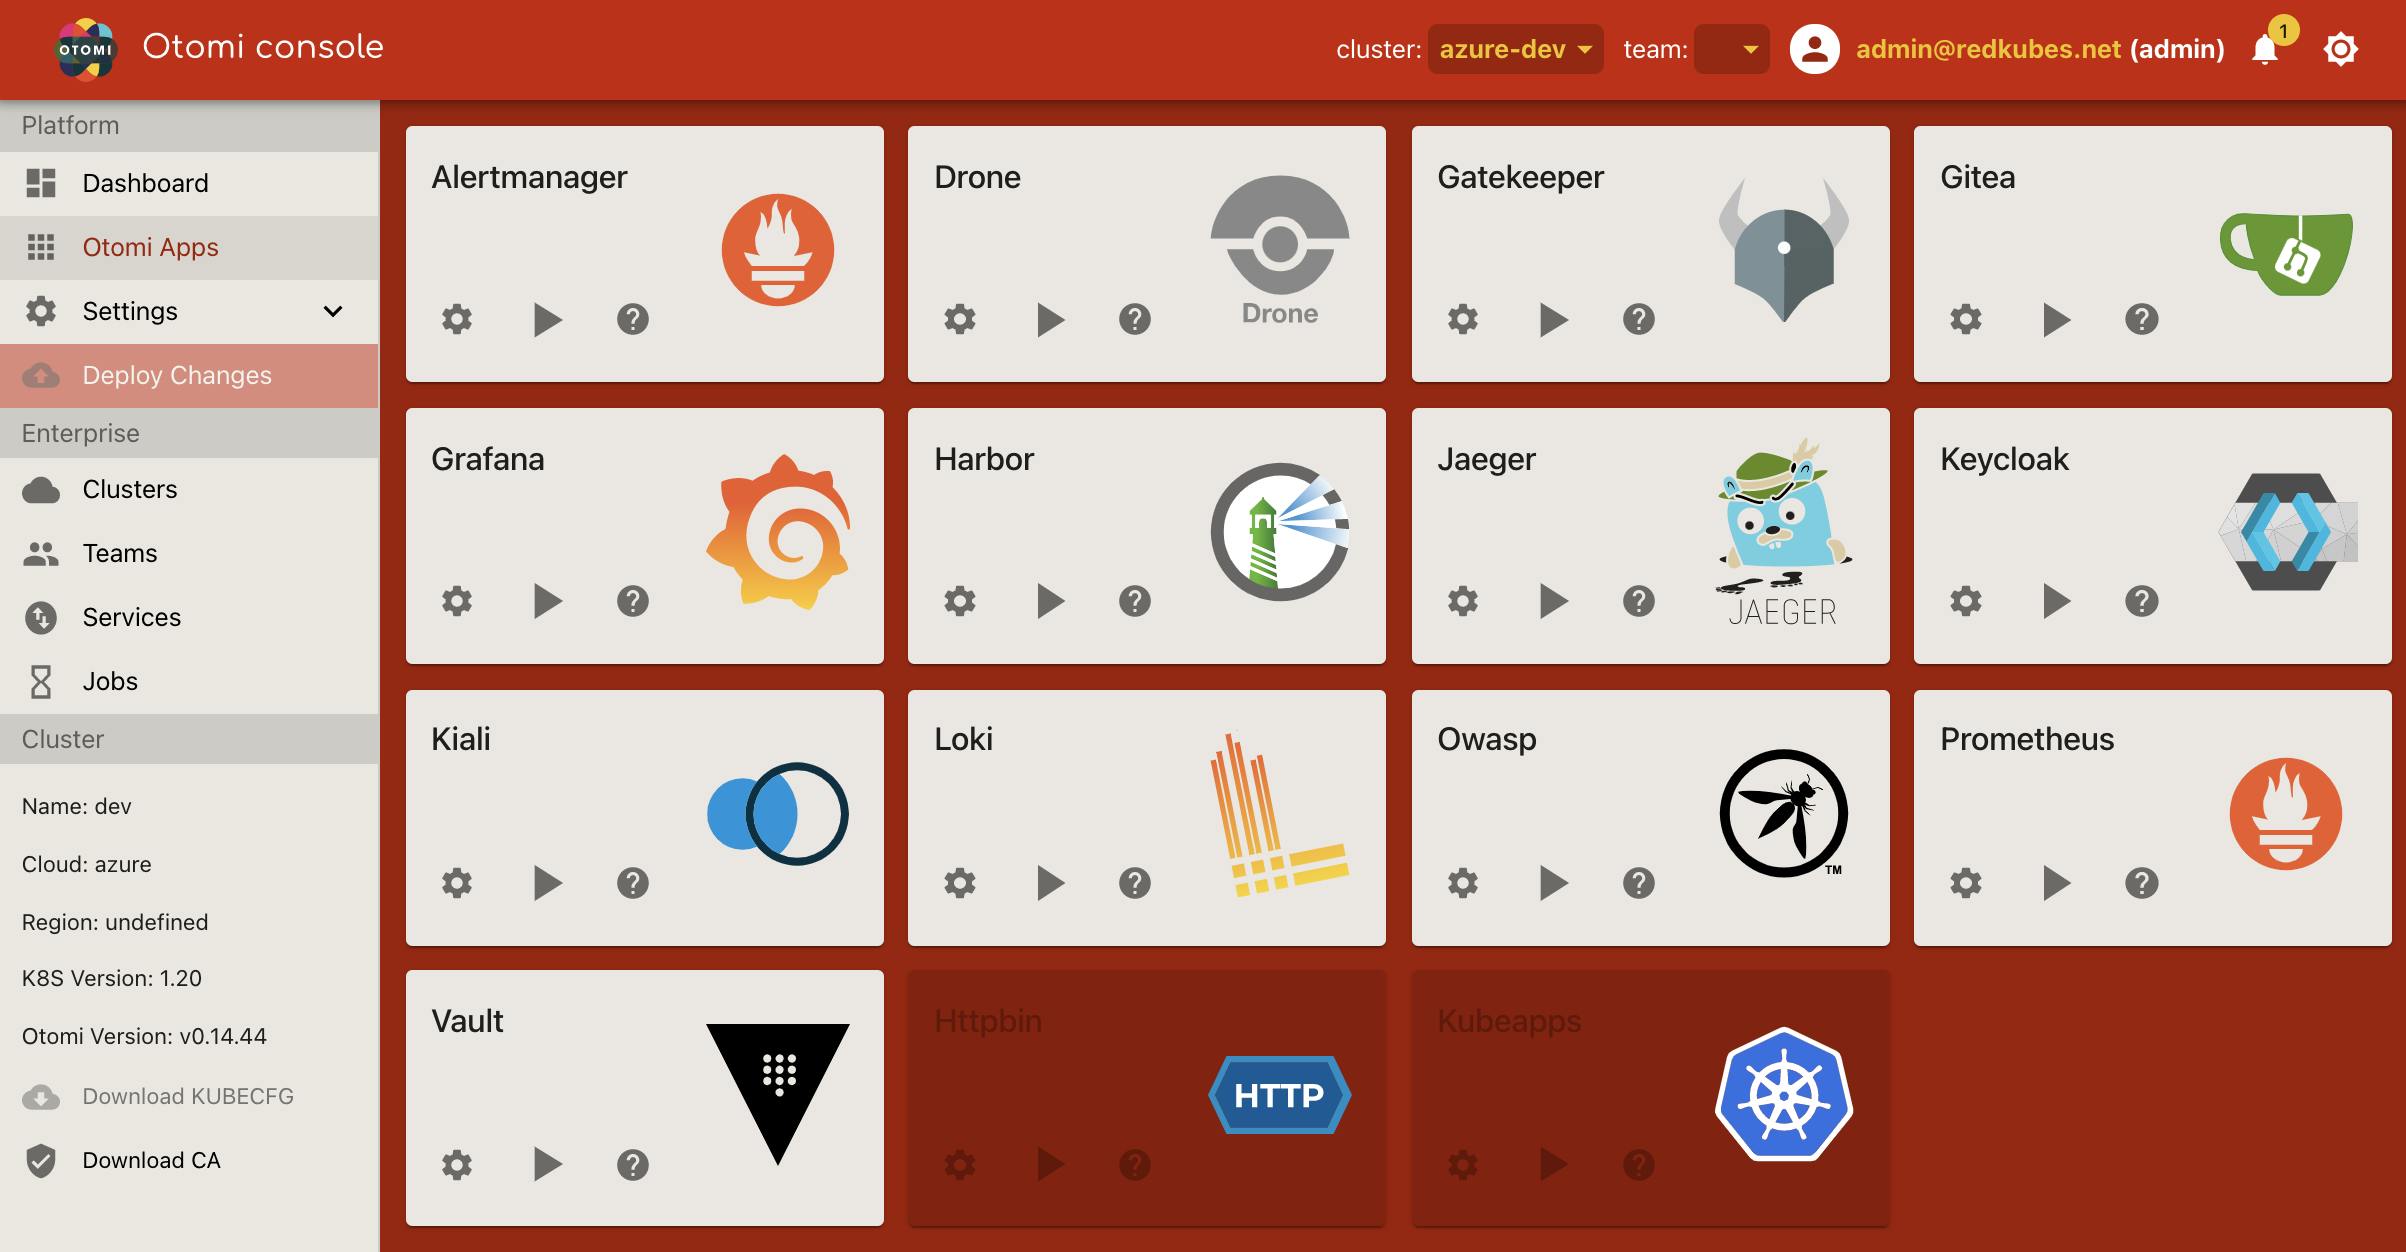
Otomi console is the web interface of Otomi. The console communicates with the API for reading and changing the configuration of the values. Otomi console also offers (via the apps option) shortcuts to the web interface of the various integrated applications.
Installing Otomi
Otomi can be installed using Helm. See here for full instructions. For experimentation and evaluation purposes, you can install Otomi with minimal values (just provide the name of your cluster). When installing using minimal values, Otomi uses nip.io for name resolution and automatically generates a CA for certificate creation.
Installing with minimal values is recommended for experimentation purposes only. In all other cases, we recommend using KMS (for encryption of sensitive configuration values) and an external (cloud) DNS service in combination with LetsEncrypt production certificates, or BYI CA.
Basically, the only requirement for Otomi is to have a running Kubernetes cluster. There is also a quickstart available for AWS, Azure, and GCP. For the quickstarts, Terraform is used to provision a managed Kubernetes service (EKS, AKS, or GKE) in your cloud of choice and also to install Otomi with minimal values.
So to install Otomi, you’ll need a running Kubernetes cluster. Let's assume you have the admin credentials of an AKS cluster in Azure with version 1.20.9, with a node pool of 3 Standard_D3_v2 instances, autoscaling enabled (min 3, max 5), Azure CNI configured, RBAC enabled (required) and Azure Policy and Azure Monitor disabled. This is the setup I'll be using.
In this example, I'll be installing Otomi with minimal values. Note (again) that this is recommended for experimentation purposes only.
First, create the following values YAML file. You can change the ower and name properties if you like to.
cluster:
  owner: myself
  k8sVersion: '1.20'
  name: my-cluster
  provider: azure
Then install the chart:
helm repo add otomi otomi.io/otomi-core
helm repo update
helm install -f values.yaml otomi otomi/otomi
The installer job will now install Otomi on your cluster. You can follow the progress of the installer by looking at the log output of the installer job:
kubectl logs jobs/otomi -n default -f
When the installer has finished (which can take around 20 to 30 minutes), copy the URL and the generated password from the bottom of the logs.
2021-11-12T09:26:11.129Z otomi:gen-drone:log gen-drone is finished and the pipeline configuration is written to: /home/app/stack/env/.drone.yml
2021-11-12T09:26:11.129Z otomi:encrypt:debug Skipping encryption
2021-11-12T09:26:11.130Z otomi:commit:info Committing values
2021-11-12T09:26:11.913Z otomi:gitPush:info Starting git push.
2021-11-12T09:26:12.414Z otomi:gitPush:log Otomi values have been pushed to git.
2021-11-12T09:26:12.414Z otomi:commitAndPush:log Successfully pushed the updated values
2021-11-12T09:26:12.713Z otomi:commit:info
    ########################################################################################################################################
    #
    #  To start using Otomi, first follow the post installation steps: otomi.io/docs/installation/post-install
    #  The URL to access Otomi Console is: otomi.20.81.68.159.nip.io
    #  The URL to access Keycloak is: keycloak.20.81.68.159.nip.io
    #  When no external IDP was configured, please log into Keycloak first to create one or more users and add them either to the 'team-admin' or 'admin' group.
    #  The password of the Keycloak admin user is: ZOdO4Fk8bmYnnb34PedZ
    #
    ########################################################################################################################################
The first thing you'll need to do now is to create a new user in Keycloak and add the user to the otomi-admin group. Go to the provided Keycloak URL and sign in with the user "admin" and the generated password provided in the logs.
Check here for complete instructions on how to create users in Keycloak.
Now you can sign in to the console. Go to the provided URL and sign in with your newly created user.
As you would have noticed, the browser says the connection to this site is not secure. Because we did not use DNS with LetsEncrypt and also did not provide our own CA, Otomi has automatically generated a CA for you. But no worries, you can add the generated CA to your keychain. In the left pane of the console, click on Download CA and add the CA to your keychain:
sudo security add-trusted-cert -d -r trustRoot -k /Library/Keychains/System.keychain ~/Downloads/ca.crt
To start using Otomi, you’ll also need to activate Drone. To enable Drone, open the Drone app (using the shortcut in Otomi Console), and sign in with OpenID Connect using the newly created user. In Drone, you’ll see the repository of the Otomi values created by Otomi.
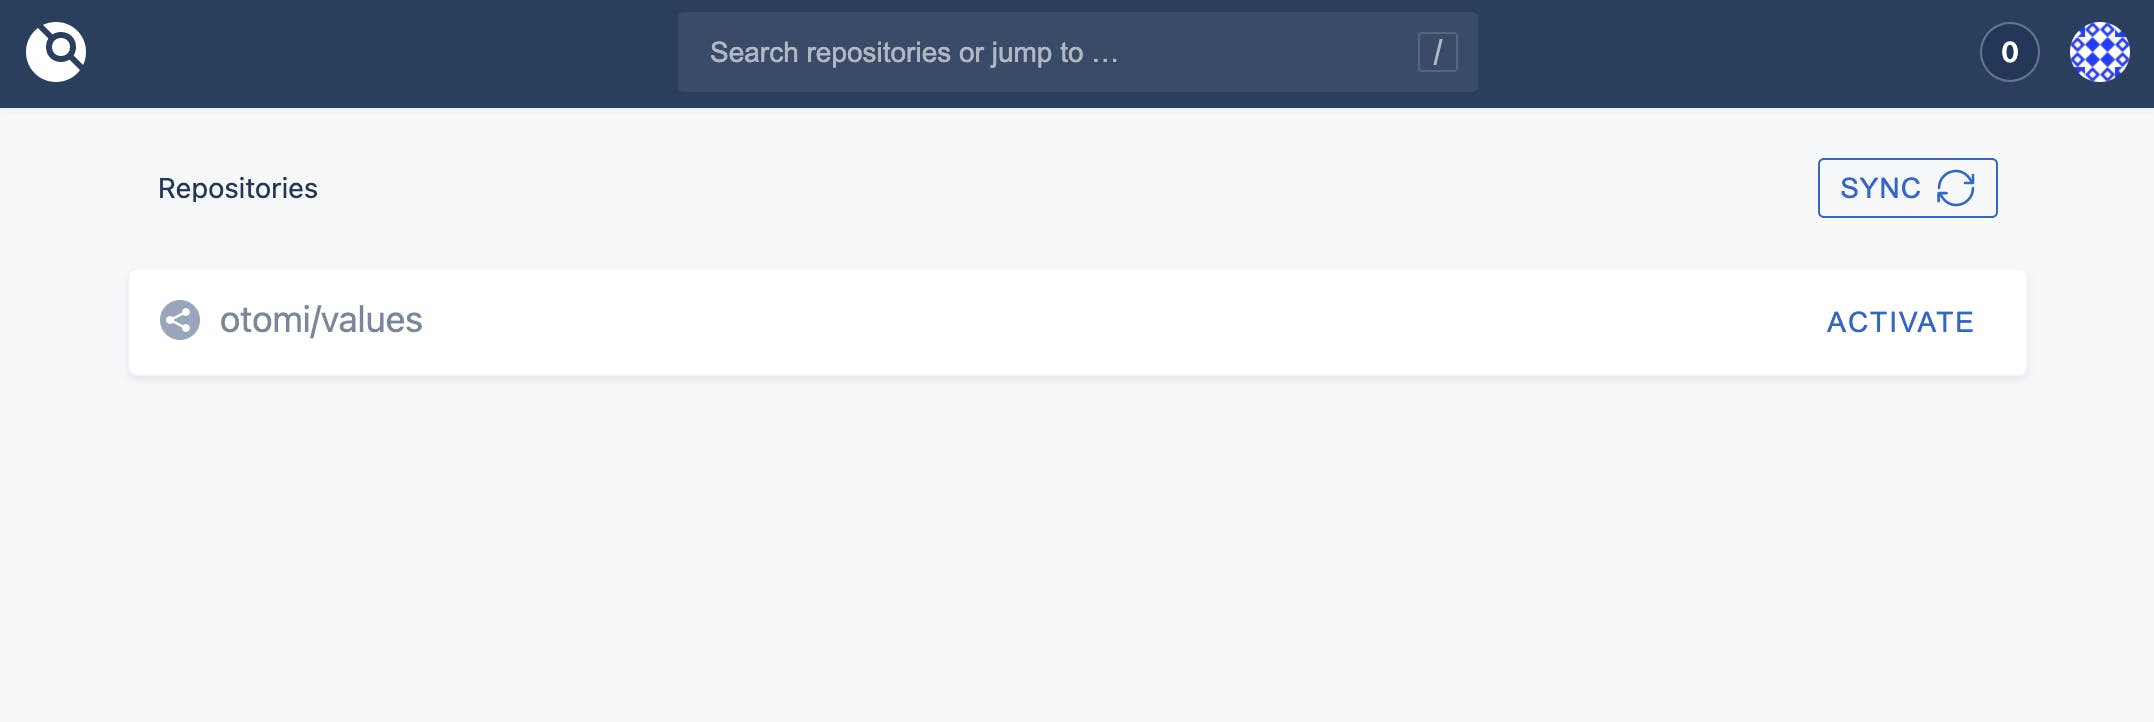
Now click on Activate, then click Activate Repository, and then click on Save. See here for complete post-installation instructions.
Now you're ready to create teams, services, secrets, and jobs, and use all the integrated tools for logging, security, metrics, tracing, and much more.
Conclusion
With Otomi, you can turn any Kubernetes cluster into a full container platform in minutes instead of months (or even years), and at the same time provide developers with easy self-service. Because of the low entry-level of Otomi for developers, they can start today and learn as they go along.