


At Intuit, we work on a plethora of applications using a variety of technologies. One of them is Backup and Restore built on Ruby on Rails. We provide users with the capability to backup their accounts and restore them at any point back in time. These backups can be initiated by users or generated by the system at various intervals.
The time to execute these operations can vary from a few seconds to multiple hours depending upon the size of the company(that includes their accounts, transactional and non-transactional data). Using a synchronous model for these operations is not feasible and thus we decided on using an asynchronous model. We leveraged the sidekiq gem to process the jobs in the background asynchronously.
What is sidekiq?
Sidekiq is an open-source job scheduler written in Ruby. It's important to be aware that Sidekiq by default doesn't do scheduling, it only executes jobs. Sidekiq uses threads to handle many jobs at the same time in the same process.
How we used sidekiq
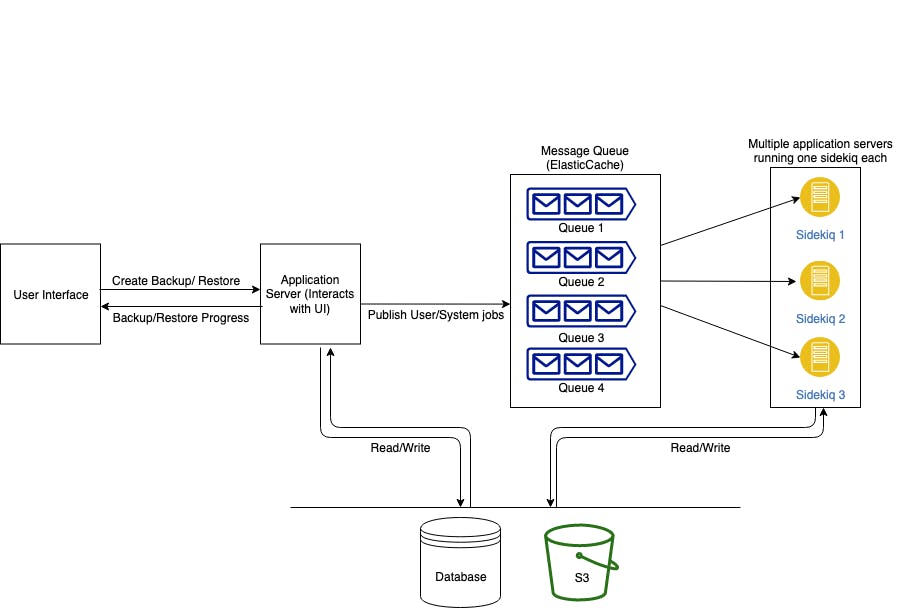
Whenever a user wants to create a backup/restore, the user interface sends a request to the application server(rails server) for the same. The application server then creates a job in the Redis queue and returns the status to the UI. Multiple sidekiq are running in different application servers that pick available jobs from the queue and execute it. This job updates the status in the database on completion. The UI polls the application server in regular intervals to get the status of the backup/restore. Different types of jobs can be pushed in different queues depending on their functionality.
Now the fun part!!
Let's explore how you can use sidekiq in your code.
To use sidekiq, add the sidekiq gem in your gemfile.rb.
gem "sidekiq"Run bundle to install sidekiq
bundle- Add sidekiq as the queue_adapter in the rails config (config/application.rb)
config.active_job.queue_adapter = :sidekiq Create a job
class TestJob include Sidekiq::Worker sidekiq_options retry: false def perform(params) puts "Hello #{params}" end end- Start the sidekiq
bundle exec sidekiq - To push the job in the queue
TestJob.perform_async("World!!!")
The TestJob will by default get created in the "default" queue. To specify a different queue, add the queue in sidekiq_options
sidekiq_options queue: test_queue, retry: false
The queue can also be set at runtime while creating a job
TestJob.set(queue: "test_queue").perform_async("World!!!")
You can set the concurrency(number of jobs that sidekiq can process in parallel) and the queue priorities in the "config/sidekiq.yml" file.
:concurrency: 3
:queues:
  - [userInitiated, 4]
  - [fast, 3]
  - test_queue
  - default
To start the sidekiq with the config file
bundle exec sidekiq -C "config/sidekiq.yml"
So, this is how we leveraged sidekiq to process multiple independent jobs parallelly in the background. This also helped us build a fail-safe mechanism where we could retry job execution in the case of failures.
Thank you for reading. Happy coding!!!