


Ably Reactor Events allow your servers to be notified or your server-less functions to be invoked via an HTTP request following channel lifecycle events (such as channel creation), presence events (such as members entering or leaving) or messages being published.
In this tutorial we will show you how to:
- Set up a WebHook rule to publish messages from a channel to your web server
- Create a simple Ruby on Rails web server to serve up the web app, issue authentication tokens for the Realtime browser client and process incoming WebHook requests from Ably
- Publish questions from a Realtime browser client to a channel, which are automatically delivered to your server via the WebHook
- Communicate with the Chuck Norris API to get the answer, and publish the answer as a message back to the client using the REST API
- Subscribe to jokes published from Rails in the web app using a realtime pub/sub channel
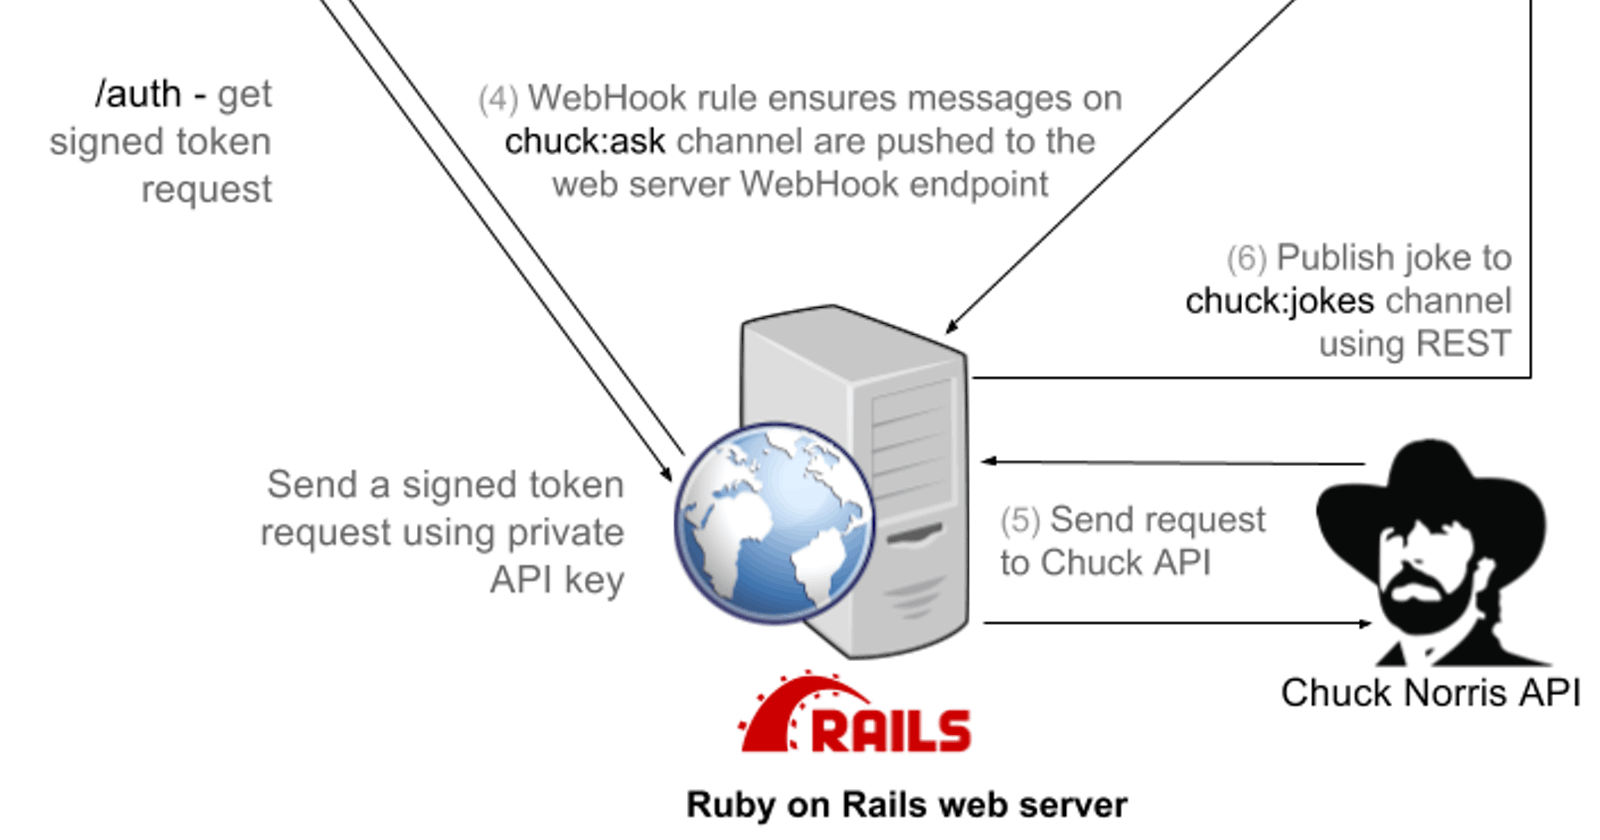
The following diagram depicts the architecture for this tutorial:
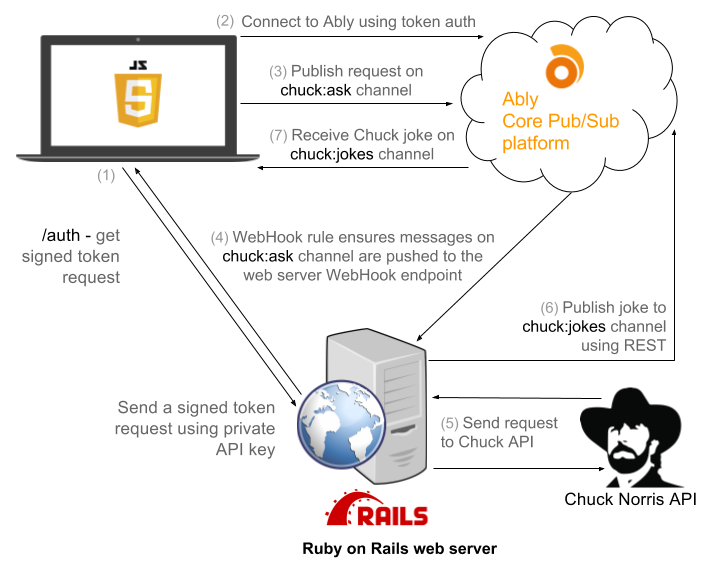
The diagram may look complicated, but fortunately getting the app up and running with Ably is not! Let’s get started.
Step 1 — Set up a free account with Ably
In order to run these tutorials locally, you will need an Ably API key. If you are not already signed up, you should sign up now for a free Ably account. Once you have an Ably account:
- Log into your app dashboard
- Under “Your apps”, click on “Manage app” for any app you wish to use for this tutorial, or create a new one with the “Create New App” button
- Click on the “API Keys” tab
- Copy the secret “API Key” value from your Root key and store it so that you can use it later in this tutorial

Step 2 — Install Rails
This tutorial is not intended to teach you how to develop using Rails and expect that you have some basic knowledge of Rails beforehand. If you are new to Rails, please the Getting Started with Rails guide.
To install Rails, make sure you have Ruby and RubGems installed, and run the following command to install the Rails gem:

To create a new Rails application for this tutorial, use the Rails generators to create a ready-to-use vanilla Rails application:

Please note that we included --skip-active-record so as to avoid an unnecessary dependency on a database for this tutorial. In most Rails applications, ActiveRecord is in fact needed so there would be no need to skip its installation.
Lets make sure Rails has been installed correctly by running bin/rails server and opening a browser window to http://localhost:3000/. You should see the Rails default information page.
Step 3 — Set up a root route and add base HTML app
The Rails deafult information page is currently being served because there are no routes yet configured. Let’s add a route to config/routes.rb by adding the following:

The route is referencing the action index for the as yet undefined HomeController so let’s add that at app/controllers/home_controller.rb:

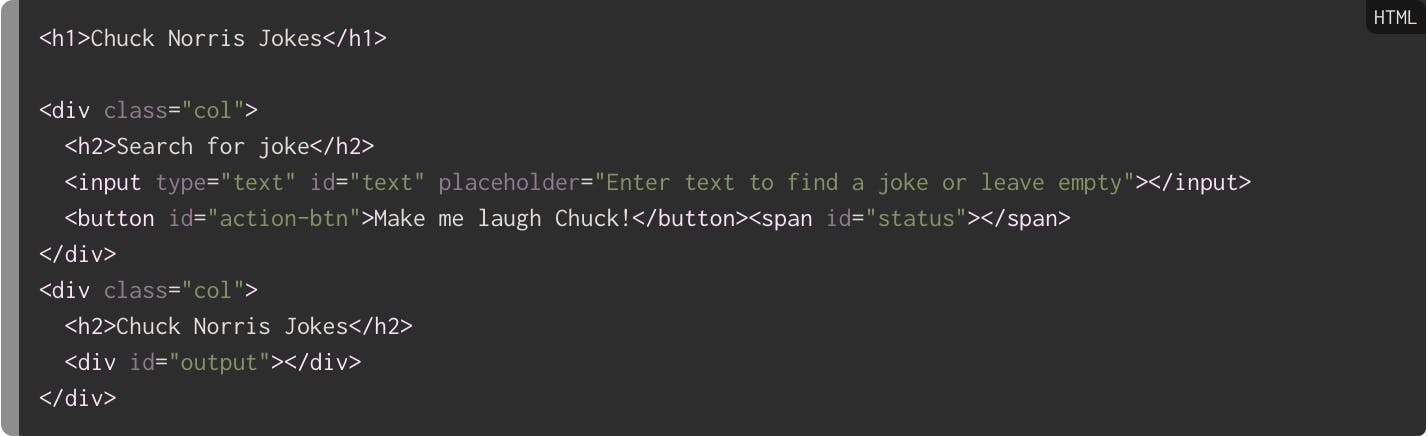
We are still missing a view for the index action, so let’s add a base view for the app at app/views/home/index.html.erb:
And finally let’s add some Javascript as a placeholder for our app at app/assets/javascripts/application.js:

Open a browser window to http://localhost:3000/ and confirm that you can see the new Chuck Norris base app page.
Step 4 — Install Ably for Rails (server-side) and add auth route
To start using Ably within your Rails server, you first need to install the Ably gem. Generally with Rails applications, as they are synchronous, the REST library is preferred over the Realtime library. The Realtime library must be run within an EventMachine reactor which provides an asynchronous evented framework. For this tutorial, the REST only version of the Ably Rubygem is used as it requires less dependencies and is a perfect fit for this synchronous Rails application.
Add the following to your Gemfile

Then run the following command to install the required gems:

Before we add the REST library to the Rails application, we need to add the private API key you copied in Step 1 to the Rails config/secrets.yml. Add the following to the development and production sections of your config/secrets.yml file:
YAMLdevelopment:

Please note that whilst we have simplified the process for the purposes of this tutorial, we would recommend that you consider the twelve-factor methodology when configuring secrets — instead of adding the secrets to the configuration file, use environment variables by referencing them i.e. ably_api_key: <%= ENV['ABLY_API_KEY'] %>.
Let’s now add the stateless Ruby REST library as an instance variable on the ApplicationController so that it’s available to all controllers. Add the following to app/controllers/application_controller.rb

Now we want to issue token requests for Realtime clients that want to authenticate with Ably. The Rails application has an API key that it can use to sign these token requests, and the Rails application can serve up these token requests through a new route. Add the following route to config/routes.rb: 
That route is referencing the issue_token_request action of the as yet undefined AuthController, so let’s create app/controllers/auth_controller.rb now: 
Try visiting http://localhost:3000/auth and you should see a JSON token request in the form: 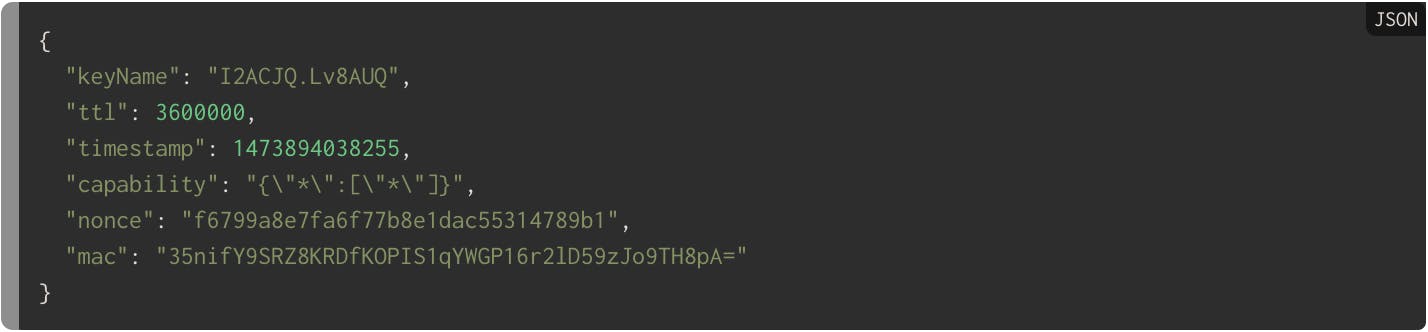
We now have a web server running with an authentication endpoint. We are ready to setup the Ably Realtime client that uses token auth.
Step 5 — Plug in Ably client-side and update UI As we’ve just set up the auth endpont to support the token authentication scheme, we will proceed to set up a Realtime client library that will request a token immediately from the web server auth endpoint before authenticating with Ably.
First we need to ensure the Ably client library is loaded from our CDN. Add this script tag to app/views/layouts/application.html.erb: 
Then add the following to your application code at app/assets/javascripts/application.js:
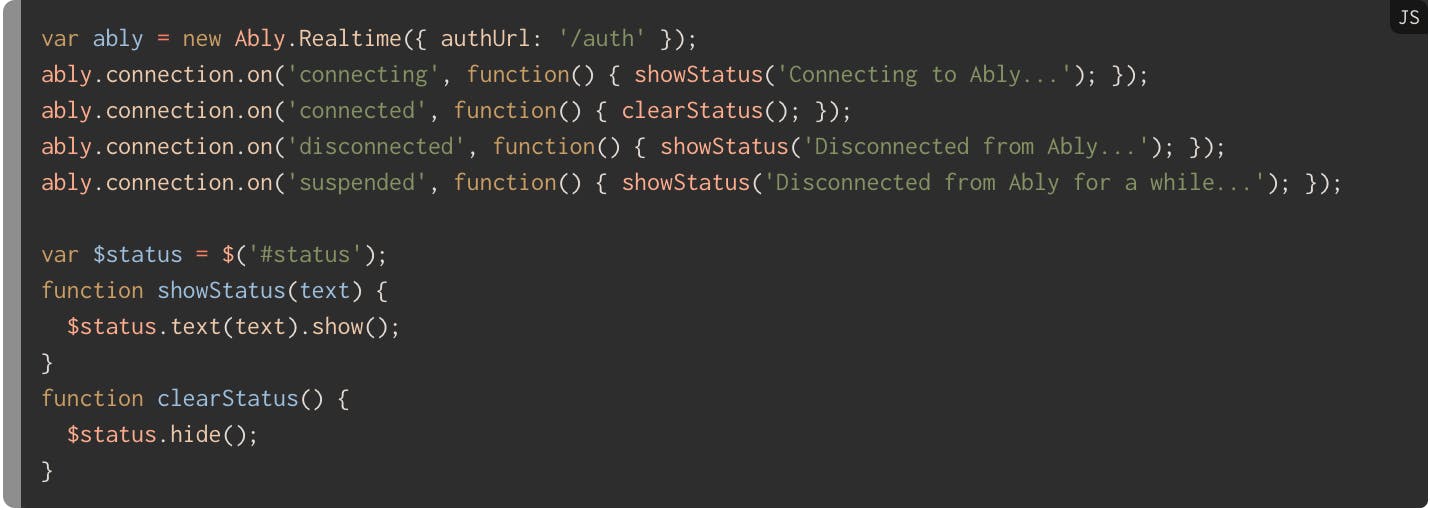
The Ably Realtime client will now automatically obtain a token request from the provided authUrl and then connect to Ably using that token request for authentication. At this point, visit http://localhost:3000/ and you should see the status element change to “Connecting to Ably…” whilst a connection is established, and the status become empty once the connection is established.
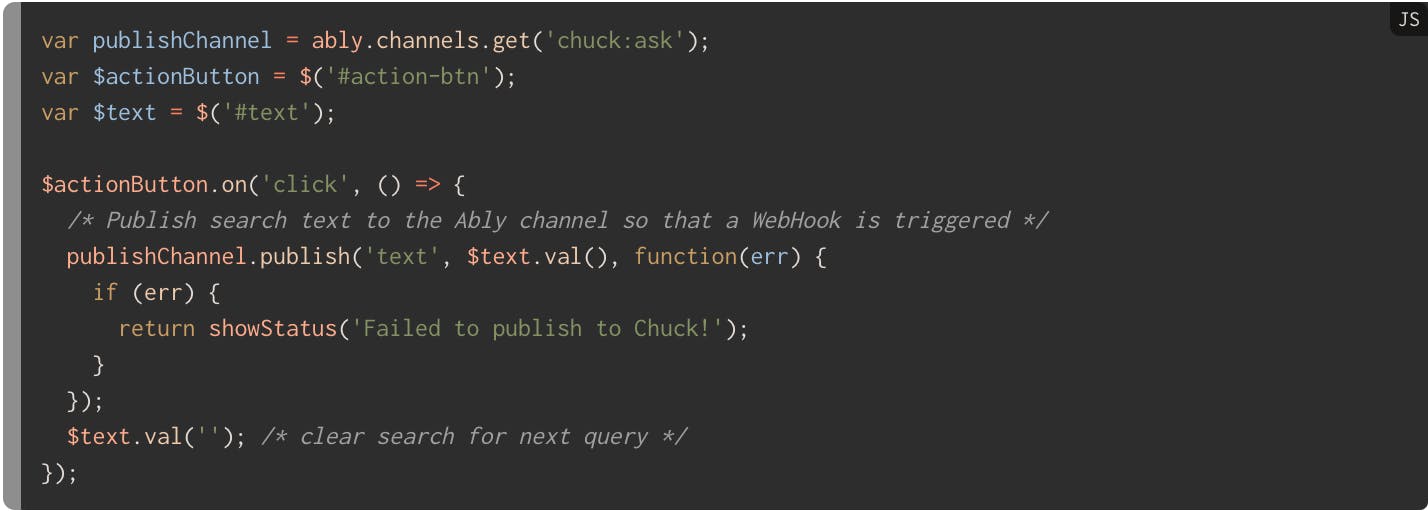
Now let’s hook up the publishing of the Chuck Norris search text to an Ably channel within application.js:
And add a subscriber that listens for new Chuck Norris jokes within application.js:
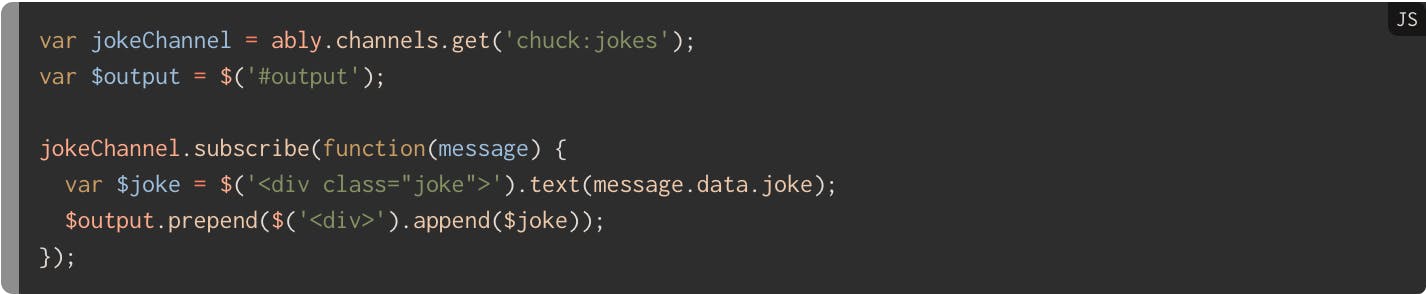
At this point the web app will instance an Ably Realtime library and connect to Ably, will publish messages to the chuck:ask channel when requested, and will automatically subscribe to answers from the chuck:jokeschannel. However the WebHook is not in place yet, so at this point publishing a request for a joke won’t do anything.
Finally, add this styling CSS to @app/assets/stylesheets/application.css so that the app’s aesthetic is addressed.
See this complete step in Github
Step 6 — Add WebHook endpoint and configure WebHook
Before we configure a WebHook, the Rails application needs to respond to WebHook requests. Let’s set up a route, and then add the controller after. Add this to config/routes.rb:

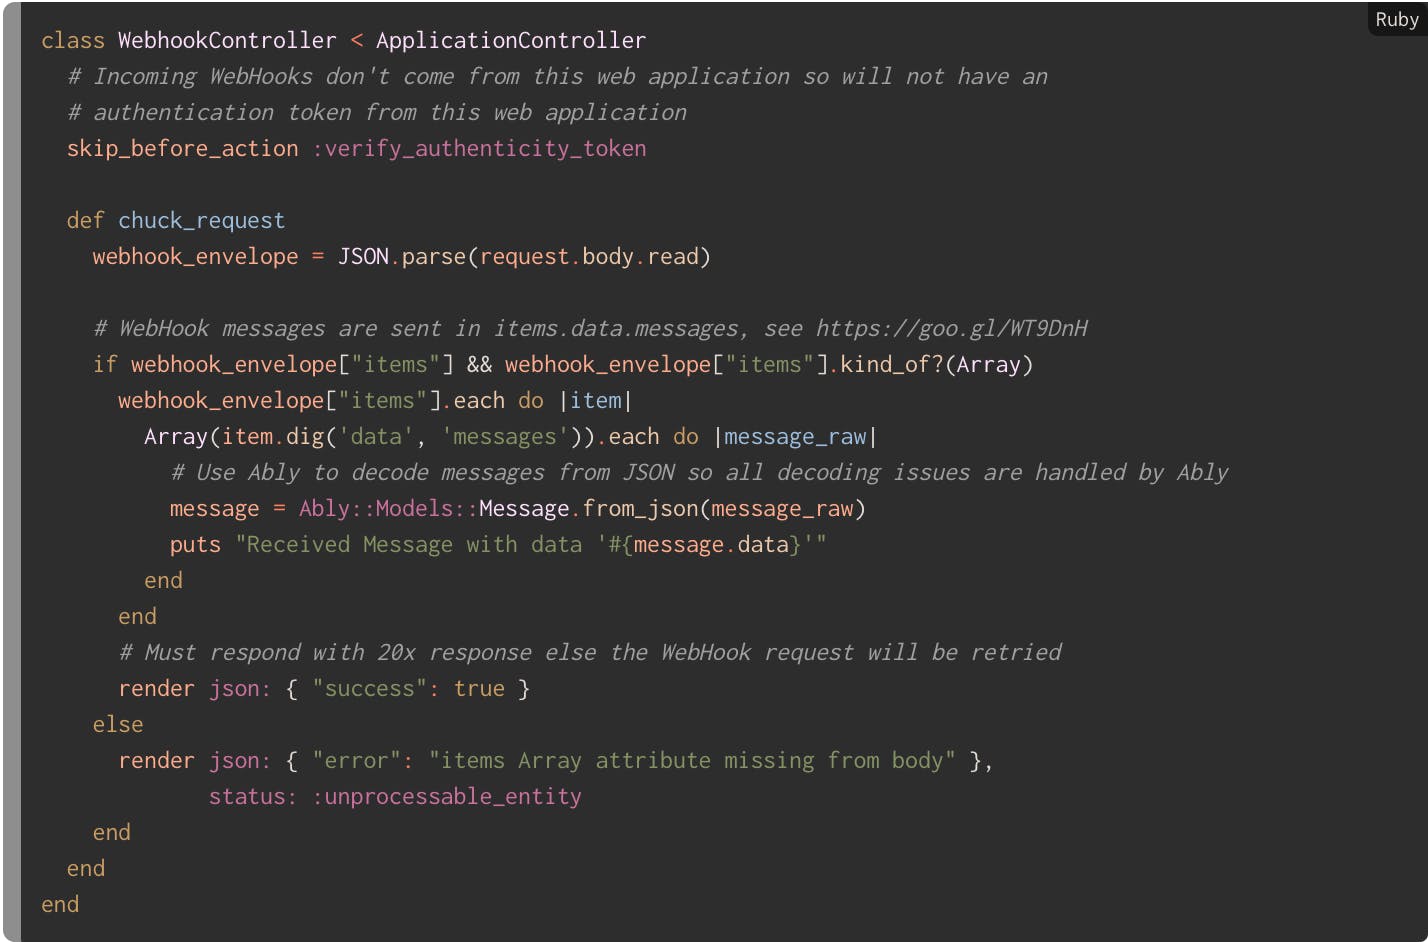
Notice that all WebHook requests are delivered using the POST HTTP verb, and based on the encoding we choose when configuring the WebHook, will be delivered with a JSON mimetype encoding.
Let’s create the WebHook controller and action in app/controllers/webhook_controller.rb:
Now that the Rails application is ready to receive WebHook requests, you can set up a WebHook rule. However, in most cases, when running a Rails application locally (like we are doing now for this tutorial), the Rails app will not have a publicly addressable hostname and port. As such, you either have to deploy your Rails app to a web server, or alternatively you can use a tunneling service to your localhost like Ngrok. We have used Ngrok extensively and would highly recommend you consider it. For this tutorial, we assume you have installed ngrok.
Run ngrok to obtain a public endpoint for your local Rails server as follows:
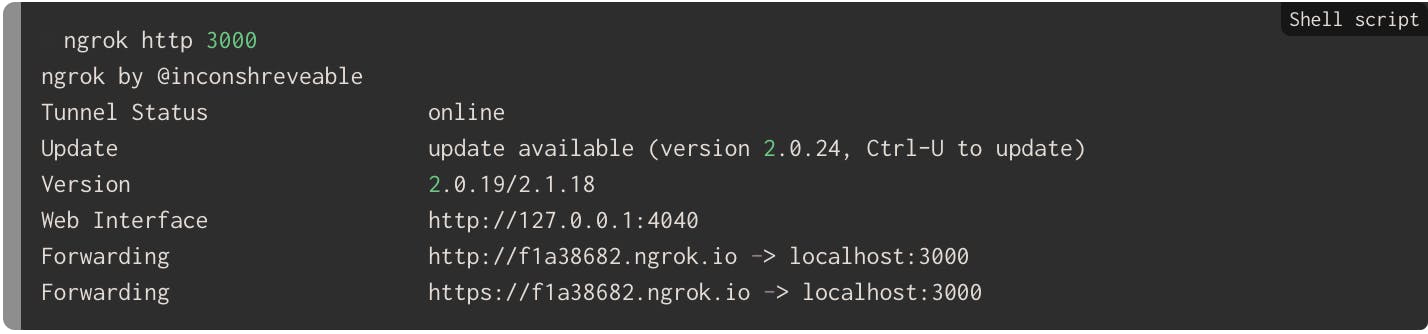
Keep the ngrok process running, and visit the secure (https) Forwarding address provided to you in your browser. In this case it’s f1a38682.ngrok.io. Confirm that you can see the Chuck Norris home page which in turn means you have a public endpoint for the WebHook you are about to set up.
To set up a WebHook for this endpoint, follow these steps:
- Log into your app dashboard
- Create a new app by selecting “Create New App”, or select an existing one that you wish to use
- Click the “Reactor” tab
- Click on “New Reactor Rule”
- Click “Choose” under “Reactor Event”
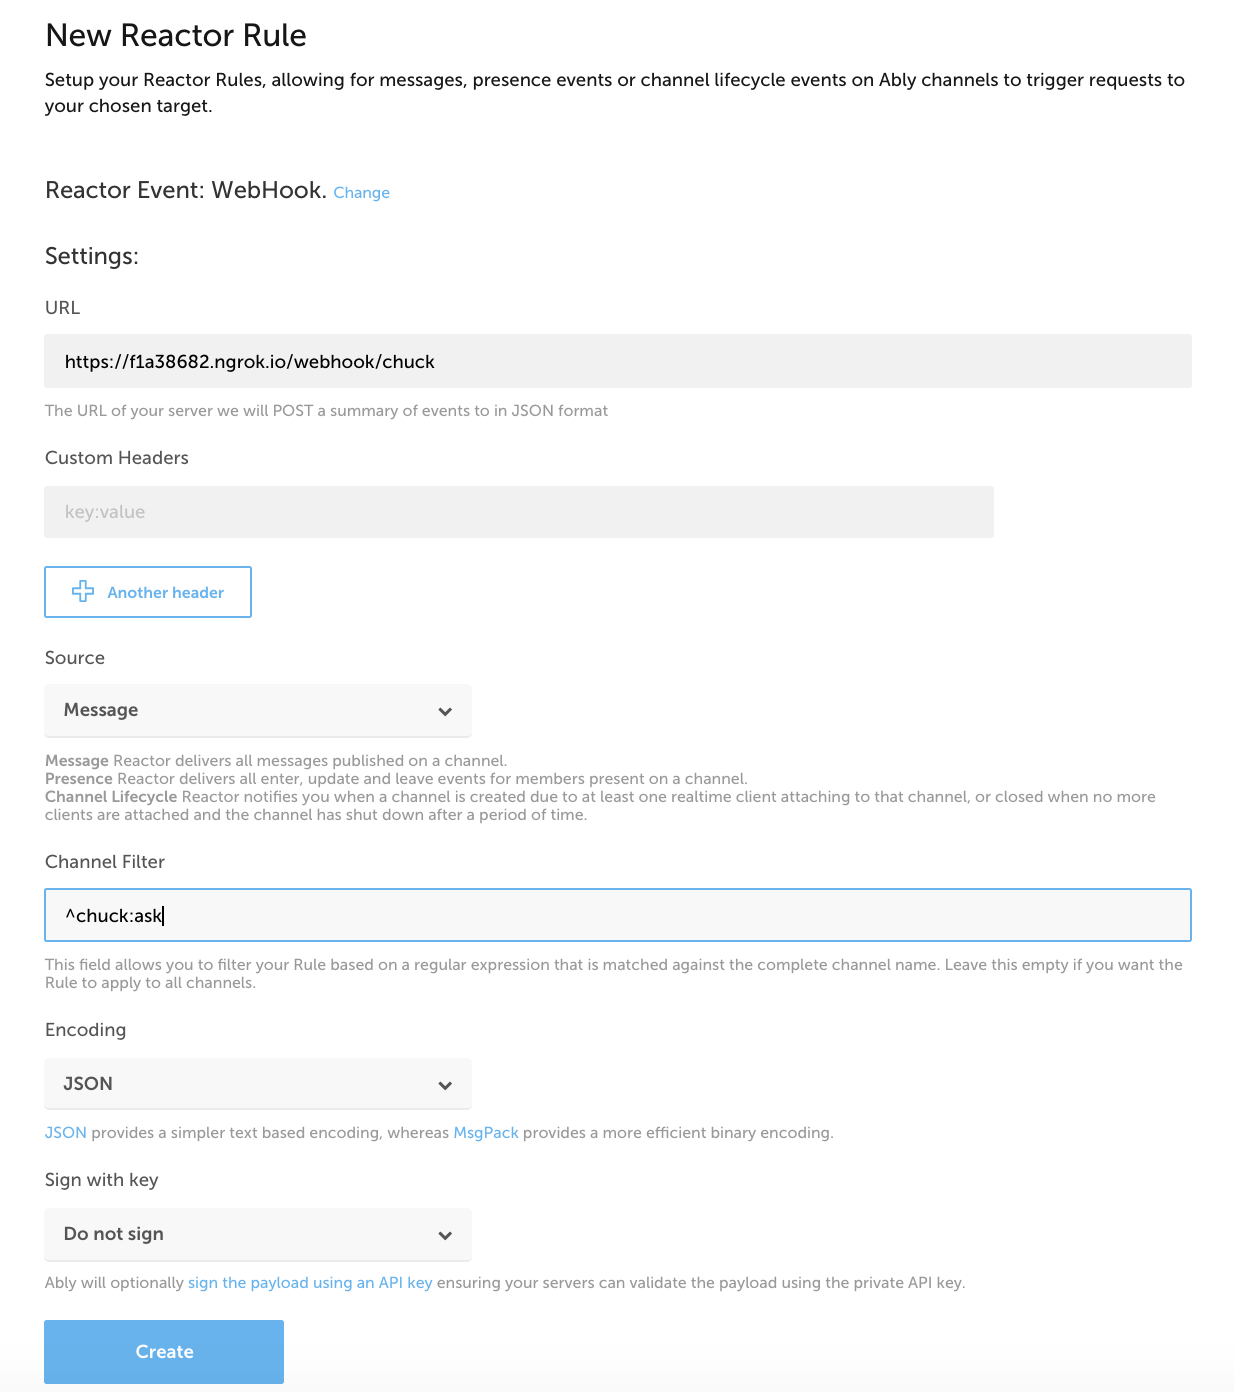
- Click “Choose” under “WebHooks”. When prompted, enter the name Ngrok endpoint + the Webhook route configured previously such as f1a38682.ngrok.io/webhook/chuck, choose Message as your source, and ensure that the channel filter ^chuck:ask is included to ensure only chuck joke requests are forwarded to your web server. See screenshot example below:
Once the WebHook is saved, you are now ready to test that WebHook is working. Visit http://localhost:3000/ in your browser, enter some text in the text field, and click the “Make me laugh Chuck!” button. You should within a second see your Rails server report an incoming request in the console log along with the message “Received Message with data ‘…’”. If you are having problems with the Webhook setup, please see our recommendations for debugging WebHooks.
Step 7 — Integrate with Chuck API and publish jokes over REST
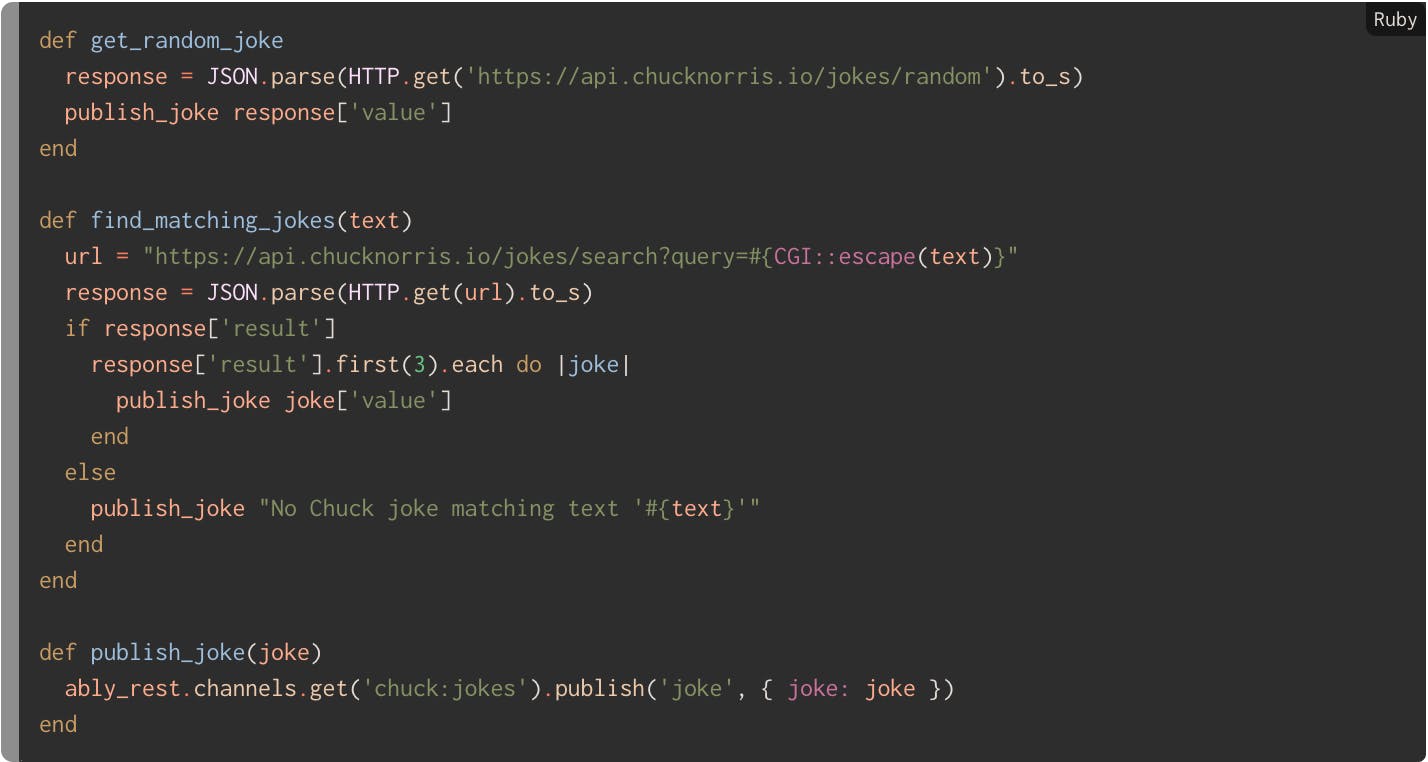
Now that the publishing, subscribing, authentication and WebHooks are in place, it’s time to hook the WebHook controller into the awesome Chuck Norris API. Modify app/controllers/webhook_controller.rb by adding logic to communicate with the API:
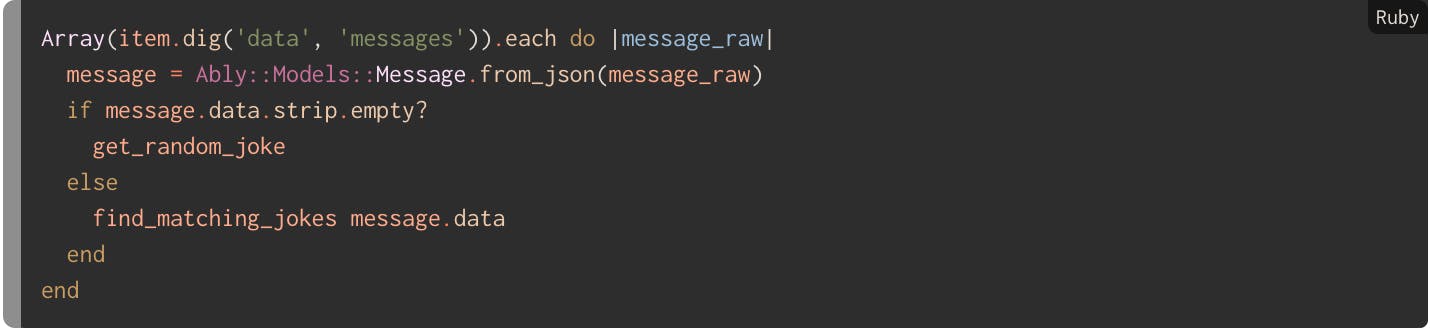
Then replace the message processing in the same controller with:
Once again, visit http://localhost:3000/ in your browser. Either type a word or phrase to filter jokes on or go for a random joke and click “Make me laugh Chuck!” button. You should see a response from the Chuck Norris API appear within the time it takes for that API to provide a joke. Given it’s a Chuck Norris API, that should be quick right?
We’ve covered a lot of ground in this tutorial. You’ve successfully covered off a lot of Ably functionality including token authentication, realtime pub/sub and WebHooks. We strongly recommend you review the next steps below for essential further reading to help you understand how to use Reactor Events and WebHooks in more detail.
Try this tutorial in one click on Heroku
The simplest way to try out this demo is to just install it now on Heroku for free. When installing with Heroku, you will automatically be provisioned with a free Ably account and the steps you need to take to configure the WebHook rules will be shown to you after the Heroku app is provisioned.
Download tutorial source code

Checkout the tutorial branch:

And then run the demo locally by adding your Ably API key to config/secrets.yml, configuring the WebHook rules as described in this tutorial and running the demo rails server
Next steps
- Find out more about Reactor Event Webhooks
- Find out more about Reactor Message Queues
- Find out more about other Ably Reactor services
- Learn more about other Ably features by stepping through our other Ably tutorials
- Gain a good technical overview of how the Ably realtime platform works
- Get in touch if you need help