


What is JAAS (Java Authentication and Authorization Service)?
JAAS is a builtin feature that comes with Java ee 8, where it provides facilities for logging users in, validating user credentials, and authorizing users according to the role associated with each user.
What is needed to implement JAAS login in java application?
Here are the tools that I'm using in this tutorial, and make sure you have this install.
- Netbeans IDE 11.3
- Payara Server 5.193 (you can use glassfish server too)
- XAMPP or WAMP ( for the database)
Creating Application Structure
- Open Netbeans IDE( must be higher than 11.3)
- Click on new Project ->Select Java web inside Java with Ant->Web Application // new project image
- Give proper name and select Java EE Version as "Java EE 8 Web"
Creating files required for application
- Create a new folder "config" inside "Source Packages" folder of the project.
- Create a new java class named "ProjectConfig" inside config folder.
- Create a new folder "jaas" inside "web pages" folder of the project.
- Add one test.html file inside "jaas" folder
- Add two files Admin.html and User.html adjacent to index.html( inside "web pages").
- Add one request filter by right-clicking on project->New->other->filter
- Give name as "loginfilter" and package name will be "filters", and press next.
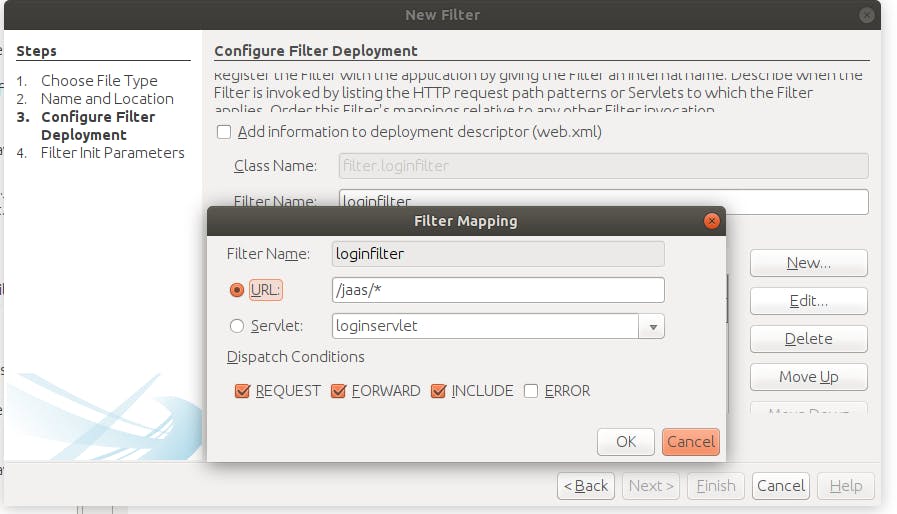
- Check the checkbox for "Add information to deployment descriptor" and click on the Edit button for Filter Mappings, and write as shown in image and click on finish.
Creating Tables and adding some credentials
Open phpMyAdmin, we need to create two tables "users" and "roles". Where "users" will hold user accounts with their name, email, SHA256 encoded password using Pbkdf2PasswordHash, and a foreign key to their associate role name in the roles table. Create one database and run these queries in your database to create tables and adding user credentials.
CREATE TABLE users ( id INT NOT NULL AUTO_INCREMENT , name VARCHAR(100) NOT NULL, password VARCHAR(200) NOT NULL, email VARCHAR(100) NOT NULL, roleid INT NOT NULL, PRIMARY KEY (`id`), INDEX (`roleid`));
CREATE TABLE roles ( roleid INT NOT NULL AUTO_INCREMENT, rolename VARCHAR(100) NOT NULL, PRIMARY KEY (`roleid`));

ALTER TABLE users ADD CONSTRAINT user_role FOREIGN KEY (`roleid`) REFERENCES roles(`roleid`) ON DELETE NO ACTION ON UPDATE NO ACTION;

INSERT INTO roles (roleid, rolename) VALUES
(1, 'Admin'),
(2, 'User');
INSERT INTO users (id, name, password, email, roleid) VALUES
(1, 'user1', 'PBKDF2WithHmacSHA256:2048:1xYOMBo6yIUl27b10KzMGNuoJ+8tJ2Y4tc7CSOOJpsM=:lKLxar4GSdw7kWj/+2Gx2NVr1NoPdBYYF5z/Pvs2KDo=', 'user1@gmail.com', 2),
(2, 'admin1', 'PBKDF2WithHmacSHA256:2048:MMuyuCBDwq7IjAF3AhYwaoideux0Vof7vRoMxtyQdw0=:5M/upJAhVQTZqx8nrL9LhfSMGvPNSXnAs6l+p3PMPCk=', 'admin1@gmail.com', 1);
There are two users in users table where the first is "user1" with password "user1" and second is "admin1" with password "admin1". Passwords in the users table are encrypted by Pbkdf2PasswordHashImpl. If you want to generate above passwords by yourself, just create one java class or servlet where import Pbkdf2PasswordHashImpl library and use it to generate a hash password, you can refer to the following code,
import org.glassfish.soteria.identitystores.hash.Pbkdf2PasswordHashImpl;
Pbkdf2PasswordHashImpl pbkd;
pbkd = new Pbkdf2PasswordHashImpl();
String hashPassword = pbkd.generate("password".toCharArray());
System.out.println(hashPassword);
Handling connection of application with database
JAAS by default uses data resource provided by payara server, that helps java to connect to the database directly. So to implement JAAS security you need to create one connection pool and connection resource in the Payara server Admin Console. This will help to connect our application directly to the database by writing very less code. I've created one connection pool and connection resource in payara console with "testpool" and "jdbc/test" names respectively.
Working on web application
Open ProjectConfig.java file from "config" folder and write the following code inside it.
@ApplicationScoped
@CustomFormAuthenticationMechanismDefinition(
    loginToContinue = @LoginToContinue(
            loginPage = "index.html"
    )
)
@DatabaseIdentityStoreDefinition(
    dataSourceLookup = "jdbc/test",
    callerQuery = "select password from users where name=?",
    groupsQuery = "select rolename from roles role, usertb user where user.roleid=role.roleid and user.name=?",
    hashAlgorithm = Pbkdf2PasswordHash.class,
    priority = 30
)
public class ProjectConfig {   }
- ApplicationScoped annotation runs file on application start and provides access to file configuration to whole application.
- CustomFormAuthenticatinMechanismDefinition annotation told the compiler to which Authentication Mechanism to use.
- DatabaseIdentityStoreDefinition annotation used to define identity store to lookup when request for login come.
Now go to index.html or create one login.html file, there we will write login form for our application. here is the simple login form that targets test.html file inside "jaas" folder.
<form method="post" action="/jaas/index.html">
Name:<input type="text" name="name" required ><br>
Password:<input type="password" name="password" required><br>
<input type="submit" name="submit" value="submit">
</form>
The flow here will be whenever some request to jaas/index.html will come, our request filter (loginfilter) will invoke and handle all the login related stuff and redirect a request to a particular user page. If a login user is from "User" role than redirects user to the User.html page if user is from "Admin" role than redirects user to the Admin.html page.
Now open loginfilter.java file and write this code inside doBeforeProcessing method.
public class loginfilter implements Filter {

    private static final boolean debug = true;
    @Inject private SecurityContext securityContext;

    private FilterConfig filterConfig = null;

    public loginfilter() {
    }

    private void doBeforeProcessing(ServletRequest request, ServletResponse response)
            throws IOException, ServletException {
            HttpServletRequest req =(HttpServletRequest) request;
            HttpServletResponse res = (HttpServletResponse) response;

            String username = req.getParameter("name");
            String password = req.getParameter("password");

            Credential credential = new UsernamePasswordCredential(username, new Password(password));
            AuthenticationStatus status = securityContext.authenticate(req, res, withParams().credential(credential));

            if(status.equals(SUCCESS)){
                if(securityContext.isCallerInRole("Admin"))
                {
                    res.sendRedirect("/BlogJaasApp/Admin.html");
                }
                else if(securityContext.isCallerInRole("User"))
                {
                    res.sendRedirect("/BlogJaasApp/User.html");
                } else {
                    System.out.println("No role found!");
                    res.sendRedirect("/BlogJaasApp/Index.html");
                }
            } else {
               System.out.println("wrong login credentials");
               res.sendRedirect("/BlogJaasApp/Index.html");
            }
    }
...
}
Open web.xml file from Configuration files folder of your web application, and defined roles, and constraints inside it, as shown write the code before ending of </web-app>
<web-app>
...
    <security-constraint>
        <display-name>Constraint1</display-name>
        <web-resource-collection>
            <web-resource-name>all</web-resource-name>
            <description/>
            <url-pattern>/*</url-pattern>
        </web-resource-collection>
<!--        <user-data-constraint>
            <description/>
            <transport-guarantee>CONFIDENTIAL</transport-guarantee>
        </user-data-constraint>-->
    </security-constraint>
    <security-role>
        <description/>
        <role-name>Admin</role-name>
    </security-role>
    <security-role>
        <description/>
        <role-name>User</role-name>
    </security-role>
</web-app>
We have two users so that i've mentioned Admin and User, you can add or remove if you want. Be sure to give same name as you have given in roles table.
Build and run the application and give name and password as "admin1-admin1" or "user1-user1" if you have entered the above credentials.