


Introduction
One of the most loved features in React, which helps us a lot while building our application, is the way we can use and manage state.
In October 2018, at the React Conf, the React team released a proposal for React 16.8. They introduced React Hooks - a new way to use and manage state throughout our application and perform side-effects in React functional components.
This was a huge surprise and nobody expected that proposal, which was enough to get community super excited. A lot of people have been waiting for this for such a long time and are already using it in production, even though it's been in alpha version which is not recommended by the React team. The feature has just been released today along with the latest version of React (v16.8), which is one the most awaited releases for sure.
This means that React Hooks are finally 100% safe to use!🎣
In this article, we're going to review how we were managing state in React, understand why React Hooks are really a game-changer and learn to write our very first React Hook.
State in React
When we are just getting started with React, one of the basic concepts that we need to learn is components, how they work, and how to make the best use of them. A component is basically a JavaScript class or a function that optionally accepts properties (props) and returns a React element. With that, we can divide behavior into roles, much like we would with JavaScript functions.
However, we have limitations with components, especially with managing state. We can manage it in React class components, not functional components. We know that state in React can only be modified and created with a class component. So, before you create your components you need to think if you are going to need to manage state. If so, you should create a class component and not a functional component.
Basically, in React we get two types of components:
Stateful Components in React
This type of component is responsible for the management and handling of state throughout our application. We can use Redux, MobX or even the setState to manage state. We can also use lifecycle methods as componentDidMount, componentDidUpdate, etc. But the main question here is: "Are you going to need to manage and handle data?"" If the answer is "Yes", you need to write a class component.
Stateless Components
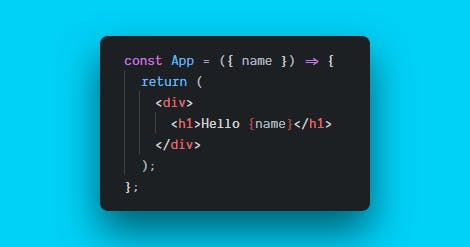
This type of component is basically a function, and it receives data via props. It can't manage or handle state -- that's why it is called a Stateless Component. In this type of component, we can't manage state nor use lifecycle methods. This type of component is also known as a Presentational Component, because it only gives us the power to present the data, not modify it.
So, when you need a component just to show data, you're going to write a functional component. You can also write a class component just to show data but there's no need to do it and a functional component would be a better choice and will make your code more readable.
In React, we get two types of components to deal with data. But how were we managing this data until now?
A lot of people started with setState, then moved on to Redux or MobX, but the truth is that you don't need Redux or MobX for everything. You can simply solve your problem with the setState.
Redux and MobX really solve a lot of problems when we're talking about global state management, and help a lot when we're building huge applications that need to manage and modify a lot of data. However, they also bring in a lot of complexity for development, so they're not the best for you to use if you don't need them.
For those who are just starting out with React, setState is the best option, but it also has some problems that we're going to see in the next section.
setState
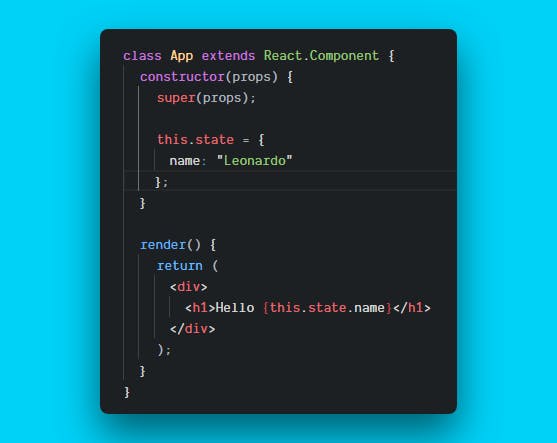
When we're thinking about components in React, we think they can have state. And when we're dealing with state in our application, the first option that we have is the setState function, which accepts an object that will be merged in the current state of our component. The setState function is only available in class components, and we don't get any way to handle state in functional components.
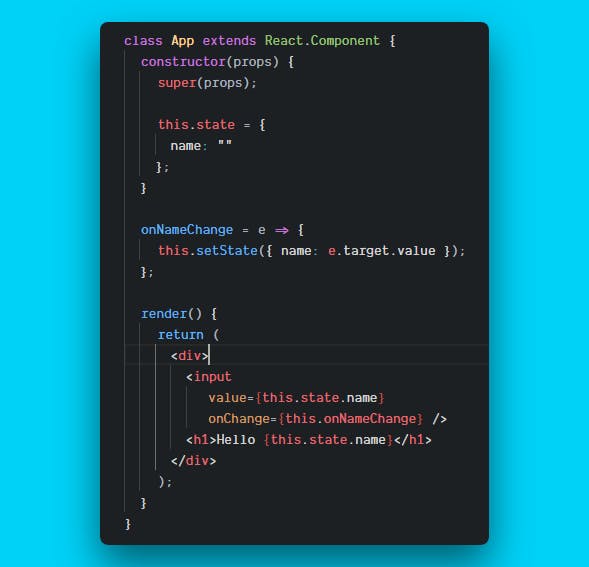
Every time we call setState, it causes reconciliation. This is the way React updates the DOM. setState function is also asynchronous. This means that we can have multiple calls to setState in a single scope.
The setState function can also take a callback so that every time that we change our state it will run our callback and give us some result.

But the main problem that we have with setState is: we can only use it in class components. There's no way we can use it in a functional component -- so if we want to use and manage local state, we need to declare our component as a class component.
That's why the React team released a new proposal: manage state in functional components! This is a game-changer. We don't need to write class components just to handle state. We can do it in functional components as well, and we can also use lifecycle methods in our functional components!
So, now, let's dive into React Hooks and find the best way to use state in our functional components!
React Hooks finally get released!
React Hooks are the new way to manage and handle state in React. We don't get only one hook -- we can get as many hooks as we want to.
To start using React Hooks, you need to update your React version to the latest version, the one that supportsHooks, which is 16.8.0 at the time of writing this article.
We're going to build a simple to-do app, and you're going to understand how hooks work pretty well! Now, to start using React Hooks, We need to import the useState hook. This is one of the most important hooks as with this specific hook we're going to be able to use state in our functional component.
import React, { useState } from "react";
The useState hook takes the initial state as an argument, and it returns an array with 2 elements: the current state, and the updater function.
const [state, setState] = useState(false);
So, when you want to update your state, your just need to call the exact updater function, and pass a new value:
setState(true)
So, now, to start creating our to-do app, we're going to create a new file called App.js, and inside that file, we're going to import the useState hook, and create a todos state to track our todos. We'll also have a setTodos updater function to update our todos every time that we add a new one. The default state for our todos is going to be an array. We can have one or more todos.
Our component is going to look like this:
App.js
import React, { useState } from "react";
const App = () => {
const [todos, setTodos] = useState([]);
return (
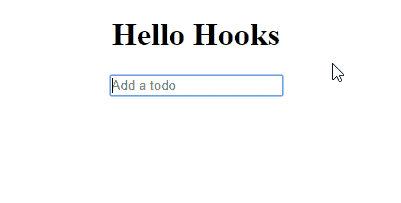
<div>
<h1>Hello Hooks!</h1>
</div>
);
};
export default App;
Now, we're going to create a file called Form.js to be our form, and we're going to create a hook called setValue to update the value of the input and when we submit, it's going to add a new todo.
Form.js
    import React, { useState } from "react";

    const Form = () => {
      const [value, setValue] = useState("");

      return (
        <form>
          <input
            type="text"
            placeholder="Add a todo"
          />
        </form>
      );
    };

    export default Form;
Now, we're going to create the last component that we're going to need. It's going to be called Todo.js and is going to be an h4 only with the text of the todo that we added. We're going pass the text props for now, but we will need to make some changes soon.
It's going to look like this:
Todo.js
    import React from "react";

    const Todo = ({ text }) => {
      return <h4>{text}</h4>;
    };

    export default Todo;
Now, we will go back to our App.js file and start creating our todos. First, we're going to create a function to add a todo. It's going to be called addTodo. In this function, we're going to pass the text of the todo, and add a new todo to our todos.
    const addTodo = text => {
      const newTodos = [...todos, { text }];
      setTodos(newTodos);
    };
Now, we're going to create a function to delete a specific todo. We're going to pass the index of the todo that we want to delete.
    const deleteTodo = index => {
        const newTodos = [...todos];
        newTodos.splice(index, 1);
        setTodos(newTodos);
    };
Now, we're going to import the Form.js and Todo.js components that we created earlier and pass some props to them.
To the Form.js component, we're going to pass the addTodo as props, so when we add a new todo, it's going to be passed and set the value.
<Form addTodo={addTodo} />
Now, we're going to create a new div and inside it, we're going to map the whole todos state. For each todo, we're going to pass the Todo.js component and pass three props to it: the index, the deleteTodo function, and the text of the todo.
    <Todo
        key={index}
        index={index}
        deleteTodo={deleteTodo}
        text={todo.text}
    />
Your code should look like this:
    import React, { useState } from "react";

    import Form from "./Form";
    import Todo from "./Todo";

    const App = () => {
      const [todos, setTodos] = useState([]);

      const addTodo = text => {
        const newTodos = [...todos, { text }];
        setTodos(newTodos);
      };

      const deleteTodo = index => {
        const newTodos = [...todos];
        newTodos.splice(index, 1);
        setTodos(newTodos);
      };

      return (
        <div>
          <h1>Hello Hooks</h1>
          <Form addTodo={addTodo} />
          <div>
            {todos.map((todo, index) => (
              <Todo
                key={index}
                index={index}
                deleteTodo={deleteTodo}
                text={todo.text}
              />
            ))}
          </div>
        </div>
      );
    };

    export default App;
We're going to finish our Form.js component. First, pass the addTodo props to it, and create a function called handleSubmit that's going to add a new todo every time we hit enter.
    const handleSubmit = e => {
        e.preventDefault();
        if (!value) return;
        addTodo(value);
        setValue("");
    };
Now, we're going to create a form and pass the handleSubmit as props. Also, in the input that we have already created, we're going to pass two more props to it: value, that's going to be the current value of the input and onChange which is going to be a set a value every time we change it.
    <input
        value={value}
        type="text"
        onChange={e => setValue(e.target.value)}
        placeholder="Add a todo"
    />
Now, our Form.js component is going to look like this:
    import React, { useState } from "react";

    const Form = ({ addTodo }) => {
      const [value, setValue] = useState("");

      const handleSubmit = e => {
        e.preventDefault();
        if (!value) return;
        addTodo(value);
        setValue("");
      };

      return (
        <form onSubmit={handleSubmit}>
          <input
            value={value}
            type="text"
            onChange={e => setValue(e.target.value)}
            placeholder="Add a todo"
          />
        </form>
      );
    };

    export default Form;
To finish our to-do app, go to our Todo.js component and pass two more props to it: the index of the todo, and the deleteTodo function. Pass the onClick event in the todo, and if they click in this specific todo, this todo is going to be deleted.
The code for a single Todo is going to look like this:
    import React from "react";

    const Todo = ({ text, index, deleteTodo }) => {
      return <h4 onClick={() => deleteTodo(index)}>{text}</h4>;
    };

    export default Todo;
Now, you'll be able to add a new todo, and if you click on the todo you're going to delete it! Success!
Using React Hooks is pretty easy and it really gives us a lot of power. We can now manage state in function components, and there's no need to use class components if you want to have state.
Should I Use React Hooks?
Well, you don't need to use this feature if you don't want to. You can stay with your class components and use setState functions, or Redux, MobX, but I really recommend you to try it at least once to see how beautiful this is.
With React Hooks your components are going to be improved, be more readable, more well-written, and you can understand your code more easily.
Also, it's going to be way easier to test your components. Since they are going to be functional components, you don't have to worry about hidden state or side effects. You'll know what they do just by reading your code.
Conclusion
Now that we have React Hooks, a lot of people have been saying that there's no need to write class components anymore. Well, maybe.
React Hooks really came out to change the way we deal and handle state in React. So, technically there's no need to write class components just to handle state when we can get the same result with a functional component.
Writing class components just to handle state is really painful because we have a lot of problems with it, such as:
We need to know how to use
bindandthiscorrectly.They are really hard to test
We can get a complex code which is hard to maintain.
As the React docs say:
Hooks embrace functions, but without sacrificing the practical spirit of React.
We don't need to drop the class components right now, but I think that we're going to use more functional components, which are a better way to manage state in our applications.
It will be really awesome if we start seeing more and more apps using React Hooks!
Hope you enjoyed reading this article. Let me know what you think in the comments below.