
Build a Simple CRUD App with Angular 8 and ASP.NET Core 2.2 - part 1 - back-end


Part 1 - back-end with ASP.NET Core 2.2 and Entity Framework Core
Let’s take a look at how to build a CRUD web app using ASP.NET Core 2.2, Entity Framework Core, and Angular 8. This is part 1 where we focus on the back-end.
Part 2 is here - Angular 8 app with REST API
We’ll have a REST API in the back-end and the Angular app on the front-end.
The basic CRUD app will be a blog, where we can Create, Read, Update, and Delete blog posts.
Github repo is here: Angular 8 blog app tutorial using .NET Core 2.2 and Entity Framework back-end
Prerequisites
For the Angular front-end we'll also use:
Make sure above are installed. We will use Visual Studio 2019 for the back-end and VS Code for the front-end. You can however use only Visual Studio 2019 if you want to.
As of Sept 15th, there are previews of .NET Core 3 that work with previews of Visual Studio 2019. However, in this tutorial we won’t use any previews and only use fully released versions of .NET Core 2 and Visual Studio 2019.
Create ASP.NET Core 2.2 REST API
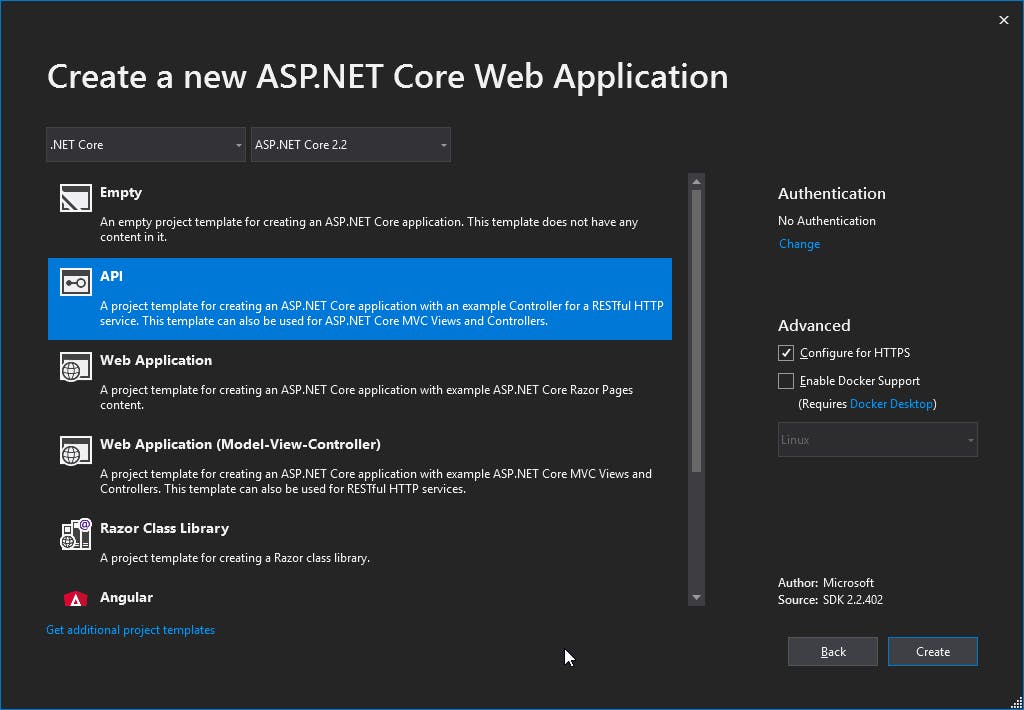
In Visual Studio 2019, create a new project and choose ASP.NET Core Web Application. Name our project (Blog). Then choose .ASP.NET Core 2.2 version and the API template:
Add models and Entity Framework Database Context
Next up, let’s create a folder called Models, and then add a class file called BlogPost.cs. Make sure to import necessary namespaces.
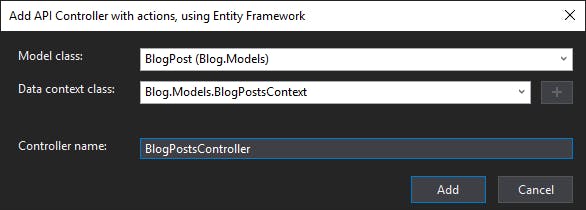
Then create an API controller — right click the Controllers folder, choose Add -> Controller. Then choose API controller with actions, using Entity Framework.
Choose BlogPost as Model class.
Under Data context class, press the + button and call the context BlogPostsContext.
When you press Add, Visual Studio will add the necessary NuGet packages and create a new database context, BlogPostContext, in the Data folder. You will also have the BlogPostsController created for you, filled with lots of API methods.
The contents of BlogPostsContext.cs:
The contents of newly created BlogPostsController.cs, our ApiController:
This is fully working code, with route configuration, all CRUD operations and correct HTTP verbs using annotations (HttpPost, HttpGet, HttpPut, HttpDelete). We also force our API to serve JSON, using the [Produces("application/json")] filter.
We’re following the best practices for REST APIs, as we use GET for listing data, POST for adding new data, PUT for updating existing data, and DELETE for deleting data.
Note that the BlogPostContext is dependency injected. This context is used to perform all actions needed for our app’s back-end.
We can however improve this a little bit, using the Repository design pattern to create a data repository, and inject it.
Create a data repository
Our existing code works, however as applications grow, it’s better to split the logic into different layers:
Data layer with the data repository that communicates with the database.
Service layer with services used to process logic and data layer communication.
Presentation layer with only the API controller.
For our application, we will have an API controller which communicates with the data repository. Let’s create the repository.
Right click the Data folder and create a new interface called IDataRepository. Copy and paste this code into IDataRepository.cs:
Then right click the Data folder again and create a new class called DataRepository. Copy and paste this code into DataRepository.cs:
As you can see, we have dependency injected the BlogPostContext into our DataRepository class.
Update BlogPostsController to use the data repository
Replace the code in BlogPostsController with the following:
You can see the data repository in action in the PutBlogPost, PostBlogPost and DeleteBlogPost methods, like this:
We however choose to keep our dependency on BlogPostsContext in the controller, using both the context and data repository.
CORS in app configuration
In Startup.cs, you already can see some configuration — our app will use MVC and have a db context for instance. Update the ConfigureServices method to look like this:
Since we’re going to call our REST API from JavaScript, we need to enable CORS. We will use a default policy.
Also, we register our DataRepository here.
Make sure to import necessary namespaces.
Note that we’ve commented out services.AddSpaStaticFiles(). We will uncomment this when we’ve created the Angular application, but we’re not there yet.
Then update the Configure method to look like this:
UseCors must come before UseMvc here. Don’t forget to import the necessary namespaces.
We’ve commented out SPA specific configuration here. We will uncomment app.UseSpaStaticFiles() and app.UseSpa() later, when we’ve created our Angular application.
Let’s also update launchSettings.json to set launchUrl to empty in two places:
"launchUrl": “”
Also delete ValuesController.cs in the Controllers folder.
Setup migrations and create the database
We’re almost there!
Now that we have the BlogPostsContext and use the code first approach for Entity Framework, it’s time to setup migrations. First, let’s take a look at the database connection string in appSettings.json.
The connection string was created for us earlier and the app will use SQL Server Express LocalDb. You can, of course, use your own instance of SQL Server instead, just make sure the connection string is correct!
To enable migrations, open the Package Manager Console (Tools->NuGet Package Manager->Package Manager Console) and run this command:
Add-Migration Initial
We’ll get this message back:
Microsoft.EntityFrameworkCore.Infrastructure[10403]

Entity Framework Core 2.2.6-servicing-10079 initialized 'BlogPostsContext' using provider 'Microsoft.EntityFrameworkCore.SqlServer' with options: None

To undo this action, use Remove-Migration.
Perfect! A Migrations folder is created with your Entity Framework migrations, which will contain changes to the Entity Framework model. We have one migration file, named something like 20190912150055_Initial.cs
In this file, we have the Up and Down methods, which will upgrade and downgrade the database to the next or previous version.
To create the database, we now have to execute the following command in the Package Manager Console:
Update-Database
Let’s open the SQL Server Object Explorer (View -> SQL Server Object Explorer). We now have this:

Remember, if you make any changes to the data model, you need to use the Add-Migration YourMigrationName and Update-Database commands to push changes to the database.
Try the API
Press F5 in Visual Studio to start the application. On localhost, browse to /api/blogposts which should return an empty JSON string. You can now use Postman to create a new blog post.
Here’s the JSON to post:
{
  "dt": "2019-09-12T18:18:02.190Z",
  "creator": "Martin",
  "title": "Test",
  "body": "Testing"
}
In Postman, make sure the API URL is correct and POST is used as the http verb. Fill in above JSON in the editor (choose raw) and choose JSON (application/json) before you press Send. The request and returned body result should look like this:
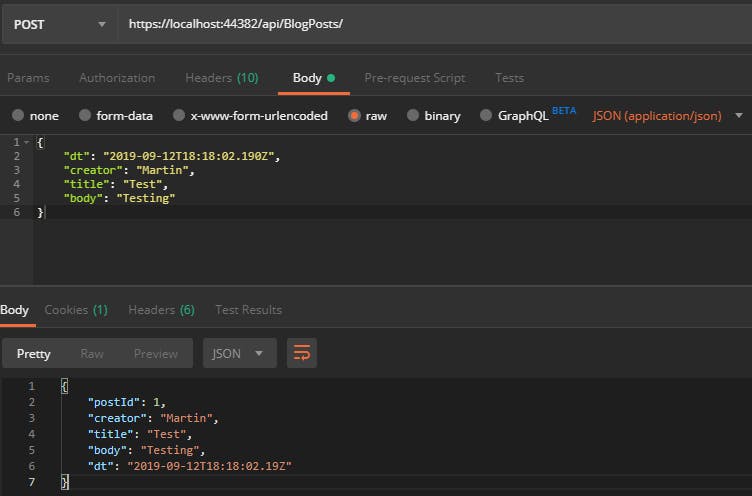
And if you change http verb from POST to GET, you’ll now get this result:
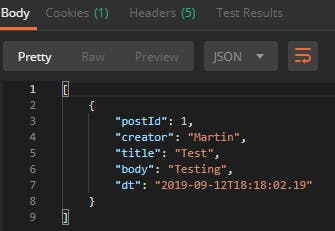
Our API is up and running!