
Building an IoT Environment Simulation: Building IoT Sensor.
Simulating an IoT Environment using NodeJs and Javascript.


This article series is inspired by our project for IoT class (CSEL 711) taken by Dr. Atanu Roy Chowdhury. In this project, we will be building a simulated IoT environment to demonstrate how various components work in an IoT environment. Before starting we would like to express our heartfelt gratitude to our professor for his valuable guidance and support.
Objective and Scope
Broken across multiple assignments, the object of this project is to:
- Build a sensor simulator that produces random data at a fixed time interval.
- Build a website that can be used to start/stop the sensor.
- The sensor publishes the data to the MQTT Broker.
- A smart device subscribes to the published data and performs calculations on that data.
- Based on the calculated data, the output is generated that controls another device.
- The processed output is also displayed on the website.
Given the scope of our curriculum, the project is based on device simulations built using NodeJs and uses REST APIs to interact with each other instead of using wires.
The following diagram provides an overview of the entire project:
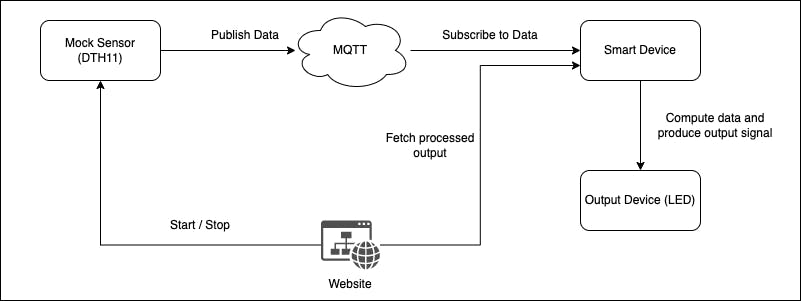
Building the Mock Sensor
For this project, we have chosen the DTH11 sensor which is a temperature and humidity sensor. The simulation will produce random data for temperature and humidity every second and publish it to MQTT Broker.
Project Initiation
We started by creating an empty nodejs project by using the following commands.
mkdir tempAndHumiditySensor
npm init -y
We will be need express, mqtt, dotenv node packages for our project. We install them by typing
npm install express mqtt dotenv
Writing some code
We start by importing our installed packages and creating an express server. Then I define the data type for storing the sensor data. I created a JSON Object named sensorData to store the latest produced data. isActive variable is used to store the present state (ON/OFF) of the sensor.
// Importing libaries
var mqtt = require('mqtt')
const express = require('express')
require('dotenv').config()

// Creating a server to simulate our sensor device
var app = express()
var PORT = 4000

// Define the datamodel for our sensor device
var sensorData = {
  temperature: 0,
  humidity: 0,
}

// Define the state of the device (On/OFF) => (true / false)
var isActive = true
Generating random data
To generate the random data, we define a function called generateData(), the code for which is as follows:
function generateData() {
  randomTemeperature = Math.floor(20 + Math.random() * 40) // 20 - 60 degree Celcius
  randomHumidity = Math.floor(5 + Math.random() * 90) // 5 - 95 RH

  sensorData = {
    temperature: randomTemeperature,
    humidity: randomHumidity,
  }

  // Publishing to MQTT Server

  if (isActive) [setTimeout(generateData, 1000)]
}
We start by generating random numbers within the output range of our sensor. We use the Math.random() function for generating the random number which by default returns a random number between 0 and 1. To generate a number within a given Lower Bound and Upper Bound, we use the formula
RequireValue = LowerBound + Math.random()*(UpperBound - LowerBound).
Once the random value for temperature and humidity is generated, we store the data in the sensorData variable defined earlier. Finally, we check if the state of the sensor is still active and recall the generateData() function after 1sec (1000ms) using the setTimeout function.
Creating API to start and stop the sensor
We want that one should be able to start/stop our sensor using a frontend. To do so we will create REST APIs.
// Created API for starting the device simulation
app.post('/start', function () {
  console.log('Starting...')
  isActive = true
  generateData()
})

// Created API for stopping the device simulation
app.post('/stop', function () {
  console.log('Stopping...')
  isActive = false
})
We are creating two POST REST APIs that will be called by the frontend. The first one is /start that will be used to start the sensor. We create the API using app.post(), pass in the endpoint, and define a function. Inside this function, we define the code that will be executed when the API is called. Inside we print "Starting..." to the console, set the isActive variable as true, and call the generateData() function defined earlier.
Similarly, we create the /stop API and in the function, we first print "Stopping..." and then set the isActive variable as false.
Now that we have our sensor simulator, we are going to publish the data to the MQTT Broker.
Connecting with MQTT Broker
We are using HiveMQ for creating an MQTT broker and will be using a username and password for authorization. During the sign-up process, a unique Host Id is generated as well that will be used to connect to our broker.
To store the Host Id, Username, and Password we use Environment variables to keep it a secret.
We create a new file and name it .env to store the environment variables. The content of the .envfile are as such:
MQTT_HOST='YOUR MQTT HOST ID'
MQTT_PORT='YOUR MQTT PORT'
MQTT_USERNAME='YOUR USERNAME'
MQTT_PASSWORD='YOUR PASSWORD'
In case you are using a broker that doesn't use username and password, keep the username and password blank.
To connect with MQTT first define the parameters as follows:
// Define the MQTT client configuration (Assignment 4)
var options = {
  host: process.env.MQTT_HOST,
  port: process.env.MQTT_PORT,
  protocol: 'mqtts',
  username: process.env.MQTT_USERNAME,
  password: process.env.MQTT_PASSWORD,
}
We fetch the values from our environment variables. Now we connect with our broker and use a variable named client to store the reference of the connection. We also use client.on('connect', function() {}) to define what happens when the connection is established with the MQTT broker. Here we are printing "Connected" to the console.
var client = mqtt.connect(options)

client.on('connect', function () {
  console.log('Connected')
})
Now that we have connected with the broker, we have to publish the data to the broker. We use the following code after generating the random values to publish the data:
// Publishing to MQTT Server
client.publish('my/test/topic', JSON.stringify(sensorData))
console.log('Published:', JSON.stringify(sensorData)
Here we are publishing the data to the broker with the topic as my/test/topic. The topic is important as in the later phase we are going to subscribe to this topic to get the data published data.
The complete code
The final code is as follows:
// Importing libaries
var mqtt = require('mqtt')
const express = require('express')
require('dotenv').config()

// Creating a server to simulate our sensor device
var app = express()
var PORT = 4000

// Define the datamodel for our sensor device
var sensorData = {
  temperature: 0,
  humidity: 0,
}

// Define the state of the device (On/OFF) => (true / false)
var isActive = true

// Define the MQTT client configuration
var options = {
  host: process.env.MQTT_HOST,
  port: process.env.MQTT_PORT,
  protocol: 'mqtts',
  username: process.env.MQTT_USERNAME,
  password: process.env.MQTT_PASSWORD,
}

//initialize the MQTT client
var client = mqtt.connect(options)

client.on('connect', function () {
  console.log('Connected')
})

// Created API for starting the device simulation
app.post('/start', function () {
  console.log('Starting...')
  isActive = true
  generateData()
})

// Created API for stopping the device simulation
app.post('/stop', function () {
  console.log('Stopping...')
  isActive = false
})

// Created the function that generated the random data
function generateData() {
  randomTemeperature = Math.floor(20 + Math.random() * 40) // 20 - 60 degree Celcius
  randomHumidity = Math.floor(5 + Math.random() * 90) // 5 - 95 RH

  sensorData = {
    temperature: randomTemeperature,
    humidity: randomHumidity,
  }

  // Publishing to MQTT Server
  client.publish('my/test/topic', JSON.stringify(sensorData))
  console.log('Published:', JSON.stringify(sensorData))

  if (isActive) [setTimeout(generateData, 1000)]
}

// Finally listed for any API calls
app.listen(PORT)
It is also available here.
Testing
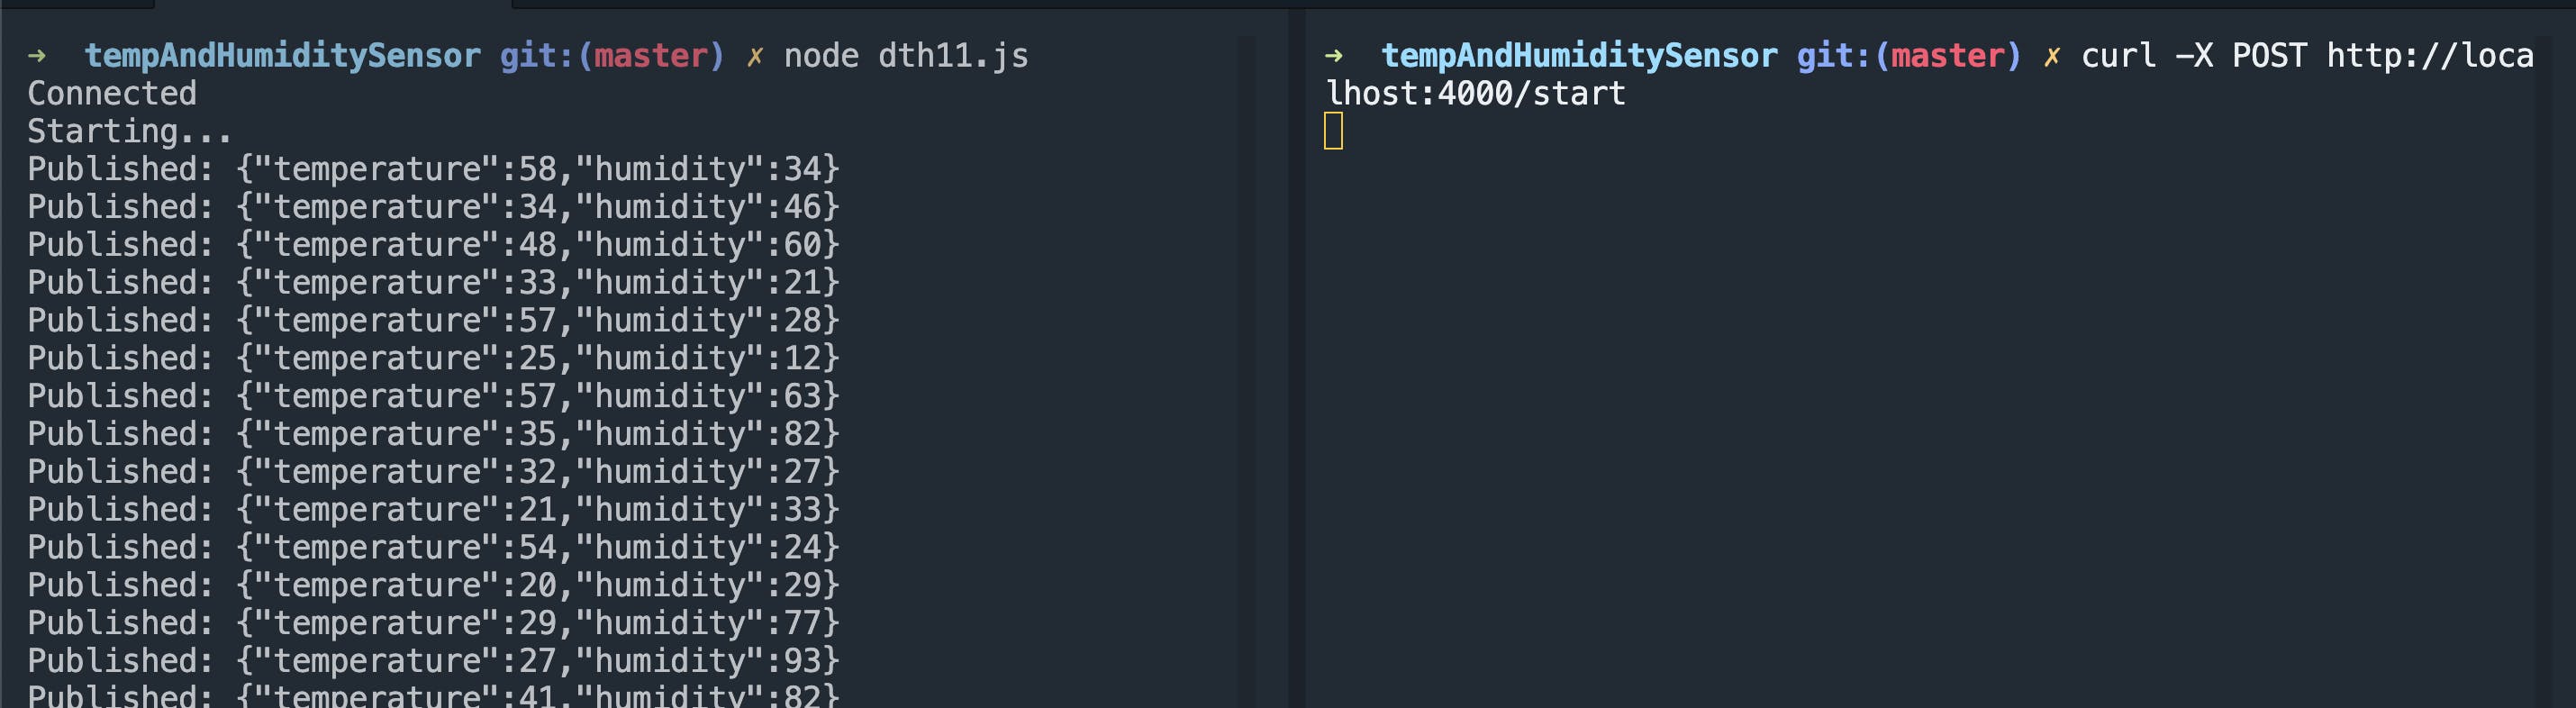
Now it is time to test our code. To test our code first, we have to run our mock server. We have saved the node as dth11.js, so to run the server we type the following:
node dth11.js
This will start the mock sensor but you won't see anything on screen except the text "Connected" as no data is generated or published unless we start the sensor using the API.
 We use the
 curl command to call our API. Type in the following command:
curl -X POST http://localhost:4000/start
This will start our mock sensor and you can see data being published from the terminal:
To ensure that the data is properly published to the MQTT Broker, we will use HiveMQ Websocket Client to visualize the published data. Using the web tool we connect with the broker using the HostId, Port, Username, and Password. Then we subscribe to the topic we are publishing under and can visualize the data as is published by our mock sensor.
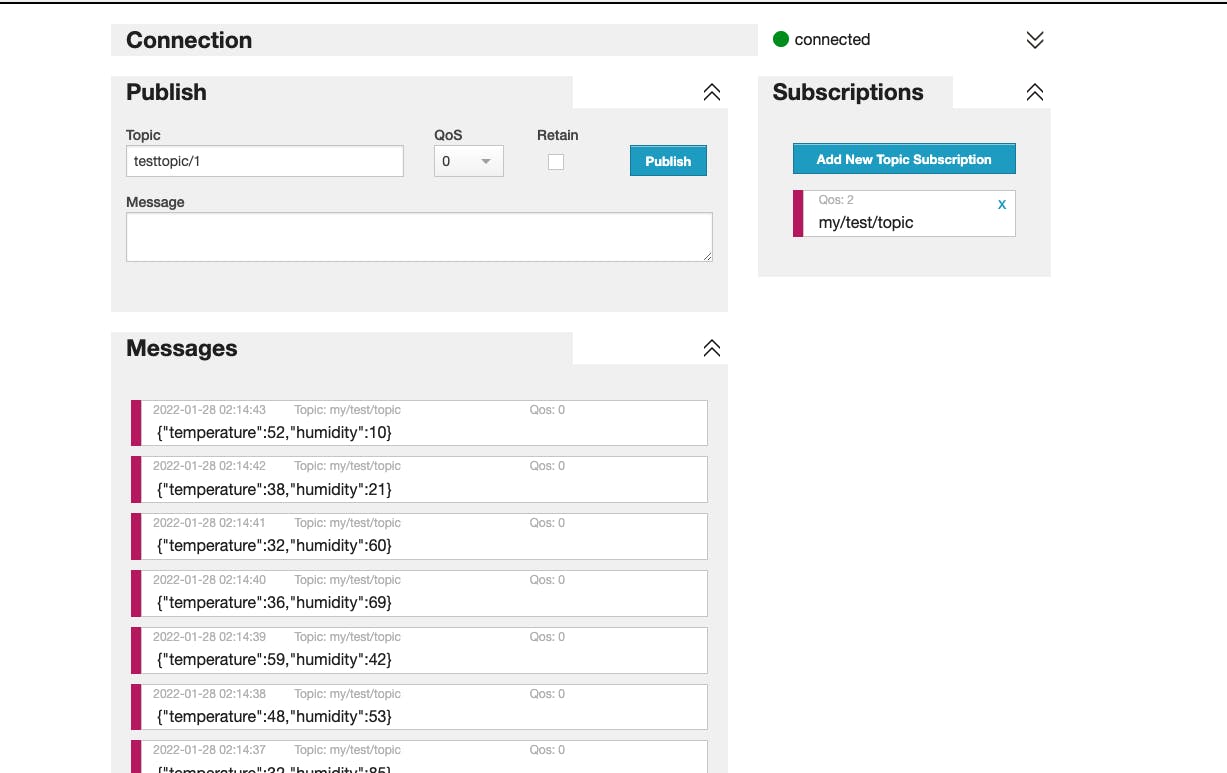
From this, we can confirm that the data is correctly published to the MQTT Broker. We use the following command to stop the sensor:
curl -X POST http://localhost:4000/stop
You will see "Stopping..." on the console and no new data would be published to the broker that can be verified from the Web Client.
Conclusion
In this blog, we discussed the scope of the project and have built the mock sensor. We are generating random data to simulate the data produced by an IoT Sensor and are publishing the same to MQTT Broker. We can start/stop our sensor using REST API calls. We also tested our sensor and are ready to move to the next step.
Next Step
In the next step, we are going to build our smart device that subscribes to the MQTT Broker to receive the published data, perform calculations on the data and display it. You can continue to the next section here.