
Building an IoT Environment Simulation: Building Smart Device
Simulating an IoT Environment using NodeJs and Javascript


This blog is a continuation of my previous blog here where we built a mock IoT Sensor (DTH11 Sensor) that generates random values for temperature and humidity and publishes that value to an MQTT Broker. Carrying forward, now we are going to build a Smart Device that will subscribe to the published data along with a mock LED that will be controlled by the smart device.
Target for this project
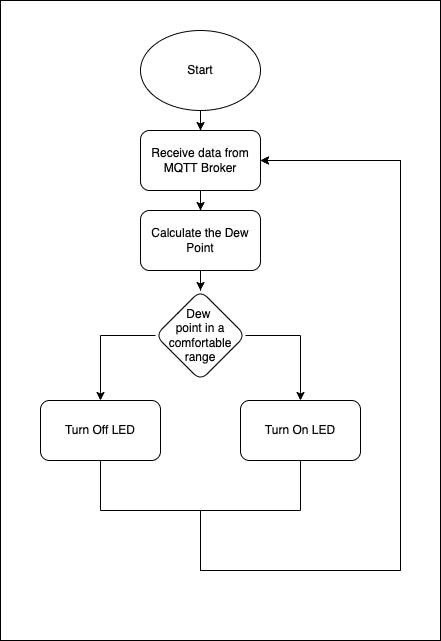
In this blog, we are going to build Smart Device that will subscribe to the temperature and humidity data published by the sensor. It then calculates the dew point based on the received data. We also build a mock LED that will be turned ON when the dew is comfortable for human habitation and will be turned OFF if the dew point is uncomfortable. The following flowchart shows the working of the smart device:
Building the LED Simulation
We will start by building our LED simulator. It will also have REST APIs to turn it ON/OFF that will be called by the smart device. We start by creating a new file in our project directory called led.js. The code for the LED Simulator is:
const express = require('express')
const app = express()
const PORT = 8000

var ledStatus = false

// Crated API to turn on the LED
app.post("/turnon", function() {
    console.log("Turning on the lights")
    ledStatus = true
})

// Created API to turn off the LED
app.post("/turnoff", function() {
    console.log("Turning off the lights")
    ledStatus = false
})

// Created API to get the LED status
app.get("/status", function(req, res) {
    console.log("Getting the status")
    res.send({
        "status": ledStatus
    })
})

app.listen(PORT)
Here we have defined a ledStatus variable that is used to store the ON/OFF state of the led. We have 2 POST REST APIs /turnon and /turnoff that are used to change the state to ON and OFF respectively. We also have a GET REST API /status that is used to find whether the LED is in an ON or OFF state by returning the value of the ledStatus variable.
Testing the LED
Now, let's test our LED simulator before moving on to the next phase. We start our LED by using the following command
node led.js
To get the status of the LED, using the following command
curl -X GET http://localhost:8000/status
By default the status returned will be false. To turn on the LED we use
curl -X POST http://localhost:8000/turnon
If we check our status again, it will return true signifying that our LED is on. Finally, we can turn it off again using
curl -X POST http://localhost:8000/turnoff
We can check the status again to ensure that our LED has successfully turned off.

Building the smart device simulator
Now let's start building our smart device simulator. We start by creating a new file called smartDevice.js. We start our code similar to our previous blog, by importing the libraries and defining the datamodel. We also define a variable called dewPoint that will used to calculate the dew point.
var mqtt = require('mqtt')
const express = require('express')
const fetch = require('node-fetch')
require('dotenv').config()

var app = express()
var PORT = 6000

var sensorData = {
  temperature: 0,
  humidity: 0,
}

var dewPoint = 0
Now we establish the connection with the MQTT broker using the following code:
//initialize the MQTT client
var client = mqtt.connect(options)
Now we define the functions that will be called when the connection is established, an error is generated and a message is received respectively
client.on('connect', function () {
  console.log('Connected')
})

client.on('error', function (error) {
  console.log(error)
})

client.on('message', function (topic, message) {
})
The client.on('message', function(topic, message){}) is used to define the function that will be called whenever a new data is published to the broker. topic contains the topic under which the data is published and message will be the main payload or data that was published.
Inside this function, we write the following code:
client.on('message', function (topic, message) {
  //Called each time a message is received
  //   console.log('Received message:', topic, message.toString())
  sensorData = JSON.parse(message)

  // Processing the Sensor data
  dewPoint = sensorData.temperature - (100 - sensorData.humidity) / 5

  console.log(dewPoint)

  if (dewPoint <= 55) {
    console.log('COMFORTABLE')
    // Calling the LED ON API
    fetch('localhost:8000/turnon', {
      method: 'POST',
    })
  } else {
    // Calling the LED OFF API
    fetch('localhost:8000/turnoff', {
      method: 'POST',
    })
    console.log('UNCOMFORTABLE')
  }
})
We start by converting our received message into JSON format using the JSON.parse() function and then store it in the sensorData variable defined. Then we calculate the dew point based on the temperature and humidity data using the formula dew point = temperature - (100 - humidity) / 5. If the dew point is less than 55, it signifies that it is comfortable for living and hence turns the LED On by calling the API defined earlier. Otherwise, it turns off the LED. Based on the value of the dew point it also prints COMFORTABLE or UNCOMFORTABLE to the console respectively.
Finally, we subscribe to the topic under which our mock sensor publishes the data so that whenever new data is published the above function can be called. Please note that this topic should be exactly the same as the one used in the previous blog.
// subscribe to topic 'my/test/topic'
client.subscribe('my/test/topic')
The complete code
The final code for the smartDevice.js is as follows:
var mqtt = require('mqtt')
const express = require('express')
const fetch = require('node-fetch')
require('dotenv').config()

var app = express()
var PORT = 6000

var sensorData = {
  temperature: 0,
  humidity: 0,
}

var options = {
  host: process.env.MQTT_HOST,
  port: process.env.MQTT_PORT,
  protocol: 'mqtts',
  username: process.env.MQTT_USERNAME,
  password: process.env.MQTT_PASSWORD,
}

//initialize the MQTT client
var client = mqtt.connect(options)
var dewPoint = 0
//setup the callbacks
client.on('connect', function () {
  console.log('Connected')
})

client.on('error', function (error) {
  console.log(error)
})

client.on('message', function (topic, message) {
  //Called each time a message is received
  //   console.log('Received message:', topic, message.toString())
  sensorData = JSON.parse(message)

  // Processing the Sensor data
  dewPoint = sensorData.temperature - (100 - sensorData.humidity) / 5

  console.log(dewPoint)

  if (dewPoint <= 55) {
    console.log('COMFORTABLE')
    // Calling the LED ON API
    fetch('localhost:8000/turnon', {
      method: 'POST',
    })
  } else {
    // Calling the LED OFF API
    fetch('localhost:8000/turnoff', {
      method: 'POST',
    })
    console.log('UNCOMFORTABLE')
  }
})

// subscribe to topic 'my/test/topic'
client.subscribe('my/test/topic')

app.listen(PORT)
Both the above codes can be found here and here respectively.
Running the simulation
We can run the entire simulation by opening three terminal instances and running the following commands
node dth11.js // Starts the mock sensor
node led.js // Starts the mock led
node smartDevice.js // Starts the mock smart device
Finally, to start the system, we use the following command to start our mock sensor
curl -X POST http://localhost:4000/start
Now you can see all the 3 components working together.
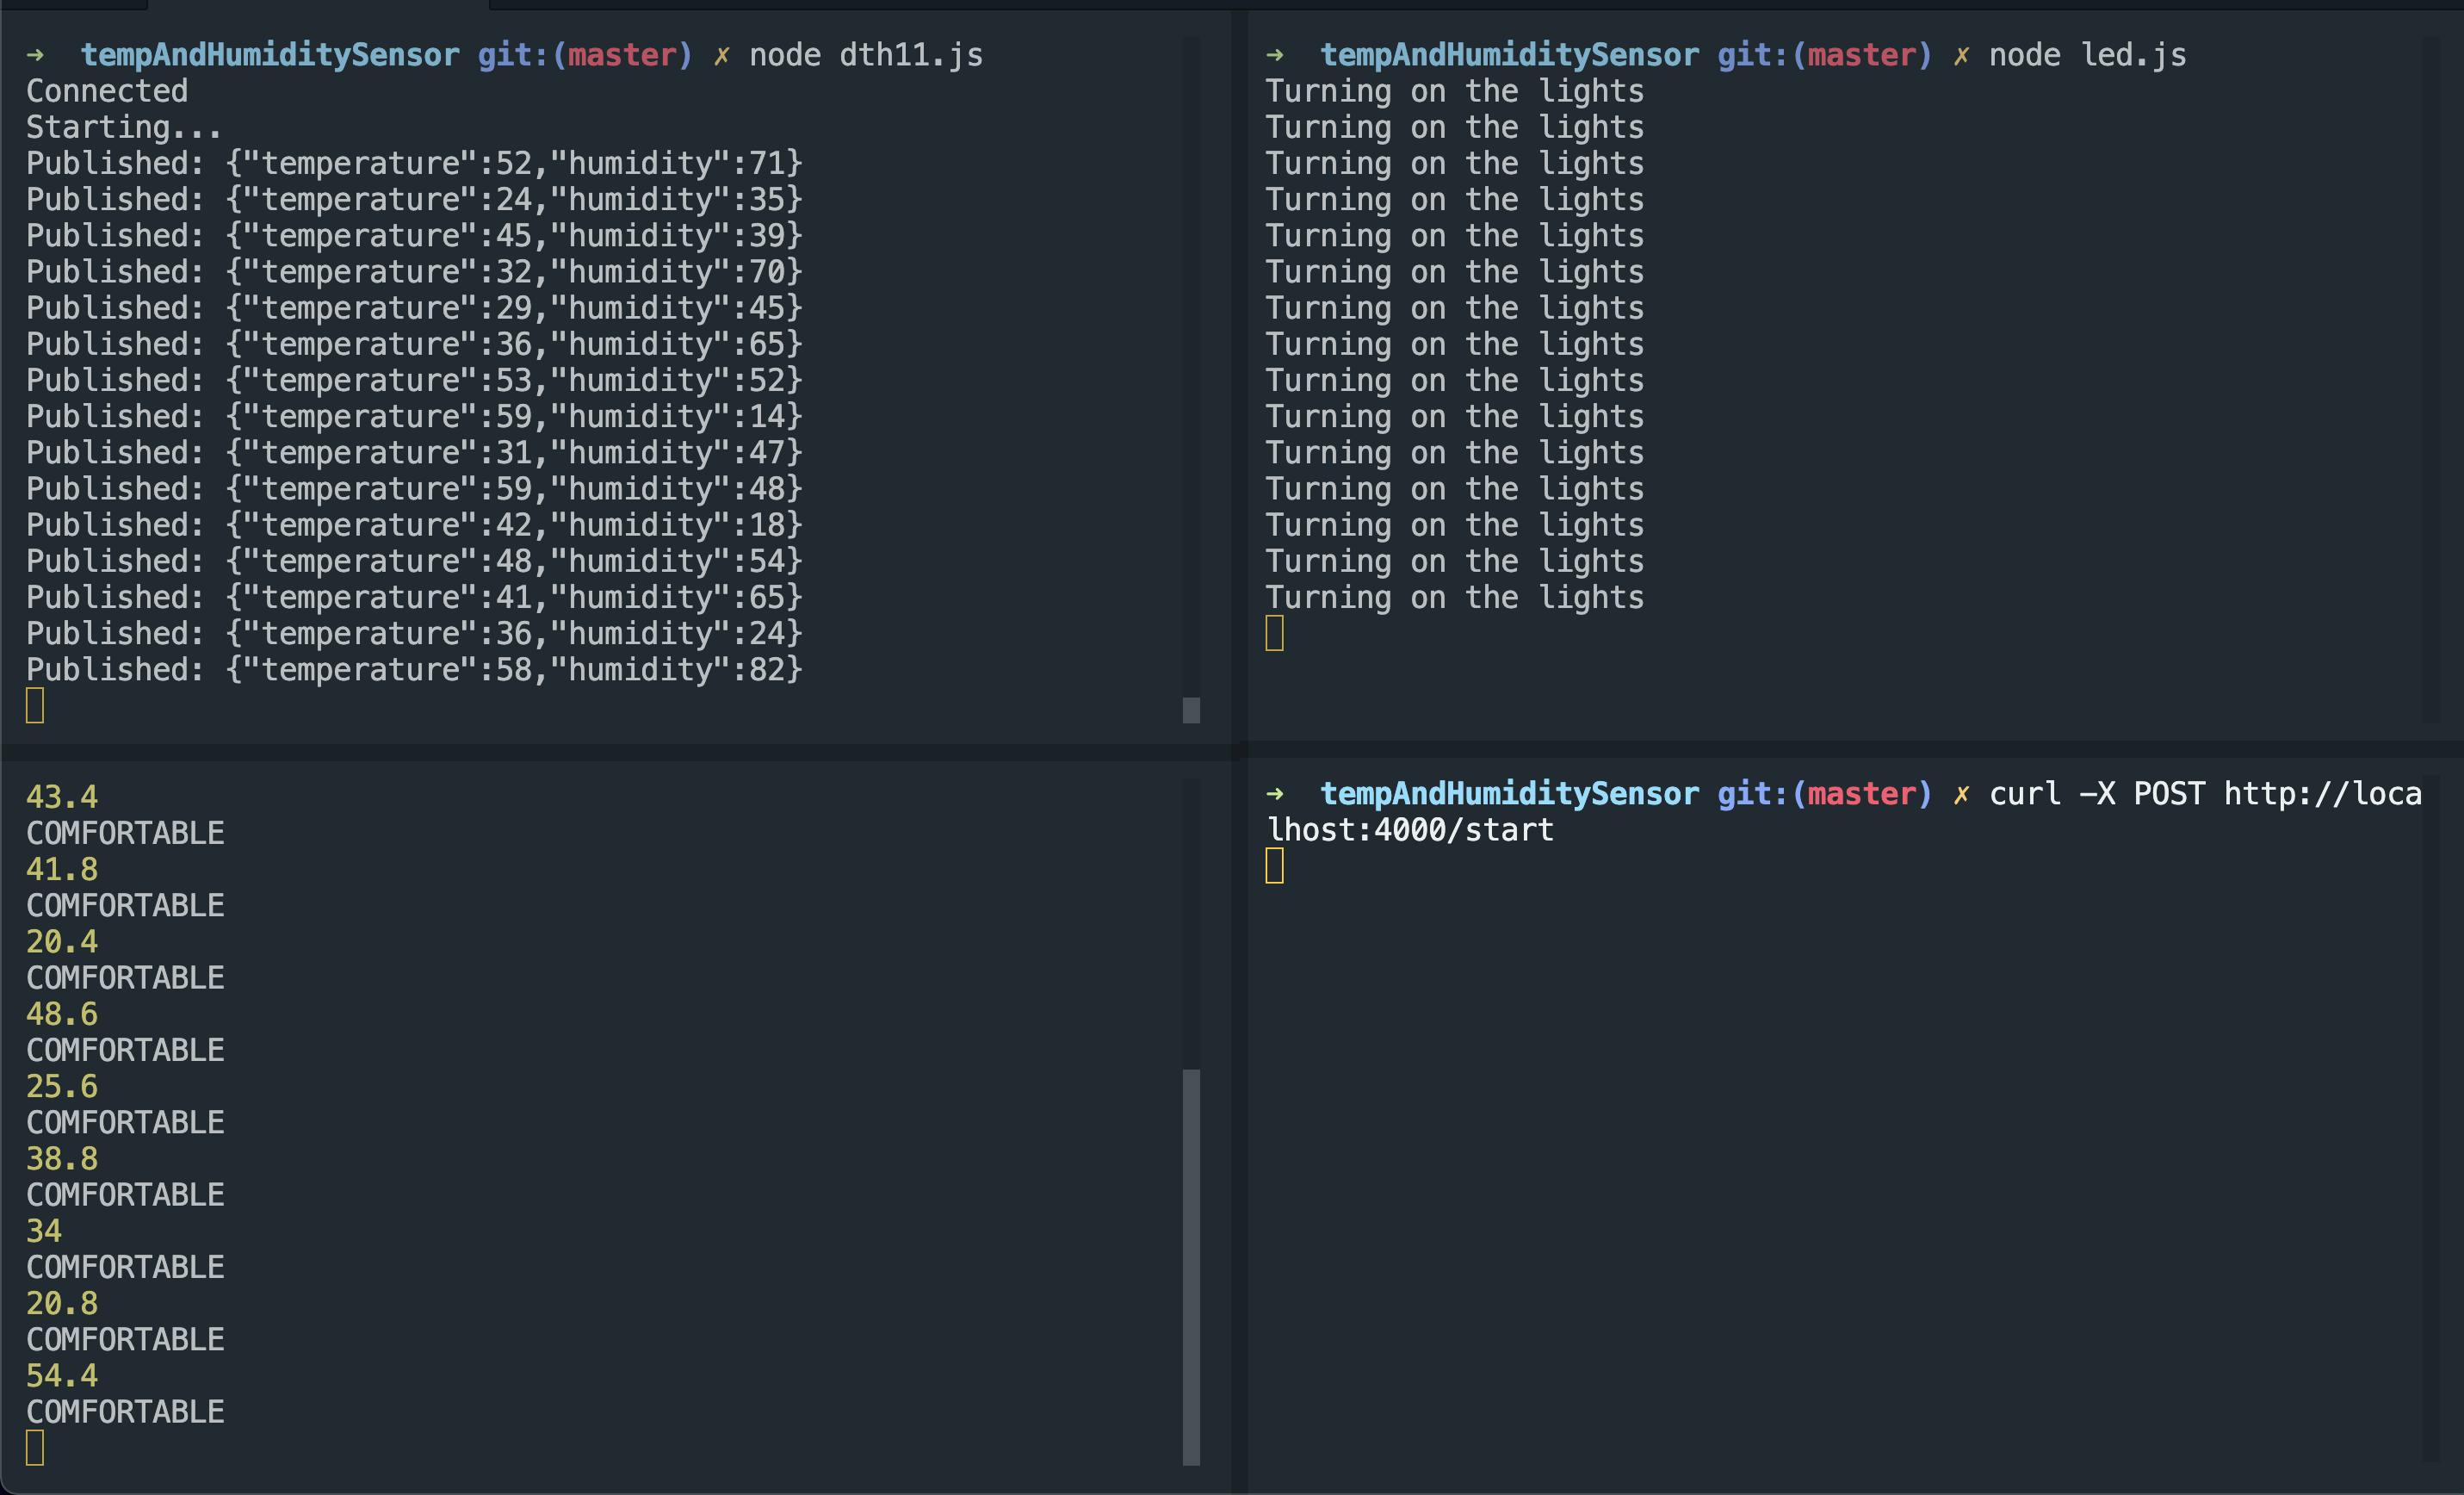 The mock sensor generates the data and published it to the MQTT broker. The smart device simulator has subscribed to the topic and hence receives the data from the broker. The sensor then calculates the dew point and sends the appropriate signal to the LED showing whether the environment is suitable for living or not.
Conclusion
We have built an IoT environment where there is a sensor that senses data and publishes it through MQTT. There is also a smart device that subscribes to this broker, receives the published data, processes it, and finally displays an output using other IoT devices. This system can also be extended to the real world using actual sensors and LEDs instead of simulation.
About Authors
We are a group of four students, Bhaskar Dutta (writer of this blog), Amartya Bhattacharya, Hrithik Anand and Rupam Kumar Roy working under the guidance of Dr. Atanu Roy Chowdhury. This blog encapsulates our project for IoT class CSEL 711.
Next Step
As the final add-on to our system, we have built a frontend using react that enables us to interact with our device and sensor. You can continue to the next section here.