


I am Kingsley Ubah, a budding software developer and tech enthusiast. I recently created a simple Family list app entirely out of vanilla Javascript. I didn’t use any Frameworks or Libraries. So, this article comprehensively covers how I did it. You can view and download the source code at ___. This project is a replica of Brad Traversy’s Book list app used in his tutorial.
Typically, we use libraries like jQuery to manipulate our DOM from our JavaScript and this has been the status quo for quite some time now. Brad Traversy displayed with his videohow you can create a responsive app with nothing but pure JavaScript and I was so fascinated with the idea of building with no dependency libraries or frameworks. This app is a result of that.
FAMILY LIST APP

This is going to be a very simple app. The app consists of just two source files, the HTML file (index.html) and JavaScript file (app.js). In our HTML file, we are going to import FontAwesome for Icons and Bootstrap for styling. I used Bootswatch utility to search for a specific feel of Bootstrap.

Include URLs to stylesheets inside the link elements in your HTML page.
<link rel="stylesheet" href="https://cdnjs.cloudflare.com/ajax/libs/font-awesome/5.15.1/css/all.min.css" integrity="sha512-+4zCK9k+qNFUR5X+cKL9EIR+ZOhtIloNl9GIKS57V1MyNsYpYcUrUeQc9vNfzsWfV28IaLL3i96P9sdNyeRssA==" crossorigin="anonymous" />
  <link rel="stylesheet" href="https://stackpath.bootstrapcdn.com/bootswatch/4.5.2/litera/bootstrap.min.css" integrity="sha384-enpDwFISL6M3ZGZ50Tjo8m65q06uLVnyvkFO3rsoW0UC15ATBFz3QEhr3hmxpYsn" crossorigin="anonymous">
After that, we can now create HTML mark-ups in our page. So first, we create a
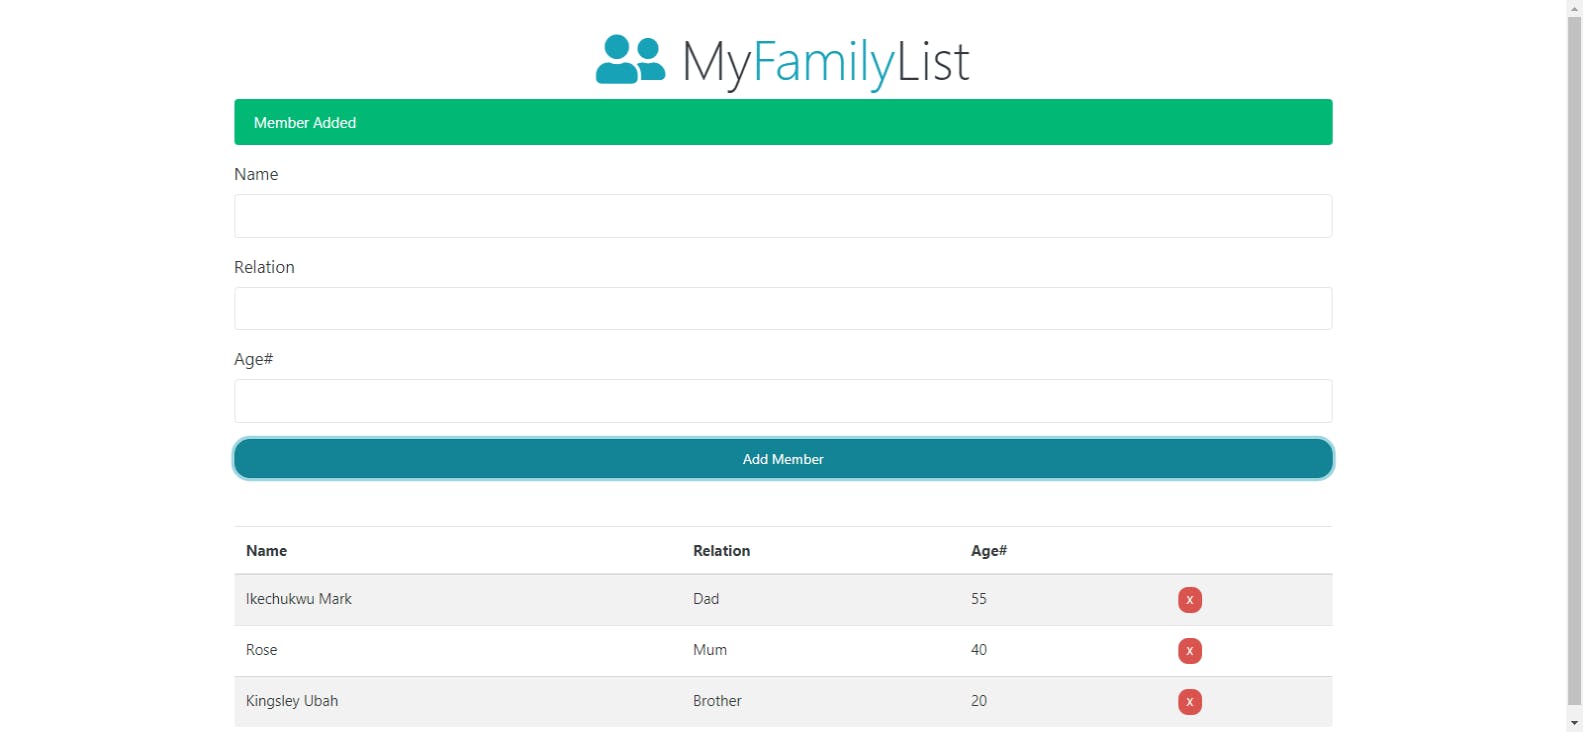
- The heading contains the heading for the page, in this case the text “MyFamilyList”.
- The icon element displays the icon provided by font awesome
- The form takes in the name, relation and age data from the user and
Table displays the information on the page for the user to see. Also a pop-up alert is displayed when form is submitted and if any of the fields is omitted. This is implemented in the javascript file which we are going to dive into next. This is the full structure of our HTML page:
<!DOCTYPE html>
<html lang="en">
<head>
<meta charset="UTF-8">
<meta name="viewport" content="width=device-width, initial-scale=1.0">
<meta http-equiv="X-UA-Compatible" content="ie=edge">
<title>Document</title>
<link rel="stylesheet" href="https://cdnjs.cloudflare.com/ajax/libs/font-awesome/5.15.1/css/all.min.css" integrity="sha512-+4zCK9k+qNFUR5X+cKL9EIR+ZOhtIloNl9GIKS57V1MyNsYpYcUrUeQc9vNfzsWfV28IaLL3i96P9sdNyeRssA==" crossorigin="anonymous" />
<link rel="stylesheet" href="https://stackpath.bootstrapcdn.com/bootswatch/4.5.2/litera/bootstrap.min.css" integrity="sha384-enpDwFISL6M3ZGZ50Tjo8m65q06uLVnyvkFO3rsoW0UC15ATBFz3QEhr3hmxpYsn" crossorigin="anonymous">
</head>
<body>
<div class="container mt-4">
<h1 class="display-4 text-center">
<i class="fas fa-user-friends text-info"></i> My<span class="text-info">Family</span>List</h1>
<form id="family-form">
  <div class="form-group">
    <label for="name">Name</label>
    <input type="text" id="name" class="form-control">
  </div>
  <div class="form-group">
    <label for="relationship">Relationship</label>
    <input type="text" id="relation" class="form-control">
  </div>
  <div class="form-group">
    <label for="age">Age#</label>
    <input type="text" id="age" class="form-control">
  </div>
  <input type="submit" value="Add Member" class="btn btn-info btn-block">
</form>
<table class="table table-striped mt-5">
  <thead>
    <tr>
      <th>Name</th>
      <th>Relation</th>
      <th>Age#</th>
      <th></th>
    </tr>
  </thead>
  <tbody id="family-list"></tbody>
</table>
</div>
<script type="text/javascript" src="app.js" defer></script>
</body>
</html>
JAVASCRIPT
Our JavaScript file is going to be named app though you name it whatever you want. First, we start by defining a Member class which is going to be instantiated anytime a new family member is added via the form:
// Book Class: Represents a Book
class Member {
constructor(name, relationship, age) {
this.name = name;
this.relationship = relationship;
this.age = age;
}
In here, we want to take the name, relationship and age as inputs and pass them into the member object. Next, we are going to define our UI class. This contains logic which will display any all members, add a new member to the table list, display an alert, make is disappear after 3 seconds and clear field afterwards:
// UI Class: Handle UI Tasks
class UI {
static displayMembers() {
const members = Store.getMembers();

members.forEach((member) => UI.addMemberToList(member));
}

static addMemberToList(member) {
const list = document.querySelector('#family-list');

const row = document.createElement('tr');

row.innerHTML = `
<td>${member.name}</td>
<td>${member.relationship}</td>
<td>${member.age}</td>
<td><a href="#" class="btn btn-danger btn-sm delete">X</a></td>
`;

list.appendChild(row);
}

static deleteMember(el) {
if(el.classList.contains('delete')) {
el.parentElement.parentElement.remove();
}
}

static showAlert(message, className) {
const div = document.createElement('div');
div.className = `alert alert-${className}`;
div.appendChild(document.createTextNode(message));
const container = document.querySelector('.container');
const form = document.querySelector('#family-form');
container.insertBefore(div, form);

// Vanish in 3 seconds
setTimeout(() => document.querySelector('.alert').remove(), 3000);
}

static clearFields() {
document.querySelector('#name').value = '';
document.querySelector('#relationship').value = '';
document.querySelector('#age').value = '';
}
}
As you can see, the methods on this class are all static. This means that you can the methods from the UI class without having to instantiate it (use the new keyword). This class handles all UI related tasks. Next, we define a Store class. This class is responsible for getting, adding and removing members from the browser’s localStorage which helps us persist the members permanently:
// Store Class: Handles Storage
class Store {
static getMembers() {
let members;
if(localStorage.getItem('members') === null) {
members = [];
} else {
members = JSON.parse(localStorage.getItem('members'));
}

return members;
}

static addMember(member) {
const members = Store.getMembers();
members.push(member);
localStorage.setItem('members', JSON.stringify(members));
}

static removeMember(age) {
const members = Store.getMembers();

members.forEach((member, index) => {
if(member.age === age) {
  members.splice(index, 1);
}
});

localStorage.setItem('members', JSON.stringify(members));
}
}
Since we can only store data as strings in localStorage, we have to covert the members array into strings to store them. Next are the events. The first event we will look at is the 'DOMContentLoaded’ event which will get triggered when the DOM is fully loaded. We then pass one of the static UI methods as callback to display list of members on the table:
// Event: Display Books
document.addEventListener('DOMContentLoaded', UI.displayMembers);
The event is the submit event which listens for the form element with the id of #family-form to be submitted. We also provide a callback to the method which:
- Prevent the form from being sent
- Gets the value of the three inputs
- Validates the inputs
- Persists the data to localStorage
- Adds the new member to table list
- Displays an alert
Clears the fields
// Event: Add a Book
document.querySelector('#family-form').addEventListener('submit', (e) => {
// Prevent actual submit
e.preventDefault();

// Get form values
const name = document.querySelector('#name').value;
const relationship = document.querySelector('#relationship').value;
const age = document.querySelector('#age').value;

// Validate
if (name === '' || relationship === '' || age === '') {
UI.showAlert('Please fill in all fields', 'danger');
} else {
// Instatiate book
const member = new Member(name, relationship, age);

// Add Book to UI
UI.addMemberToList(member);

// Add book to store
Store.addMember(member);

// Show success message
UI.showAlert('Member Added', 'success');

// Clear fields
UI.clearFields();
}
});
The last event is the click event which listens for a click on an element with the id of family-list. A callback function is passed in to delete a member.
// Event: Remove a Book
document.querySelector('#family-list').addEventListener('click', (e) => {
  // Remove book from UI
  UI.deleteMember(e.target);

  // Remove book from store
  Store.removeMember(e.target.parentElement.previousElementSibling.textContent);

  // Show success message
  UI.showAlert('Member Removed', 'success');
});
We have come to the end of the tutorial. If you liked the article and won’t mind seeing more of this, kindly share and follow. Also reach me on twitter.
 P/S: If you are on the look-out for someone who can create top notch content for your blog or website, I am available. Kindly head over to my gig on Fiverr and make an order or reach me on twitter for a chat.