![[Guide] The Simplest Way to Integrate with the Microsoft Graph API](https://cdn.hashnode.com/res/hashnode/image/upload/v1612516104526/A0LHVpOGT.png?w=1600&h=840&fit=crop&crop=entropy&auto=compress,format&format=webp)
[Guide] The Simplest Way to Integrate with the Microsoft Graph API


Microsoft offers a RESTful web service named Microsoft Graph API. This allows you to create 3rd-party applications that easily integrates with your instance of Office365. The scope of the Microsoft Graph API is pretty large and allows all your entities on Office365 to connect to one another.
The following will be covered in this guide:
- Setup of an Azure OAuth 2.0 App
- Authenticating and connecting to the Microsoft API
- Example requests
Notes, Additonal Information & Resources
Linx is a low-code developer tool for integrations, automations and APIs. It allows you to easily extend the functionality of any REST API - In this case the MS Graph with other 3rd party applications such as Xero, Google Drive, QuickBooks and other system’s APIs.
Before continuing it is advised that you take a look at the below articles to familiarize yourself with working with APIs in Linx:
If you have any queries regarding specifics about integrating with Microsoft Graph and Linx, reply to this article or connect with support@linx.software.
Resources Sample: Open the provided Linx application in the Linx Application Designer to get you up and integrating Linx with Microsoft Graph quickly: MicrosoftGraphTemplate.lsoz (65.8 KB)
API Reference More information on the specifics of authentication can be found on the Microsoft Graph API reference documentation.
1. Register an application with Azure
In order for you to interact with the Microsoft Graph API you must first register an app and configure the permissions, this will then provide you with the necessary authorization details which you can then use to generate your Access and Refresh tokens.
- Login to the Microsoft Azure Portal.
- Open the App Registrations tab (Left Menu bar > Manage > App registrations).
- Click on the + New Registration button at the top of the screen.
- Give the connected application a name such as “LinxDemoApp” and appropriate account type.
- For the Redirect URI set the type to Web and add the
http://localhost:8080/microsoft/oauth/token - Click Register at the bottom of the screen. Your connected application has now been registered and the client identifiers are displayed on the screen.
- Copy and store the Application ID (Client ID) and Directory ID (Tenant ID) for later use.
2. Generate Client Secret
Now that we’ve registered an App on Azure, we now have to generate a client secret which is a set of characters that identifies your App when requesting for tokens. This will be used in conjunction with the client identifiers generated earlier.
- On the new App’s overview page, navigate to Certificates and secrets.
- Next, under the ‘Client secrets’ section, click on +New Client Secret.
- Give your secret description as well as an expiry period and click Add.
- Once generated, your client secret will be displayed. Copy the Value and save it in a secure location for the next section.
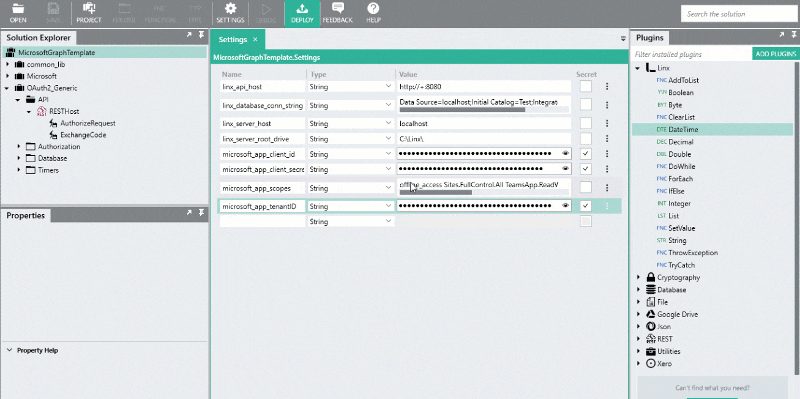
3. Configure Linx Application Settings
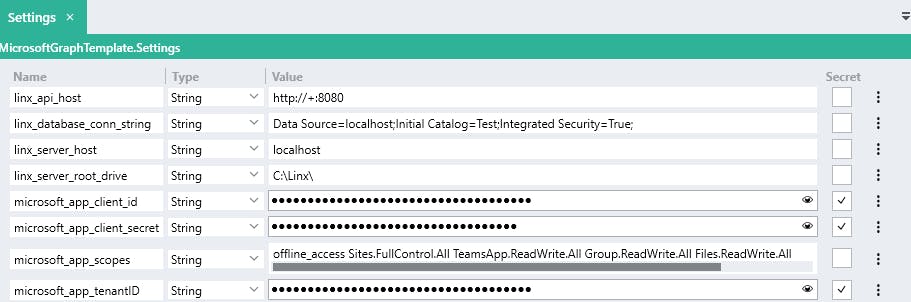
Open the provided sample application in the Linx Designer and update the $.Settings of the Linx application with the client identifiers:
- linx_database_conn_string: Connection string used for storing and retrieving the authentication token from a database. Read more about creating connection strings here.
- microsoft_app_client_id: Your connected app’s Client ID.
- microsoft_app_client_secret: Your connected app’s Client Secret.
- microsoft_app_scopes: Access scopes of the app.
- microsoft_app_tenantID: Tenant identifier - referred to as the Directory ID or the Tenant ID on the App’s overview page.
Your Linx Solution’s $.Settings should look like below:
4. Generate access token
- In the Linx Designer, start debugging the RESTHostSVC .
- Once started, in your browser, navigate to the below URL or click here:
http://localhost:8080/microsoft/oauth/authorize - Log into Microsoft and grant access to your registered app.
- Once you’ve granted access, the Microsoft Graph authorization server will redirect your browser to the Redirect URI with the code and state parameters. This will trigger the access token generation, if successful, the resulting message should be displayed in your browser like below:
{
  "date":"2021-01-06T13:15:48.1323123+02:00",
  "summary":"Linx application successfully authorized.",
  "platform":"MICROSOFT",
  "authorized_entity":"LinxDemoApp"
}
This indicates that Linx successfully generate and stored the access token is stored in the database. This token information will be retrieved from the database each time a request is made.
5. Making requests to the Microsoft Graph API
Requests are made using a CallRESTEndpointFNC following the below structure:
https://graph.microsoft.com/v1.0/{path}
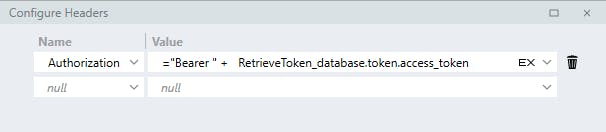
In order to authenticate the request, include the Authorization header containing the access token generated in the previous step like below:
Authorization: "Bearer " + {access token}
In the provided sample Solution, the access token is for retrieved from the database before each request is made.
The retrieved access token is then submitted in the Authorization header:
= "Bearer " + RetrieveToken_database.token.access_token
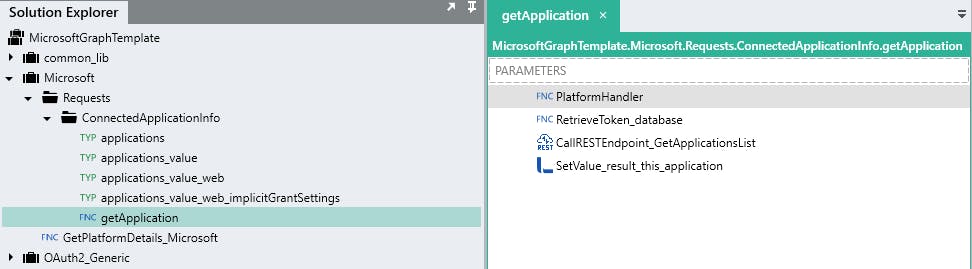
Take a look at the custom function getApplication in the provided sample to get an understanding of interacting with the Microsoft Graph API.