


In my previous article, we learned how to create the todos component and how to fetch them from the server.
In this part, we will learn how to create a new todo.
Remember that it is a continuation of the previous article. I will write here only the updates related to this section.
Build the AddTodo Component
@Component({
  selector: 'add-todo',
  template: `<input type="text" placeholder="Add todo.." [formControl]="control">
             <button (click)="add.next(control.value)">Add</button>
`,
  changeDetection: ChangeDetectionStrategy.OnPush
})
export class AddTodoComponent {
  control : FormControl = new FormControl("");
  @Output() add = new EventEmitter();

  @Input()
  public set reset( value : boolean ) {
    value && this.control.reset();
  }
}
The AddTodo component is just a dumb component that exposes:
addOutput — emits an event with the title when the user clicks on the Add button.resetInput — we want to reset the control when theADD\_TODOaction completes.
Keep in mind that in real life you have at least to add some validation.
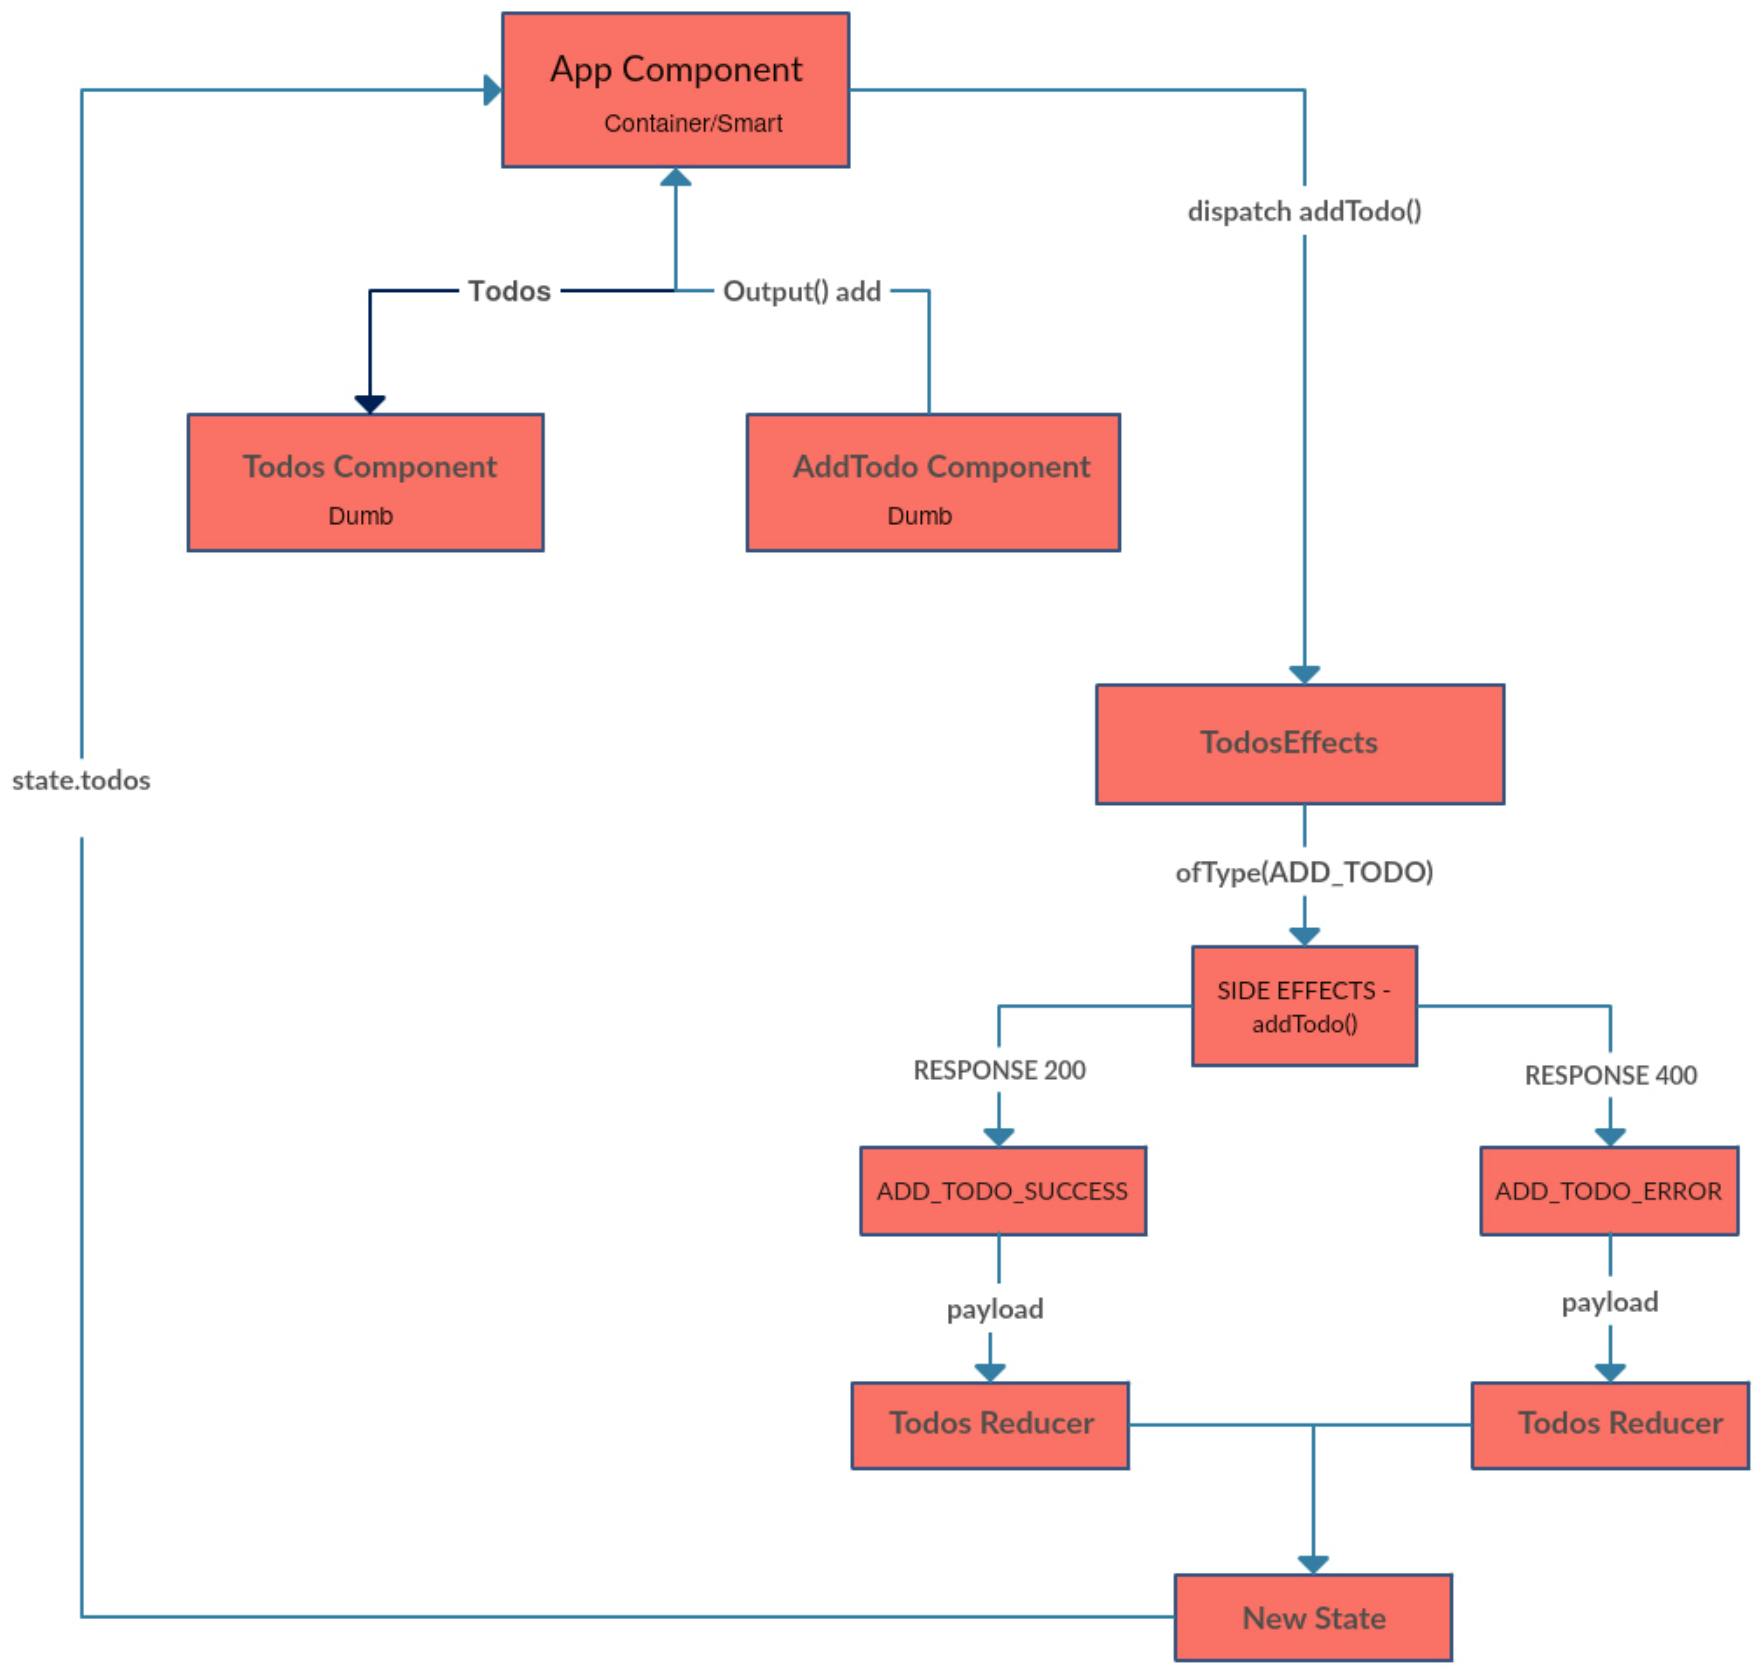
The smart component (AppComponent) now can subscribe to this event and dispatch the action to the store.
<app-todos [todos]="todos | async"></app-todos>

<add-todo (add)="addTodo($event)"></add-todo>
We are going to see later the app component and how to set the resetInput.
Update Todos Actions
Let’s create in our reducer file the new actions.
export const ADD_TODO = "ADD_TODO";
export const ADD_TODO_SUCCESS = "ADD_TODO_SUCCESS";
export const ADD_TODO_ERROR = "ADD_TODO_ERROR";

export function addTodo( title ) {
  return {
    type: ADD_TODO,
    payload: {
      title,
    }
  }
}
The only thing that the addTodo action need is the todo title.
Update Todos Service
Now we need to add an addTodo method to our todos service.
@Injectable()
export class TodosService {

addTodo( title ) {
    return Observable.timer(2000)
      .mapTo({id: Math.random(), title, completed: false})
  }

}
Again, we are just faking an HTTP request with the timer operator from Rx and returning dummy data with the same title. (in this case we are faking POST request)
Update Todos Effects
@Injectable()
export class TodosEffects {
  constructor( private actions$ : Actions, private todosService : TodosService ) {
  }

  @Effect() addTodo$ = this.actions$
    .ofType(ADD_TODO)
    .switchMap(action =>
      this.todosService.addTodo(action.payload.title)
        .map(todo => ({type: ADD_TODO_SUCCESS, payload: todo}))
        .catch(() => Observable.of({type: ADD_TODO_ERROR})));
}
The same process again, call your side effects and return a new action.
Update Todos Reducer
function todos( state = initialState, {type, payload} ) {
  switch( type ) {
    case ADD_TODO_SUCCESS:
      return Object.assign({}, state, {
        data: [...state.data, payload]
      });
  }
I am skipping on the errors and the loading indicator parts because it should be straightforward to you by now.
Now let’s see our smart component (AppComponent).
export class AppComponent {
  todos : Observable<any>;
  addTodoSuccess$ : Observable<any>;

  constructor( private store : Store<any>, private todosEffects : TodosEffects ) {
    this.store.dispatch(getTodos());
    this.todos = store.select("todos");
    this.addTodoSuccess$ = this.todosEffects.addTodo$.filter(( { type } ) => type === ADD_TODO_SUCCESS);
  }

  addTodo( todo ) {
    this.store.dispatch(addTodo(todo));
  }
}
The first thing we’ve added is the addTodo method that just dispatches the ADD\_TODO action.
The second thing is, remember that we need to reset our form control when the ADD\_TODO action completes?
The beauty in ngrx/effects that you can inject the effects to your component and subscribe to them.
In our case, we need to subscribe to the addTodo$ effect, and we only care about the ADD\_TODO\_SUCCESS action. So now we can use our reset Input like this:
<add-todo (add)="addTodo($event)" [reset]="addTodoSuccess$ | async"></add-todo>
If you are asking yourself what the addTodo$ effect returns, it just returns an observable with the new action.
My initial intent was also to write the part of the toggle completed status, but I think it’s pointless now.
As you see usually is the same process.
- Emit a
toggleevent when the user clicks on the todo. - Create the new actions and update your reducer for this new case.
- Create
toggleTodo$side effect. - Dispatch the action from your smart component.
If you have difficulty with something leave me a comment and I’ll be happy to help.
In the next part, we will learn how to create the filters. (It will be more interesting)
Originally published on Medium.